Torque and sequence of tightening the camshaft bed
Why is it necessary to properly tighten the beds of camshafts and other parts of the cylinder head? Correct tightening determines the normal functioning of all components and assemblies. In order to properly tighten threaded connections, a standard tightening pattern and a torque wrench are used.
Before installing the bolts in place, they must be thoroughly washed and lubricated with silicone grease. To properly tighten the bolts you need to know the sequence. The sequence starts from the middle part and gradually moves to the edges. It is best to familiarize yourself with the process via video.
Consequences of improper tightening
- Oil leakage (due to the formation of a gap or a loose connection).
- Air getting inside the cylinder head.
- Malfunction of the engine or cylinder head.
- Ingress of water, dirt, dust.
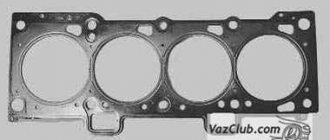
No sealants are used when installing the gasket (including no lubricants - grease, cyatim)! The task is to degrease the metal. The cylinder head gasket itself must be new.
All these factors can adversely affect the operation of the cylinder head and main power unit.
Process Features
Each engine has its own torque, as does the pin tightening pattern. The indicator of this moment is influenced not only by the type of engine, but also by other factors that you need to know if you decide to carry out this procedure yourself.
The same factors:
- how well the pin holes are lubricated and the very condition of the elements;
- the quality of the bolts plays a big role - bad or old ones may not survive tightening;
- if the thread or the pin itself is deformed, it is better not to tighten it. Because after a short period of time, all elements that do not meet operating standards will fail.
The most urgent need for the tensioning procedure occurs when dismantling the cylinder head, as well as when reinstalling it. Some car enthusiasts tighten very elongated bolts in 4 stages. In this case, at the second step the torque is 70-85 N*m, which is absolutely unacceptable when working with a Lada Priora engine with 16 valves.
The correct sequence of tightening the keys is very important. Only in this case will the head correctly perform its primary and secondary functions. Before installation, be sure to clean all threaded bushing holes.
Then all the bushings are placed in place, and a gasket is placed on top. All metal elements must be free of grease.
Each engine has its own torque, as does the pin tightening pattern. The indicator of this moment is influenced not only by the type of engine, but also by other factors that you need to know if you decide to carry out this procedure yourself.
No sealants or other lubricating oils are used during gasket installation.
Tightening the camshaft bed on a 16 valve VAZ-2112: order and torque
Many motorists have heard that it is necessary to correctly tighten the threaded connections on the 16-valve VAZ-2112 engine, but they have never done it themselves. Thus, the tightening torque is determined by the manufacturer and is indicated in the service repair manuals.
Video about installing camshafts and split gears on a 16 valve engine
The video will tell you how to properly tighten the threaded connections on the camshaft beds
Advantages of a 16-valve engine
The VAZ 2112 with 16 engine valves has a number of advantages over cars of the same brand, but with fewer valves. Its main advantage is the ability to achieve maximum engine power, regardless of the type of the latter. (see picture).
For comparison:
- VAZ 2112 with a volume of 1500 cubic cm, has 77 horsepower.
- A VAZ 2112 of the same volume can have a power of up to 90 horsepower.
This difference is possible due to the fact that in the second case the filling of the cylinders with the warm-air mixture is much higher. In addition, the advantages of the 16-valve engine:
Better performance of the cooling system and, as a result, greater strength of the unit. Possibility of increasing engine knock resistance
This is especially important if low quality fuel is used. With 16 valves, the intake and exhaust tracts are located on opposite sides of the cylinder head, which facilitates their installation, repair, etc.
Torque and sequence of tightening the camshaft bed
Camshaft cover tightening sequence
Correct tightening of the camshaft bed, as well as other parts of the cylinder head, determines the normal functioning of all components and assemblies. So, in order to tighten threaded connections, a standard tightening pattern and a torque wrench are used.
Before installing the bolts in place, they must be washed thoroughly and lubricated with silicone grease.
In order to properly tighten the bolts, you need to know the sequence. It starts from the middle part and gradually moves directly to the edges. The detailed sequence can be seen in the photo below.
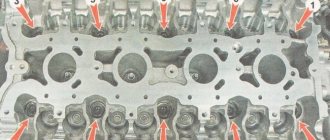
Tightening diagram for each camshaft bed bolt with numbering
As for the tightening force itself, it is 8.0-10.0 Nm . After the bed is installed on the block head, the connection bolts are tightened by hand or without much force using a ratchet with a head.
We tighten all the bolts by hand, but do not tighten them
When all the bolts are in place, you need to take a torque wrench and tighten them according to the standards in the order indicated above.
Torque wrench for tightening threaded connections
In what cases is it necessary to tighten the camshaft bed?
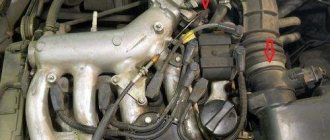
The bolts are tightened. Marked with arrows
Tightening the camshaft bed will be necessary if it was previously dismantled for restoration and repair work. So, in what cases will you need to remove the bed, let’s look at it in more detail:
- Replacing camshafts, lifters or valve seals.
- Overhaul of the block head.
- Engine repair operations.
- Replacement of individual elements of the cylinder head.
Procedure for installation and dismantling
The cylinder block is the basis for mounting the head, which is held on by 10 screws. Unscrewing is carried out with a special socket wrench - “ten”. The photo shows the correct folding order:
- Top right corner.
- Bottom right corner.
- Top left corner.
- Bottom left corner.
- Top second from left.
- Top second from the right.
- Second bottom from the right.
- Second bottom from the left.
- Top in the middle.
- Bottom in the middle.
By strictly observing this sequence, you can avoid deformation of bolts and threads, as well as other unpleasant moments. The design of the unit is quite complex, although at first glance it seems primitive.
The head is bolted or pinned to the block and closes the cylinders on top. The seating area of the upper element is very large, therefore the correct sequence of tightening the threaded connections with a specific force is very important. Previously, older car models had cast iron elements of this unit, which were easier to work with.
Nowadays, softer, lighter and more ductile aluminum is predominantly used, when working with which it is very easy to damage a cylinder. Cast iron is also much more resistant to heat shrinkage and deformation, which does not yet allow us to completely abandon it.
The part called the cylinder head is attached to the cylinder block with 10 screws. They are unscrewed with a 10mm socket wrench. The procedure for dismantling the cylinder head is shown in the first photo.
Unscrewing sequence (1-10) Standard screw length is 93 mm. If the screw has been pulled out to at least 95 mm, it is replaced with a new one (AvtoVAZ requirement).
The standard screw length is 93 mm. If the screw has been pulled out to at least 95 mm, it is replaced with a new one (AvtoVAZ requirement).
During installation, a different scheme is used (photo 2). Each screw is lubricated with machine oil, otherwise the efforts will be reduced to nothing. The order of tightening the head is indicated in this photo
When do you need a VAZ 2112 cylinder head broach?
You can wrap the car engine block head yourself. However, for this you need to know that the tightening torque of the cylinder head bolts of the VAZ 2112 16 valves and 8 valves are different. This is justified by the different design of internal combustion engines.
The user manual describes the reasons when work needs to be done.
- Oil leakage from the contact points between the block and the head. Usually expressed in the appearance of dark streaks on the walls of the block, or the formation of sweaty spots on the adjacent surface.
- The appearance of a whitish emulsion on the filler cap and dipstick. This is a sign of antifreeze leaking into the crankcase compartment. It may also be accompanied by foaming of the liquid in the expansion tank and the appearance of oily films there.
- Gasket burnout. Usually accompanied by the smell of gasoline from the cooling system or oil. While the engine is running, fuel under pressure seeps into the compartments, where it dissolves lubricant or antifreeze.
- Overhaul of the internal combustion engine, usually the cause is overheating, maintenance of the piston group or serious breakdowns.
- After dismantling the old head and installing a new one.
If there is no urgent need to climb into the engine structure, there are no lubricant leaks anywhere, there is no need to perform the procedure.
Let's sum it up
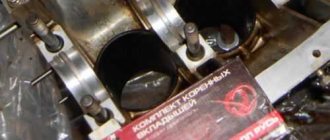
Although the tightening torque of the main and connecting rod bearing caps is an important parameter, quite often the torque value is not indicated in the general technical manual for the operation of a particular vehicle. For this reason, you should separately look for the necessary data in special literature on the repair and maintenance of a particular type of internal combustion engine. This must be done before installation, which will allow you to carry out repair work correctly and also avoid possible consequences.
For this reason, tightening is carried out using a torque wrench and taking into account a precisely defined force. Do not forget that the tightening torque of the connecting rod and main bearing cap bolts is somewhat different.
Why does the crankshaft liners turn: the main reasons. What to do if the connecting rod bearing has turned, how to change the connecting rod bearings correctly.
The appearance of knocking noises in different diesel operating modes. Fault diagnosis. The nature of the knocks of the crank mechanism, timing gear, and fuel equipment.
When it is necessary to bore the engine crankshaft, what is crankshaft boring for? How the crankshaft is bored, features of the selection of liners.
Is it worth doing chip tuning of a production car engine: the advantages and disadvantages of such modifications. Engine life and maintenance after chipping, tips.
What should be understood by the definition of “knocked engine”. Why does the engine start knocking? In what cases does a knocking sound in the engine indicate a breakdown of the internal combustion engine.
Purpose and design of the crankshaft of an internal combustion engine.
Bolt tightening diagram for GBTSVAZ 2112 16 valves
When performing work, strict tightening rules must be observed. For the 16 valve engine model 2112, the permissible bolt length is 94 mm. If the indicator is 95 millimeters, the parts should be replaced. Some experts even recommend installing new pins for each procedure - this is guaranteed to ensure high-quality operation of the system.
Separately, it is required to adhere to the sequence of tightening the nodes - this guarantees an even fit of the surfaces and the absence of leaks in the future. The last point is the force applied during work. The indicator is critically important, as it ensures tightness and sealing of the block.
Tightening torque of cylinder head bolts VAZ 2112
Force is measured in newtons per square meter. The standard tightening scheme for a 16 valve head does not require any special frills:
- tighten all 10 bolts in the correct sequence with a force of 20 N/m;
- wait 2 minutes and turn the caps 90 degrees;
- after 3-4 minutes. repeat the previous point.
Note! Tightening is performed in a similar way for VAZ Priora 21126.
The manufacturer strongly recommends following the procedure. The longevity of the entire power plant depends on the correct tightening. If the bolts are not tightened enough, oil leaks may occur or antifreeze may enter the crankcase. If excessive force is applied, the bolts break, which will require a major overhaul of the block with drilling out the remaining threads.
The order of tightening the cylinder head bolts of VAZ 2112 16 valves
Reference sequence of actions.
- Completely degrease the flat surfaces of the block and head and allow to dry.
- Remove all debris and dust from the bolt sockets. If there is debris left inside, you won’t be able to tighten the studs all the way, as this could result in the threads being licked.
- Calibrate the guides and install a new seal. Only a metal gasket is used; the use of sealants, adhesives, and oils is strictly prohibited.
- Prepare the cylinder head for docking, pre-install and lubricate all components.
- Place the head on the gasket and lower the studs into the seats, after wetting them with a thin layer of motor oil.
- Tighten the bolts in the sequence shown in the figure with a force of 20 N/m. (this is the first round)
- Next, rotate the elements 90 degrees and leave them alone for 3 minutes.
- By analogy, repeat point No. 7.
Head design
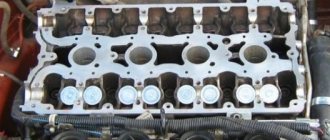
The 16-valve engine uses a cylinder head containing the following elements:
- Two camshafts. They have five supports, cast iron, each with 8 cams. It is impossible to install an exhaust camshaft instead of an intake camshaft (and vice versa).
- 16 valves. They are installed on guide bushings.
- Seats are installed directly on the block head, which come into contact with the valve plates.
- Hydraulic compensators in the amount of 16 pieces.
Camshafts are mounted on cylinder head supports. Compliance with the tightening torque of the VAZ-2112 cylinder head (16 valves, 1.5 liters) ensures normal engine operation. This will also allow you to avoid expensive surface milling after the next dismantling of the head.
Preparing to replace the cylinder head gasket
When removing the cylinder head, be sure to change the gasket - it cannot be reused, as this will lead to breakdown. It also needs to be changed if a leak of antifreeze or engine oil is detected in the area where the block and head are connected. Leaks often occur as a result of damage to the head itself due to excessive heat. If you do not observe the tightening torque of the VAZ-2112 cylinder head bolts (16 valves), the gasket may be damaged and fluid leaks may occur.
Preparatory work before replacing the gasket:
- Disconnect the negative terminal from the battery.
- Set the piston in the first cylinder to the position corresponding to top dead center.
- Completely drain the liquid from the cooling system - to do this, first unscrew the plug at the bottom of the radiator, then in the engine block.
- Be sure to relieve pressure in the fuel system - there is a special fitting in the rail for this.
- Unscrew the nuts securing the exhaust pipe from the exhaust manifold.
- Remove the thermostat.
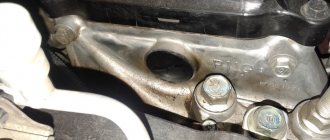
- Unscrew the nut that secures the bracket to the liquid pump pipe.
- Loosen the nut that secures the bracket to the manifold (exhaust). After this, move it to the side so that it does not interfere with the work.
- Disconnect the wiring block from the oil sensor and on engines of the VAZ-2111 modification you need to unscrew or loosen the nuts that secure the support and support brackets.
conclusions
Replacing and installing camshafts on a 16-valve VAZ-2112 is not entirely easy, but it is quite possible. The main thing to ensure results is caution and following instructions. It is worth noting separately that the intake and exhaust camshafts are different and not interchangeable. On the intake there is an additional border for the phase sensor.
The work is shown on engine 21124. For details of performing work on engine 2112, see the text.
1. We prepare the car for work (see “Preparing the car for maintenance and repair”).
2. Remove the camshaft pulleys (see “Camshaft pulleys - removal and installation”).
3. Remove the tension and guide rollers (see “Timing belt - replacement”).
10 mm socket wrench
unscrew the six bolts securing the rear timing belt cover and remove it.
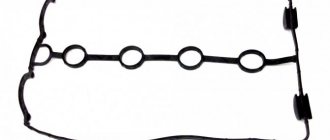
5. Remove the cylinder head cover (see “Cylinder head cover for engines 2112 and 21124 (16V) - removal and installation”).
6. To avoid damage, remove the oil pressure sensor (see “Emergency oil pressure sensor in the engine - replacement”) or disconnect the wire tip from it.
8 mm socket wrench
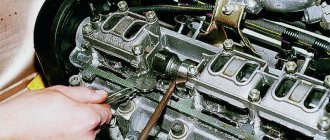
Evenly, half a turn, unscrew the 20 bolts securing the camshaft bearing housing.
8. Remove the camshaft bearing housing.
On the 2112 engine, remove the camshaft bearing housing together with the guide pipes of the spark plugs (spark plug wells). We remove the pipes from the bearing housing.
9. We remove two plugs for technological holes from the seats in the cylinder head (near the rear ends of the camshafts).
10. Remove the camshafts of the intake and exhaust valves.
11. Remove the seals from the shafts.
12. Inspect the shafts. The journals and cams of the shaft should not show signs of heavy wear, scratches, cracks, or traces of metal envelopment.
1. Lubricate the bearing journals and shaft cams with clean engine oil.
2. Place the camshafts in the cylinder head. The shafts are not interchangeable and have different markings.
The exhaust valve shaft is marked 1006014.
The intake valve shaft is marked 1006015.
In addition, the intake valve shaft has an additional belt.
When repairing an engine, do not use sealant with a high content of silicone (silicon compounds), the vapors of which can get through the crankcase ventilation system into the cylinders and then into the exhaust tract. Use a sealant that specifically states on the packaging that it is safe for the oxygen concentration sensor.
Do not apply too much sealant to the mating surfaces of the bearing housing. When tightening the mounting bolts, the sealant squeezed into the internal cavities of the engine can clog the oil passages.
3. Apply a thin layer of Loctite sealant No. 574 or similar to the plane of the cylinder head and to the lower surface of the bearing housing around the holes of the spark plug wells according to the following scheme:
4. Install the camshafts into the cylinder head with the keyways facing up.
5. Install the bearing housing on the cylinder head and evenly tighten its mounting bolts until the bearing housing comes into contact with the cylinder head. We finally tighten the bearing housing mounting bolts in pairs, to a torque of 8.0-10.0 Nm (0.8-1.0 kgfm) in the following sequence (see photo).
Tightening sequence for camshaft support bolts
6. Press in the camshaft oil seals (see “Camshaft oil seals - replacement”).
7. On engine 2112
Apply clean engine oil to the rubber O-rings of the spark plug guide pipes (spark wells) and install the pipes into the head.
8. Further assembly is carried out in the reverse order of disassembly.
Removing the block head
After the preparatory work, you need to completely remove the head. To do this, the following manipulations are performed:
- Disconnect the white block from the DPKV; to do this, you will need to press the plastic latch.
- Remove the plastic decorative panel and metal cover from the block head.
- Remove the timing belt. To do this, you need to unscrew the tension roller nut and remove it completely.
- The camshaft pulley must be secured with a screwdriver - try to prevent it from turning.
- Unscrew the camshaft mounting bolt and remove it completely.
- The second camshaft is removed in the same way.
- Unscrew the ten bolts that secure the head to the block.
After this, you can completely remove the cylinder head. The tightening torque of the VAZ-2112 cylinder head (16 valves) under the turbine is the same as without it.
Description of the procedure for replacing the timing belt VAZ 2110, (2112) 16 valves
Former flagship of the Russian automobile industry VAZ 2110 with a 1.5 16 valve engine. Scheduled replacement of the timing belt 30,000 km after the last replacement. The autopsy showed that if they had not changed it today, then tomorrow there would have been more work for our mechanic. In general, we recommend that all customers check the condition of the belt at least once every 5,000, or once a year. But knowing the quality of our spare parts, more often is better. On this engine, if the belt breaks, almost all the valves bend. The article is also relevant for VAZ 2112))
We look, remember and don’t let it get to that point.
The patient became five millimeters narrower and generally looked very bad. We send him to the honor board.
And here is the hero of the occasion himself.
We remove the absorber and power steering reservoir so that they do not interfere in the future.
We loosen the bolt by seventeen, the tension roller of the service belt and remove the last one. It will not be possible to remove it completely because the engine mount is in the way. If the belt requires replacement, you will have to unscrew the engine mount.
Remove the tension roller. We unscrew the bolts securing the upper protective cover; they are hexagonal.
Remove the right wheel, plastic mudguard and drain the antifreeze.
We see the crankshaft pulley. Using its bolt, clockwise, rotate the crankshaft until the marks on the camshaft pulleys and the timing belt protective cover match.
Markings on the left exhaust camshaft. The mark on the protective cover is highlighted in red.
Likewise for the intake camshaft. He's on the right. Its pulley has an inner ring for the phase sensor, so it is very difficult to mix up the pulleys.
Remove the crankshaft pulley. Let's lock the crankshaft with the help of a friend. We put him in the car and force him to turn on fifth gear and press the brake all the way. And at this time, with a slight movement of your hand, unscrew the crankshaft pulley bolt. Remove it and the lower protective cover.
We see that the mark on the sprockets and the slot on the ebb of the crankshaft cover coincide.
Loosen the seventeen bolts of the tension and idler pulleys and remove the timing belt. Then the videos themselves. We change them anyway.
We lock and unscrew the camshaft pulleys and remove them. Remember that the right camshaft has a pulley with an inner ring for the phase sensor. The picture should look like this.
We unscrew everything that holds the protective plastic cover and remove the latter. Unscrew the three bolts holding the pump. They are hexagonal.
The pump for a sixteen valve engine is slightly different from the usual for an eight valve engine. It has a small threaded ear for attaching the protective casing.
Lubricate the gasket with a thin layer of sealant and put the pump in place. Tighten the fastening bolts. We put the protective cover in place. We make sure that he sits in his place, otherwise he will rub the belt. If everything is in order, tighten everything that holds it and install the camshaft pulleys and new rollers.
We check that the marks on the camshafts and crankshaft match. We install a new timing belt. If there are no directional arrows, put it so that the inscription is read from left to right.
The right, or descending, branch of the belt should be tight. You can turn the right camshaft clockwise a few degrees, put on the belt and turn it back. In this way we will stretch the descending branch. The tension roller has two holes for a special key. You can find it in any auto store. The issue price is 60 rubles. To tension the timing belt, insert a special key and turn the roller counterclockwise. Since there is a lot of controversy about tensioning the timing belt, we will write this: a tensioned belt should not have a sag between the camshafts of more than 5 mm when pressed and 7 mm on the longest branch (specially experimented). Remember: an overtightened belt reduces the service life of the pump, and an undertightened belt can lead to cylinder head repair. (photo below)
We check all the marks. We turn the crankshaft two turns and check the marks again. If the pistons and valves do not meet and the marks coincide, then accept my congratulations. Then we put everything back in place in the reverse order of removal. Don't forget to tighten the bolts. We tighten the service belt roller with the same wrench as the timing belt tension roller. Fill with antifreeze and start the car. We wish the belt many years of service, but don’t forget to check it periodically; after all, it was made in Russia.
Valve System Features
On the VAZ-2112 car, the valve design is very similar to that used in the engines of the VAZ-2110 modification. Only their diameter of rods and plates is slightly smaller. Dimensions:
- The inlet valve is a plate with a diameter of 29 mm, a rod of 6.975 mm.
- The exhaust valve is a plate with a diameter of 25.5 mm, a rod of 6965 mm.
A spring is installed on each valve; its unloaded length is 38.19 mm. If there is a load of 240 Newton, it decreases to 32 mm. If a spring is subjected to a load of 550 Newton, its length is reduced to 24 mm.
Causes of valve malfunction on VAZ 2110, 2112
The main reason is that the timing belt has broken. The consequences that this can cause are the bending of these parts. Although the design of the 8-valve engine on the “tens” does not imply that the valves meet the pistons at the so-called dead center during breaks. But on the 2114(1.3) engine and 16-valve engines 2112(1.5), 2114(1.5) this leads to the inevitable “death” of the valves and quite expensive repairs. Another quite trivial reason is wear of the valve stem, which must have certain dimensions, measured with a micrometer.
If the valve stem during measurement is less than 7.97 millimeters, then the valve must be replaced. You also need to change the valve if it is burnt out or cracked.
Replacing VAZ 2110, 2112 valves is a very responsible matter and requires certain skills from the employee. However, no special equipment is needed. Therefore, a person who is familiar with the tool and has an idea of the design of mechanisms can do it with his own hands, in the garage.
Hydraulic tappets
The valves are driven by cams on camshafts and hydraulic pushers. These elements are located inside the guide holes. With the help of hydraulic pushers, it is possible to automatically eliminate gaps in the valve mechanism. Therefore, when operating a vehicle, there is no need to adjust the thermal clearances of the valves.
In order for the hydraulic pushers to operate in normal mode, oil is supplied to them from the lubrication system. It is supplied through special channels in the engine block and cylinder head. Oil passes through these channels to lubricate the journals on the camshafts. There is a valve in the channel that prevents oil from draining from above after the engine is turned off. This allows you to maintain the system in normal mode until it stops completely.
Camshafts
When repairing the head, it is imperative to check the condition of the camshafts. When assembling, follow the instructions and maintain the tightening torque of the VAZ-2112 cylinder head (16 valves). The Priora is equipped with such a motor - it is quite powerful, has excellent characteristics and does not require frequent maintenance. Two camshafts drive the intake and exhaust valves.
The camshafts rotate in special sockets, which are located directly in the head. The difference between camshafts is that there is a small belt on the intake. It is located near the very first support. To prevent axial movement, there are thrust collars - they are located on both sides of the support in front. At the front of both camshafts there are self-clamping type oil seals.
Camshaft replacement process
In order to install camshafts on the VAZ-2112 16 valves, they must first be dismantled. Like any spare part, they are installed in the reverse order from disassembly.
So, let's look at the step-by-step process of removing and installing the intake and exhaust camshaft.
Removing camshafts
- To begin with, as with any repair operations, it is necessary to remove the “minus terminal” from the battery.
- Remove the timing belt cover.
- Now, you need to remove the valve cover. Please note that the bolt tightening order must be followed during assembly.
- Disconnect the wires of the emergency oil pressure sensor, and then unscrew it.
- Using a socket wrench or 8mm socket, unscrew the 20 bolts securing the camshaft cover.
- We dismantle the camshaft bearing housing.
- Now, there is free access to two plugs that are located on the rear side of the cylinder head. We take them out.
- We take out the intake camshaft.
- We take out the exhaust camshaft.
- We press the seals out of the camshafts.
Installation of camshafts
Now that everything is removed, you can proceed to installing new camshafts on the car:
- Lubricate the cams and shaft support journals with engine oil.
- We place each camshaft in its seat. It is worth considering that camshafts are not interchangeable, so they should not be confused.
- Apply sealant to the surface of the cylinder head and camshaft bearing housing.
- We put the camshaft cover and cylinder head in place. Tighten the bolts evenly to a certain torque.
- We press new oil seals and install the rear plugs.
- We collect the remaining parts that were removed from the car.
How to carry out repairs
In order to repair the block voice, you will need the following tools:
- Device for compressing valve springs. You can use both “store-bought” and homemade. The main thing is that it is convenient to work.
- Device for pressing out oil seals.
- A tube-shaped mandrel for installing caps.
- "10" keys, hexagons, tweezers and screwdrivers.
Perform the following manipulations:
- Carry out all the steps to remove the head and camshafts.
- Remove all valves using a special device.
- Remove the valve stem seals.
- Replace and grind the valves. Valves need to be replaced if there is damage - burnouts, geometry violations. Be sure to sign which seats you are lapping the valve on - otherwise the tightness will be broken.
- Assemble all the valve drive mechanisms - hydraulic pushers, springs, secure them with bread crumbs.
All steps for assembling the unit are carried out in the reverse order, only you need to take into account one feature: adhere to the recommended tightening torque values for the VAZ-2112 cylinder head (16 valves). The photo shows the tightening sequence.
How to tighten the cylinder head bolts
Be sure to tighten according to the diagram given in the article. To tighten the bolts, you need to follow a few simple steps:
- Install a new head gasket and place it on the centering bushings.
- Install the head and tighten its mounting bolts.
- Start tightening with a torque of 20 N*m. If the scale is in “kgf/m”, then divide by 10.
- In the second run, you need to tighten all the bolts according to the diagram by 90 degrees.
- During the third pass they turn another 90 degrees.
Bolts with a length of 95 mm or more cannot be used. In general, the procedure is quite simple, but a torque wrench is required - without it, it will not be possible to maintain the correct tightening torque of the VAZ-2112 cylinder head (16 valves).