Many admirers of domestic cars are familiar with replacing the rear axle bearing on VAZ 2106 and 2107. The frequency of this work directly depends on your driving style. Many car enthusiasts can easily go without replacing this part for several years, while others can change it every six months. Therefore, there is no definite replacement time here, everything is very individual, you should rely on the condition of the car, otherwise you will not end up with problems. It should be noted that, like any bearing, it loudly announces its malfunction, it is impossible to miss the moment of failure. The need for regular replacement is due to the low quality of parts.
Replacing the rear axle bearing on a VAZ 2106 and 2107 requires quite a lot of steps. This is due to the location of the part. The axle shaft is located in the drive axle of the vehicle. In the case of the “classic”, this is the rear axle. It is the axle shaft that transmits the force from the gearbox to the wheel. Since the part is located inside the bridge, to replace the bearing you will have to remove the brake mechanism, and only after that the axle shaft is removed.
Diagnostics
It should be noted that identifying the problem is quite easy. First of all, when driving, an increased howl begins, emanating from the rear axle. If you do not pay attention to this point, then after a while grinding and cracking may begin. As the speed increases, the sound increases significantly.
A fairly strong backlash appears. You can identify it by jacking up and shaking the wheel. It is recommended to check both wheels. After all, it is very problematic to determine by ear whether 1 wheel is howling or 2. In some cases, balls may fall out of the bearing. The most serious problem may be a wheel jam. This happens when the bearing is completely destroyed. If this happens while driving, an accident may occur. Monitor the condition of the bearings in the axle shafts carefully.
Let's sum it up
Taking into account the above information, it becomes clear that even with relative simplicity in terms of design, the front stabilizer, rear stabilizer and stabilizer struts are the most important elements in the design of the vehicle's chassis. At the same time, in practice, the front stabilizer struts most often fail due to the poor condition of roads in the CIS.
One way or another, these elements greatly influence not only comfort, but also stability and controllability. This means that regular diagnostics of the chassis and separate verification of the stabilizer struts are necessary at each maintenance.
As a summary, we note that it is extremely important to maintain the suspension in good condition so that control over the car is complete. Only this approach allows for maximum driving safety.
Replacement
Before carrying out work, carefully secure the vehicle in place. In particular, it is necessary to install wheel chocks under the front wheels. This will prevent the machine from moving spontaneously and will reduce the risk of it falling off the jack. Also, just in case, you need to turn off the power supply. The work is carried out in the following order:
- After jacking up the car from the side of the damaged bearing, place additional support under it. You can use stacked wheels for this. The bridge is also raised separately on a jack. As a result, the side that needs to be moved will look slightly upward. This will avoid transmission oil leakage;
- Remove the wheel;
- Remove the brake drum. To do this, it is necessary to pour penetrating lubricant into the gap between the support disk and the drum itself. After which you should apply several gentle blows through the block to the part. According to the manufacturer, the drum should be easily removed. In practice, you have to knock it down by striking its trailing edge. Be sure to use a block. The drum is made of cast iron, so it is not recommended to hit it with a hammer;
- Remove all parts of the brake mechanism;
- The screws securing the axle shaft are unscrewed. To do this you will need a “17” socket. Please note that screws often stick, so it is advisable to moisten them with liquid key and wait a little;
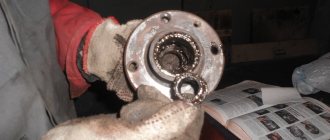
- There is a special puller to remove the axle shaft, but our car enthusiasts often use another method. To remove the axle shaft, a wheel is placed on it, but only 2 or 3 wheel studs are tightened. It is important that they do not curl completely. Due to the resulting play, blows are applied to the axle shaft, and it jumps out without much difficulty. After removal, inspect the part. There should be no deformation or damage on it;
- Bearing dismantling begins with the retaining ring. This action is carried out using a hammer and chisel. The ring is simply cut off. If you have an angle grinder, you can simplify the task and simply cut off the retaining ring. Just don’t cut the axle shaft at the same time;
- The same goes for the bearing itself;
- Before installing the new bearing in place, it should be lubricated. The manufacturer saves a lot on lubrication, so fill the spare part with lithol or other suitable lubricant;
- To press in the bearing, a pipe with the same diameter is used. While striking the pipe, install the part into the seat;
- Before installing the retaining ring, it should be heated with a blowtorch. In this case, it will fall into place without any problems;
- The remaining parts are installed in the reverse order. The manufacturer recommends tightening the axle shaft mounting screws with a certain torque during assembly.
Replacing the axle shaft seal
Don't think that's all. Now let's leave the axle shaft and pay attention to whether the axle shaft seal is leaking
. Let's consider the worst case scenario and imagine that it is so. In this case, we will use a seal puller or improvised means. Now let’s attach the new oil seal and gently press it into place with light blows through the block around the entire perimeter. It is strictly forbidden to warp the outer ring, as this will lead to a loose fit of the oil seal to the axle shaft and, as a result, repeated oil leakage.
Well, now you can install the axle shaft itself. When installing, you should pay attention to the position of the heads of the mounting bolts, since they have a specific shape. In addition, there is no need to hammer the axle shaft with heavy objects: such actions can damage the splines in the gearbox. If it doesn't fall into place, you just need to find the right position. Well, all the parts are in place and now you can complete the assembly.
Replacing the axle shaft and its seal VAZ 2106
To replace the axle shaft seal on a VAZ 2106, you need to remove the axle shaft from the rear axle housing; to do this, lift the car onto a lift, remove the wheels and brake drums
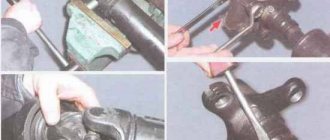
Using a 17mm socket, unscrew the four nuts through the holes in the axle shaft flange.
Remove the elastic washers with tweezers
We attach an impact puller to the axle shaft flange and knock the axle shaft out of the beam. Instead of this device, you can use the removed wheel. We install it with the reverse side on two bolts and with a sharp movement pull out the axle shaft
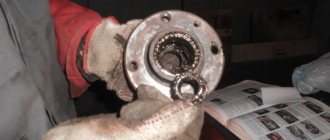
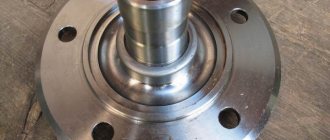
The axle shaft is removed along with the oil seal, mounting plate, bearing and locking ring
A rubber O-ring is installed between the beam flange and the brake shield.
Using sliding pliers, remove the axle shaft seal from its socket in the rear axle beam
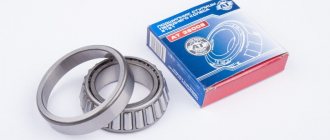
With light blows of a hammer on the socket head, we press the new oil seal into the stocking of the rear axle of the VAZ 2106. If the axle shaft is deformed, there are large radial and axial clearances in the bearing, the locking ring is displaced, or the splines are worn, the axle shaft must be replaced with a new assembly. Independent replacement of the VAZ 2106 axle bearing and locking ring is not recommended. Installation of the axle shaft on a VAZ 2106 is performed in the reverse order of removal. Before installation, lubricate the working surfaces of the oil seal with Litol-24 lubricant.
Repair work to replace the axle shaft on a VAZ 2106 should be carried out in cases where, when driving a car, there is increased noise from the rear wheels, which will be felt not only when the car moves in a straight line, but also when turning, as a rule, when increased noise occurs, the backlashes increase accordingly , both axial and radial.
Photo report on the removal and installation of the rear axle shaft on a VAZ 2106
So, the first thing you need to do is remove the rear wheel mounting bolts, jack up the car and finally unscrew the bolts and remove the wheel. After this, it is necessary to remove the brake drum, since it is under it that all the axle shaft mounting nuts are located. As a result, we get the following picture:
Next, you need to align the holes in the axle flange with the fastening nuts. Since there are two such holes, you need to do this twice, of course, then turn the axle shaft so that the third and fourth fastening nuts are accessible in the holes.
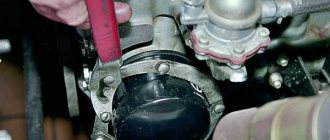
It is advisable to first apply a penetrating lubricant and then rip it off with a wrench:
When the force is already small, you can use a ratchet handle for greater convenience:
When all 4 are completely unscrewed, you can then begin to remove the axle shaft. To do this, take the wheel, turn it over and screw it onto two bolts, just tighten it so that there is a slight spread across the bolts. This is clearly shown in the photo below:
And with sharp jerks using both hands we try to pull the axle shaft off the splines. This usually happens after the first jerk, since it does not require much effort:
Next, you can unscrew these bolts and remove the wheel, and finally remove the axle by hand:
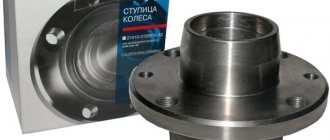
After this, you can replace either the axle shaft itself or its bearing if necessary (I’ll write about this in future articles). Installation takes place in reverse order and does not take much time. The only thing worth noting is that when installing it is necessary to ensure that it matches the slots and hit it with a small blow. But I think that everything is clear from the video clip. As for the price of a new axle shaft for a VAZ 2106, it can range from 100 to 1300 rubles.
Source
↑ How to remove a VAZ 2106 axle shaft?
We hang the rear of the car on tripods, remove the rear wheel and brake drum.
Using a jack, we lift the disassembled edge of the rear axle beam so that after removing the axle shaft, oil does not spill out.
Using a “17” socket, unscrew the four nuts through the holes in the axle shaft flange.
Remove the elastic washers with tweezers.
We attach an impact puller to the axle shaft flange (see Appendix) and knock the axle shaft out of the beam.
Instead of this device, you can use the removed wheel. We install it with the reverse side on two bolts and with a sharp movement pull out the axle shaft.
The axle shaft is removed along with the oil deflector, mounting plate, bearing and locking ring.
A rubber O-ring is installed between the beam flange and the brake shield.
Using sliding pliers, remove the axle shaft cuff from its socket in the rear axle beam.
Using light blows of a hammer on the socket head (a piece of pipe of suitable diameter), we press in a new cuff.
In case of deformation of the axle shaft, large radial and axial clearances in the bearing, displacement of the locking ring, wear of the splines, the axle shaft must be replaced with a new assembly.