Installing speakers in the rear doors of a Priora
You seem to have found what you were looking for - installation of speakers in the rear doors of a Priora - click. On our website you will find a video of DIY car repair. How to repair a car yourself at home. We will help you with repairs and repair the car yourself. We know how to restore a car with minimal investment. I have attached video instructions.
Category: DIY repairs
Laughter on the topic: - Darling, do you have any erotic fantasy? - Yes. - Tell me. - I make love under palm trees on an exotic island on a tropical night. The sea is rustling nearby and there are huge stars in the sky. It smells like unfamiliar herbs. The wine makes me dizzy... - And am I on top or below? - And you stayed at home.
Published by Admin: at the request of Ditmar
The car owner's reasoning: I'm happy with everything and the reviews say that the car doesn't listen to anyone, it means the person doesn't like his car.
- The windshield fogs up on a VAZ Priora - 4 answers
- Water in the cabin of Lada Priora – 3 answers
- The shelf on the VAZ Priora is rattling, what should I do? – 3 answers
- The handbrake light is constantly on and there is a beep in the Priora - 2 answers
- Water dripping from the front passenger door, VAZ 2110 – 2 answers
Of course you can. I wouldn't even ask permission!
Subscribe
to our channel in
Index.Zen
Even more useful tips in a convenient format
Installing speakers in the rear doors is not a problem if the places for the speakers are prepared by the manufacturer and all you need is to buy rear panels, remove the trim and attach the speakers. But that's how it is with people. With us everything is different.
In order to install speakers in the rear passenger doors, you must first make holes in the plastic plugs, then buy a decorative mesh that will cover the speaker, and also think about how this speaker will be attached. Now about all this in more detail.
Tool:
- Drill with a thin drill bit;
- Sharp knife, sandpaper;
- Screwdriver, plastic spatula for working with sheathing;
- Jigsaw, plywood, marker, 8 bolts (8x35);
- And, of course, don’t forget to buy new 13 cm speakers.
Installing speakers in the rear doors - preparation
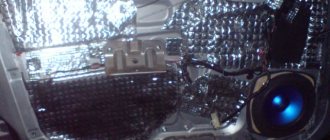
- First of all, remove the door trim. To do this, remove the window handle and pry off the plastic cover of the door handle. There are two fastening bolts in the handle that need to be unscrewed. Next, remove the handle and unscrew the door lock head. Carefully pry up the edge of the casing from below, then, holding it firmly with your hands, snap off all the fastening points of the plastic casing one by one. Ready!
- Now you need to make markings and prepare a place for future columns. We figure out where the decorative mesh will be located, make markings, drill holes and cut them using a sharp knife.
Actually, installing speakers in the rear doors of Lada Granta
- In order to install the speaker, you need to make a speaker mounting bracket; for this you can buy a ready-made one or go the other way and make your own.
- For production you need plywood. We take measurements and make patterns for future brackets. We double-check everything properly, then proceed to sawing. We cut with a jigsaw.
- After the brackets are cut, we make a central hole in them for the speaker and sand everything down with sandpaper. Before installation, I would recommend performing sound insulation and vibration insulation of the doors, this will improve the sound and save you from extraneous noise, as well as various rattling noises that occur some time after installation.
- We fasten the brackets to the bolts, in my case it is 8x35, I recommend placing rubber gaskets between the metal and the bolts, as well as washers, this will prevent the occurrence of rattling during sound.
- Next, install and connect the speaker. It is important to check everything so that you don’t have to disassemble everything again later. Check how the speaker works, try lowering the glass, pay attention to whether it touches the speaker or bracket.
If everything is fine and you are satisfied with the result, you can begin assembly. Repeat all the above steps for the second door. Well, that’s all, I’m personally pleased with the work, I hope everything worked out for you too and you don’t regret what you did!? Thank you for your attention and see you again at VAZ Repair.
News RusAutoNet » Installation of 16th speakers on Priora
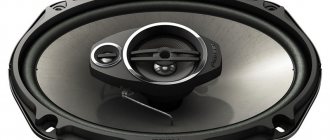
The speakers that the manufacturer installs on the Priora have a rather modest (No. 13) size. It is unlikely that such speakers will be to the taste of a true music lover. The motorist who purchased this car will soon change the factory speakers. In place of those, he will buy speakers with size No. 16.
But buying is one thing, but installing is a completely different matter! We should not forget the fact that the Priora doors are made for only size 13 speakers, and you will need to modernize them. A lot of drivers do this: they additionally purchase podiums, on which they build new speakers. The inconvenience is that these stands “podiums” become sources of various knocks and noises. And there are quite a few of them in domestic cars. There is no need to add unnecessary extraneous sounds to your cabin. The owner of Priora decides to make more typical places. And we will watch how he achieves what he wants.
First he removes the upholstery. It's quite simple. Every car enthusiast can cope with this task, and we will not pay special attention to this. So, we removed the upholstery and gained access to the speaker holes. We need to increase their size. What's the best way to do this? To do this, it is recommended to use an electric jigsaw. And if you don’t have this tool, you can use a regular drill. Using a compass or ruler, you need to mark the points with which we will determine the size of diameter No. 16. Then we drill small holes along the contour. Next, after the small drill, we use a larger one. It is necessary to ensure that the edge of the hole is smooth and that there are no sharp edges on it. For this we need a file.
Source
Installing speakers in Priora
One of the reasons for a person’s comfort and good mood is music. It has been confirmed that periodically listening to your favorite songs increases the level of serotonin, the brain hormone of joy. But modern man is constantly on the move - he sits in his office, goes to work, rushes to a meeting at the airport. Listening to music is far from being in the forefront - there is simply no time for this activity.
Installation
A music system in a car is a good solution to this issue. One of the more frequent questions asked by car owners is “How to install speakers in the front and rear doors of a Priora?” In this article we will try to answer all questions related to installing and configuring speakers in a Lada Priora car.
To begin with, you need to figure out the desired diameter of the speakers: the larger the diameter, the higher the likely volume. Priora's standard speakers have a diameter of 13 cm, which is not enough to obtain high-quality and sonorous sound. Fans of louder music are advised to install larger speakers.
Installation of speakers (music) - Tuning and repair of Lada Priora
I decided to install this music in my Priora:
There were no questions with installing the head unit: I pulled out the plug, connected the power connectors, antenna, tulips and put them in place
The speakers had to be redone, since the standard places are for 13-inch speakers, and I have 16-inch speakers. In the end I decided to install spacer rings.
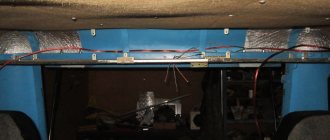
We cut the metal of the door. It's a shame, but it has to be done
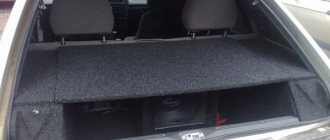
We install the rear shelf, making sure that nothing touches it. and enjoy good music! The wires from the radio go to the amplifier (unfortunately there are no photos), and from the amplifier they are routed to the speakers
Installation of speakers in Priora front doors
The main emphasis when playing music is on the front door speakers. They make volume, sound effects and acoustics inside the car. Speakers that are built into the rear door
, make the function of additional sound. It follows from this that it is better to install huge speakers in the front doors of the Priora. This will make the car more comfortable, and it can be used as a source of music, for example, at a picnic.
Priora Installation of 16 speaker speakers in the front doors of Lada Priora VAZ 217030 Hertz ESK 165.5
Install 16
speakers
for the front
doors
of LADA
PRIOR
, Hertz ESK 165L.5, excellent music, car audio.
Diary Lada Priora 2. Entry 44. 16 cm speakers in the front doors.
Subscribe to the channel Dismantling BC https://www.youtube.com/
More often, speakers with a diameter of 13 cm are replaced by 16 cm, which adds sound power, although the replacement requires reworking the mounts. This is done in three steps:
Step 1: remove the door trim
This is necessary in order to get to the wires coming from the car radio. Before attaching them to the speaker, you need to trace its contours on a piece of plywood.
Step 2: cut a hole of suitable diameter in the door
When the template is ready, we begin trimming. You can cut a circle of the desired diameter using a jigsaw. We screw the plywood to the mounting location of the standard speaker, and attach the new speaker to it.
Step 3: Connect the Speakers
Connecting speakers
to the radio tape recorder using the alternate connection method. Once the speakers are connected to the system, you can turn them on. If the sound appears, it means everything was done correctly. There are few options and you can enjoy the music in your car.
Installation of front speakers 16 cm in diameter, installation of speakers without cuts and podiums
1. Installation of front speakers 16 cm in diameter
2. Installation of 16 columns in Priora without cutting
3. Installation of 16 speakers in a door without podiums
Installation of front speakers 16 cm in diameter
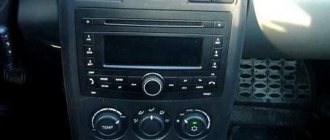
I finally got a radio. Inexpensive radio tape recorder SoundMAX SM-CCR3037.
I bought Mystery speakers.
As a friend advised, I took 16, they should have better sound. But the question is how to install it in the door, because the size is standard for 13 speakers. Today I decided to install it myself. Below is a photo report of the installation process of the front speakers. To remove the trim you will need: a screwdriver and an asterisk wrench. Thanks to AvtoVAZ I will have to buy a set of asterisk keys. There are probably many more such pitfalls.
Looking ahead, the plastic, as well as the clips on the doors of the Priora, are not bad, compared with the former two-piece.
There is a standard place for speakers for 13. There is audio preparation - it’s correct to say two wires for the speakers are brought out.
This piece of paper was already included with the speakers, all I had to do was draw a circle in a convenient place.
For the future, you shouldn’t move the hole as in this picture. The outermost clip on the casing will touch the speaker. I made a hole on the second door without moving it higher to the side. It was inconvenient to attach, but the casing fit perfectly.
To securely attach the speaker to the door sheet, I used 9mm as a backing. plywood
To prevent the clip fastening on the casing from touching, I ground down the edge of the speaker.
Speaker on spacer
Speaker on plywood spacer
There was no suitable material for sound insulation, but there was one at hand - foil-coated isolon.
That's not a professional thing to say, I agree. But isolon is better than nothing at all.
Everything is ready, you can put on the trim.
Installation of 16 columns in Priora without cutting
The process itself is not complicated, I chose the music carefully, but not expensively, I think this option will suit many.
The basis was a Pioneer head, which I got from my father when I was still driving a 99. A nice thing with AUX and Bluetooth. I don’t remember the name, but it’s not so important, because now most tape recorders play “at the level”, that’s enough for me. The most important incident for me was the purchase of speakers, I walked around a lot, listened, and chose. I settled on an Alpine SXE-1750s in the front and an SXE-69c2 in the rear. Good mids, not crunchy lows + tweeters included (albeit without crossovers, but it doesn’t matter, they pull). I read a huge number of blogs about installing 16″ speakers in the front doors. The vast majority of them in the text seemed to hint that the doors would have to be sawed and spacers made. I decided to buy spacers at the car market so as not to suffer and make a mistake. No problem, I thought, and armed with patience, a tool and a jigsaw, I went to the dacha.
In analysis, under the noise already, the bottom layer
Having disassembled the car (doors, sills, back seat), I began to make noise on the doors. For one door, a sheet of foil-coated isolon was enough (forgive me if I named this material incorrectly, the dealer sold it to me under that name). Next, having tried on the column itself in the standard 13″ position, I was pleasantly surprised that the core is almost completely hidden in the door and, together with the spacer, reassures us that there are no hard metalwork sculptures with Zhiguli metal.
Installing speakers in the rear doors of Priora
To create great sound in the cabin, it is also recommended to install speakers in the rear doors of the Priora.
Speakers with a diameter of 16 cm will significantly improve sound quality. Installation
16 speakers in the Priora are more popular among owners of this car model.
If you need a louder sound in your car, you need to install speakers with a diameter of 20 cm. An increased size increases the power and volume of the acoustics. Installing 20 speakers in a Priora follows the same principle as described above.
Useful
Glass products: application in interiors
The words in the title of our website “Glass is like a work of art” are not just a beautiful slogan. According to the team and
Installation algorithm
The algorithm will be approximately the same as for installing speakers in the front door.
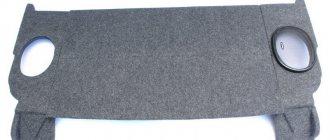
Rear door trim
Let's allow a couple of deviations to this. You may need to make custom spacers to replace the stock mounts. We can’t give exact advice here, everything is individual.
What should those who have the “Standard” equipment do?
The standard configuration does not include audio preparation and decorative plugs in the rear door trim. You will have to pull the wires yourself from the radio, and buy plugs and install them in the upholstery yourself. There will also be no standard fasteners.
Cladding article number.
- 2190-6202095 — speaker trim, left rear door trim
- 2190-6202094 — speaker trim, right rear door trim
Article number of standard fastening.
- 2190-7901033 — standard rear speaker mount left
- 2190-7901032 — standard rear speaker mount, right
If standard fasteners are not available for sale, you can cut your own.
I blinded you from what was. The main thing is the result!
We prepare the tools: a stationery knife, a marker, straight arms.
We fix it, if possible, use hot glue to prevent it from rattling.
Finished product.
Speaker selection
Kicx PD 5.2 in Grant's tailgate
There is not much space under the rear door trim, so if you purchase a speaker that is too large, you may need to work to remove the standard sound insulation and install new one. Therefore, carefully consider the selection of components, otherwise you risk being subject to a return procedure.
If you choose a pancake that is too powerful, you will need to make spacers. As car audio gurus say, you don’t need a powerful sound from the rear, so I don’t see the point in putting something “very big” in the rear doors.
Therefore, I recommend choosing 13th speakers to create a pleasant background sound, but if you need bass, then you should look at subwoofers. Kicx PD 5.2 speakers are one of the best options according to Grantovodov.
The advantages of the speakers will be:
- installed “usually”;
- play well;
- are inexpensive.
Morel Tempo Coax 5x7 - These speakers also won't require any "locksmith work" on the door.
Speakers Morel Tempo Coax 5x7
Speaker power
Beginners who decide to select a speaker system must remember that purchasing high-power speakers does not mean that the output can be high-quality sound. The main thing is that the power of the speakers matches the power of the radio. The total acoustic sound power should not be less than the declared power of the car radio. It is worth paying attention to the fact that at peak or maximum power the speakers produce very large distortions. A clean signal is obtained at rated power.