Soon, owners who purchased the domestic Lada Kalina model are faced with the question of replacing the belt that drives the on-board power generator. This is equally interesting to owners of both eight and 16-valve versions of the practical “Russian”. Due to the fact that Kalina motors are endowed with different design features, there are differences in replacing the specified consumable component. The service life of a belt is primarily influenced by factors such as the quality of the product itself and the intensity of use of the vehicle. And only after learning many details can you judge when the alternator belt needs to be replaced.
There are quite a lot of handwritten works on the network about replacing the generator assembly belt, but in our material we will try to explain as clearly as possible all the points that interest the owners. This will be clear even to inexperienced owners of their Lada Kalina, since the work will not require special equipment, expensive tools and “gigabytes” of experimental information. All actions can be carried out, as they say, “on your knees in the yard.”
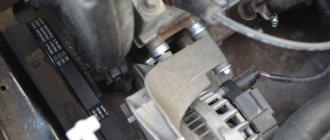
Replacing the Lada Kalina belt for the version with air conditioning
replacing the belt on Lada Kalina in initial configurations with an 8-valve engine here. For more expensive Lada Kalina equipment with air conditioning, the auxiliary drive belt needs to rotate not only the generator, but also the air conditioning compressor pulley. The belt is replaced every 90 thousand kilometers. For work you will need a pit or overpass, since some of the work must be carried out from below the car.
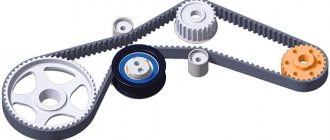
Lada Kalina auxiliary drive belt diagram further
- 1 - auxiliary drive pulley
- 2 — tensioner roller
- 3 - tensioner
- 4 — generator pulley
- 5 — air conditioning compressor clutch pulley
- 6 - auxiliary drive belt
- 7 — bracket for the right support of the power unit
Marking of the drive belt for auxiliary units Lada Kalina 6РК 995 (six-V-ribbed, length - 995 mm).
To replace the belt, we have to dismantle the right support of the power unit, since it passes through the belt. From the bottom of the car, remove the middle and right mudguards of the engine compartment. Next, we should remove the fender liner of the right front wheel or, having released all the fender liner fastenings in the front and middle parts, bend the fender liner behind the wheel brake disc.
We hang and remove the right front wheel and release the fender liner fastenings according to the diagram.
- Mounting points for the mudguard and fender liner on the Lada Kalina: 1 — screw with a Torx T-27 key for general fastening of the mudguard and fender liner to the wheel arch; 2 — two Torx T-20 screws for general fastening of the mudguard and fender liner to the wheel arch and fender; 3 - Torx T-20 key screw for fastening the fender liner to the wing; 4 — four self-tapping screws “8” for fastening the fender liner to the wheel arch; 5 - four Torx T-20 screws for fastening the fender liner to the front bumper.
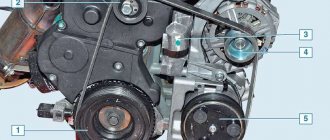
We install a height-adjustable stop under the engine oil pan so that it takes on the weight of the engine.
Using the E-14 head, unscrew the two screws securing the support to the engine cylinder block bracket. Using a 17mm socket, unscrew the two nuts and the bolt securing the support to the body side member (shown by arrows).
If you have already loosened the tension of the auxiliary drive belt, now we can remove it from the pulleys and remove the belt from the engine compartment.
We install the new belt in the reverse order, ensuring the required belt tension by rotating the tensioner lead screw.
The belt deflection in the area between the pulleys of the engine and the air conditioning compressor with an applied force of 100 N (10 kgf) should be within 6–7 mm.
Attention! Do not overtighten the belt. Excessive belt tension causes premature wear of the alternator belt and bearings.
Next, assembly is carried out in reverse order. Please note that the upper screw securing the support to the bracket is shorter than the lower one - do not mix it up during assembly.
To tension the Lada Kalina belt, there is a special tensioning device.
From the engine compartment side, use a 19mm spanner to loosen the locknut of the belt tensioner lead screw, hold the screw with a 8mm wrench or socket, hold the nut, and rotate the leadscrew counterclockwise, tensioning the belt.
Source
Replacing the alternator belt: step-by-step instructions
First of all, to replace the alternator belt of the 8-valve Lada Kalina, you will need a tool: an open-end wrench with a size of 19, a wrench with a size of 10, and a socket with a size of 8. Now you can proceed directly to the replacement process:
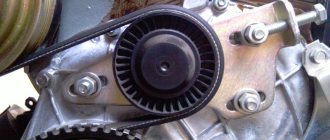
- The alternator belt is located to the left of the engine.
- Using a wrench, you need to loosen the tension roller to release the belt.
Loosen the tensioner roller
Belt adjustment rod down
The new belt is preparing to be installed in its “rightful” place
The tension moment must be strictly observed. Too little tension will not give normal speed to the generator, which will lead to a drop in voltage in the on-board network. Too strong and will cause the belt to “stick” or break.
Russian know-how, ordinary market weights guard the alternator belt tightening force
Recommendations
Experts recommend changing the alternator belt on the 8-valve Kalina every 25 thousand km, but AVTOVAZ - every 30,000 km. But, it is worth considering that you need to constantly check the condition of the belt. Since failure can occur even after 10,000 km.
Gates belt - mileage 40,000 km, rips are visible, nothing critical, but better to replace
Replacing this element is not limited by a time frame, but is determined by the condition of the generator belt. If you constantly examine the condition, you can prevent breakage and other negative consequences. At the same time, motorists are recommended to carry a spare belt with them so that they can change it at any time and move on.
How to change the belt yourself
If you have ever encountered the need to replace a belt on a 16-cl or 8-cl engine, then this procedure will not take much time. If you are encountering this for the first time and have never heard of a generator before, we recommend that you seek help from specialists. Don't forget that one wrong action can lead to irreversible consequences. Therefore, these instructions will help everyone who decides to replace the belt for the first time.
Loading …
Required Tools
Of course, any repair work begins with the preparation of the necessary tools. To replace the strap on an 8- or 16-cl. Lada Kalina engine, prepare:
- open-end wrench size “19”;
- socket wrench set to “8”;
- wrench to “13”;
- new alternator belt.
Open-end wrench on "19"
Socket wrench "8"
Wrench "13"
New generator element
Stages of work
If you have prepared everything that may be required in the process, then you can begin the replacement work. So let's get started:
- Turn off the engine and open the hood of the Lada Kalina.
- The alternator belt can be found on the left side of the engine compartment. If you don’t know where it is, then start the engine and look in the engine compartment. The strap will rotate on rollers and you will see it.
- Having found the installation location of the element, take a wrench and loosen the screw that secures the adjusting rod. Immediately try to touch the belt to see how tight it is. This is necessary so that you understand how to set the tensioner after installing the element.
- When the nut is loosened, take an “8” spanner and tighten the adjusting rod. When you start turning it clockwise, the tension on the generator belt on the rollers will be loosened. Turn the rod almost all the way.
- This will loosen the belt tensioner on the rollers. If the tensioner is already loose, you can unscrew the lower fastening of the device. To do this, use the key at “13”.
- It is necessary to move the adjusting rod upward. When the rod is pulled back, the strap can be removed, but first remove it from the shaft of the device.
- Once the belt portion is removed from the pulley assembly, remove it completely from the crankshaft.
- Pull out the element and visually inspect it. If the strap is cracked, you will see other signs of deformation, for example, the shape has changed, then it must be replaced. Install the new component in place of the old one, assembling everything in reverse order.
- When the installation of the element is completed, it is necessary to check the tension on the rollers. The tension must be adjusted using the appropriate rod. The element should not be too loose as it will regularly come off while riding. But it shouldn’t be too tense either.
- Start the engine and warm up the car to 50 degrees. Then turn off the engine and check again how tightly the element is tensioned. If it's loose, tighten it.
1. Stop the engine and loosen the adjusting rod nut
2. Tighten the adjusting rod so that you can loosen the belt.
3. Move the rod up and remove the strap, first from the generator pulley
4. Remove the element from the crankshaft pulley
Belt selection, catalog number, price
Each belt in a car has its own service life and resource, and therefore requires periodic replacement. So what kind of alternator belt should be installed on the 8-valve Lada Kalina and how is this done?
Original number and belt size:
- Knowing the original catalog number. Using it you can easily find a suitable belt, without knowing the size or teeth.
- By size and type of teeth (number of ribs = 6, size = 1018 mm). Belt marking for Lada Kalina with 8 valves – 6PK1018 .
Gates 6pk108 - ideal price/quality ratio
This is the standard size that fits this car. The teeth of the generator belt on Kalina do not run across the base of the court, but along it, having 6 strips that are installed on the corresponding pulleys.
It is worth considering that the replacement of the alternator belt also includes a tension roller, which wears out along with it. When performing the replacement process, it also needs to be replaced.
When choosing a belt and roller, the motorist faces a difficult task: original or analogue. Both are good. But what should you do if you don’t have a belt with you when buying in a store?
Alternator belt items for Kalina
- The original article number for the alternator belt for the 8-valve Lada Kalina looks like this - 1118-1041020 . The average cost in the Russian Federation is 750 rubles.
Analogue of the original alternator belt 1118-1041020 - 6PK1018
Old roller and new 2123-1041056 generator belt tensioner pulley
Table of alternator belt analogues for the 8-valve Lada Kalina
| Manufacturer | Catalog number | Price in rubles |
| Luzar | LB 0190 | 750 |
| Contitech | 6PK852 ELAST | 1000 |
| Gates | 6PK823SF | 1150 |
| LYNXauto | 6PK0823EL | 1200 |
All belt analogues performed quite well and won the trust of motorists.
Table of alternator belt roller analogues for the 8-valve Lada Kalina
| Manufacturer | Catalog number | Price in rubles |
| Trialli | CM 123 | 800 |
| Master-sport | 21230-1041056-10-ST-PCS-MS | 1000 |
| Pilenga | PT-P 1523 | 750 |
Belt selection and price
If the generator design has a tensioner, then the belt length is 883 mm. In the vast majority of cases, Kalina has 8 valves. If the generator is like on Grant, the length is 823mm.
When choosing a manufacturer, you should take into account that the official supplier of these belts for AvtoVAZ is GATES, so preference should be given to its products. Belts are also produced by BTR (lots of bad reviews), Continental, Finwhale, and ANDYCAR. It is better to buy Dayco 825 (manufacturer GATES), elastic belts are marked Poly-V, if not, then the belt is rigid. The price of belts is approximately from 500 to 1000 rubles.
Prices for alternator belts vary on average from 300 to 400 rubles, depending on the manufacturer, which is not affordable.
We recommend: The brake pedal sinks (becomes soft) or hard: what to do
Determination of malfunction and replacement time
Determining a faulty alternator belt is quite simple. Let's look at the main indicators:
- Whistle in under engine space. It appears when you increase the speed of the gas pedal, and the current in the bot network increases.
- Tightening the belt had no effect and the whistle remained.
- Cracks or elasticity in the belt.
Bad alternator belt, bad - teeth torn (torn off)
The crack on the alternator belt is clearly visible
All these malfunctions indicate that it is time to replace the alternator belt on Kalina. Otherwise, it may break at the most inopportune moment.
Torn belt on one of the Kalinas
Technology for replacing the drive of auxiliary units on Lada Kalina
- Specifics of the drive circuit on different modifications of Lada Kalina
- Recommendations for choosing a belt drive
- Regulations for periodic inspection and replacement of the alternator belt on Kalina
- Repair technology for the auxiliary drive system
- Tension adjustment
- Useful video tutorials on the topic
- How to replace the alternator belt on Lada Kalina
- How to tighten a belt
Lada Kalina from AvtoVAZLada Kalina The domestic auto industry continues to progress - AvtoVAZ presented a new generation Lada Kalina
.
The model is equipped with a Jatco automatic transmission and an improved ventilation and heating system. Representatives of the plant claim that the new car has gotten rid of the problems associated with the electric power steering of the previous series. This is all wonderful, but it was thanks to the first generation of the VAZ 1118 that repair techniques were developed that can be very useful to owners of new cars. Let's say the procedure for replacing the alternator serpentine belt on Kalina
is absolutely the same for both models.
conclusions
Replacing the belt and generator roller on an 8-valve Lada Kalina is very easy and simple. A wide range of product choices will not suit every consumer's taste. Moreover, even analogues of original parts are of fairly high quality. Diagnosing faults is easy and can be done by any motorist.
I didn't think it was that simple. Before, I didn’t even really look under the hood, but now I’ve changed the belt itself to a new one. Useful material.
Some kind of bullshit. A belt with a length of 1018 is for Kalina with an air conditioner, but for cars without an air conditioner the belt is shorter, I don’t remember the exact numbers. Everything in the article is mixed up. The torn timing belt was especially annoying, even though it was an alternator belt. Even on Kalina with an air conditioner, in order to change the belt, just the 1018th, you will have to remove the engine mount.
Source
Generator belt whistling. What to do?
It is very easy to distinguish the whistling of an alternator belt from other extraneous sounds.
This is an ear-piercing sound that will be noticed not only by the driver and passengers, but also by ordinary passers-by.
This sound occurs due to slipping of the inner part of the belt. And there are several reasons for this, including: belt wear, poor quality of the belt material, as well as engine oil, fuel and coolants getting on the pulley or belt. Therefore, you first need to visually inspect the surface of the belt for wear, and only then make a decision about replacing it. First you need to look at the following factors:
- whether the integrity of the belt is broken;
- what degree of tension does the belt have?
- whether there are traces of foreign liquids on the belt or pulley;
- Is there any displacement of the line where the two pulleys are located.
If no defects were found, it is worth replacing the alternator belt with a better one. Sometimes very stiff belts lose their effectiveness, which can cause a squealing noise. Such a defect may be due to cold temperatures, at which the belt becomes stiffer. But we go through this factor as the car warms up.
Lada Kalina: alternator belt tensioner, check and replacement
The fact is that if the alternator belt is worn out or loose, the alternator itself may work worse, which leads to problems with charging the battery. You can also note the appearance of extraneous noise (for example, the alternator belt whistles or makes noise). In such a situation, a worn belt needs to be changed or, at a minimum, tightened if possible. At the same time, the condition of the generator belt rollers should be checked.
It often happens that the belt itself is in good condition, without obvious defects. However, it cannot be tensioned due to the fact that the Kalina belt tensioner has failed. Next, we will look at how to replace the alternator belt on Kalina with your own hands, as well as how to change the Kalina tension roller.
Adjusting the alternator belt on Kalina
Diesel or gasoline. what's better? what are the pros and cons of designs
The first thing we need to do is loosen the tensioner rod lock nut by unscrewing it slightly counterclockwise:
And then we unscrew the tensioner rod, and thereby the belt will be tensioned. To avoid having to put a lot of effort during tensioning, you need to press the tensioner body with your hand and unscrew it at the same time, as shown in the photo below:
After tightening the belt, tighten the lock nut and check if there is no more whistling noise when the engine is running. To make sure of this, you need to turn on as many electrical appliances as possible with the engine running: high beams, heater at high speeds, rear heated glass, etc. If the belt does not whistle after performing this procedure, then it is tensioned normally.
But you should also keep in mind that reupholstering will also not benefit the device. Firstly, the belt itself will wear out a lot. Secondly, the bearing will not withstand heavy loads, it will hum and may even jam within a fairly short period of time. Once on a previous car I had a sad experience: I pulled it too tight and after a week of driving the bearing had to be replaced. So don't go overboard when performing this type of maintenance on your Viburnum.
Source
Adjustment methods
Currently, there are three main methods of tensioning the alternator belt in cars:
- Using a special arc-shaped strip. In this case, the generator has two mounting points. One of them is an axis around which it can move within small limits. The other is the nut on the adjustment bar. If you release it, you can move the pulley to the required distance. This method is now considered obsolete. It is mainly used on VAZ classics.
- The generator is moved by rotating the adjusting bolt. This system has become widespread in cars of the tenth family.
- Using a tensioner. This is a special movable roller that rests on the belt between the generator and crankshaft pulleys. It is equipped with a screw mechanism. By rotating it, you can adjust the pressing force. This is exactly the kind of alternator belt tensioner on the Lada Kalina.
LADA KALINASelection and replacement of alternator belt
Communities Lada Priora Lada Priora Club Blog Alternator belt length EURAir conditioner The factory design provides for different lengths of standard gears, which depends on the vehicle configuration:
- without air conditioning – 882 mm;
- with air conditioning – 1018 mm.
The first VAZ 1118 models without air conditioning and a tension roller are equipped with a poly-V drive with a length of 823 mm. Thus, with one belt from the crankshaft pulley, not only the alternator, but also the air conditioning compressor can be activated. The roller circuit allows you to adjust the tension.
Recommendations for choosing a belt drive
The initial configuration of the Lada Kalina car is equipped with a Gates drive. As a replacement on the first models, Dayco 825 could be used. Here you need to take into account that elastic specimens are marked with the “Poly-V” symbol; if it is absent, the product has a rigid structure.
Alternative drives for VAZ 1118 with air conditioning:
- Roulunds Rubber 6PK1015;
- Dayco 6PK1005;
- Bosch 6PK1015;
- Gates 6PK1019.
Alternative drives for VAZ 1118 without air conditioning:
- Bautler 6PK883;
- Dayko 6PK888;
- Finwhale BP6 883;
- Luzar LB 0118 1118-3701720 6РК 884;
- Roulunds Rubber 6PK884;
- BRT 882 mm (Balakovo plant).
Regulations for periodic inspection and replacement of the alternator belt on Kalina
Many new owners of vehicles, either from prolonged joy or out of ignorance, remember the presence of a flexible connection under the hood only after the lamp on the dashboard lights up. The technical documentation of the vehicle indicates operational standards, after which the torque transmission elements must be removed and new ones installed:
- tensioner roller after 60,000 km;
- belt after 30,000 km.
Experts strongly recommend monthly scheduled maintenance of the rubber drive, consisting of simple external inspection steps. The part needs to be replaced if the following defects are detected:
A high-frequency whistle that appears when electrical consumers are turned on also indicates the need to replace the generator belt on Kalina or, at a minimum, to adjust its tension.
Repair technology for the auxiliary drive system
The sequence of actions is similar for both models with and without air conditioning and consists of the following points:
- Remove the engine protection.
- Remove the right wheel and fender liner.
- Remove the expansion tank.
- Jack up the right side of the engine and unscrew the mount.
- By tightening the tensioner mechanism pin, loosen the belt tension.
- Remove the drive from the roller and then from all pulleys.
- Install the new part and reassemble in reverse order.
- Adjust the tension.
Tension adjustment
After replacing the generator belt on Kalina, making a “rough” adjustment and then starting the engine, it is necessary to more accurately adjust the drive tension. To do this, we perform the following operations:
- loosen the tensioner rod locknut;
- turn the adjusting pin with a wrench to “8” until the result is achieved;
- tighten the locknut.
When gradually tightening the belt, you can use a simple canter scale, which you need to attach to the key at “8” and tighten the pin counterclockwise to a reading of 2 kg. A normal setting is considered when, with a force of 10 kgf, in the area between the generator and crankshaft pulleys, the deflection value will be within 8-10 mm.
Useful video tutorials on the topic
A video with a step-by-step operation will help you analyze in detail all the nuances of replacing and adjusting the tension
How to tighten the alternator belt
Once you have discovered that the alternator belt is loose, it is better not to delay with this problem and immediately begin solving it, that is, tighten the belt. This is a simple job that you can do on your own without professional technical skills and knowledge. However, depending on the car, the process of tensioning the alternator belt may differ; let’s consider the main ones.
Adjustment screw
A more reliable and modern way of mounting the generator involves using an adjusting screw. On modern premium foreign cars, as well as on many models in the middle and even budget price segment, this is the mounting method used. To tighten the alternator belt, tensioned using the adjusting screw, you must:
- Loosen the top or bottom tightening of the generator;
- Next, turn the adjusting screw clockwise once;
- Move the generator away from the cylinder block, making sure that the belt is sufficiently tensioned;
- Tighten the nuts that secure the generator.
After this, you need to check how well the alternator belt is tensioned. If necessary, re-tension.
Important: An over-tensioned alternator belt can lead to rapid wear.
Adjustment bar
The simplest mechanism for adjusting the tension of the generator belt is the adjustment bar. It can be found more often on cars in the budget price category.
A generator with a similar mechanism is attached to the engine block or crankcase using a long screw. Using this screw, you can move the generator relative to the motor. A bar with a slot for a nut is used as an adjustment mechanism. Most often, this mechanism is located at the top of the generator.
To adjust the generator mounted on the bar, you must do the following:
- Unscrew or loosen the adjusting nut itself;
- Using a pry bar or other similar tool, move the generator away from the engine until the belt is sufficiently tensioned;
- Next, the previously loosened nut is tightened on the bar.
- After this, you can check how well the work was done and whether the belt is tensioned enough.
Important: It is also recommended to test the tension after 2-5 minutes of engine operation. Run the engine for a while, then turn it off and check the tension of the alternator belt
Using a roller
Regardless of the method used for tensioning, after completing the task, the engine crankshaft must be turned several revolutions.
After this, the tension level is re-diagnosed. A control check can be carried out after the trip, but it should not be long. The adjustment procedure using a roller may differ depending on the car model and have its own characteristics.
To complete the task, you will need a set of wrenches and a tool designed to turn the adjusting bearing. The tool is a key made in the form of two metal rods with a diameter of 4 mm.
If you don’t have a key, you can use curved pliers; the process of adjusting the tension is discussed using the example of a Lada Priora car:
The hood of the car opens and the generator device is located. There is a fixing screw on it, with which the roller is secured. It must be loosened, but not completely unscrewed. To loosen, use a 17mm wrench. Then, using the adjustment wrench, the roller is rotated. Depending on the need (increasing or decreasing the tension value), the roller rotates in one direction or the other. Using a wrench after adjustment, the roller is fixed
When setting up, it is important to select the correct tension force. When the procedure is completed, a diagnosis of the correctness of the work is performed. To check, the power unit is started and all electrical equipment is activated. You need to turn on the optics, radio, heater or air conditioning system, wipers, heated glass system, etc.
d. If all devices function correctly and the drive belt does not whistle, then the tensioning procedure was carried out correctly.
You need to turn on the optics, radio, heater or air conditioning system, wipers, heated glass system, etc. If all devices function correctly and the drive belt does not whistle, then the tensioning procedure has been completed correctly.
Advantages of a tensioner
Why weren't designers happy with the previous adjustment methods? Why did they add an extra video? It's not just about convenience. The tensioner significantly increases the service life of the generator. Without a roller, the entire load falls on its bearings. If the belt is tensioned normally, then there is nothing to worry about. In this case, the generator will last many thousands of kilometers. However, very often car owners overtighten the belt, and this is bad.
The load on the bearings increases many times over, so they quickly fail. In itself, this is not so scary and expensive, although repairing a generator is quite labor-intensive. But the car owner does not always recognize the breakdown in time. The bearings gradually “break”, the rotor moves and begins to cling to the stator winding. The result is the need to purchase a new generator. Of course, the Kalina generator belt tensioner pulley can also fail, which happens quite regularly, but that’s only 400 rubles, not twelve thousand.
Design
The main element of the tensioner is the pressure roller. It is made of plastic, and a sealed bearing is pressed inside. The roller is mounted on its own bracket, which, with the help of a threaded rod, can move in a vertical plane. This ensures the required moment of pressure on the belt. To prevent the bracket from moving spontaneously when the car is moving due to engine vibration, the pin is tightened on top with a locknut. The entire structure is placed on the generator bracket. There are two holes in it for attaching the Kalina generator belt tensioner.
Checking the tension of the generator belt
If there is a suspicion of a malfunction of the alternator belt, it is necessary to carry out appropriate diagnostics. To carry out diagnostics, you need to acquire a caliper or an ordinary metal ruler.
Diagnostics of the alternator belt is carried out as follows:
- You should press the belt with a certain force (about 3-4 kg);
- Next, use a ruler to measure the degree of bending.
If you have extensive experience, it is not necessary to use measuring devices - it is enough to determine the condition of the alternator belt by eye.
In the case of normal tension, the maximum bend is 1cm. Otherwise, we can confidently say that it is too weakened. If you do not have enough experience to identify the problem by eye, follow the diagram and use measuring devices to get the most accurate result. There is also a way to diagnose the alternator belt using a dynamometer. It consists of using a dynamometer to move the belt to the side, which should not bend more than 10-15 mm with a force of approximately 10 kgf.
Most common faults
During operation, the surface of the roller is constantly in contact with the generator belt. In addition, it is in continuous rotation, which places additional demands on the reliability of its bearings. The tensioner bracket is also subject to heavy load. Hence the main problems:
- Bearing wear. It simply runs out of service life or becomes unusable due to dust and dirt getting on it.
- Damage to the work surface. As already mentioned, the roller itself is made of plastic. Despite its high wear resistance, it often cannot withstand loads. This manifests itself in the form of scratches and chips, which quickly render the alternator belt unusable.
- Misalignment. This means that the belt and tensioner are at a certain angle to each other. Alignment can be disrupted in both the horizontal and vertical planes (due to the curvature of the bracket). This always causes rapid wear of the belt and the roller itself.
Often the cause of the malfunction is the driver himself. When trying to make adjustments, he forgets or does not loosen the locknut enough. As a result, the hexagon of the stud breaks off, and the Kalina generator belt tensioner fails.
Signs of breakdown and vulnerable spots
In any tension roller design, the weakest point is the bearing. The part is subject to loads of a constant nature, in addition to which temperature differences contribute. Under such conditions, element failure can occur quite often.
What kind of oil to pour into Granta 8 valves
Lada Granta engine oil change
Gearbox Lada Granta
Let's take a closer look at the list of main signs, due to the presence of which the roller can be considered faulty:
- The battery no longer receives a full charge;
- the car's energy-intensive current collectors began to show disturbances in their functioning;
- a characteristic hum coming from the area where the generator unit is located;
- presence of play during roller operation;
- The working surface of the generator set drive belt shows signs of uneven wear.
Symptoms of a problem
Damage to the tensioner is usually easy to diagnose. It is often noticeable visually. Running the car for a short time without an alternator belt helps to identify the problem. This often allows the damage to be localized. You should think about replacing the Kalina generator belt tensioner in the following cases:
- Presence of traces of rust and corrosion on the roller axis.
- A characteristic whistle when the engine is running.
- Short service life of the alternator belt.
- Curvature of the roller relative to the belt.
If the cause of the malfunction is precisely established, you can proceed to its elimination.
When to change?
VAZ Lada Kalina vehicles use a belt drive for auxiliary units. On cars with air conditioning, the service life of such a belt is no more than 30 thousand km. On simple versions of cars, the strap can last longer, but most owners try to change it after the same 30 thousand kilometers traveled. For various reasons, the belt may fail earlier, so it must be checked periodically during vehicle operation. There should be no cracks on the working track, and delamination on the outer part of the belt is unacceptable. If such defects are present, we immediately change the strap. Another signal to replace this element is a whistle or other noise when the unit is operating.
The process of replacing the belt on a Kalina with air conditioning (sixteen valves) is presented in a video from the user Alexander.
Let's sum it up
This completes the dismantling procedure. Now you know how to tension the alternator belt. The steps for reinstallation are also very simple, so there is no particular need to comment on them. Upon completion of the entire list of installation procedures, we check the tension level for compliance with the specified requirements. We start the engine and observe the operation of the unit. If no side factors are detected, then the work was done correctly.
Also in LADA Kalina it is possible to remake the tensioning device, which is confirmed by this video:
Forced tuning
Unfortunately, since 2011, designers have abolished the tensioner on Kalina. They were guided primarily by considerations of economy, but they did this without any modification to the generator. In practice, cases of its premature failure immediately became more frequent. Therefore, owners began to install the tensioner on their cars themselves.
It's not very difficult to do this. True, you will have to purchase not only the tensioner itself, but also the generator bracket. The only problem is removing the standard belt. It is very difficult to remove because it is very tight at the factory. You can simply cut it, as you will have to buy a new one. The fact is that the Kalina generator belt without a tensioner has a size of 820 mm, but 880 will be needed.
| Valery user menu |
| View profile |
| Find more posts by Valery |
Good day everyone!
A whistle appeared near the generator. Checking the belt tension is normal. Suspicion of the pressure roller. A more thorough inspection showed that the belt had jumped 1 groove to the right on the pulley. We loosen, rearrange, tighten - the whistle disappeared.
5000 thousand) At 38000 thousand. It started to whistle very loudly, the whistle did not disappear even after warming up. Upon inspection, it turned out that the belt had jumped one groove towards the engine on the camshaft pulley. We rearranged it, adjusted the tension, after 2000-3000 thousand. history repeats itself. The roller is also skewed. The whole dog is buried in the tension mechanism, or rather in its distortion. I'll try to level it with washers.
__________________ If in a dark alley you suddenly received a kick in the groin, a punch in the stomach and a baseball bat on the head, then the most important thing is not to get confused
When replacing the alternator belt or when repairing the engine, it is imperative to check the condition of the alternator tensioner roller.
The roller should rotate easily and silently, there should be no traces of grease from the roller
To replace the roller, you need to loosen the tension on the generator drive belt.
Use a screwdriver to pry off the roller cover (shown on the removed tensioner)
Remove the roller cover
Using a spanner wrench or a 17mm socket, unscrew the bolt securing the roller to the lower bracket of the tensioner (the bolt thread is left-handed, so unscrew the bolt clockwise)
For clarity, we show it on a removed tension device.
We take out the tension roller with the bolt, support sleeve and washer
Install the tension roller in reverse order
To remove the tensioner completely, release the belt tension.
Using a 13mm head, unscrew the bolt securing the upper bracket of the tensioner to the generator bracket.
Remove the washer from the bolt (located on the inside of the tensioner bracket), remove the bolt and bushing.
Using a 13" socket, unscrew the bolt securing the lower bracket of the tensioner to the generator bracket (shown on a dismantled engine for clarity).
We take out the tensioning device assembly.
We remove the bolt securing the lower bracket of the tensioner by removing the spacer and two cup washers from it.
If necessary, disassemble the generator drive belt tensioner.
We assemble and install the tensioner in the reverse order
| 16.02.2008, 14:36 | #22 |
What is it needed for?
As mentioned above, any vehicle is equipped with such an important device as a generator. If it fails, the operation of the vehicle will be impossible. Therefore, special attention should be paid to the performance of all elements of the device, be it a Lada Kalina with a 16- or 8-cl. engine, with or without air conditioning. What is the component size? How is the roller strap adjusted and replaced? How to tighten up? You can find out the answers to these questions in the article.
Car Lada Kalina tuning
Before answering questions that interest Lad Kalin owners, you should understand why this component is needed. Not every motorist knows what role he plays in the functioning of the car.
In modern cars, this belt is the only element that allows you to transmit crankshaft rotation to the generator. When the crankshaft transmits rotation to the device pulley, energy appears in the vehicle's electrical network, thanks to which all electrical equipment operates.
We recommend: How to measure the pressure in the fuel rail?