Filters
The vehicle's heating system must work properly. It is not difficult to achieve uninterrupted operation of the stove if you know the device. The heater creates a comfortable stay in the car interior, creating visibility for the driver. The stove design provides for the use of small-class machine options. The production of Kalin cars began over ten years ago. The following options are included for the base model:
- Anti-lock braking system.
- Airbags.
- Electric power steering.
New Lada Kalina models were developed, which were already equipped with additional options:
- Electric door window lifts.
- Reliable heater.
- Heated seats.
- Interior air conditioning device.
The Lada Kalina heater device is designed for heating and cooling the car interior. If the car does not heat up, the windows fog up, or you feel discomfort, then you need to test the performance of the heating system. Understand the functioning of the stove on Kalina.
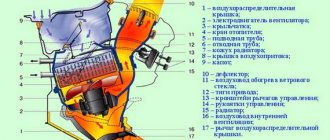
General layout of the Kalina stove
The location of the stove was designed for easy installation of an air conditioner. The system is simple, but at the same time quite reliable.
- Left side flow outlet.
- Left air duct.
- Heated side window.
- Air flow splitter.
- Stove.
- Right ventilation duct.
- Right side flow exit.
- Bottom heating duct.
- Interior heating duct.
- Central outlet of ventilation flows.
The supply and exhaust principle is used. The air masses inside the car are heated using a special liquid, which simultaneously cools the engine. The operating principle of the Kalina stove is based on the fact that the liquid warms up the radiator, where heat exchange occurs, and the heated air passes into the cabin through the air ducts.
If you analyze the Kalina heater, the configuration will differ. The first option has a simple and reliable design. And in the other - full electronic control. The air passes through the filter into the air intake, and then the fan blows further through the system. The engine is running and warmed up. Antifreeze moves through the system in which the heater radiator is involved.
The amount of air that is heated by the stove radiator is regulated by a damper. Controls the operation of the fan and dampers by a unit located on the central panel.
Heating device control unit
- Temperature regulator. We change the heating of the air flow by turning the knob. The blue zone produces cold air, the red zone produces warm air.
- Tumblr. By turning the knob clockwise, the intensity of the air flow is adjusted. Choose one of 4 fan speeds.
- Air flow separation selector. Distributed in specific areas:
The flows pass through the upper part of the cabin.
The air is directed downwards.
Air flows are directed onto the windshield and down.
Air flows are concentrated in the area of the windshield, as well as the side ones.
- The handle that controls the recirculation of cabin air. We turn on the mode when driving off-road or in a traffic jam. Used for a short time, the glass fogs up.
- Rear window heating mode switch.
We regulate the direction and saturation of air flows through aerodynamic devices. We turn the guide blades and change the position of the dampers to achieve the desired air direction.
Interior ventilation of Lada Kalina
The outlet pipes are located in the car body under the trunk. The heater is located under the dashboard. The air flow enters the car interior through an intake, which is designed in front of the windshield in the engine compartment. The air enters through the filter and is accelerated throughout the cabin under pressure created by the fan.
1.Pipes for supplying air to the rear of the cabin.
2.Side ventilation nozzles.
3.Blowing the side windows.
- Windshield blower nozzle.
5-6-7. Central deflectors for flows entering the car interior.
We direct the supply air through the deflectors by turning the handwheel. If we turn it up, the flap opens and vice versa. You already understand how the stove on Kalina works.
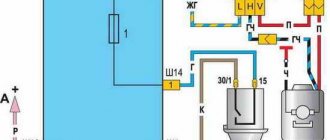
- Mode switch.
- Resistor.
- Electric stove motor.
- Egnition lock.
A. To the power source.
Checking ventilation and stove Lada Kalina
Car owners claim that Kalina’s heater heats much better than previous VAZ models. It sometimes breaks down and requires repair. Do a full system diagnostic to ensure it's working properly.
- We start the car engine.
- Turn the left handle counterclockwise and place it in the blue zone.
- We place the fan speed switch in each of the 4 positions one by one. If the fan does not rotate in one of the positions, then check the power supply circuit of the device.
- Turn the speed controller to maximum.
- Using the right handle (damper control) we check the redirection of air flows. If we notice that there is no change, then the damper drive needs to be repaired.
- Warm up the engine to 90°C. Turn the left handle to the extreme position of the red zone.
- The air that comes out of the panels should blow warm air.
- Return the left stick to the blue zone. Cold air will come out of the nozzles again.
- If the temperature of the air flow does not change due to a change in the position of the regulator, then the control of the central damper drive is faulty.
The car owner may not immediately understand that the Kalina interior heater, the circuit of which is simple, is damaged. You constantly add antifreeze in small quantities, and the carpet in the cabin is dry and there is no smell of antifreeze. A stove leak does not appear immediately, and the main thing is that the liquid can evaporate. The radiator on Kalina does not have pipes leading into the cabin that could leak.
Hot air blows when heater is off
Without condos PRIORA. I noticed this thing back in the summer and thought it was just an illusion. Now, when it’s +32 outside in the shade, +40 in the sun, I see that it didn’t seem like it. And after reading the relevant sections of the Priora forum, I realized that the typical hacky-VAZ phenomenon in this part of the car did not escape me either.
So that's it. When the temperature regulator is in the extreme left position, warm air blows from the ventilation. It’s not very hot, and for example at +20 you won’t really feel it overboard, but at +30 you will feel it. In principle, there is adjustment from cold to hot, but the general impression after a year of operation is that the heating and ventilation system does not produce either the coldest air (equal to the outside air) or the hottest air, which is noticeable in extreme situations - maximum heat, or vice versa Max. frost overboard. Theoretically, the options for the sources of the notice are clear - the damper does not completely come to the extremely closed or extremely open position due to a notice in the damper, or because of a notice in the drive, or because of a notice in the control unit. I don't think the interior temperature sensor has anything to do with it, because... in extreme positions it just turns off and is not used. Question for the prior experts - who has encountered this? What did it cost to get out of the situation? How much do you need to disassemble in order to diagnose or replace something? The cars are under warranty, but when it comes to a good disassembly of the interior, dashboard, etc., there are very big doubts that our valiant servicemen can do something and return everything to its original state without spoiling anything else, starting with the external type of upholstery. Spasmb.
Messages: 148 Registered: Jan 21, 2008, 00:00 From: Tyumen Experience: recently Auto: Nexia :
Awards: 1
| Rating: 451 |
| Reputation: +1 |
Thanked: 2 times
Heater fan is off but air is still blowing
Post by zoorik » Sep 22, 2008, 02:47 pm
Good afternoon dear forum users
Please tell me how to fix the following bug: I have a VAZ 21093I, when driving, air constantly blows from the fan, even when it is turned off, and depending on the position of the switch (hot or cold), the corresponding air blows. Thank you in advance
Possible heater malfunctions
Yours either heats poorly. Look for the cause of the problem. The fan does not work or the heater radiator is leaking - obvious breakdowns that occur at any time.
Stove control unit
:
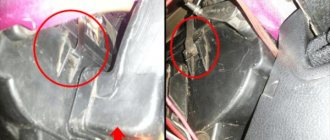
- The engine was warmed up, but warm air did not enter the cabin.
- The damper drive cables may have come off. The only solution is to remove the console.
Dampers
. Partially open or close. The rubber seal has come off in the air duct or foreign objects have gotten into it.
Antifreeze circulation
. Start the engine and check the level in the expansion tank, and also check for any disturbances in the normal flow of antifreeze. Possible reasons:
- Pump. Cannot be repaired, only replaced.
- The cooling system is clogged. Clean or rinse.
Checking the Thermostat
. Warm up the engine to 75°C. If the upper pipe is cold, then the thermostat does not work correctly and does not allow coolant to move in a large circle. Replace the device.
Airlock
. Remove the plug from the vehicle's engine cooling system.
Temperature sensor
. Constantly blowing cold or hot air. If cleaning the contacts does not help, then replace the non-working temperature sensor.
Air filter
. If the air flow is weak and there is no desired temperature, then replace the filter. Be sure to check the heater resistor, which controls the rotation of the fan and is located under the glove compartment.
Electric fan
. The device does not turn on regardless of the selected mode. Check the fuse that controls operation. If the fan is turned on and its operation is accompanied by strange sounds, clean or replace it.
Dampers
. It is difficult to determine the breakdown unless you replace the dampers themselves.
The cause of a heater malfunction may be a depressurization of the car's engine cooling system. The types of breakdowns described above cause malfunctions in the operation of the Lada Kalina car's stove. Such breakdowns do not require special knowledge; they are easy to understand and repair.
Problems with Kalina's heater elements?
To understand why Kalina’s stove does not work, you should understand its operating principle: The heater control unit (HCU) receives a signal from the ceiling temperature sensor in the cabin (installed in the interior lamp) and compares it with the temperature set by the driver. If the difference is greater than a certain value (for example, more than 2 degrees), then the ACS unit sends a control signal to the micromotor-gearbox (MMR), which controls the heater dampers (opens or closes hot air from the heater).
Therefore, if Kalina’s stove only blows hot or cold air, regardless of the position of the handle on the heater block, then start by checking the interior temperature sensor.
Also, the cause may be the MMR itself, for example, its resistor layers or gear teeth have worn out.
Sometimes it happens that the stove does not blow well - the first thing you should do is replace the cabin air filter. The speed of the heater fan is affected by the heater resistor (for example, the 4th speed of the heater does not work), so it makes sense to check it too (it’s under the glove compartment).
If the electric heater fan does not turn on at all, then check the Kalina heater fuse - F5. And if the heater howls or hums, then most likely the problem is in the heater fan.
Another reason for the heater not working properly could be the Kalina heater control unit itself (for example, there are problems with the heater damper), but don’t rush to buy a replacement without making sure the actions are correct. The easiest way to find out why the stove is not working properly is to replace the part with a working one and check its functionality. It is not necessary to buy a new part; you can ask a friend for a known working part, or negotiate with the seller, leaving a deposit.
Thus, we have examined all the elements of the heater (see also the design of the Kalina stove). Start following the order of the article, moving from simple to complex, and then you will certainly be able to repair Kalina’s stove with your own hands!
Summary
The Lada Kalina car is available with a ventilation and heating unit or with an air conditioning unit. For the first option, it is impossible to provide a cabin climate whose temperature will be lower than the ambient temperature.
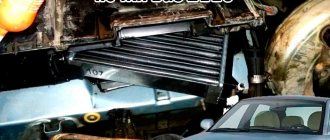
Probably every car enthusiast, regardless of the cost, class and prestige of the car, has encountered various types of breakdowns. It’s not for nothing that there is a joke about a famous British brand whose cars can only move in the direction of a car repair shop. But this is not about him now. The domestic automobile industry also has problems that require immediate solutions. For example, if you have a Lada Kalina, replacing the stove radiator is inevitable.
Recommended repair method
A special feature of the Lada Kalina is the not-so-convenient location of the radiator-heater. Replacing it may take quite a lot of time.
Owners of a Lada Kalina car can choose one of 2 ways to change the stove themselves. The first method is recommended in the car repair manual and, as a rule, is carried out at service stations. This method requires careful and step-by-step operations. It involves the dismantling of a significant number of parts and elements of the car, so independent replacement causes some difficulty.
If you decide to proceed in this way, you will need to carry out additional operations.
- The front panel is freed from the fastening bolts. Unscrew the following screws: at the ends on the side of the doors, at the top left and right in the corners of the front pillars, in the glove compartment, along the edge of the windshield.
- Release the plastic casing of the central tunnel near the parking brake.
- Remove the instrument panel, all external toggle switches, and buttons.
- As it is released, the plastic case is lifted, monitoring the condition of the electrical wires and connectors.
Dismantling begins with complete disassembly of the panel
This work cannot be done alone; the help of 2-3 people is required, since the correctness of dismantling cannot be objectively controlled. It is better to remove the central panel completely, but if you can secure it securely, you can leave it in a slightly raised state. The main thing is to get free access to the radiator of the heating system.
It is imperative to follow the procedure and carefully place the dismantled parts and fasteners. Otherwise, you will not be able to reassemble and correctly connect all the necessary equipment.
A little about the device
It just so happens that Russian winters are some of the coldest, which means cars should be produced taking this little feature into account. In such weather conditions, the undoubted advantage of the Kalina is its powerful stove. It will not only bring the interior temperature to an acceptable minimum in a matter of minutes, but will also warm its owner with the warmth of the Russian automotive heart. However, there is a small drawback to this device - over time, you begin to notice how the main heat source leaks, forming oily drops on the rubber mats.
At this moment, you should start sounding the alarm and think about the fact that the heater radiator on the Kalina needs to be replaced. The oily drops turn out to be antifreeze, which can not only stain the mat, but also flood the electronic control unit, which, in turn, will cause a lot of problems.
How to replace a stove radiator?
You can follow one of the selected paths.
1. Trust the professionals and take the car in for service.
2. Try to solve the problem yourself by spending a whole day disassembling half the car.
3. Without removing the panels, complete all work in half a day.
If you see in the price list the item “replacing the heater radiator on Kalina”, the price is unlikely to pleasantly surprise you. The cost of the service is about five thousand rubles. After this, you will want to spend the whole day, invite friends and, after disassembling a considerable part of the car, replace the radiator yourself. But don’t rush into this either. Replacing the radiator of a Kalina stove without removing the panel, although a rather labor-intensive process due to some inconveniences, is the fastest.
Without removing the panels
There are many options for replacing a radiator without removing the panel. Let's focus on one of them.
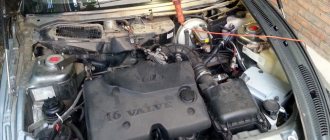
1. The first thing we need is sufficient room for action, namely the ability to fully open the driver's door.
2. After this, open the hood to disconnect the air filter along with the air duct, and also remove the battery along with the platform.
3. Drain the antifreeze.
Remember that it is under pressure while the engine is running. Therefore, carry out all actions after first making sure that nothing threatens your health. Wait until the engine has completely cooled down.
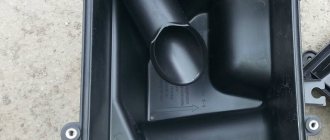
4. Now you can dismantle the old radiator.
We disconnect the pipes attached to the engine fittings. Then we find the same fittings, but on the heater radiator, and remove the pipes from them. Thus, we disconnected the two hoses leading to the stove.
Having completed these simple operations, you will notice that between the hoses there is a nut with which the metal casing is attached to the engine shield. It needs to be unscrewed.
Replacing the heater radiator on the Kalina is in full swing.
Remove the gas pedal and loosen the nuts on the brake pedal to move it a little to the side for easier work. Why don't you remove the brake pedal? Firstly, this is not the first need, the pedal won’t hurt much, and secondly, you won’t be able to remove it anyway.
So, we have completely freed up space and can now remove the old radiator.
Remember that it is in a casing that will require some cutting. Since everything is located very compactly and there is too little space between the radiator and the panel, it will not be possible to easily remove the broken part. We ruthlessly cut off the tubes, free the radiator from its mounts and remove it from its rightful place.
5. We install a working part.
When you pick up a new radiator, you will immediately understand that it does not want to go back to its original place. The plastic tubes attached to the structure are in the way.
What to do? We cut them about a centimeter. During dismantling, we removed the hoses, which means we need to put them back in place. Before doing this, heat the plastic edges of the tubes with a regular lighter, and then press them against any surface, preferably metal, so that an obstacle is formed and the hoses do not jump off in the future.
Now you can install the heat exchanger in place. The entire procedure is performed in reverse order.
This is how the heater radiator (Kalina) was replaced. The price of the materials spent is several times lower than the cost of the service.
The final step is adding antifreeze. Be sure to also release any trapped air.
Results
Having completed all the work and enjoyed the warmth in the cabin, we can say that replacing the heater radiator on a Kalina does not take as much time as it seemed. And the invaluable experience gained during repair work allows you to be proud of yourself and your skills.
Replacement
stoves without
removing the panel Lada Kalina
Most instructions, including the service book for the Lada Kalina car, describe how to replace the stove by dismantling the dashboard. This causes a lot of trouble and inconvenience. Replacing the radiator of a VAZ-2115 stove without removing the panel. Replacing the stove without removing the panel of the Lada Kalina. We will describe the replacement
stove without
removing the Lada Kalina panel
, which is more convenient, faster and will allow even a complete new person to cope with the task.
It should be noted that in the previous article Replacement
heater fan
Lada Kalina,
two methods of replacing the fan were carefully described: according to the service management and the folk method.
As mentioned above, the method that we will present does not require dismantling the dashboard, which means that much fewer tools and materials will be needed to implement it. Basically, you will need a ratchet, a set of sockets, a pair of screwdrivers (phillips and flat), and a new stove
. With the latter, we would not recommend rushing, especially if you have little experience in car repair. The thing is that stove malfunctions that seem obvious at first glance may turn out to be problems in completely different components. Therefore, first remove the old stove and make sure that it is the one that has failed, and only after that go to the store to buy a new one.
It is best to buy VAZ stoves, since small savings by purchasing stoves from other manufacturers often result in large expenses due to the low quality of their products, as well as the almost complete absence of a warranty.
Algorithm for replacing the stove on Lada Kalina
Replacement
stoves without
removing the panel Lada Kalina
is a real find for the younger generation of car owners. Lada Kalina - replacing the heater radiator (without removing the panel). Novel. To learn this method, you should carefully read the following step-by-step instructions and be sure to strictly follow everything that is written in it. So let's get started.
Step 1:
First of all, you must dismantle the steering wheel column.
Technical device of the heating system
The functions of the heating system are to heat and cool the vehicle interior, as well as to blow warm and cold air onto the windows. If you cannot effectively warm up the interior, and the windows constantly fog up, you should look for the reason in the operation of the stove.
Lada Kalina has a traditional supply and exhaust system, and the air is heated by liquid heated to 90°C in the cooling system, which is then pumped through the stove. In the stove, heat exchanges water with air, which is subsequently directed through air ducts into the cabin.
Heating system in the car
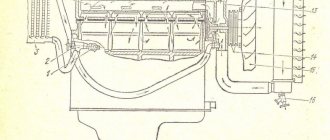
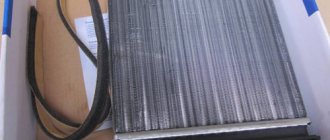
The heating system of the Lada Kalina includes the following elements.
- Radiator with air distributor.
- Electric fan.
- Ventilation system filter.
- Air ducts.
The fan on Kalina has 4 operating modes. The change in rotation speed is ensured by the operation of additional resistances. If it is necessary to replace resistors, it should be taken into account that they have a resistance of 0.23 and 082 Ohms.
The air flow is carried out through an intake device installed in front of the windshield. Before entering the cabin, the air is cleaned through a cabin filter. The filter element is made of synthetic fabric, and its replacement is necessary every 15 thousand km.
The degree of heating is provided by the amount of air passing through the heating radiator. Next, the heated and cold flows are mixed in the air duct, after which they enter the cabin. Diagrams, drawings, photos of the heating system can be found on the Internet.
Replacing the heater radiator on Kalina 1117
Replacement
heater
radiator for VAZ 1117
Kalina
Group in contact
Step 2:
Next, you should release the pedals. replacement of the gas-31105 stove, replacement of the stove radiator on the Volga 31105 without removal. Replacing the heater radiator without removing the panel and steering wheel. To do this, pull the pedal about halfway and turn it to the side. Today I will talk about what flushing the stove is, how to clean the stove, and also how to flush the stove radiator without removing and disassembling the dashboard. Thanks to this manipulation, you will be able to free up the area that will be used to dismantle the radiator. To make this even easier, you can slightly bend the reverse tongue, which serves to create a stop for the sensor.
Step 3:
Remove the stopper axle. Lada Kalina - replacing the heater radiator (without removing the panel. Unfortunately, in this case you will not be able to achieve visual contact, so you will have to work by touch.
Step 4:
Pull out the metal casing, cut it and mount it in its original place.
Step 5:
Now you should carefully inspect the radiator. The thing is that it can become clogged, which will require you to clean it using special solutions. Replacing the heater radiator without removing the panel on the Lada Kalina. The video will tell you how to remove the heater radiator on a VAZ-2114 car without removing the dashboard, and will also tell you about the nuances and subtleties of the process. In some cases, you may find that it is damaged, requiring you to buy a replacement.
Step 6:
dismantle the valve of the car’s heating system and, just as in the case of the radiator, carefully inspect it, clean it, and, if necessary, replace it with a new one.
Step 7:
Now all you have to do is clean the remaining elements of the heating system, carefully inspect them and, if necessary, replace them. It is important to note one small but very significant detail: radiator hoses are very difficult to put in place, especially if you decide not to change them, therefore, if you have the financial opportunity, it is better not to skimp on them. Replacing a stove radiator without removing the panel on a VAZ. This also applies to tubes, but in their case there is one more important detail - they must have absolutely identical length.
Step 8:
Reassemble everything in the reverse order and do not forget to add antifreeze to the system, since most of it will be lost during the repair process.
Step 9:
Check the functionality of your car's heater.
The method described above, although simple and practical, has a number of significant disadvantages compared to the classical technology, which is usually used as an answer to the question of how to change the stove on Kalina. Replacing the Lada Kalina heater radiator without removing it. The thing is that with such partial disassembly of the machine, you will not be able to inspect all the components of the stove well enough, and you will not be able to replace some of them, if necessary. Therefore, we recommend resorting to the method of replacing the stove on the Lada Kalina without removing the dashboard only in extreme cases, and when you are sure that either the faucet or the radiator is to blame - two elements that will definitely be in your hands, and you will definitely you can determine the degree of their wear.
I would also like to note another important nuance regarding the “simple” method of repairing the Lada Kalina stove. Without disassembling the instrument panel, you will still not avoid contact with it, so act very carefully so that its elements do not burst. Also, do not forget about spilled antifreeze, which must be constantly collected with rags so that it does not spoil the interior of your car.
With the onset of cold weather, car enthusiasts begin to use the heaters of their cars. Due to the fact that this unit has not been used at all or quite rarely, malfunctions in its operation are possible. According to statistics, all heating system breakdowns are caused primarily by the failure of two components:
- stove radiator;
- fan motor.
Winters in Russia are some of the coldest, so one of the advantages of the Lada-Kalina is the presence of a fairly warm stove. However, the downside is that during constant use, you soon begin to notice a puddle on the carpets from a leaking radiator with a persistent aroma of antifreeze or antifreeze.
You should immediately set yourself a goal to replace the radiator, because leaking fluid can flood the electronic control unit, which will lead to more serious problems.
The Kalina radiator, by the will of the manufacturer, is located in a not very convenient place; getting to it is not so easy. In order to replace it, you need to disassemble and remove the central panel. It is located just below the audio preparation area to the right of the gas pedal above the electronic control unit.
The problem can be solved in three ways:
- Choose professionals and take the car to a service center for repairs.
- Try to solve the problem yourself using the technical instruction manual by disassembling half of the car according to the instructions.
- It is possible to use the traditional method, which avoids removing the panel, and carry out the replacement process through the gas pedal in the driver's seat.
The cost of services is approximately five thousand rubles, so many people still prefer to change the exhausted unit themselves.
- Drain the antifreeze before starting repair work.
- Release the pipes leading to the stove from their fastenings.
- On the driver's side, use a screwdriver to unscrew the radiator mount consisting of three screws, then use a wrench to unscrew the gas pedal mount and remove it so that it does not interfere with further manipulations.
- Carefully remove the ECU (electronic control unit).
- Unscrew the two bolts securing the cover; under the Velcro there are nuts; they also need to be removed. Important! There is no need to unscrew anything else.
- According to the reference instructions, the diagram shows the mounting locations for the front panel. It is necessary to use it to unscrew all the bolts to free it from the fastening.
- Carefully place the removed elements with their fasteners.
- Loosen the palatal handbrake belt by unscrewing one of its fastening bolts and unscrewing the second completely; this is necessary to facilitate the process of removing the screws from the tunnel.
- Next, you need to dismantle the dashboard and remove the front panel.
- Then unscrew the heater mounting bolt.
- Upon completion of these procedures, access to the stove with radiator is completely open.
- By unscrewing the screws from the casing cover, the seal frame is released.
- The old radiator is dismantled and a new one is installed in its place.
- Carry out the assembly step by step in the opposite direction. At the end of it, new antifreeze or antifreeze is poured in. To check the functionality, integrity and absence of leaks, it is necessary to leave the unit in operating condition for some time.
- After verification, the process can be considered complete. The process described above is very labor-intensive, so many forums suggest the following process for replacing the radiator.
Repair and replacement of faulty parts
Many novice motorists ask questions: how to remove the heater regulator on Kalina, what LED is in the heater switch on Kalina, what should be done when the heater mode switch on Kalina does not work. Answering these questions, I want to say that initially it is necessary to dismantle our entire mechanism, after which we proceed to disassembly according to the following scheme:
- First of all, disconnect the negative terminal from the battery. This is done to de-energize the system so as not to short-circuit any of the sensors during the disassembly process.
- We remove the radio and turn off the power coming from the wiring harness.
- We remove the damper switch lever, then remove the temperature regulator and the air flow distribution regulator.
- At the bottom, remove the plugs behind which there are 2 screws, unscrew the fastening screws and gradually begin to remove the instrument panel console.
- After our panel is removed, it is necessary to disconnect the power supply connectors located on the back.
- After eliminating the malfunction, assembly is carried out in the reverse order.
To carry out this work, we only need a flat and Phillips screwdriver from the tools.
Difficult or impossible switching of the temperature regulator may be due to a breakdown of the switch itself. On a Lada Kalina car, replacing the heater switch is quite easy (provided that work has previously been done to remove the heater control mechanism). On the rear console of the control panel, unscrew the four screws securing the switch block.
We remove the cable fastening clamps, then remove the cables from engagement with the drive unit. We replace the broken switch and reassemble it in the reverse order. When performing this work, I give you useful advice: the location of the cables on the lever block must be marked with a marker; this is done in order to install the rods in their original places during assembly.
When the stove temperature regulator does not work on Kalina, the main reasons for the breakdown may be: a disconnected connection wire or a failure of the thermistor. Such malfunctions are treated by soldering the wire and replacing the broken element. It happens that the stove regulator on Kalina does not work due to a breakdown of the temperature sensor, which happens quite rarely. This sensor is located inside the car interior lamp. If it is found to be damaged, it must be replaced with a new one.
Answering the question about what kind of LED is installed in the stove switch in Kalina, I want to say that there are LED lamps with a power of 3 Watts and a voltage of 12 Volts. This lamp is quite enough for illumination, but some motorists install LEDs with a power of 5 Watts. This does not affect the work process, the backlight just becomes a little brighter.
To summarize, it should be noted that it is much more comfortable to drive in a warm car. To ensure that the heater switching mechanisms do not break, it is necessary to switch them smoothly and not jerk sharply. Good luck and may your cars be warm and cozy in winter.
- First of all, disconnect the negative terminal from the battery. This is done to de-energize the system so as not to short-circuit any of the sensors during the disassembly process.
- We remove the radio and turn off the power coming from the wiring harness.
- Remove the damper switch lever, then remove the temperature regulator and air flow distribution regulator.
- At the bottom, remove the plugs behind which there are 2 screws, unscrew the fastening screws and gradually begin to remove the instrument panel console.
- After our panel is removed, it is necessary to disconnect the power supply connectors located on the back.
- After eliminating the malfunction, assembly is carried out in the reverse order.
Difficult or impossible switching of the temperature regulator may be due to a breakdown of the switch itself. On a Lada Kalina car, replacing the heater switch is quite easy (provided that work has previously been done to remove the heater control mechanism). On the rear console of the control panel, unscrew the four screws securing the switch block.
We remove the cable fastening clamps, then remove the cables from engagement with the drive unit. We replace the broken switch and reassemble it in the reverse order. When performing this work, I give you useful advice: the location of the cables on the lever block must be marked with a marker; this is done in order to install the rods in their original places during assembly.
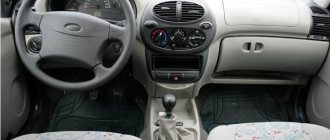
The dashboard of a Lada Kalina car disassembled
Visual instructions for removing the fan resistor
Options from users on how to change a radiator without removing the panel
- To carry out the radiator replacement procedure without removing the front panel, you need enough space to fully open the door on the driver's side.
- Free up space under the hood by removing the air filter battery plate along with the air duct.
- Drain antifreeze or antifreeze.
- Disconnect the pipes that are attached to the engine fittings. Exactly the same fittings are located on the stove mount; they are quite easy to find.
- Disconnect the pipes leading to the stove.
- Between the hoses there is a nut securing the casing to the engine shield.
- Unscrew and remove this nut.
- In the cabin, remove the gas pedal and loosen the brake pedal to make it possible to move it to the side.
- Remove the side panel and radiator cap, three self-tapping screws, three ten nuts.
- Cut the tubes leading to the radiator, slightly cut the seat, and remove it.
- Remove the faulty unit and install a new one.
- If, during the installation of a new radiator, difficulties arise with the running pipes, then they must be reduced by cutting them by about a centimeter.
- Melt the ends of the tubes so that after connecting the pipes do not jump off.
- Assembly is carried out in reverse order.
The second option for replacing the radiator
- Drain the antifreeze.
- Remove the gas pedal.
- Disassemble the steering column and remove the electric power steering.
- Remove the radiator tubes.
- Carefully cut out a piece of the stove body for freedom of manipulation during the process of removing the radiator.
- Remove the faulty part and install a new one.
- Assembly is carried out in reverse order. The cut piece of the body can be installed in place and made into a hatch, secured with self-tapping bolts.
- Fill in new antifreeze and leave the system to operate normally. Car enthusiasts have a great variety of options for replacing a radiator; you can get acquainted with them on forums and in auto parts stores, where highly qualified specialists will certainly advise on repair methods and options.