Characteristic differences between sedan and liftback bumpers
The front/rear “plastic” of both modifications is completely identical in terms of the mounting method.
The main difference is in the exterior, color, and shape of the radiator grille. You can visually distinguish the first generation from the second by the color of the front grille of the cooling system. In the first generation, she is in her original color - the natural color of plastic. In the second - to match the main color of the car. This rule also applies to the Grant liftback model, the so-called “bolt on” landing. This is such slang among motorists.
Typical bumper mounting locations:
- front: four bolts in the upper perimeter, two in the middle, four at the bottom, on each side;
- rear: two side fasteners, four upper and the same number of lower.
Lada Granta 2013, l. With. - with your own hands
Sayansk
Lada Granta, 2015
275 000 ₽
Krasnoyarsk
Lada Granta, 2020
593 500 ₽
Voronezh
Lada Granta, 2020
664 900 ₽
Permian
Lada Granta, 2020
559 500 ₽
See more cars on Drome
Participate in the discussion can only registered users.
Login Register
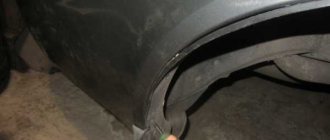
This is interesting: Removing the front wheel arch liners of Lada Granta
Removing the rear bumper
The process is the same as above, except for the placement of the fasteners.
So, how to remove the rear bumper of a grant liftback:
- Place the car on a level platform, open the trunk lid;
- remove the plastic latch, remove the lamps, unscrew the three nuts, remove the left/right lamp one by one;
- Having done the work described above, we proceed to unscrewing eight bolts in the upper perimeter and four in the lower. First remove the mudguards in the wheel arches;
- Carefully tear off the plastic clips and remove the bumper.
We carry out planned work, preventive maintenance, cleaning, etc.
How to put the rear bumper back
Replacing the rear bumper on a Lada Granta, like the front one, may be necessary not only if it is damaged, but also in order to improve its image. Installation is in the reverse order.
- Having installed the rear cowlick behind the car, connect the blocks of wires going to the license plate lighting unit. Hide the pads in the housing and insert the rubber seal in place.
- Fasten the rear bumper with the latches and tighten the upper mounting bolts.
- Place the light on the guides, push it all the way and tighten the 3 fastening screws. Insert the wiring harness connector until it clicks. Cover with trunk trim. Repeat the steps for the second flashlight. If necessary, attach the trim with screws.
- Tighten the remaining bolts and screws, attach the mudguards.
After completing the work, connect the battery. Check the operation of electrical appliances. If everything is in order, you can hit the road.
The process of dismantling the rear bumper Grants
To remove the rear buffer, prepare:
- TORX T30 key set to “10”;
- Phillips screwdriver.
- Remove the mudguards.
- Unscrew 1 screw on each side securing the bumper to the wheel arches.
- Unscrew the 3 bolts of the lower fastening to the car body.
- Remove the lights.
- Unscrew the 8 bolts of the upper fastening to the body.
- After overcoming the resistance of all latches, release the side latches that secure the part to the wing. They are located on both sides of the car.
- Now move the bumper away from the body a short distance not exceeding the length of the connecting wiring harness.
- Release the rubber seal of the harness from the body holes by prying it up with a screwdriver.
- Pull the harness out of the body, then disconnect the wiring harness connectors for the rear license plate lighting.
- Remove the bumper and rear license plate light unit.
The front bumper of the Lada Granta is easier to remove, but most often it is the rear bumper that has to be removed, so approach the process responsibly. Study the features of your car to avoid mistakes.
The front bumper of the Lada, as well as the rear one, is installed in place, performing all the steps in the reverse order. If a new bumper is being installed, choose it responsibly. In most cases, such parts are not assembled according to factory drawings, so tuning of the Lada Grant can be carried out poorly.
DIY rear bumper installation
Replacing the Grant liftback bumper, hanging the upper perimeter, snapping the side and bottom, tightening the bolts. At this stage it is important to maintain the integrity of the plastic clips. In case of damage or deformation, tightness to the surface is not guaranteed.
If you accidentally damage the clip, consult a specialist. Restoring without experience does not always lead to guaranteed success. Self-replacement of the rear bumper on a Lada Granta liftback is completed.
Procedure for work
Placing the vehicle within the perimeter of the repair area;
- Open the hood/trunk lid;
- Unscrew the mounting bolts one by one. In the case of the rear bumper, first remove the rear lights to provide access to the bolts;
- Remove the plastic bumper and carry out maintenance;
- Put on a new one and secure it with clips.
DIY installation is complete.
Bottom line The process of replacing the front / rear bumper yourself is not at all difficult. If you have tools, equipment, and spare parts, prevention will take no more than 15 minutes. When it comes to the negative consequences of an accident, impact, collision, the time interval is impossible to predict. Before removing the Grant liftback bumper, be sure to conduct preliminary diagnostics using digital scanners to determine the geometry of the body.
In what cases is it necessary to replace the bumper?
- the consequence of a frontal collision, an accident, when the structure of the plastic is deformed, standard fasteners are destroyed, subsequent use is not rational;
- manufacturing defects at the assembly line stage;
- negative consequences of operation in critical negative / positive temperatures;
- mechanical damage caused by the driver;
- combustion, melting;
- installation of tuning elements, local upgrade, insertion of non-standard designs.
Regardless of the type of damage, carry out preliminary diagnostics in order to assess the general technical condition of the machine, components, and assemblies. Based on the results, choose the recovery method.
Assess the condition of the machine either independently or by turning to service station specialists for help.
What is needed for a successful renovation
Removing the front brake caliper VAZ 2101-07
To remove the Grant liftback bumper you will need: a set of automotive tools, a Phillips-head screwdriver, rags, rust remover WD-40, restoration components.
The decision on the type of repair is made by the workshop specialist based on the results of a comprehensive diagnostic. If the impact occurred “head-on” at a speed of over 60 km/h, then replacement with a new one is guaranteed. When the scale of the damage is not large, the structure of the plastic fasteners is not damaged - restoration of the standard element is allowed.
Do-it-yourself front bumper removal
- We install the car on a flat platform, an inspection channel. In this case, it is not at all necessary to use an electric lifting mechanism;
- open the hood;
Unscrew the top row of mounting bolts (4 in total), two in the middle, four at the bottom.
First turn the steering wheel to the side for ease of work. We remove the front bumper of the Grant liftback, the dismantling process is completed. Subsequently, the master (car owner) carries out preventive maintenance, replaces the plastic product, and installs additional equipment as necessary.
Algorithm for step-by-step installation of the front bumper
- after diagnostics, prevention of fastening points, we install a new “plastic”, it must be painted in the original color of the car;
- we hang the upper perimeter, then the lower one, followed by snapping the plastic clips;
- Having made sure that the fit is tight, we proceed to fastening it with bolts.
DIY installation is complete.
The concept and purpose of the front bumper amplifier on the Lada Granta
Many motorists practice strengthening the frontal structure of the car in order to minimize possible risks. One way is to install a metal amplifier. It is fixed on standard fasteners in the middle, covering the radiator and fan. A plastic bumper is placed on top of the metal tire. The location of the tire is secretive, invisible to the eye.
In the event of an accident or collision, the metal protection will take the blow, minimizing damage to the engine compartment. In the event of a frontal collision at a speed of no more than 50 km/h, the protection will maintain the integrity of the plastic. The maximum that can happen is damage to the paintwork.
| Catalog article / OEM number | Price, rub.) |
| 21900280313100 | 430 — 460 |
| 21900280313118 | from 450 |
| 21900280313279 | from 450 |
| (21911428459) |
Why do you need to remove the front bumper?
From time to time, for various reasons, the car owner needs to independently carry out some work on the car, which involves removing the front bumper.
- Installation or replacement of lighting fixtures located in the front part of the car.
- Work with electrical wiring.
- Repair and replacement of signaling device.
- Tuning works.
- Bumper straightening, repair or replacement.
- Body painting.
- Installation of sensors, for example, external temperature.
- Installation of additional equipment and devices.
In order to detach the front body kit yourself, the car owner will need the simplest set of tools and auxiliary materials.
Why might you need to remove the bumper?
If everything is relatively clear regarding the issues of dismantling the front bumper, then why such a procedure may be required still needs to be figured out.
Most often, the bumper needs to be dismantled in order to repair it.
Removing the bumper for repair
The fact is that it is made of plastic, so it will be very easy to damage it. And, given some difficulties in welding plastic, the best choice would be to completely dismantle the bumper. In addition, if it is no longer possible to repair it, then you may need to completely replace this part with a new one.
But, in addition to the real need to replace the bumper, its dismantling is also required in situations where you install a new tuned radiator grille or new “horns”.
Installation of “horns” (horn, sound signal) from Volga - cheap and cheerful
In addition, the bumper will significantly interfere with the installation of fog lights. In any case, working with the body will be much more convenient without a bumper.
How to remove the front bumper on a Lada Granta
For a car enthusiast who has driven a Lada Grant, removing the front bumper is a common thing. After all, this is often required to repair or replace the front “whisker”, as well as to access what is behind it, install fog lights, a signal, etc. It is possible to replace the radiator grille or the entire bumper with an improved model that improves aerodynamic characteristics and modernizes the external type of car.
Before you begin dismantling, make sure that all tools are at hand and that access to the front of the underbody is sufficiently clear.
- It is necessary to remove the license plate, behind which there are 2 bolts. They should be unscrewed with a 10 mm wrench.
- Lifting the hood cover, use the same key to unscrew the 6 bolts located under it that secure the bumper and radiator.
- Unscrew the 2 bolts on the fender liners, at the top and bottom of the arch. To be more precise, these are not bolts, but self-tapping screws with an asterisk head. They are unscrewed with a TORX T-20 key. To access them, turn the wheels all the way to the left and unscrew the screws from the right fender liner. Turning the wheels to the right, unscrew the screws from the left fender liner.
- Another 4 self-tapping screws attach the bumper to the fender liners from below - 2 on the left and 2 on the right. They are also unscrewed with a TORX key.
- Using a 10mm wrench, you need to unscrew the 3 bolts securing the part from below. Depending on whether there is an engine guard and how it is installed, you may need to remove 2 more bolts that hold the crankcase cover in place at the front. When they are unscrewed, the cover should not hang on the rear bolts. To prevent the fastening from deteriorating, place an object under the crankcase protection.
- Now the bumper is free, only the latches hold it in place. But you should unhook them carefully, because the plastic can easily break. First unhook the latch on the left side, then also carefully on the right, or vice versa. If fog lights are already installed, be sure to disconnect the connector. Place the part aside to avoid accidental damage.
Necessary tool
Cooking:
- Torx hexagon T-20;
- Phillips screwdriver;
- Wrenches 10: ring or open-end, ratchet with corresponding head;
- Pit or lift.
How to remove step by step
Let's get to work.
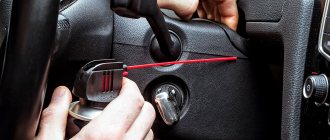
Step 1 : remove the license plate frame from the front bumper - there are 2 10mm bolts under it. Unscrew them.
For bolts, a socket wrench or ten-point socket is suitable. Photo from Drive2 website, Lada Granta MAGMA logbook
Step 2 : open the hood. We unscrew 6 bolts: 4 hold the radiator frame from above, one more to the right and left of the frame.
Use the same head to unscrew the bumper mount from above.
Step 3 : remove the star screws (Torx wrench required) that secure the fender liners. 2 on each side.
If the wheels are in the way, you can turn them one by one to their extreme positions for better access.
Step 4 : from below we find 2 screws (on the right and on the left) closer to the wings - we unscrew them.
We remove the screws either from the hole or by lying under the bumper.
Step 5 : remove the last three fastening bolts from the bottom closer to the protection. If the protection interferes, unscrew the edge that interferes with dismantling.
It is not necessary to remove all protection.
Step 6 : along the edges near the wings, carefully pull the bumper towards you until it comes off the latches.
Are fog lights installed? Disconnect them before work!
Reassemble in reverse order .
How to properly remove the front and rear bumpers of a Lada Granta
Fastening the front bumper of the Lada Granta
There are a number of reasons why the rear and front bumpers are removed. First of all, this is straightening in case of damage to this structure. The bumper must be removed when repairing the car and during painting work.
Some wiring work also requires removing the bumper. Another reason for dismantling the body kit will be tuning the Lada Grant. In the process of tuning a car, you can replace the standard body kit with a more suitable one. Conventionally, the whole process can be divided into three stages.
- To begin, unscrew all the bolts securing the Lada Granta bumper from the top in the engine compartment and the three existing bolts from the bottom.
- It is necessary to unscrew two bolts and remove the license plate. On the sides of the front body kit and in the front wheel arch there are two self-tapping screws that can be easily unscrewed.
- Removing the front bumper requires a little effort, namely: you need to pull the structure away from the fender, since the bumper is located in the grooves of the front fenders.
This is the simple way to remove the front body kit from a Granta. Removing the front bumper on a Lada Granta with your own hands does not take much time and effort. Every car enthusiast can handle this.
Car tuning: sports version
The tuning of the front bumper on a Lada Granta car in a sporty style will not leave indifferent lovers of additional devices. Today there is a considerable selection of tuned spare parts and accessories for every taste and color. This is suitable for those who like to add something of their own to their cars and give them uniqueness and aggressiveness. One of the most popular manufacturers, LSD Flagman, offers a voluminous front bumper that allows you to change the factory appearance of this car to a more sporty design.
This bumper includes a large trapezoidal air intake, the dimensions of which are quite impressive. It has a special mesh that provides excellent protection against external and internal damage and acts as an additional stiffener. Thanks to its thoughtfulness and volume, the engine receives the necessary amount of air for cooling, which allows it not to overheat at high speeds and at very impressive speeds, thereby ensuring longer and more reliable operation of the car’s power unit.
When discussing the LSD Flagman front body kit, you need to pay attention to the air ducts in it, which act as additional cooling. At the bottom of the body kit there is a skirt, the function of which is to capture a certain air flow. The body kit fits the design perfectly and gives the car good dynamic qualities. An important factor when installing such a body kit is to attract the admiring glances of other drivers and passers-by to the car. This type of bumper gives the car recognition and individuality.
In addition to the considerable advantages listed above, it should be noted that this element of the car’s design is made of high-strength materials that are resistant to domestic climatic conditions, as well as endurance to country roads, not very smooth roads, rough terrain, which are not uncommon in our country. In general, it is highly reliable. By choosing this body kit, you can transform and make your car special, different from others. Speaking about this type of front car body kit, we should not forget about the rear body kit, which plays an important role both in safety and in the exterior of the car.
Removing the rear bumper of the Lada Granta
To remove the rear bumper, you need to perform several steps. The first thing you should pay attention to is the rear fender flaps from the bumper. You need to unscrew them. And to do this, you need to separate the two existing screws on the left and right sides of the car. Then you should unscrew the three bolts at the bottom of the rear body kit. To remove it, you need to unfasten the taillights. Dismantling them does not require much effort. They are easy to unscrew from the luggage compartment.
You also need to take into account the fact that there are bolts under the headlights. There are eight bolts around the perimeter of the bumper at the top. For further dismantling, you will need to firmly grasp the corners of the bumper, but at the same time carefully move them towards you, thereby disengaging them. Carefully move the bumper to the side until the wiring harness is visible. The next step is to pull out the wiring harness, and you need to disconnect the wires going to the sign lighting. These are the mandatory points that you need to know when disassembling the rear bumper.
Bumpers are one of the most damaged parts of a car body, which is often the reason for their removal. Tuning the Lada Granta, especially its body kit, allows you to make the car original, unique and easily recognizable in traffic.
General questions about body kit 2190
Let's answer a couple of basic questions about Granta bumpers.
Differences between sedan and liftback bumpers
The principle of working with front and rear bumpers on a sedan and a liftback is the same! There are no fundamental differences.
Why you may need to replace the bumper
Possible reason for replacing the body kit on a VAZ 2190:
- Minor (or major) accident;
- Installation of a non-original body kit;
- Installation of additional devices: emergency parking sensors, rear view camera, etc.;
- Curiosity.
There are many options for non-standard body kits for Lada today.
Non-native body kits are made unofficially. This can lead to problems with joints and color mismatches.
Where to find the front bumper amplifier
Unlike pre-restyling Kalinas, Grant comes with a bumper reinforcement from the factory . Many people confuse it with a regular mount. You will gain access to the part only after dismantling the front body kit.
The amplifier on the Lada is rather symbolic, like the factory crankcase protection. But there is no such thing on Kalina.
Bumper selection
How to replace the front or rear bumper on a Kalina?
If you don’t want to install a tuned radiator grille, but completely replace the car’s bumper, pay attention to what parts manufacturers offer for the Lada Granta. You can replace the front element with one of the following models:
- "I am a robot". Thanks to its design, this model increases the aerodynamics of the car, which, in turn, increases the speed of the vehicle. At the same time, the owner of the Lada Granta does not spend more fuel. In addition, the model is easily fixed to the car's factory mounts. Therefore, you can complete the installation yourself. Of course, we cannot forget about the attractiveness of the detail: the trapezoidal air intake and the underskirt transform the car beyond recognition;
- STM. The design of the model increases the cooling efficiency of the Lada Granta brake system;
- GTS. This model not only increases the aerodynamic characteristics of the car, but also has a unique design. The angular air intake makes the car more attractive and interesting.
If you want to change the car as much as possible and improve its performance, then do not limit yourself to replacing the front element. In addition, install the trim on the rear bumper. Such parts protect the car from scratches, chips and other mechanical damage. All overlays are divided into two types.
- Smooth details.
- Profiled parts with a bend. Many drivers choose these linings because they protect the part from mechanical damage both from the outside and from the sides.
Rear bumper trim
general information
Manipulating the body kit takes no more than 20 minutes, even for a novice auto mechanic. Bolts with soured threads can complicate the situation and prolong the work time. Most often this happens with the four screws that secure the radiator and body kit. The bolts sit as if rooted, and it takes no effort to move them. In such cases, a penetrating lubricant such as WD-40 comes in handy. It must be applied in advance, right under the bolt head. After a short period of time, the lubricant will do its job, and the screw will easily unscrew.
When installing the body kit, it is recommended to lubricate the screw threads with grease or grease, such as “Universal” or “Mobile”. Thanks to this treatment, it is possible to avoid souring and corrosion of fastening joints. This will make it easier to remove the bumper again and extend the life of the screw elements.
A removed body kit is a good reason to inspect devices and parts to which access was denied. Check the condition of the wires, fasteners, inspect the power bumper, etc. If rust is detected on the body, the area is treated with anti-corrosion treatment. This will prevent further damage and hole formation.
Purpose of headlights
A car headlight is designed to illuminate the cavity of the front and side parts of the road surface. It provides the necessary visibility and also performs road safety functions.
Lada Granta headlights, in accordance with international automotive legislation, have passed all the necessary tests and received certificates and licenses that make it possible to carry out international traffic in any country in the world.
Reasons why headlight removal may be necessary
The reasons for removing the headlight on a Lada Grant can be many factors, namely:
- Damage to the structure of the surface or body due to an accident, as well as exposure to external factors.
- Dismantling for repair of adjacent parts.
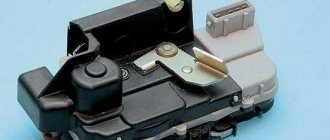
Disassembling the headlight for repair
- Restoring the surface or soldering fasteners.
- Replacing the headlight.
Tuning headlights for Lada Granta
All these or other factors contribute to the need to remove the Lada Granta headlight.
Types of headlights for Lada Granta
There is an original headlight and several of its analogues, which can be used as an alternative or tuning optics. Let's look at the catalog numbers and descriptions for all:
- The original Lada Granta headlight has a catalog number - 21900-3711010-00. It is easy to remove and install, and does not require special knowledge for this.
- The closest analogue with xenon lenses from, which is not widely used, is 21901-3711010-90. This is the same original headlight, which was already initially made by the factory for the installation of xenon. The price is 15% more expensive than the original.
- Optical tuning. In order not to redo the headlight mounts, I released two analogue models. The first has integrated LED turn signals and daytime running lights. Catalog number – DM-171052. The second option has different lenses for low and high beam, and the headlight edging itself has LED backlighting in blue, green or white. Listed in the catalog under number DM-171118.
A special mention is worth mentioning such a useful modification as installing a lens in the headlight unit.
Installing a lens into a standard headlight
Thus, it can be seen that there are several options for standard headlights on the Lada Granta, which do not require alteration of the mounts for removal and installation.
Reasons for removing headlights
There are a number of reasons why the owner of a Grant will need to remove the headlights on his car. These include:
- The occurrence of disturbances in the surface structure or in the body of a part that occurred as a result of a traffic accident or due to exposure to environmental factors.
- In the case when removing the headlights is necessary to repair any adjacent part.
- When restoring the headlight surface or when performing soldering work on fasteners.
- Directly when replacing them.
All of the above factors are a valid basis for dismantling headlights.
Reminder
To remove the front/rear body kit, it is better to use a lift; You will need: a Phillips screwdriver, a 10mm socket wrench, a 20/30 Torx sprocket, a ratchet with a set of sockets; Simple, but important: wash the car before work, since we will be tinkering with the dirtiest part of the car; After dismantling all mounting points, check and disconnect all wiring, such as PTF, license plate lights or parking sensors.
Do you like working with Granta? See other articles. For example, how to install acoustics yourself.
Write comments
This is important - otherwise we will miss details or lose motivation
Domestic cars have finally become truly modern vehicles, the quality of which meets all the latest standards. However, breakdowns also occur on modern cars.
Technological process of removing headlights on Grant
Many car owners are wondering: how to remove the headlight of a Lada Grant? Easier than it seems. To begin with, you will need two keys from the tool - 8 and 10. And now you can go directly to the process itself:
- To begin with, we remove the “negative terminal” from the battery so as not to accidentally short-circuit anything.
- We are dismantling the front bumper, since it is impossible to get to the lower mount otherwise.
We removed the bumper and took out the headlight (I ran a little ahead)
- Now we disconnect the clamps of the direction indicator lamps and daytime running lights.
- Counterclockwise, we dismantle the cover of the main light (more details in the material on replacing the low and high beam lamps) and gain access to the inside of the headlight.
- Remove the wire clamp from the low and high beam lamps.
- We dismantle the headlight hydraulic corrector by turning it counterclockwise.
We remove the hydraulic corrector unit (it doesn’t work for me and the hose is cut off, you can see in the photo)
- Now you can unscrew the 4 bolts securing the headlight and carefully remove it.
It is worth remembering that when the lower mounts are removed, the optics should be held so that the upper “ears” do not crack under load when dismantling occurs.
Lada Granta bumper repair
Removing the front bumper Grants
I decided to make detailed instructions for removing the front bumper of the Lada Granta. True, the Internet is full of all sorts of manuals, but still. Maybe someone will find the manual from me useful.
So, what tools do we need:
1. Open-end or socket wrench 10 mm. You will also need a 10mm socket. with ratchet. 2. Phillips screwdriver. 3. TORX T-20 key. You can't do without Torxes; you can't do without them on Grant.
We remove the bumper in the following sequence:
1. Unscrew the front license plate. 2. There are two bolts under the sign. 10 mm head. unscrew these bolts.
3. Unscrew the six bolts securing the bumper and radiator grille.
4. Using a TORX T-20 wrench, unscrew the 4 screws (2 pieces on each side) securing the fender liners to the front bumper. For convenience, you can turn the wheels all the way.
5. Next, you need to unscrew 4 more screws located at the bottom using the same TORX T-20 key.
6. Then you need to unscrew the last three bolts from the bottom.
Note: If you have a crankcase guard installed like I do, it will interfere. You don't have to remove it completely. You just need to unscrew the two bolts under the bumper and place something under the protection so that the rear ears do not bend. In my case, these are two empty milk cartons. After all the bumper fasteners are unscrewed, you need to release the edges of the bumper from the latches on the wings. To do this, you need to carefully pull the bumper towards you from the edges. If your car is equipped with fog lights, then before removing the bumper, you must disconnect the connectors from them. Reassemble in reverse order.
But this is a scary view without a bumper.
Lada Granta front bumper repair
Because I don’t yet have the free funds to repair the bumper, but I also didn’t want to drive with such a crack. Therefore, it was decided to try my hand at self-repair. To do this, I needed a 100-watt soldering iron and a metal mesh from a VAZ 2101-2106 air filter purchased for 40 rubles. The bumper was removed and washed. First, I used small tacks to level and join the edges of the crack, then I carefully soldered the entire seam from the inside, and then placed and soldered a metal mesh over the seam. I'm quite pleased with the result. The crack is practically invisible from a distance of a couple of steps.
But in the summer, maybe I’ll still decide to buy RAZOR, I really like it.
DIY rear bumper repair Lada Granta
The first set of May holidays have passed. And they didn’t go in vain. Hello to all subscribers and those who accidentally visited me
The weather was kind, so all the work took place at the dacha, combined with eating a baked goose in the oven and washing in the bathhouse. This is what the bumper looked like before work began:
Somewhere it got caught and broke the bumper mount
It was not possible to remove the bumper without unscrewing the rear wheels, but I wanted to avoid this. Well, of course, you need to remove the rear lights since the bumper mounting bolts are located under them. You need to be careful with the lanterns so as not to break the clips with which the lanterns are also attached. To avoid breaking the clip, pull the flashlight back after unscrewing all the nuts. To the side, as if you were driving in reverse.
here is the clip itself, on the left side of the photo
To carry out the work, the following tools were required: a soldering iron, scissors, a tape measure and a stationery knife, and also pliers for cutting wire.
Materials for bumper repair: 40 cm wire and copper mesh.
wire with a cross section of 2.5 sq. mm and copper mesh
In this way I removed the insulation from the wires.
the knife is in place, I pull the wire, the insulation is cut.
I cut the bare copper wire into pieces 15-20 mm long; don’t go any longer, otherwise the wire will take longer to heat up.
Then the renovation began. We lay the bumper so as to connect the crack as tightly as possible. Place a piece of wire across the seam and heat it until it sinks into the plastic.
This is how the seam turned out. I placed pieces of copper mesh along the edges of the crack. so that the crack does not spread further.
Then I started repairing the broken bumper fastener. I connected the broken part to the bumper and temporarily secured it by soldering it with a piece of wire.
I cut the copper mesh to the required size and began soldering it into the plastic using a soldering iron. I soldered the mesh on both sides of the fastener for reliability. Now if the bumper breaks, it will break somewhere else, not at the seam. This is what the repaired fastener looks like.
The entire bumper is ready and installed in place.
If you want to achieve the ideal, then you now need to clean the crack from the outside, solder the entire seam with a soldering iron, putty it and paint it. No one will see the difference.
https://www.drive2.ru/l/4497330/, https://www.drive2.ru/l/5198811/, https://www.drive2.ru/l/6534042/
Results
In general, the process of dismantling the Lada Granta bumper is not very complicated. You just need to keep in mind that you are working with a fragile material that can break very easily. To prevent this, never leave the bumper without support, especially when it has already lost some of its fastenings.
In addition, you do not need to pull the bumper too much. If it doesn't snap off, it means something is blocking it. You can find out by once again inspecting all the fastening points.
And, of course, the help of another person will not be superfluous, with whom the chance of breaking the bumper will be much lower.
Sources
- https://o-ladagranta.ru/kak-snjat-perednij-bamper-na-grante-video/
- https://carfrance.ru/snimaem-perednij-bamper-na-lada-granta-svoimi-rukami-video-i-foto/
- https://InfoKuzov.ru/kuzov/zamena-bampera-lada-granta
- https://ladaprofi.ru/lada-granta/kak-samostoyatelno-snyat-perednij-bamper-na-lada-granta.html
- https://car-fact.ru/marki-i-modeli/otechestvennye/lada-granta/granta-bampery.html
- https://umelyeruki.info/avto/zamena-perednego-bampera-lada-granta/
- https://carfrance.ru/snimaem-faru-na-lada-granta-svoimi-rukami/
- https://new-granta.ru/kak-snyat-i-samostoyatelno-ustanovit-fary-na-lada-granta/