Heating severs operates from 220 V. It is connected to the engine cooling system, fluid circulation occurs by changing the heating temperature of the fluid.
Severs M 1.5 kW, At -30, heats engine coolant to 50 degrees in 25 minutes
Prepare: tools – wrenches; screwdriver (for tightening clamps); sealant type "Avtosil" (for sealing threaded connections); socket head for size 32; knife (for cutting hose); coolant (coolant) in the amount of 1 liter; container for draining coolant.
Cut the rubber sleeve into lengths: output sleeve L2 = 480 mm; inlet sleeve L1 = 190 mm.
Secure the bracket to the heater with studs through the bushings using washers and nuts
Place the sleeves on the corresponding heater pipes and secure the connections with clamps.
Install the spring from the kit into the inlet sleeve.
Remove the Gazelle Next engine protection.
Disconnect the air intake pipe.
- Coolant temperature sensor: where it is located, how to check and replace
Provide access to the plug in the engine head: disconnect the inlet hose from the engine; Unscrew the fastening of the interior heater pipe at the rear of the engine; disconnect the interior heater pipe hose from the engine; Unscrew the oil dipstick tube.
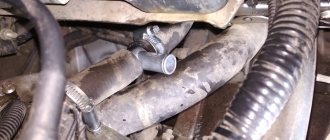
Unscrew the plug from the engine head (the location of the plug is indicated in Fig. 3 by arrow B).
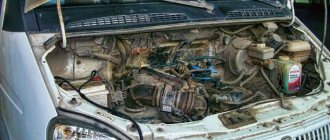
Attach the bracket with the heater to the frame, as shown in Fig. 2. Arrow A points to the bracket mounting bolt.
Cut the lower radiator hose (see Fig. 2 and 4 arrow B).
Install the tee with clamps into the hose section with the side outlet directed towards the heater. Secure the tee with clamps.
Remove the sealing ring from the unscrewed plug from the engine head and put it on the fitting from the kit.
GAZ 31 406i › Logbook › Replacing the radiator, installing a 220V preheater
Nizhny Novgorod, Russia
Greetings to all who stopped by!
Made some minor repairs to my cart.
Since the old radiator was leaking, I decided to replace it. I bought inexpensive Iranian aluminum.
I don’t think it’s worth describing how I changed it. He fell into place without any questions and did his job.
There was nothing difficult about the installation.
I also wanted to install an expansion tank from 31105 for a long time. I found drawings of these brackets on the net and cut them out of a tin of PC case.
I installed everything, connected it, laid the wire, filled it with antifreeze and checked it)))
The heater operates at a temperature of about 50-60 degrees.
It turns off and, as soon as it cools down, turns on again.
When the frost hit -25, I carried out a test. I turned on the heater, covered the engine with a blanket and left it to warm up.
After 1.5 hours I turned on the electric pump, pumped up the antifreeze and the temperature settled at +5 degrees. Seems not bad.
(It’s a pity the frosts ended and for the rest of the winter incl.
didn't have to anymore).
Operating principle
The operation of an electric antifreeze heater is based on a heating element. It heats antifreeze from a battery or 220V power supply.
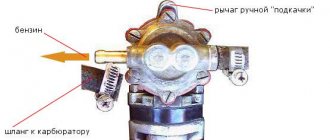
The principle of operation of the boiler is to connect to a 220V electrical network, as a result of which the substance in the body heats up. Heating the temperature of the liquid, in turn, increases the pressure. The valve closes the supply suction pipe; when heated, the liquid enters the outlet pipe. When the pressure in the engine decreases, the valve opens and allows the product to enter it through the inlet pipe.
Thus, the effect of targeted thermosiphon circulation from the heater to the cooling system appears. The thermal regulator automatically regulates the liquid temperature, which completely eliminates the risk of boiler overheating.
Design of the cooling system for UMZ-4213 and UMZ-4216 engines on UAZ and GAZelle vehicles.
To increase energy performance, improve fuel efficiency, reduce toxicity and noise, models with an integrated microprocessor fuel injection and ignition control system were developed on the basis of the UMZ-421 carburetor engine: the UMZ-4213 engine for UAZ cars and the UMZ-4216 engine for GAZelle cars. The design of the cooling system on the UMZ-4213 and UMZ-4216 is somewhat different, since it has differences in the connection diagram of the expansion tanks and heating radiators.
General design of the cooling system of UMZ-4213 and UMZ-4216 engines on UAZ and GAZelle vehicles.
The cooling system is liquid, closed, with forced circulation of liquid and an expansion tank, with liquid supply to the cylinder block. Includes a water pump, thermostat, water jackets in the cylinder block and cylinder head, radiator, expansion tank, fan, connecting pipes, as well as body heating radiators.
For normal operation of the UMZ-4213 and UMZ-4216 engines, the coolant temperature must be maintained within plus 80-90 degrees. It is permissible to operate the engine for a short time at a coolant temperature of 105 degrees. This mode can occur in the hot season when driving a car with a full load on long climbs or in urban driving conditions with frequent accelerations and stops.
Design of the UMZ-4213 engine cooling system on a UAZ vehicle.
Design of the UMZ-4216 engine cooling system on a GAZelle car.
Operation of the cooling system of UMZ-4213 and UMZ-4216 engines on UAZ and GAZelle vehicles.
Maintaining normal coolant temperature is carried out using a two-valve thermostat TS-107-01 with a solid filler. When the engine warms up, when the coolant temperature is below 80 degrees, a small circle of coolant circulation operates. The upper thermostat valve is closed, the lower valve is open.
The coolant is pumped into the cooling jacket of the cylinder block by a water pump, from where, through holes in the upper plate of the block and the lower plane of the cylinder head, the liquid enters the head cooling jacket, then into the thermostat housing and through the lower thermostat valve and connecting pipe to the inlet of the water pump. The radiator is disconnected from the main coolant flow.
For more efficient operation of the interior heating system when circulating liquid in a small circle, and this situation can be maintained for quite a long time at low negative ambient temperatures, there is a throttle hole with a diameter of 9 mm in the liquid outlet channel through the lower valve of the thermostat. Such throttling leads to an increase in the pressure drop at the inlet and outlet of the heating radiator and more intense circulation of liquid through this radiator.
In addition, throttling the valve at the liquid outlet through the bottom valve of the thermostat reduces the likelihood of emergency overheating of the engine in the absence of a thermostat, since the shunting effect of the small circle of liquid circulation is significantly weakened, so a significant part of the liquid will go through the cooling radiator.
Additionally, to maintain the normal operating temperature of the coolant during the cold season, UAZ vehicles can have shutters installed in front of the radiator, with which you can regulate the amount of air passing through the radiator.
When the liquid temperature rises to 80 degrees or more, the upper thermostat valve opens and the lower valve closes. The coolant circulates in a large circle through the radiator.
For normal operation, the cooling system must be completely filled with liquid. When the engine warms up, the volume of liquid increases, its excess is pushed out due to increased pressure from the closed circulation volume into the expansion tank. When the temperature of the liquid decreases, for example after stopping the engine, the liquid from the expansion tank, under the influence of the resulting vacuum, returns to a closed volume.
Installation methods
The method of installing the device can be very different, so you should carefully study the instructions before starting installation. For many models, when inserting, it is necessary to strictly observe the placement of the device relative to the engine. Otherwise, the circulation of liquid (especially in gravity models) may be disrupted and the device will not be able to fully perform its functions.
Let's look at the most common methods of installing pre-heaters on cars. Since the “Start” model is structurally and externally identical to the “Start M” versions (the difference is only in size and power), we will consider installation using the example of the latter (they are often preferred by car owners).
Installation of the Start M engine heater according to the instructions is carried out in a parallel circuit. The peculiarity of this scheme is that antifreeze is supplied for heating from the cylinder block.
To do this, instead of a drain plug, a special adapter fitting is installed on the block. In some cases, a plug on the block can be used for supply (in some kits with a heater there is an identical plug, but with a hole for a fitting). The heated liquid is drained into the upper pipe leading from the radiator to the engine.
In this case, certain rules must be followed in order for the heater to function normally after installation:
- The instructions for installing the “Start M” heater stipulate that the device should be located at a lower level than the point of intake (below the drain plug or plug, instead of which the fitting is installed);
- The supply and discharge pipes must have a slight slope, and they are not allowed to have kinks or humps (as a result, circulation is disrupted);
- The position of the device relative to the engine is only horizontal (a tilt of no more than 15 degrees is allowed), while the outlet pipe must be directed upward;
Start Turbo heaters, since they have a pump in their design, do not require such harsh installation conditions, since liquid circulation is forced.
The installation method is selected depending on the purchased kit. Thus, the “Universal No. 1” set is intended for installation according to a sequential circuit.
This method implies that the device cuts into only one pipe - the supply or discharge of coolant to the heater radiator. That is, for installation it is enough to cut the required tube, install the heater into this cut and secure the connections with clamps. After this, you need to vertically attach the device using a bracket to the engine.
But the “Universal No. 2” set contains all the necessary elements for inserting into the system in both serial and parallel ways. As for the second method, some drain the heated antifreeze not into the upper radiator pipe, but into the pipe supplying the stove.
As for the “Start Classic” heater, its installation does not differ from the installation of the “Start M” model with only one difference - the device must be positioned vertically (with a slight tilt angle possible).
All other models - M1, M2, MP, since they are flow-through, they are installed only in a sequential manner and they cut into the pipes leading from the radiator.
RECOMMENDATIONS FOR INSTALLATION OF ELECTRIC ENGINE HEATER Severs 1.5 kW 220 V ON GAS CARS with engines 406, 405
This installation manual serves to ensure the installation of the SEVERS heater (103.3741) and its modifications, hereinafter referred to as the “heater,” on GAZ vehicles with engines 406, 405 when using installation kit No. 6.
General preparation
Prepare: tools – keys, screwdriver (for tightening clamps); sealant or sealing tape (for sealing threaded connections); coolant in the amount of 1 liter; container for draining coolant with a volume of 7-10 liters.
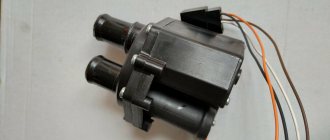
Preparing the heater for installation Cut the rubber sleeve into lengths: first of all (outlet sleeve) L 2 = 220 mm; remainder (inlet sleeve) L 1 = 430 mm. Secure the bracket to the heater with studs (M5x45 bolts) using washers and nuts (see Fig. 1).
Place the sleeves on the corresponding heater pipes and secure the connections with clamps. Install a spring L = 200 mm into the inlet sleeve so that it rests against the inlet pipe of the heater.
Preparing the car engine Open the drain valve and drain the coolant. Unscrew the emergency temperature sensor from the cylinder head and the drain valve. Clean the holes. Remove the upper right engine mount bolt (see Fig. 1).
Installation of the K1/4″ fitting Apply sealant to the thread of the fitting, or seal it with tape. Instead of the drain valve, screw in the K1/4″ fitting.
Heater installation Secure the bracket with the heater with a bolt with spring and flat washers.
Installation of the temperature sensor and adapter Wipe the thread of the temperature sensor and apply sealant or sealing tape to it. Screw the temperature sensor into the axial hole of the adapter. Apply sealant or sealing tape to the male threads of the adapter. Screw the adapter into the hole for the temperature sensor so that the side hole is directed towards the heater.
Installation of the K1/4″ fitting Apply sealant to the thread of the fitting, or seal it with tape. Screw the K1/4″ fitting into the side hole of the adapter.
Connection of the heater to the engine cooling system Place the inlet hose onto the K1/4" fitting of the adapter and tighten it with a clamp. Place the clamp on the outlet sleeve. Insert spring L =150 mm into the outlet sleeve. Place the outlet hose onto the fitting, sealing the connection with a clamp. Fill the cooling system.
Fixing the power cable The power cable should be laid and secured with ties or in another way that ensures the safety of the wire from mechanical damage, so as to exclude the possibility of its contact with moving and heated parts of the engine. For heaters that have a detachable connection on the power cable, it is necessary to connect the connectors and securely fix (see above) sections of the wire near this connection to prevent disconnection during vehicle operation.
How the stove works in Gazelle Business
For correct diagnostics and repairs, it is necessary to know the structure and operating principle of the heater in order to diagnose a breakdown or carry out repairs at the first sign of a malfunction, preventing failure of the entire unit as a whole. Most faults can be predicted by indirect signs and their progression can be prevented. To do this, you need to know and understand what each element is responsible for and what the principle of its operation is.
Car cooling system
In Gazelle Business the stove is an integral part of the engine cooling system. When the engine operates, a large amount of heat is generated that must be removed. Heat is released due to fuel combustion and from rubbing surfaces. If the heat is not removed, the engine will heat up very quickly and fail. The cooling system has two circuits (small and large circle), they are separated by a thermostat. When the liquid is cold, it circulates in a small circle, and when it warms up, it circulates in a large circle. This allows you to quickly reach operating temperature and not overheat. During the warm season, heat is released into the atmosphere, and when cold weather sets in, part of the heat is spent on heating the cabin.
Heating
After we have figured out how the cooling system works, we can move on to heating the interior. The heater circuit on a Gazelle car is identical to the heaters of other cars that have a liquid-cooled engine. Fluid can circulate through the heater core whether the thermostat is open or not. For better heating, the heater fluid comes from the hottest part of the engine (the cylinder head). Therefore, on an engine that has not yet reached operating temperature, warm air still comes out of the deflectors. The heater has a valve in its design that either allows liquid to flow into the radiator or dumps it back. And the temperature of the air leaving the deflectors depends on how much it is open. The valve position is adjusted from the heater control panel. The faucet is equipped with an electric drive that changes the position of the valve. It is also possible to change the blowing intensity and direction from the control panel. The intensity is controlled by a motor with an impeller, the rotation speed of which changes the intensity of the airflow.
Changing the position of the dampers changes the direction of the airflow (to the face, to the legs, to the chest, to the glass). The heated coolant from the engine enters the heater radiator through the highways, causing it to heat up. At this time, air blown by a fan passes through it. Then it passes through air ducts, the dampers of which are open. The hot air then enters the car interior and heats it. To repair or diagnose a malfunction of this equipment, there is an electrical diagram that shows all the components of the electrical devices. And in case of breakdowns or incorrect operation of devices, it is necessary to read it in detail in order to understand where it is powered from and how the failed device is regulated.
When you know the principle of operation and the device, it is much easier to navigate in case of breakdowns. After all, to successfully carry out repairs, it is important to understand the cause of the malfunction, otherwise the repair will not be completed successfully. For correct diagnosis, it is also important to understand the algorithm of operation of the entire mechanism as a whole. Currently, a driver does not have to know how to repair a car; there are service stations that can handle repairs of any complexity. But it happens that a breakdown catches you on the road, and there is no opportunity to use the services of specialists. This is when knowledge of the structure of a car and its mechanisms comes in handy. When you know how the Gazelle stove works, then if a malfunction occurs on another car, it will be easier to navigate when repairing or diagnosing, since in all cars they are almost the same, with the exception of small nuances. And you can easily diagnose the problem.
Owners' opinions
Reviews of Gazelles with Cummins engines show that many purchased this car because of the desire to have a diesel engine. Some were confused by the production in China, but given the reputation of the American company, they still purchased the car. Buyers are not disappointed; the engine met their expectations. There are few negative reviews; some honestly indicate that this or that problem arose due to improper use.
Owners of new Gazelles with Cummins describe their first impressions, in which they note that the car is not inferior to foreign cars of a similar class, but costs much less. Pay attention to the good engine thrust, low noise and vibration levels even after a cold start. After a short period of operation (a month or two), they write about the absence of oil and coolant leaks. The engine has no loose mounts and is in excellent condition.
Owners of cars that have undergone maintenance note the convenience of changing the oil, which does not require removing the engine protection, as well as the constant availability of consumables. Prices for them and for maintenance are quite affordable. Some authors with longer experience in operating a Gazelle with a Cummins engine indicate that they have never used the warranty during its entire period of validity (two years). Efficiency is also confirmed - fuel consumption is 10–12 liters per 100 km. Post-warranty repairs, if you have to do them, are also not too expensive.
The reviews provide advice on winter use. The ease of starting the engine in frosts of 20–25 °C is noted. But you should prepare the battery for the cold season in advance - check the level and density of the electrolyte, cover the terminals with a protective layer, charge if necessary.
The manufacturer recommends using oils with a viscosity of 5W-40, 15W40 and changing them every 15 thousand kilometers. These are all-season oils: the lower the first number in the designation, the lower the viscosity. In cold weather it is better to use 5W oil, while 15W is more suitable for summer. When working with low quality fuel, you should change more often than the manufacturer recommends.
Starting the engine at low temperatures is made easier by using a preheater. It is recommended to check its operation at the beginning of the season. However, not all advice in reviews should be followed. For example, there is advice online to “fill the starter and battery with low-viscosity oil.” The author either made a mistake or does not understand very well what he is writing about. The starter is lubricated for its entire service life at the factory.
This is what the starter for the Cummins isf 2.8 engine looks like
Types of heaters 12V and 24V
For travelers and long trips for cargo transportation, it is acceptable, and sometimes simply irreplaceable, not a stationary one, but a vehicle network in the cabin - electric heaters, powered from the mains, or autonomous (on-board):
An autonomous 12V or 24V heater is installed only in the power supply system or also in the cooling system. The advantages of this type are installation where it is best for the motorist. During production they are not built into the vehicle.
Autonomous devices are equipped and equipped with a remote control. Modern models are controlled from mobile communication devices. The latest models are controlled from a fairly significant distance using GSM (control via auto electronics). This is for devices that operate on 12V and 24V. It is possible to use smartphones and a number of different devices for these tasks, which is undoubtedly a huge plus in favor of convenience when using such a device.
Advantages of 12V and 24V units:
The disadvantages include:
Both types of heaters are installed independently or in automobile service centers.
What is the device for?
Previously, drivers resorted to extreme methods of warming up cars and trucks. To do this, they used open fire sources, electric stoves and other devices that emitted even the slightest heat. But these methods were not only ineffective, but also unsafe.
Over time, engineers have developed new electrical devices designed specifically for preliminary preparation of the engine for starting - 220V engine pre-heaters with a pump. This device is mounted in the engine cooling system. It carries out forced circulation of the coolant in the form of heated antifreeze, which significantly reduces the warm-up time.
Pre-heater operation diagram
Let us remind you that the leading places in the rating of heaters are occupied by variations that include a pump. The fact is that devices with natural circulation warm up the car much longer - from 40 minutes, while devices with a pump require from 20 minutes at average temperature weather conditions.
The engine preheater with a pump operates on a voltage of 220 volts. Most drivers consider this nuance to be a disadvantage, since it is difficult to find a parking space where it is possible to connect to the electrical network. But the main advantage of the device is that it has a simple installation scheme, so even an inexperienced user will not have any difficulties with the task of installing an engine pre-heater. But if the car owner is not confident in his capabilities, it is better to use the services of a specialist.
A heating element and a pumping system are installed in the 220V engine preheater. These are the two main parts in an electric heater.
There are two types of devices:
The housing of the pre-heater with a pump has 2 outlets for installation to the cooling system of the 220 engine. High-quality sealing of all joints is ensured by a set of gaskets and clamps. This eliminates the possibility of any coolant leaks.
When operating an electric engine preheater, no harmful substances are released into the atmosphere, so it belongs to the category of environmentally friendly devices.
VIDEO: LUNFEY - engine pre-heater from 220V
Principle of operation
In the car market you can find various modifications of foreign or domestic manufacturers. But despite this, the design of the devices has virtually no technical differences. All variations of the electric engine preheater for diesel or gasoline operate according to the same principle:
The main feature of modern engine preheaters is that there is no need for installation in the lowest area of antifreeze passage. The device is connected to the mains using a cable with a traditional household plug. After warming up, the wire is folded into the engine compartment.
After turning on and starting circulation of the heated antifreeze, part of the heat is transferred to the interior
The cable must be properly secured after use to completely eliminate the possibility of damage or getting caught in moving parts of the car.
Most models are equipped with a thermostat. Thanks to this element, the temperature of the antifreeze is controlled and it does not boil during heating. When the temperature reaches 60°C, the thermal switch sends a signal to stop the operation of the equipment and it turns off until the temperature drops, after which it restores the maximum operating mode.
Installation recommendations
The connection diagram for an electric preheater is quite simple; the main thing is to study the design of the equipment in detail and follow the recommendations of specialists. Also, the installation principle depends on the type of cooling system. On some car modifications there is no need to drain the antifreeze.
Installation diagram of PPPD 220V
In rare cases, difficulties arise with the process of cutting into the cooling system. The issue can be resolved by purchasing additional clamps and a special pipe of the required size.
The heater can be connected to a radiator inlet, a liquid pump and other components. It is very important in this task to completely eliminate the possibility of antifreeze leakage.
Pay special attention to the safety of operating the engine preheater. The source of the electrical network must be equipped with high-quality grounding. It is not possible to create such conditions in an open parking lot or in the yard. In this case, experts advise installing emergency shutdown parts. This method will avoid the possibility of an engine fire or electric shock to a person.
Recommendations for choosing a boiler
To figure out which 220V boiler to choose from the entire variety of models on the market, it is important to consider the following factors:
The boiler is manufactured with the following power gradations:
The period for heating is selected individually, experimenting and choosing. Decisive factors:
Now boilers are made of square-shaped plastic.
On average, the boiler heats up for 40-60 minutes. In this case, it is important that the engine is hot, but the liquid does not boil.
You need to buy a boiler only from trusted commercial manufacturers of this type of product.
You can purchase the boiler on the manufacturer’s websites, in specialized retail outlets or at the car market.
Due to the wide range and many models, the device is selected for cars, trucks, and SUVs.