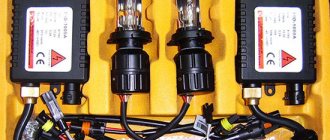
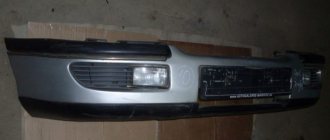
Installing bi-xenon on a VAZ 2106 Many articles have been written about the advantages of xenon, we will not dwell on this, but will immediately move on to installation. There is nothing difficult in installing xenon lamps, and absolutely any car enthusiast can cope with this task, while saving their finances at the service station. This is what a set of xenon lamps looks like:
For installation we will need: 2 bi-xenon lamps (low and high in one headlight) for an H4 base, 2 ignition units, wiring. All this comes included. The temperature of the lamps to suit your taste.
Our advice: 4300, 5000 K°. Yellowish light better illuminates the road in any weather conditions.
Lamps are installed in external (low beam) headlights.
Remove the decorative frame of the headlights by prying it from below with a screwdriver
Unscrew the three bolts of the headlight holder and remove it by twisting.
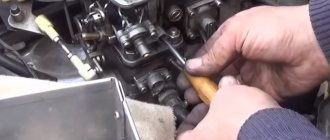
We disconnect the old lamp from the headlight and insert the xenon one.
During installation, a problem arose in the xenon base (you may well not have one)
If you have the same problem, then simply use pliers to pinch the edges on the cartridge
You also need to insert the lamp correctly: with the reflector down, so that the lamp is directed towards the top
We inserted it, fixed it, and did similar manipulations with the second headlight.
Let's move on to the connection.
Since the xenon lamp is much larger than the halogen lamp, we need to free the inside of the headlight from the wiring and move it under the hood
We cut with reserve.
We cut, pulled out the wires and twisted them in the same way according to the colors under the hood. Do not confuse the positions of the contacts in the plastic base. The xenon wire input will be inserted into it. The same thing happens with the second headlight, but now we DO NOT NEED . It's easy to insulate them well.
There is a hole in the sidelight for wiring. We thread the wires of our xenon lamp there. (for convenience, you can remove it from the headlight)
If the hole is small, then widen it with a drill, or whatever comes to hand
Now we install the ignition blocks. We screw the fastener to the wing using self-tapping screws and insert the block into it (you can immediately screw the ground wire to it from the wiring that came with the kit)
After installing the blocks, let's move on to connecting them. Everything here is quite simple, it’s difficult to make a mistake, since all the plugs are of the “male-male” type with “foolproofing”, otherwise there is no way to insert them correctly.
Then we insert the xenon plug into the socket that we moved from the headlight
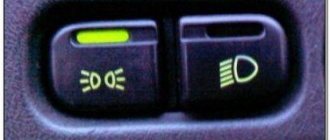
If you did everything correctly, it should work. When you turn on the low beam, the lamp lights up for about 5 seconds, then stabilizes; when switching to high beam, the retractor relay clicks, the lamp retracts and changes focus in the headlight. A few more points about installing the headlight in the sidelight. The longitudinal center of the lamp should be in line with the arrow on the headlight glass (it is barely noticeable, but still there)
As mentioned above, the lamp is installed with the reflective base facing down.
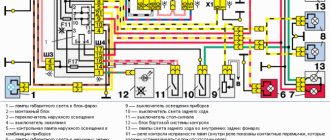
After installation, you need to adjust the luminous flux (there are a lot of articles on this topic on the Internet), for this there are two bolts
1 – top – down, 2 – left – right. The main thing is to set it so that the light from your headlights does not blind oncoming drivers, but does not shine up to your feet. That's all!
If you have any questions, write to us! Easy installation and good luck on the roads.
About self-installation of xenon on a VAZ 2107
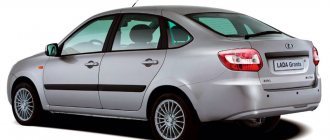
The quality of standard light on domestic VAZ 2107 cars does not suit everyone, so it is not surprising when more and more cars with bright headlights are seen on the road. To improve the quality of lighting, various methods are used - installing more powerful halogen or LED lamps, as well as xenon and bi-xenon elements. One of the popular options for improving the quality of headlights is installing xenon on a VAZ 2107. We will find out in detail how to implement this.
The device of block headlights VAZ 2107
On a VAZ-2107 car, the front headlight units are plastic boxes, the front side of which is often made of glass and has a rectangular shape.
There are also those where the front side is made of plastic. Each option has its pros and cons. Glass headlight block. The main advantage of this material is the maximum reflective effect, which is achieved by applying ribbed surfaces inside the device. Another advantage is that it is virtually impossible to scratch. There are also disadvantages to the glass surface:
- when the slightest crushed stone or gravel hits the glass, a crack will form;
- destruction due to stronger physical impact;
- impossibility of fastening with screws.
Headlight made of transparent plastic. So, a plastic device has less focusing properties, but is already quite widely used in the domestic and foreign automotive industry. The main advantage is the fracture resistance; small stones are not able to break through the front coating of the lighting device. Therefore, many drivers, due to this property, choose plastic material. Disadvantages include the possibility of easy scratching, which negatively affects the reflective properties.
The headlights on the VAZ 2107 are plastic boxes with a front side made of glass or durable transparent plastic.
Glass headlights are scratch-resistant and provide better, more focused light output. But glass breaks easily when hit by stones and physical impact. Plastic has less focusing properties and is scratched. But it has greater fracture strength and small stones are unable to damage it. This is why many car owners prefer plastic headlights.
Inside the headlight unit there is a 12-volt lighting lamp with two filaments for low and high beam, a side (parking) lamp and a turn signal lamp. The latter is also intended for emergency signaling.
The lamps are inserted into sockets, and behind them there is a reflector that focuses the light and directs the beam onto the road surface.
The VAZ 2107 headlight has an important detail - a hydraulic corrector. When heavily loaded, the front of the car, and with it the headlight beam, lifts up. The hydraulic corrector changes the vertical angle of the headlight, which allows you to adjust the angle of the light flux and direct it down onto the canvas.
The back side of the headlamp has a cover, which is used to replace burnt out lamps.
What does it consist of?
Inside the device has lighting lamps that are powered by a constant voltage of 12V. The main lighting function is performed by a halogen lamp type AKG 12-60+55 (H4). By design, it has two spirals, which make it possible to switch between high and low beam types of lighting. There is also a lamp type A12-4-1 (T4W1), the purpose of which is to provide the car with side light. The design of the headlight also includes another type of lighting, which is intended for two types of lighting: emergency signaling, and giving a light signal for turning right or left.
All these types of lamps are connected to a socket, which actually provides 12V power. Inside the headlight there is also a reflector, the main function of which is to focus the light flux in one direction. Without a reflector, the light will not be scattered onto the road surface, but will only illuminate the inside of the device.
One important device that is added to the VAZ-2107 is a hydraulic corrector. Many drivers sometimes do not know why the transparent tube is connected to the headlight and what functions it performs. The hydraulic corrector performs the function of changing the angle of the headlights, the need for which arises when the vehicle is loaded. That is, if the car is overloaded, then the light flux will be directed not towards the road, but upward, and with the help of a hydraulic corrector this situation can be corrected. On the reverse side of the headlight unit there is a round cover, by opening which you can replace burnt out lamps.
Standards or is it possible to install xenon on a car in Russia
Xenon light appeared in Russia relatively recently, but has already won millions of fans. This is not surprising, because xenon gas lamps consume less energy and shine much brighter than halogen lamps, which has a positive effect on driving at night. If xenon is installed in the headlights from the factory, then there are no problems or claims from the law, but in cases where owners install lamps with bright light on their own, there are some restrictions. You need to immediately find out about them before starting to implement your idea.
Since the advent of xenon lamps, the number of cars with such light has increased exponentially. Moreover, many owners began to install this xenon in their cars themselves, which caused emergency situations due to incorrect installation or blinding oncoming drivers. Xenon lamps emit very bright light, which is comparable to a welding arc, so its incorrect use leads to emergency situations.
Based on these consequences, Russia adopted a ban on the independent installation of xenon in headlights that are not intended for gas-discharge lamps. Since then, the number of cars with bright lights has decreased, but some are still not afraid of fines, since high-quality lighting of the roadway seems more important to them. In Russia, installing xenon in the standard optics of a car for which it is not intended is prohibited and punishable by law. If the driver is stopped by a traffic police officer, then with a high probability for such an alteration he will not only have to pay a fine, but also return to the previous light.
Xenon and bi-xenon - what are the differences?
Having decided to install xenon on a VAZ 2107, the question arises: what is better xenon or bi-xenon and how do they differ? Bi-xenon is exactly what xenon is, only additionally equipped with a mechanism for switching high and low beams. Unlike halogen lamps, where switching between high and low beam is realized by switching 2 spirals located inside one lamp, a xenon lamp has one chamber with gas, which creates bright radiation. To switch between low and high beams, the bulb is located in a special shell with a movable shutter. This curtain, depending on whether the low or high beam is turned on, moves in one direction or the other.
On the VAZ 2107 you can install not only xenon lamps, but also bi-xenon, but for this you will need a set of bilenses. The role of the switch between low and high beam is played by bi-xenon lenses that have a built-in curtain through which switching occurs.
If you are going to install gas-discharge lamps instead of halogen ones, then it is better to choose xenon with lenses. The lenses are not only designed to switch the light, but also to focus the light on the road surface. The light with the lenses is correct and does not scatter throughout the headlight, blinding oncoming cars. It is xenon with lenses that is recommended for installation in the standard optics of the VAZ 2107.
Do-it-yourself installation and connection of bi-xenon - video
Car headlight bulbs are consumables.
This means that after some time they will have to be changed. Here the question arises, which lamps to install on your car. Conventional incandescent lamps do not provide good illumination, and xenon lamps do not have a duplex mode. The best option is bi-xenon headlights. The principle of their operation is based on the geometry of light movement, which allows the use of both high and low beams. Bi-xenon installation rules
• Touching the wires is strictly prohibited. The same applies to lamps with ballasts. Touching is prohibited both before and after installation, not to mention during operation. The reason for this is the high ballast voltage, approximately equal to twenty thousand volts. If it goes not into the lamp, but into a person, it will lead to death.
• It is recommended to turn lamps on and off only during operation. Frequent mode changes lead to rapid wear of the elements.
• If interruptions are detected in the bi-xenon system, you must try to fix the problem as quickly as possible. It’s better not to do this on your own, so head to the service station. If repairs are not possible, you will have to spend money on new lamps. It is prohibited to drive a car with a faulty light system, as there is a risk of a fire. Plus, inconsistent light can blind other road users.
• If the lights turn off randomly, stop the car and turn off/on the headlights. If the light appears, it means that a minor malfunction has occurred that will not affect the operation of the headlights as a whole. If the light does not appear, then look for the nearest car repair service.
• You need to adjust the headlights carefully, because the light emanating from them is very bright. If you cannot focus the lamps properly, contact a specialist.
How to install bi-xenon on a VAZ - video
• Do not install a damaged lamp set.
• Wash and dry your hands before installation.
• Check every wire connection.
• Do not scratch or break the lamps.
• Do not squeeze light bulbs.
• The equipment must be moved only by interacting with the housing.
• Bi-xenon can only be turned on when assembled on the car.
• Degrease the lamps in areas of contact.
Cases of impossibility of installing bi-xenon
Installing and connecting bi-xenon with your own hands is prohibited only in one case - if the lamp does not fit into the headlight. Of course, sometimes you can modify the headlight and lamp in order to adjust the dimensions, but this can only be done in the presence of a specialist. Let us remind you that in the previous article we told you how to reupholster a car ceiling with your own hands.
Visibility of headlight failure
• Different illumination of headlights. • Change the color of the glow. • Noise from ballasts. • Headlight switch-on delay.
1. Connect the right side to power. 2. We turn on the low beams. 3. Check the functionality of the high beam. 4. If the high beam does not work, then you need to install the diode in reverse. It didn’t work - the diode is faulty. 5. Connect the left side.
1. Start the engine. 2. Turn on the headlights. 3. Switch the light range. The delay indicates a malfunction in the ignition system. 4. Check the temperature.
Tips for use
• Do not touch the lamps. • You can turn on xenon only after starting the engine. • Do not switch headlights unnecessarily. • Install headlight washers. • Carry out inspections and preventative maintenance.
It is important that the bi-xenon works correctly, otherwise you and other road users will get into big trouble.
How to choose a good xenon kit?
The selection of a suitable xenon lighting source for a car should be based on two factors: the popularity and reliability of the manufacturer and the required brightness of the lamps.
What should a xenon kit consist of?
The complete set of gas-discharge bulbs for headlights or fog lights includes:
- lighting sources designed for a certain power and with specific markings;
- ignition device;
- a set of wires and elements for connecting and fixing lamps.
The ignition unit is a module designed to supply a certain amount of voltage required for activation to light sources. More expensive units have a more complex design, which allows them to control a larger number of processes. If the device is of high quality, it will be able to ensure long-term and uninterrupted operation of the light elements. This is due to the fact that when igniting the lamps, the basic technical parameters are observed within the required range.
Work order
Some headlight repair operations should be performed indoors to avoid water and debris getting into the bonding area. In general, replacing a damaged element includes the following steps:
- Disconnecting the unit from the on-board network of the VAZ 2107 by uncoupling the connectors of the turn signal and the headlight lamp.
- Removing the body from the body opening using a Phillips screwdriver.
- Removing shards of broken glass, in this part of the operation you should be careful not to cut yourself.
- From the junction of the parts, it is necessary to remove the remaining adhesive mass using a flat screwdriver.
- The next step is to clean the unit and degrease it with a solvent.
- Using a dispenser syringe, apply a small amount of glue along the contour evenly without gaps or breaks.
- We place the transparent element in its intended place, press it and fix it using disposable devices or tape.
This is interesting: Turbine diagnostics using VagCOM
As the glue dries, the headlight element of the VAZ 2107 is installed in place; it is recommended to change both parts at the same time; during operation they tend to become cloudy and this will become noticeable even with a cursory inspection. The new transparent glass on the headlight of a VAZ 2107 car, which was replaced on our own, is pleasing to the eye. At night, better road lighting is provided.
Preparation for self-installation and connection of xenon in a car
Every driver can replace standard light bulbs and install xenon lights themselves. When performing installation, the main thing is to follow the manufacturer’s recommendations and follow the diagram.
In order not to damage the light bulbs, the bulb of the light source should not be touched with your fingers.
If this happens, then the surface with the imprint must be treated with a clean rag with alcohol. Before performing the task, be sure to disconnect the battery. When launched, gas-discharge light sources produce 23 thousand volts of voltage, which will be fatal to humans.
What may be required to connect?
To quickly install gas-discharge lighting sources, you will need:
- set of lamps;
- stationery knife or scissors;
- Phillips head screwdriver;
- plastic clamps;
- drill with 25 mm cutter;
- set of wrenches.
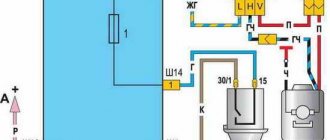
Xenon installation diagram
The installation and connection process is carried out as follows:
- First, old lighting sources are removed and new ones are installed in their place. To complete the task, the plastic protective cover installed on the optical instruments is dismantled. Electrical wiring is disconnected from halogen or incandescent lamps. Removing the device may require the release of a special retainer or clamp.
- The gas-discharge bulb is carefully removed from the protective bulb and mounted in the hole on the lantern. If a special clamp is used for fastening, it must be fixed. If there is a spring, the electrical circuit from the gas-discharge lamps must be pulled through this element. Afterwards, the wiring is routed through a plug into the engine compartment.
- Running an electrical circuit near the battery will be problematic. The battery usually blocks access to the flashlight, so it will have to be removed. After the lighting sources are installed, their contact elements are connected to the ignition unit.
- Then you need to make special holes in the plugs of the optical devices; the power line will be laid through them. If the protective casing is made of rubber, you must use scissors for installation. If the plug is made of metal, then you will have to drill a hole to pull the wire through it. A cutter is used for this; a 2.5 cm piece is best.
- After completing this task, a location for installing the ignition device is selected. It will be located next to optical instruments. It is important that the power supply circuit is not stretched.
- When installing the ignition unit, it is recommended to choose a place where the device will not be exposed to high temperatures, moisture, and dirt. These devices themselves are usually sealed, but it is better to take this rule into account. If there is no such place under the hood, then the device should be wrapped with tape or tape, this will partially increase its safety. The block is fixed using plastic clamps or tape.
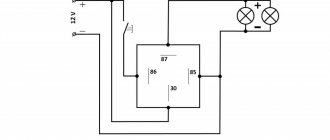
Xenon connection diagram
More details on how to connect xenon:
- The lighting sources are connected to the ignition unit. Each electrical circuit has a specific color coding; detailed connection information is indicated in the diagram.
- The unit itself is then connected to the standard wiring system. To accomplish this task, one line from the device goes to the block where the old light source was connected.
- The second lamp is connected in the same way. First it is connected to the ignition unit, and then to the electrical wiring of the machine.
- Fixation of electrical circuits is carried out using plastic clamps. If the piece of wire is large, it is recommended to twist it into a ring.
Connection diagram for xenon to standard wiring
Do-it-yourself installation and connection of bi-xenon - video
Car headlight bulbs are consumables. This means that after some time they will have to be changed. Here the question arises, which lamps to install on your car. Conventional incandescent lamps do not provide good illumination, and xenon lamps do not have a duplex mode. The best option is bi-xenon headlights. The principle of their operation is based on the geometry of light movement, which allows the use of both high and low beams.
Bi-xenon installation rules
• Touching the wires is strictly prohibited. The same applies to lamps with ballasts. Touching is prohibited both before and after installation, not to mention during operation. The reason for this is the high ballast voltage, approximately equal to twenty thousand volts. If it goes not into the lamp, but into a person, it will lead to death.
• It is recommended to turn lamps on and off only during operation. Frequent mode changes lead to rapid wear of the elements.
• If interruptions are detected in the bi-xenon system, you must try to fix the problem as quickly as possible. It’s better not to do this on your own, so head to the service station. If repairs are not possible, you will have to spend money on new lamps. It is prohibited to drive a car with a faulty light system, as there is a risk of a fire. Plus, inconsistent light can blind other road users.
• If the lights turn off randomly, stop the car and turn off/on the headlights. If the light appears, it means that a minor malfunction has occurred that will not affect the operation of the headlights as a whole. If the light does not appear, then look for the nearest car repair service.
• You need to adjust the headlights carefully, because the light emanating from them is very bright. If you cannot focus the lamps properly, contact a specialist.
How to install bi-xenon on a VAZ - video
• Do not install a damaged lamp set.
• Wash and dry your hands before installation.
• Check every wire connection.
• Do not scratch or break the lamps.
• Do not squeeze light bulbs.
• The equipment must be moved only by interacting with the housing.
• Bi-xenon can only be turned on when assembled on the car.
• Degrease the lamps in areas of contact.
Cases of impossibility of installing bi-xenon
Installing and connecting bi-xenon with your own hands is prohibited only in one case - if the lamp does not fit into the headlight. Of course, sometimes you can modify the headlight and lamp in order to adjust the dimensions, but this can only be done in the presence of a specialist. Let us remind you that in the previous article we told you how to reupholster a car ceiling with your own hands.
Visibility of headlight failure
• Different illumination of headlights. • Change the color of the glow. • Noise from ballasts. • Headlight switch-on delay.
1. Connect the right side to power. 2. We turn on the low beams. 3. Check the functionality of the high beam. 4. If the high beam does not work, then you need to install the diode in reverse. It didn’t work - the diode is faulty. 5. Connect the left side.
1. Start the engine. 2. Turn on the headlights. 3. Switch the light range. The delay indicates a malfunction in the ignition system. 4. Check the temperature.
Tips for use
• Do not touch the lamps. • You can turn on xenon only after starting the engine. • Do not switch headlights unnecessarily. • Install headlight washers. • Carry out inspections and preventative maintenance.
It is important that the bi-xenon works correctly, otherwise you and other road users will get into big trouble.
How to properly install and connect xenon to fog lights?
If xenon light sources were installed in the headlights, it is advisable to install them in the PTF. This will prevent you from spoiling the aesthetic appearance of the car.
Installation and Connection Precautions
Nuances that must be observed when installing gas-discharge devices in fog lights:
- If damage appears on the light sources during the task, you must stop working. This also applies to wiring defects, as well as ignition units.
- Before performing the task, the car owner must wash his hands, dry them and degrease them. Otherwise, the bulbs may be damaged and you may receive an electric shock.
- When connected, you should not look at the light sources for a long time without glasses.
- The joints are completely insulated using heat-shrinkable tubing or electrical tape. Otherwise, moisture may get into the wiring, which will lead to a short circuit or fire.
- Before mounting the light source bulbs, it is recommended to degrease them.
Installing xenon in fog lights (PTF)
Xenon is installed in foglights in the same way as in headlights, only it is still easier and faster. The main thing, after xenon appears in the PTF, is to lower the luminous flux of the fog lights down a little, so as not to blind oncoming drivers. The requirements for installing xenon in foglights are as follows: lenses must be installed in the headlights, the headlights must have a marking in the form of the letter “D”, which indicates that xenon lamps can be used in the headlights for lighting (the letter “H” indicates that in the headlights Only halogen lamps can be used).
What happens if you install xenon in headlights that are not designed for this?
What do you think? Firstly, with a 99% probability you will blind drivers of oncoming cars, and secondly (which is worse for you) if you are stopped by traffic police inspectors, you may lose your license for a period of 6 months to 1 year with confiscation of instruments and accessories. So it’s up to you to decide whether to install xenon according to all the rules or drive around and blind everyone you meet. By the way, humanity does not stand still and now people are already installing xenon lamps not only in headlights and PTF, but also in reverse, here, of course, no lenses or permits are needed, I think that no one will bother you for this, especially that parking in the dark, after installing xenon in reverse, will be a complete pleasure. In conclusion, I would like to say that installing xenon is not a complicated operation that anyone can do. The main thing is that if you decide to install it, then do it competently and do not save money, especially since there is nothing on the automotive market now and the choice of everything is simply huge at different prices and from different manufacturers. If you want to learn more about the light from xenon and halogen lamps, watch the following video:
Is it possible to drive with xenon in 2017-2018?
The answer to the possibility of driving with xenon in 2017-18 is quite simple - no, you can’t. Indeed, without much debate, the law banning xenon headlights was not only confirmed, but also became much more stringent. The government has received confirmation from experts who assure that there is no need for xenon, and that the harm these lamps cause to other road users is incomparably greater than their usefulness. Illumination of the road using basic lamps is sufficient for even the least experienced driver to see the road surface perfectly and be able to navigate.
Let us note that there are no fines for this violation and there will not be any - it is so severe, so unambiguous that you will simply be deprived of your driver's license. It is worth recognizing that this is a very fair decision against the backdrop of the danger a driver with xenon headlights exposes other people to, blinding them, even if only for a few seconds, but on the road for very important ones. The quality of road illumination from xenon headlights does not improve significantly - the car simply begins to shine like a Christmas tree, while the correct illumination of the road is based on the desired direction of the headlights.
How to replace xenon lamps with halogen ones yourself?
The disadvantages associated with the operation of xenon lead to the fact that many car owners decide to replace gas-discharge lamps with conventional ones. There are nuances in this process, especially if the light sources were installed regularly.
DIY lamp replacement procedure
Replacement is carried out after preparing a wrench and a screwdriver; sometimes electrical tape is required:
- The engine compartment is opened and the negative clamp is disconnected from the battery.
- Installed lighting sources are disconnected from the power supply circuit. The protective elements under which the screws are located are dismantled. They attach the optics to the car body, so they need to be unscrewed, but not completely, just loosened.
- The lights are dismantled. They can additionally be fixed using latches. When performing the task, it is important not to break the fastener. After this, the lighting device is dismantled from the seat.
- The ignition units for gas-discharge light bulbs are removed; for this, the fastenings on the modules are unscrewed.
- The power line is laid from the control unit, the device is mounted next to the steering wheel. If halogen bulbs were installed in cars, then there is no need to change the electrical circuits. But in the case of standard xenon, new cables will be required. This task is performed carefully so as not to damage the conductors.
- Optical devices are installed and connected to electrical circuits. Then the lighting flux is adjusted.
The MazdaGarage channel in its video, using the Xedos model as an example, showed how to remove xenon lighting sources from headlights.
When is it possible?
And yet there is one possibility when LEDs and xenon can be installed in headlights. But, unfortunately, this opportunity will not make it any easier for us.
The fact is that the mandatory compliance of the light source with the headlight design is enshrined in the Basic Provisions of the Traffic Regulations. There is also a note that if the car is old and out of production, then you can install lighting devices from other models and even brands of cars on it.
Does this mean that VAZ can be equipped with other headlights, including those with xenon or LED? No, that doesn't mean it. According to the Technical Regulations, in any case, such a light source must be certified and tested as part of the vehicle on which it is installed. This means that if the old VAZ provided only halogen lamps, then the headlights will have to be installed only with a halogen light source.
In addition, with such an installation, you will have to go through the procedure of making changes to the design of the machine, which is quite labor-intensive and expensive.
What to do if xenon headlights stop working?
If xenon bulbs stop functioning, the reasons may be as follows:
- damage to the contact on the connector for connecting to the power circuit;
- broken wiring;
- failure of the lighting source, the lamps cannot be restored;
- control module failure.
Why does the ignition unit break?
Reasons for failure of the ignition device:
- Lack of tightness on the module body, which leads to dirt and moisture getting inside the unit. The problem can be determined by disassembling the device and diagnosing its internal components. If dirt or water gets into the module, the lights will not light up or will begin to blink when turned on.
- Negative effects of corrosion. The solder joints of electronic components may oxidize, causing components to fall out of the solder. The problem is associated with assembly errors or regular exposure to moisture.
- The pulse signal from the controller has disappeared. There may be problems with the transistor elements, multiplier or transformer device.
How to repair a xenon ignition unit yourself?
Module repair is performed as follows:
- All electrical circuits are diagnosed for breaks or leaks. This refers to the wires that go to the module. The problem may be a pinched or damaged power line.
- The device is treated with an alcohol solution, this will remove rust and traces of condensation. You must act carefully so as not to damage the board. The sealant is removed from the back of the circuit and the contact elements are re-soldered with a soldering iron. Everything needs to be soldered, since leaky parts are difficult to visually identify.
- An opened ignition device is diagnosed on something that does not allow voltage to pass through. When diagnosing, there are no parts that light up nearby. The test is performed while the device is connected to a light source. The voltage of the multiplying element is 35 kV, so if the unit is not turned on, then it will not be touched until it is completely turned off.
- The next step will be to perform diagnostics on the transistor elements, there are a total of four on the board. A multimeter is used to check. If testing shows a device with a breakdown, it is soldered again. It is recommended to install 4N60 parts.
- Using a tester, it is not always possible to determine an element with a breakdown. It may be necessary to remove each transistor before the ignition device is activated. You can turn it on briefly, for a couple of seconds.
- If the transistor elements are intact, the resistor devices are checked. The burnt out part is replaced with a new one.
When assembling the block, it is not recommended to use silicone sealant.
After hardening, this product is as hard as possible. If the transient device needs to be replaced in the future, opening the module will be problematic.
Video
The “Fire & Ice” channel presented instructions for troubleshooting problems in the operation of a standard ignition module using the example of a Mazda car.
"""""For skeptics: in the future, LENSES and GLASSES for lenses, or lensed optics will be purchased and installed""""" Hello everyone. As promised, I installed Sho-me 5000k bi-xenon. I picked up the box for 3 days , looked at it and put it back)))) And finally it matured))) And so in more detail:
To whom the information was useful, leave likes and comments. Subscribe. Happiness to everyone and fewer fools on the road))
For skeptics: in the future, LENSES and GLASSES for lenses, or lensed optics, will be purchased and installed