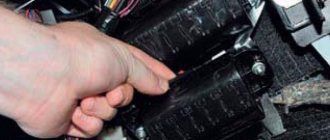
First of all, it is necessary to check the integrity of fuses No. 9 and 10, as well as their secure fastening in the fuse block.
In addition, even though the fuses appear to be in good working order (the fuse link has not blown), the fuse may be faulty. The fact is that despite the fact that the insert has not blown, the fuse is nevertheless faulty. Due to long service life, the tops of the fuses at their entrance to the sockets wear out. This can be determined visually. To do this, the fuse is removed from its sockets and the upper and lower parts of the fuse, which are a continuation of the fuse link, are inspected. Visually, the worn edge of the fuse will be immediately visible in the form of a circle, like a mark from the socket where it is inserted. Such fuses are replaced and charging is checked again.
If, after replacing the fuses, the VAZ 2106 still does not charge the battery, then you should continue troubleshooting.
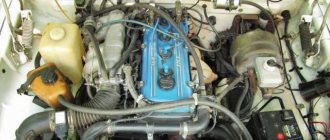
Next, you need to check the integrity of the generator drive belt and its tension. If the belt is not torn and its tension is normal, then you need to check the condition of the drive pulleys. When the inner surface of the pulleys wears out, the alternator belt simply begins to slip, which will also contribute to the incomplete charging of the battery or there will be no charging at all. You can check this visually by looking at the inside of the pulley. If it shines, it means the belt is slipping and it was he who polished the inside of the pulley.
This pulley must be replaced together with the drive belt.
The next reason why the battery may not charge is poor contact at the battery terminals or their oxidation. The unreliable contact is tightened, and the oxidized terminals must be treated with a solution of soda and water. Soda neutralizes the oxide, after which the terminal must be rinsed with water and wiped well. To ensure that the remaining oxide is removed with fine sandpaper. Then the terminal must be lubricated, for example with Litol 24 grease. A similar operation must be done with the terminals themselves. There is no need to sand the terminals or scrape them with a knife. They are very malleable, since they are cast from lead, and three or four such procedures will noticeably reduce their diameter, which will make it impossible to properly tighten the terminals, and therefore there will be no reliable contact between them. Entrust this issue to soda and it will perfectly clean the terminals of oxide.
It is worth checking the contact points of the terminals on the generator for oxidation, which also need to be freed from oxide.
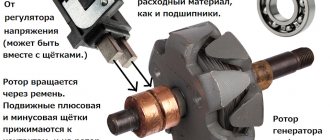
If there is no battery charging in a VAZ 2106 car, then the brushes in the generator set may be to blame.
. They may have extreme wear or jam in the brush holder sockets.
To check the brushes, the generator does not need to be removed from the vehicle, since the brush assembly is accessible and easily removed. Worn brushes are either replaced or the entire assembly is replaced. The movement of the brushes is checked by pressing. The brushes should slide into their wells easily and return easily. Otherwise, the brushes are removed and the wells are cleaned, and burrs are also removed from the brushes themselves.
The contact of the generator with the vehicle ground is also checked and, if necessary, restored. Sometimes it is enough to slightly release the fastening of the wire with ground and move the wire from side to side, which will be enough to restore reliable contact. For complete control, the wire is removed and the tip is stripped.
Possible malfunctions of the VAZ 2106 generator
The generator itself may have the following faults:
- Damage to the diode bridge (popularly known as a “horseshoe”)
- Malfunction of the stator winding - interturn short circuit, short circuit to the housing or internal break
- Malfunction of the rotor field winding, with symptoms similar to those in the stator winding. In addition, there may be a lot of wear on the contact rings, which disrupts their reliable contact with the brushes
If, when checking, there is a normal voltage of 13.5-14.2V at the generator output, and the battery is not charging, then it is necessary to check the integrity of the wire running from the generator to the battery.
The lack of charging can also be affected by a malfunction of the relay-regulator, as well as its poor contact with ground.
Also read other reviews
There were 3 cases during the winter. Frosts. In the morning a client calls and complains that there is no charger. I'm calling you to come over. He arrives and says that halfway through the journey the charging appeared. I checked everything: I rang and shook the wiring, tightened everything I could, measured all the voltages. I didn't find anything, everything is fine. He sent the client away with God, everyone remained with their own interests. On the 2nd car the same thing, except that I removed and shook (with a test on the stand) the generator to calm my conscience. I decided to figure out the 3rd car to the end and finally earn at least something. Leave the car in the cold - relax! About two hours later I start it on the street - no charger! There, on the street, I began to look at what was wrong - God forbid the malfunction disappears again. The charging lamp does not light up, there is no initial excitation. From the control (from the battery positive), the generator is excited, the wiring to the instrument panel is connected. Found what I was looking for! On the instrument panel, the connector contacts are riveted to the board (I didn’t discover America, everyone knows that). There was no contact from the charging indicator lamp in the connector. I soldered all the contacts in the connectors, because while the instrument panel was tinkering, other glitches appeared due to these rivets. It turns out that as the interior warmed up, the contact in the riveted connectors was restored. By the way, in 4 years I have never observed this in carburetor sevens; they knew how to rivet before! I called the first two cars, did the same thing, and never showed up again.
A typical problem for classics. The problem is most often in the tidy, you have to solder it.
Another solution to the problem
:
On my new 2107 (2010 model), when starting in cold weather, charging did not occur (GENERATOR - “EIGHT”). If you increase the engine speed to 2000, the battery begins to charge. Everything would be fine, but sometimes the battery charging light did not light up at all when the ignition was turned on and it was necessary to warm up the engine without charging the battery, and then when the engine was restarted, charging began. What was done on the advice of auto electrician friends: changed the brush assembly with the tablet, tightened the alternator belt, pulled the + terminal on the alternator. Removing the generator for a full inspection was extremely lazy. But it didn't help. I assumed that in the cold there is not enough current in the excitation winding (again, the VAZ engineers did not take something into account). And to increase the current, I connected contact +15 (ignition) with contact 61 (excitation winding) through a series-connected diode and a 10 Ohm, 20 W resistor. I've been driving for a year - the flight is normal, no symptoms of old problems. A diode is needed so that when the engine is turned off, the current intended for the excitation winding does not flow back into the ignition circuit. However, the phenomenon of reverse current through the charging lamp can be easily noticed: when the engine is turned off, the lamp lights up for a short time. The resistor was connected under the glove compartment, in the harness passing through the engine shield. The ignition wire (+15) is thick blue with a black stripe, the excitation wire (61) is thin brown with a white stripe. Instead of a resistor, you can use a 10 W light bulb, but IMHO, a resistor is more reliable.
No charging - main causes and troubleshooting
Owners of VAZ classics often have to deal with the problem when there is no charge for the 2106. The reasons leading to such a problem can be very different, and most likely it will not be possible to list them in full here, so we will list at least the most common of them.
1. The brushes of the VAZ 2106 generator are worn out. If the brushes are not long enough, this can lead to a situation where the VAZ 2106 battery is not charging, or when the charging is too weak. Therefore, if the VAZ 2106 battery charging light is on, first of all you should check the generator brushes of the VAZ 2106 car and, if necessary, replace them. It should be noted that the length of the brushes should not be less than 12 mm.
2. The diode bridge has failed. Poor battery charging can also be caused by burnt-out diodes of the rectifier unit, since the generator cannot fully charge the battery. To check, you need to diagnose the diode bridge and, if necessary, replace it.
3. The charging relay has failed. If the battery of a VAZ 2106 car is not charging, then the reason for this may also be a breakdown of the charging relay. As a rule, if charging on a VAZ 2106 is lost precisely for this reason, then car owners have to look for a fault for a long time until this electrical part is replaced. By the way, it must be said that it changes very easily, since it is attached with only two bolts under the hood on the right side.
4. Problems with the rotor and stator. If, after checking all of the above parts, the VAZ 2106 car battery charging light is still on, you need to diagnose the generator and be sure to check its stator and rotor, and if necessary, replace the generator.
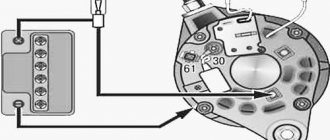
How to connect a generator to a VAZ 2106? First, the generator is placed in its “legal” place, near the engine, and its location must be secured with a washer and bolt. After this, the lower fastening nut is put on. The generator is connected to the VAZ 2106 by two wires, the first comes from the terminal of the brush holder, and the second comes from the plug of the main terminal of the stator winding. The main difference between the output of the brush holder and the wire coming from the output of the stator winding is the absence of insulation pads.
The wire fastening nut must be attached to the generator terminal; a protective rubber cap is placed on top of the terminal. Next, screw the nut securing the generator onto the tension bar. Then the generator belt is put on the crankshaft, generator and pump pulley. The tightening of the generator fastening to the bar located under the hood is increased. After this, you should install the protective shield, carefully securing it with 12 fastening screws. That's all, the generator is installed and after that all that remains is to check it.
You should immediately look for the cause of the malfunction, because the supply of current to all electrical equipment, as well as battery charging, is at risk.
As you know, with a working generator, the battery does not require charging for many months and years, while maintaining at least 60% charge. That is, a battery with a capacity of 55 Ah, which is usually equipped with dozens, is replenished with current due to the operation of a working generator.
Methods for treating battery charging faults
Recently the charger in the car disappeared.
So, we figured out the principle of operation of charging the battery on the VAZ-2106. Now let's look at possible problems in this system.
First, it would be worth deciding on the control lamp; it can either blink or constantly shine. The common people use the “old-fashioned” method of diagnosing a generator. To do this, with the engine running, you need to disconnect the negative terminal of the battery. If the generator is working properly, the engine should continue to work, but if it stalls, we are looking for a problem in the generator
Very important - this diagnostic method is prohibited on injection engines!
If the problem is in the generator, proceed to its diagnosis:
- remove the generator from the engine;
- we disassemble it;
- check the carbon brushes for wear;
- Using a tester, we check the diode bridge. In most cases, this is where the problem lies.
If the diode bridge malfunctions, it must be replaced. Before replacing it with a working one, it is advised to find the reason for its failure.
At the same time, we check for breaks or short circuits in the rotor and stator coils. If a fault is found in the coils, they should be replaced.
If, during the check, you find that the generator is working properly, but the control lamp continues to shine, the problem may be hidden either in the regulator relay or in the control lamp relay. In this case, there is only one solution - replacing it with a working relay. If the control lamp blinks, it is not receiving the required voltage. To solve this problem, it is necessary to clean the oxidized contacts of the generator with sandpaper.
Basic problems
If the generator begins to act up, then the main causes of the malfunction should be sought either in the on-board network, or these are problems with the generator itself. If the generator gives a charge, but not enough, then perhaps it has been “loaded” too much by installing many other gadgets in addition to the standard electrical equipment, and it is already working at the limit of its capabilities.
Our motorists really love tuning the VAZ 2110, adding, for example, speaker power, enhancing the light, etc. In such cases, some people change the battery, for example, installing it with a capacity of 70 Ah, instead of the usual VAZ one with 55 Ah.
But although this may help at first, over time such a battery will run out even faster, since a standard generator will not be able to provide it with a full charge; it does not have enough power for this.
The reasons for battery discharge are described in detail in the following material:
Why there is no charging: main reasons
Today I decided to highlight one of the topics that quite often worries owners of the VAZ 2106 and other “classic” models.
Namely, it will be about problems with charging the battery or its complete absence.
Again, I want to immediately warn you that most likely I will not give all possible reasons, but I will try to highlight those that I have encountered below in the article.
troubleshooting
To accurately determine the source of the problem with the generator, you need to perform a basic check. If you do not have “additional” energy consumers, you can immediately look for generator faults; if there are any, turn them all off for a while. Moreover, do not turn it off, but simply disconnect it from the car.
Test plan:
- Measure the current output on a cold car, when it is not running and all its life support systems are turned off. It will be ideal if there is no return at all. But this happens extremely rarely. On almost every VAZ 2110, somewhere due to insufficient contact, local short circuit, etc. There is still a small return. But - just a small one, and not one in which the battery can run out during a night of parking;
- If everything is normal, there are no current leaks, or they are negligible, the battery is not discharged, reconnect all those devices that you (no matter, independently or with the help of hired specialists) installed on your car on your own initiative. Repeat the same check. If it turns out that current is actively leaking, it means that the reason is not in the battery and is not related to the generator; it is the device not provided for by the designers of the VAZ 2110 that is to blame;
- But if even then no kickback is detected, we proceed to a thorough examination of the generator. And here there are many possible malfunctions: there is not enough contact between the brushes and the rotor rings; there is a break in the field winding; an interturn short circuit is possible directly in the field winding coil. At the same time, the generator heats up and hums; the field winding may short-circuit to the rotor housing; breaks can also occur in the stator phase winding; the stator can short-circuit to the housing; Possible short circuit of the “plus” to the housing; can break through diodes in the rectifier unit; Mechanical failures are also high on this list.
Now let's look at all of the above generator malfunctions in more detail.
How to check the generator relay regulator with your own hands
Having examined the device and principle of operation, you can proceed to testing. It is noteworthy that it is quite possible to check the relay regulator in an ordinary garage. To do this, you need to have a regular multimeter with a scale of up to 35 volts, a set of wrenches and screwdrivers.
- A simple method for checking the generator regulator on a VAZ 2106 assumes the following: a well-charged battery is needed for testing. To perform diagnostics, you need to start the internal combustion engine, turn on the headlights and leave the engine running for 10-15 minutes, while the engine speed does not increase above 2 thousand rpm. Next, you need to use a multimeter to measure the voltage between the battery terminals. The norm is no higher than 14 Volts and no lower than 12 Volts.
If the voltage deviates from the norm, this indicates problems with the relay regulator. Considering that this device cannot be repaired, it needs to be replaced. Replacement involves removing (you need to unscrew a couple of bolts) and installing a new regulator.
- The second test method should be used when the problem is “floating” (the voltage at the battery terminals is slightly less than 12 Volts or slightly higher than 14 Volts). In such a situation, the regulator must be checked separately by removing it. To check, use a multimeter and a 12 volt light bulb.
Having examined the regulator of the VAZ 2106 generator, you can find a pair of outputs (on the diagrams often marked with the letters B and C). The indicated contacts must be supplied with power from the battery. Two more relay contacts go to the generator brushes. A lamp is connected to the indicated contacts.
If the voltage at the outputs when power is supplied from the battery is not higher than 14 volts, the light will light brightly. If you use a multimeter to increase the voltage at the power supply outputs to 15 volts or higher, the light should go out. If this does not happen, then the regulator has failed. If the light does not light up initially, both in the first and second cases, then the relay needs to be changed.
- Replacing the VAZ 2106 generator regulator involves selecting a suitable device. It is important to immediately determine what type of device is on the generator (external regulator, internal regulator). The external regulator is located on the front left arch (in the area of the front wheel). The internal regulator is removed after removing the air filter, since the filter blocks access to the generator.
The external regulator can be easily removed (just unscrew the two 10mm bolts holding the relay with an open-end wrench), after which the wires are disconnected. Assembly is carried out in reverse order. The internal regulator is a little more complicated, since you first need to unscrew three 12 nuts. The internal regulator itself is located on the front cover of the generator, secured with two bolts. The bolts are unscrewed with a screwdriver.
Then the relay is carefully pulled out of the generator cover, after which the wires and contact block are removed. When removing the block, special care must be taken, since the contacts are fragile. Next, a new regulator is installed and reassembled.
We also recommend reading the article about why the battery icon on the instrument panel is lit. In this article, you will learn about the main reasons why the battery lights up on the dashboard, as well as how to detect and fix the problem.
- Please note that external regulators for the VAZ 2106 are almost impossible to find new for sale. We have to pay for used devices. So, the real condition of such a regulator is difficult to visually determine, that is, a check is necessary before purchasing (you can use the methods discussed above).
Regarding internal regulators, the main problem is the wires connected to the relay from the generator. Very often, when replacing, they break in the area of the contact block. If this happens, you will need to cut the block, resolder the wires, make high-quality insulation, and then glue the block back together.
To avoid such problems, when replacing the internal regulator of the VAZ 2106 generator, you need to be extremely careful, do not repair the car in the cold, since the wires break more easily in such conditions, etc.
Winding break
If the excitation winding is broken, then there is no charging of the battery. To determine this, it is often enough to place your hand on the generator. When it breaks, it heats up. For an accurate check, you need to disconnect the end of the excitation winding from the brush, connect the battery wires to it, and connect the battery wires to terminal Ш of the generator (via a voltmeter or a light bulb).
If there is a break, the voltmeter needle will not deflect and the light bulb will not light up. To find which of the coils prevents the generator from working, connect the wires from the battery to each individually. Finally, check the soldering and coil terminals. If the break is internal, the coil needs to be replaced; for external ones, soldering helps.
Let's sum it up
As you can see, the generator relay for a VAZ or any other car is an important and responsible device. Moreover, any malfunctions in its operation will lead to the fact that the car’s battery will not be charged properly. In this case, both low and high battery charge will quickly damage the battery.
We also recommend reading the article about what to do if the electrolyte in the battery freezes. From this article you will learn why the electrolyte in the battery freezes, as well as what to do if the car battery freezes. If the above-mentioned signs of a breakdown of the generator regulator appear to a greater or lesser extent, you need to check the regulator using one of the methods discussed above. Finally, we note that it is not difficult to replace the generator voltage regulator on a VAZ, but some nuances must be taken into account separately. Sources used:
- https://acums.ru/akkumulyatory/avtomobilnye/net-zaryadki-vaz-2106
- https://10prichin.ru/avto/6-prichin-pochemu-net-zaryadki-na-vaz-2106
- https://studopedia.ru/19_327243_ustranenie-prichin-propadaniya-zaryadki-na-vaz-.html
- https://avtovx.ru/elektrooborudovanie/shema-zaryadki-vaz-2106-179/
- https://krutimotor.ru/rele-generatora-proverka-rele-zaryadki-vaz-2106/
Mechanical problems
The first place among the mechanical problems of the VAZ 2110 is belt stretching. In this case, the generator pulley usually gets very hot. In addition, the battery is not sufficiently charged. Also inspect everything for poor contact, breakage, etc.
Therefore, regardless of whether your car has a carburetor or an injector, it is better not to joke with the generator, but if malfunctions are detected, respond quickly to them.
If the generator stops charging, there is nothing good about it. It is necessary to immediately begin searching for the cause of such a malfunction. Otherwise, all your electrical equipment will be without power, and the battery will soon run out completely.
If the generator works well, then the battery will not need additional charging with special devices for many months, sometimes even years. The battery will consistently retain at least 60% charge. Thus, the batteries are constantly replenishing their charge reserve through the operation of the generator.
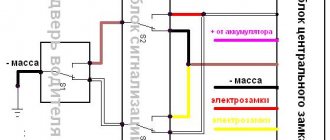
Wiring diagram
The section of the diagram that interests us on the VAZ 2106 is not particularly complicated, and understanding it will not be difficult. To do this, it is enough to have basic knowledge of electrical engineering.
Electrical circuit for recharging the battery on a VAZ 2106
In the figure the numbers indicate:
- 1 – battery;
- 2 – generator;
- 3 – relay regulator;
- 4 – ignition switch;
- 5 – mounting block;
- 6 – battery charging indicator lamp;
- 7 – warning lamp relay.
Let's figure out how this scheme works. After turning on the ignition, +12 V voltage from the battery through fuse F10 of the mounting block is supplied to the relay regulator, which is responsible for stabilizing the output voltage. Next, it goes from the relay to the excitation winding, which is located on the rotor and is powered through the brushes. The second terminal of the winding is connected to the car body, which is the negative wire.
The alternating voltage generated by the generator is rectified by a three-phase diode bridge and supplied to the on-board network. The value of this voltage is in the range of 13.5-14.5 V. If it becomes too high, the relay regulator is activated and reduces the voltage on the field winding. Accordingly, the voltage generated by the generator decreases.
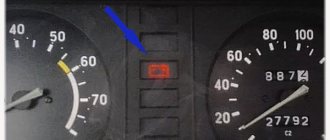
The charging control unit, assembled on a relay and a lamp, is connected to a separate terminal of the generator. As long as there is voltage at this pin, the relay is turned on, and the light bulb connected to the normally closed contacts of this relay is turned off. As soon as the voltage disappears, the generator does not work, the relay releases and the “No battery charging” lamp located on the dashboard lights up.
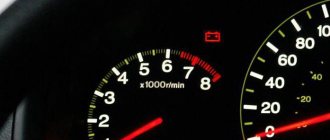
Emergency lamp “No battery charging”
Important! While the engine is not running, but the ignition is on, the emergency lamp will be on - because the generator is not working. This is fine. If everything is in order, it will go out after the engine starts.
What is on the VAZ 2110
For VAZ 2110 cars, the installation of two types of generators is provided, depending on the installed engine.
- For carburetor models, a generator with number 9402.3701 is installed.
- If the engine is injection, then the catalog number of the generator used will be 3202-3771. It has a serpentine belt.
Regardless of the type of installed engine and generator, respectively, problems with the devices are the same, therefore the inspection and repair procedure is identical in both cases.
Getting to the repair site
Finally, about what to do if an overcharge is detected while on the road and you need to get to the place of repair.
If the voltage does not exceed 15 V, then you can safely continue driving, but try not to give high speed to the engine and reduce the number of switched on electrical consumers as much as possible (keep only the necessary ones).
If the overcharge is strong (more than 15 V), you can first loosen the tension of the generator drive belt, which will reduce its performance (although the belt will quickly wear out).
If loosening the belt does not give any results, you can turn off the generator (disconnect the wires from it). In this case, the on-board network will be powered only from the battery.
If the battery is well charged with a minimum number of consumers on its charge, you can drive 70-90 km, but after that the battery will need to be well charged.
Malfunctions
There are two main reasons why an alternator stops charging properly.
| Cause | Peculiarities |
| Device overload | This happens to those who like to install numerous additional equipment that is powered by a generator, that is, it requires electricity. These could be speakers, electric pumps, video devices, etc. A standard generator is not designed for such loads, and therefore loses efficiency |
| Battery and alternator mismatch | To ensure the operation of electrical equipment additionally installed on the car, many decide to install a more powerful battery with a standard generator. A mismatch in power leads to the fact that the generator ceases to provide proper charging to the more powerful battery. So he simply does not have enough resources for this |
What charge does the generator produce?
Many people are interested in the question of how much a generator should produce for normal operation.
Here the parameters directly depend on the current state of the car.
- If the engine is cold and just turns on, then the voltage will normally be 14.1-14.4 Volts;
- If you check the voltage after long trips in traffic jams, then the generator will produce less, about 13.9-14.1V.
Reason #7. Problems with the generator
When the generator completely fails, there can be no question of charging the battery. It's another matter when the generator does not produce enough power. In such cases, the battery may well be undercharged. What does this mean and what does it look like in practice?
When the car engine is running, not all of the electricity generated by the generator is used to charge the battery. The lion's share of it goes to power various consumers - ignition systems, lighting, ventilation, air conditioning, acoustics, electronics, and so on. If the total power of all operating devices and equipment is greater than the generator can cover, then the battery is either undercharged or not charged at all. Moreover, if the situation is really bad, it will even “help” the generator, spending the accumulated energy.
A primitive test of the generator’s ability to provide all consumers, including the battery that requires charging, is as follows. First you need to measure the voltage at the battery terminals with the consumers turned off. Then repeat the measurements, turning on the headlights, stove, air conditioner, music and other devices. If during the first measurements the voltage was normal, but during the second it dropped by 1-1.5 V, then the generator cannot cope with the load placed on it, and the battery will never charge to 100%.
Similar material
Troubleshooting
Lack of charging can be caused by a wide range of reasons, which we will talk about today.
These reasons include:
- Weak contacts;
- Winding breaks;
- Short circuit on the rotor housing;
- Interturn short circuits;
- Mechanical breakdowns;
- Closing the positive clamp on the body;
- Short circuit in the phase winding;
- Short circuit of the stator to the housing.
Let's look at these situations in more detail to determine the true cause of the breakdown specifically in your case.
Start by turning off all additional equipment in your car that is not included as standard - DVR, navigator, audio system, etc.
- Measure the current output when the vehicle is cold, not running and all life support systems are disconnected. If there is no return at all, that's good. But this rarely happens. Almost always on tens there may be insufficient contact, some kind of short circuit, due to which there is recoil, but it is small. It’s much worse if the recoil is impressive and leads to battery discharge in one night spent in a parking lot or garage.
- If everything is normal, there are no strong current leaks or they are insignificant, and the battery has retained its charge, then you can return all the devices to the places that were installed additionally.
- Recheck the recoil. If at the same time the instruments show an active leak, then the reason does not lie in the battery and is not related to the generator. The culprit of the problem is one of the additionally connected devices.
- If no recoil is observed, then you need to carefully inspect the generator.
- There are many sources of trouble that can lead to generator failure. These include:
- Insufficient contact between the rotor rings and brushes;
- There was a break in the excitation winding;
- An interturn short circuit has occurred on the field winding coil. In this case, the generator will hum and get very hot;
- The field winding closes to the rotor housing;
- The stator shorts to the housing;
- A break occurs in the stator phase winding;
- The diodes have broken through in the rectifier block, that is, the diode bridge;
- The plus is shorted on the body;
- Mechanical problems have occurred.
Problem solving
- Poor contact. Loose contact can occur due to contamination, oil getting on the brushes, slip rings. Also, contact may deteriorate due to shrinkage of the springs that press on the brushes, or the brushes are stuck. Such phenomena lead to an increase in excitation resistance and can sometimes break the circuit. To eliminate the problem, sometimes it is enough to simply treat the surfaces with a rag soaked in gasoline. If the brushes are worn out, it is better to replace them. At the same time, check the condition of the springs and rings. The rings oxidize, so treat them with glass sandpaper.
- The winding has broken. If this happens, the battery will no longer charge. To determine the problem, place your hand on the battery. If there is a break, the device will begin to heat up. If you want a more accurate check, then disconnect the end of the field winding from the brush and connect the battery wires to it and terminal Ш using a voltmeter or a light bulb. If there is a break, the lamp will not light up and the voltmeter needle will not budge. Test each coil individually to determine which one is preventing the alternator from working. The internal coils must be replaced, and the internal coils must be soldered.
- Short circuit between turns. An interturn short circuit can occur in any field winding coil. If such a situation occurs, the winding will begin to heat up, and the excitation current will increase. To check, be sure to measure the resistance of each coil. For this you will need a voltmeter.
- Short circuit on the rotor housing. Such a breakdown leads to the fact that the entire field winding is short-circuited. The generator stops working. The most common short circuit area is where the ends of the winding lead to the rotor rings. To check, use a 220V light bulb. One wire should be connected to any contact of the ring, and the second to the rotor core or shaft. If there is a short circuit, then the light will turn on. It is impossible to operate a car with such a generator. It is necessary to isolate or completely replace the faulty winding. The first option is only suitable for getting to a service station and carrying out a full repair.
- Short circuit on phase winding. This kind of problem occurs because the insulation between the turns of the stator coil is destroyed. If this happens, the generator will start to get very hot, the battery will not receive sufficient charge, as this happens at high crankshaft speeds.
- Short circuit of the stator to the housing. As is the case with the other listed short circuit options, in this situation the generator begins to overheat, hum, and its power drops significantly. To check you will need a 220V light bulb. One wire is connected to the core, and the second to the winding terminal. Any. If there is a short circuit, your light bulb will light up. To fix the problem, simply replace the failed coil.
- The positive terminal closes to the housing. This kind of malfunction is unpleasant because it does not just overheat your generator. Also, due to this short circuit, breakdown of the diodes of the rectifier unit occurs. From there, the problem goes to the battery, which can simply short out. Not infrequently, a short circuit led to complete failure of the battery. Although most often it just completely discharges.
- Mechanical problems. If we take into account all possible mechanical problems of the generator, then belt stretching will be in first place in terms of frequency. This is the most common breakdown in the case of the VAZ 2110. If this happens, the pulley will begin to seriously overheat and the battery will not have enough charge. It is not superfluous to check the quality of all contacts, the presence of broken connections and other possible mechanical problems.
If problems are detected with the generator, you should immediately begin measures aimed at eliminating the breakdown. If you have no experience, contact only trusted service stations.
The alternator is the heart of your vehicle's electrical system. Like the main human organ, it provides power to all instruments and devices. Therefore, you should treat it very carefully and if problems arise, do not delay repairs.
Home » Chassis » Why the VAZ 2106 is not charging. Why there is no charging: the main reasons. What is a generator
What to do if the battery light is on or the light is off but there is no charging: diagnostics
In a situation where the battery light is on while the engine is running, you need to check the voltage at the battery terminals with a multimeter. This can be done quickly, and the voltage itself should normally be 13.5-14.3V. When there is no charging, the voltage will be about 12V.
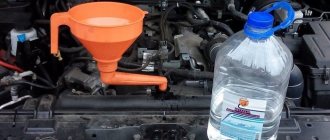
To check the charging status in more detail, you need to prepare a pair of screwdrivers (flat and Phillips), a 12V test lamp, a multimeter, a knife and pliers, as well as fine sandpaper. Now let's look at the main problems when the battery light comes on.
First, the generator is charging, the tester at the battery terminals shows a voltage of 12V, and the battery itself is discharged. In such a situation, stripping of the terminals and wires will be required. After cleaning, the voltage on the battery is measured again.
If stripping does not produce results, then you need to check the voltage at the generator terminal (connect one multimeter probe to the generator terminal, and the second to ground). If the voltage is higher than at the battery terminals, you will need to clean the generator terminals. You may also need to completely replace the cable from the alternator to the battery.
Secondly, the battery is discharged, and the voltage on the battery is 14V, but it drops under load. In this case, the cause may be poor tension of the generator belt, problems with the pulley, failure or wear of the generator bearings.
You also need to check the diode bridge and stator winding, since a breakdown of one diode can lead to insufficient charging. To believe this, you need to turn off the ignition, then check the generator, its diodes and other elements with a multimeter. At the same time, the generator brushes are also checked (if their length is less than 5 mm, the generator brushes need to be replaced).
Another situation where the battery is not charging may be due to a blown fuse. Usually this is an F10 fuse with a rating of 10 A. In some cases, replacing it can solve the problem. There may also be a problem with the ignition switch or relay. To determine, a ring with a multimeter is required.
Note that it also happens that after turning the key there is no charge in the lock, but the devices work. To check, you need to remove the wire from the generator terminal, and then connect it to negative or to the body. If the control lamp lights up, then the generator excitation winding has failed.
Often the culprit may be a bad contact in the connector to the battery lamp itself. To eliminate this problem, you need to clean all contacts and connectors
If the problem is with the light bulb (it does not burn brightly, intermittently or does not light), then attention should be paid to other icons. If the lights are dim, then the problem is not with the lamp.
If the other indicators glow brightly, then the battery light itself or its contacts may be faulty.
By the way, it may turn out that after turning on the ignition the battery light comes on, then does not go out or blinks after the engine starts. The battery icon on the panel indicates that charging is either intermittent or not charging. Often the cause is poor contact of the wire with the corresponding connector, which is located on the dashboard itself.
If all of the above checks did not produce results, then you need to move on to how to check the relay regulator. To do this, voltage is applied to the contacts. The voltage on the brushes is also checked. When the voltage is 12V, the relay works normally. If not, then it will need to be replaced.