Content
Expert recommendations
Many car owners, not wanting to overpay for cargo transportation services, decide to make a towbar with their own hands. It may be needed in many cases. In the modern world, living without a trailer and having a car is quite difficult. Everyone sooner or later makes repairs in their homes, and to transport building materials you have to overpay and order delivery. Those who own a country house or dacha, at the end of each season, rack their brains: how to transport the harvest to their city home. Residents living near the seas transport their boats to the water at the beginning of the season. In general, a towbar is an irreplaceable thing that should be on every car, unless in your garage, in addition to a passenger car, there is also a truck.
If your car does not have a towbar, you can buy it at the car market or make it yourself. It’s not difficult to make a tow hitch for a car with your own hands.
But the very first thing you need to know is that before you take up the materials, be sure to go and register with the traffic police, otherwise installing a tow bar will be illegal and you will have to pay a fine.
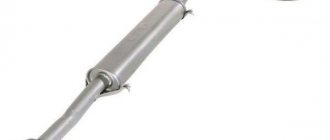
Tow hitch for car
To make a part yourself, you will need the following tools and equipment:
- welding machine;
- Sander;
- drill and drill bits of the required diameter;
- steel ball, made independently or purchased ready-made;
Materials required for work:
- one and a half meter steel pipe with a diameter of 50x50;
- sheets of steel, the thickness of which is 5 mm, measuring 300 by 70, and two sheets of 200 by 70;
- bolts M10 and M12. The first will require two, the last - six pieces;
- socket;
- insulated wires and electrical tape (or heat shrink);
- screws with nuts, about 40 mm long.
Semi-automatic welding machine
As you can see, you will not need many consumables to make such a useful device for everyday use.
In order to decide how to make a towbar with your own hands, you should understand what the maximum load the device will have and install the type of fastening that is suitable for a particular car.
Ideally, it is recommended to install towbars manufactured in a factory, but there is nothing wrong if you make it yourself. This is not difficult and it will serve you for as long as the factory one, if everything is done technically correctly and all the nuances are taken into account.
Most often, homemade towbars are installed on domestically produced vehicles. Do-it-yourself towbars on Oka come in different types: welded, flanged and collapsible. Installation is carried out using general rules.
Towbar sizes are selected individually for each vehicle, taking into account the design features and size of the vehicle
The expected load and type of fastening are taken into account. You shouldn’t miss the appearance of the car after attaching the part.
Towbar sizes are selected individually for each vehicle
In the era of computer technology, you can easily get any information and download any drawing on the Internet. The same applies to the do-it-yourself towbar drawings.
There are several design options:
- stationary towbar;
- removable;
- quick release.
You should select the one you need, taking into account the design features of your vehicle. They have a common scheme, but the types are different - depending on the method of attachment to the body.
Fixed, or as it is also called, stationary, is attached in such a way that the tow bar with the car body is one piece and cannot be removed.
Using a flange mount, which is also removable, the tow bar is secured to the frame or power bumper using bolts. This method is used to make it possible to transport heavy loads.
The design of the tow bar, its types and features
A towbar is a device that allows you to attach a trailer to a car and tow it. It is also called a towing device (TCU). Structurally, it is a coupling ball attached to the car, to which the coupling head mounted on the trailer is attached. This towbar design allows you to transport a trailer with a total weight of up to three and a half tons. A similar device is shown in the photo:
The towbar is attached to the car frame or body. There are several different types of coupling balls and their attachment to the frame or side members of the machine , some of them are shown in the photo:
Depending on the design of the hook on which the tow ball is located, the following types of towbars are distinguished:
- fixed or welded;
- flanged, installed on a specially provided platform;
- removable.
Their appearance can be seen in the photo:
As can be seen from the information provided, a universal tow bar has not yet been created. Each type is designed for its own method of fastening and towing a trailer with a certain load. In fact, each vehicle should have its own towbar, and preferably it should be a quick-release towbar.
The fact is that installing such a device does not have the best effect on the appearance of the car, and therefore in cases where it is not used, it makes sense to remove the hook, then the towbar will not be visible.
How to make a towbar with your own hands
Making a homemade towbar with your own hands is quite simple; its design will largely be determined by the make of a particular car. But in general terms a drawing of such a device can be seen in the photo
To make any towbar with your own hands, you will need:
- a ball mechanism, which you can buy in a store or make with your own hands a ball fifty millimeters in diameter;
- metal pipe and beam (1 and 0.5 m long, respectively);
- nuts, bolts, washers.
During the process of making it yourself, a homemade tow bar must be constantly tried on and monitored at its future location on the car. The prepared parts, together with the lugs for fastening, are welded to the pipe. The center is determined and the corners are welded there. One of the possible options for how to make a towbar with your own hands is shown in the video ” alt=””> The final stage of work will be priming and painting.
Do-it-yourself trailer hitch
You can make your own towbar for a passenger car using an angle grinder and a welding machine. We present the basic algorithm for the manufacturing process:
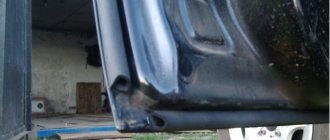
- remove the rear bumper;
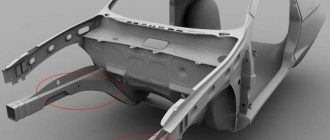
- find the holes that lead into the voids of the side members;
- measure the length of the segment between the holes found;
- cut a section of steel pipe 50x50 mm according to the obtained length;
- make a mark in the middle of the workpiece;
- take two pieces of 5 mm thick sheet steel measuring 20x7 cm and make holes 5 cm in size at the edge of each;
- place the strips on the pipe with the holes and weld them - the distance should allow you to place a coupling hook with a ball between them;
- secure the hook with nuts and bolts 10;
- then we move on to working on the attachment to the side members - weld steel strips 5 mm thick and 30x7 cm in size onto the ends. The direction should be opposite to the hook, and with the hook bracket the angle should be 900;
- insert these strips into the side members;
How to make a homemade towbar for your car
- drill holes with a diameter of 12 mm in the rear side members and inserted plates;
- weld nuts of the same size to them;
- take a 3 mm thick plate and mark the holes for the socket, then drill them;
- weld the plate to the hook bracket, install the socket on it.
The product is ready - you can install it and connect it to the machine’s electrical network.
See also:
Installing a towbar on a Hyundai Solaris
Wiring diagram
The left and right terminals are different in wiring. On the left, the contacts go in a simple order:
- Free
- Fog
- Mass (black)
- Turn signal
- Stop signal
- Dimensions
Almost the same will happen on the right:
- Free
- Reverse
- Mass (black)
- Turn signal
- Stop signal
- Dimensions
There is no point in running a cord from each terminal to the outlet. On the left side, you can generally take only two signals. And then the diagram looks simple (Fig. 1).
Option for 7 contactsSimplified option for 7 contacts
The circuit will look even simpler if you connect pins 5 and 7 (Fig. 2). The cord from terminal 6L is then not used.
On Renault Duster, it is better to connect the towbar socket according to diagram 1. Otherwise, three lamps will “hang” on one cord (6P). Ask yourself where this will lead.
The right harness, which is pulled from the coupling to the “square,” will have nowhere to hide. Well, all the cords on the left are perfectly hidden under the plastic.
>
Left-hand side
It turns out to be a paradox - where there are a lot of wires, they go “openly”. But the scheme can be reworked.
Be aware that pin 2 can be connected to a “licence light”. And then do the following: in the socket, connect terminals 2 and 7 or 2 and 5. This does not lead to negative consequences.
About connecting the “ground”
If the ground, that is, pin 3, is connected according to all the rules, you need to remove the right lamp. Underneath there will be a “pin” (not shown in the photo) onto which the nut is screwed.
Hairpin – slightly higher
The pin itself is located on top, that is, above the lantern.
Make a “petal” that fits over the stud and is pressed with a nut. The ground cord is soldered to the petal.
Those who do not want to remove the flashlight solder the cord to the connector pin. The terminal number in the connector is number 3, both on the left and on the right. There is an even simpler way - the “petal” can be soldered to the body. Use just one thing.
When connecting ground to the socket, use a cord with a larger cross-section than you use for the other contacts. Standard calculation method: per 1 sq. mm accounts for 10 Amperes.
About technology
To connect to any of the terminals, do the following:
- Disconnect the connector, open the lid on it;
- The terminal is removed from the connector by pressing it with a screwdriver;
- Another one is soldered to the “standard wire”, and “heat shrink” is put on top;
- Assembly is carried out.
The result of all efforts is shown in the photo.
This is where the turn signal was connected
If any trace remains on the standard wiring, the warranty for the “electrician” will end! You can buy male-female connectors to make extension cords. Bends are made from extension cords, and standard units are not affected. Connector code: 0988211060, 0988251060.
Installing a tow bar on a Renault Duster also includes installing a socket. Take care of the following:
- Let two harnesses be connected to the outlet. Then use a corrugated splitter. If there is no suitable part, use two corrugations (see photo); A couple of corrugations won't hurt anyone
- If only one harness is supplied, still cover it with corrugation. The material may be plastic.
Any discrepancy can be solved with electrical tape.
Be aware of the durability of plastic sockets: one such socket, judging by reviews, is “enough” for one season. It is better if the body is made of carbolite, silumin or aluminum. Well, prices for high-quality equipment are not budget-friendly.
Installing a towbar on a Renault Logan with your own hands
The installation of the coupling device on the Logan, as well as on the Renault Duster, Sandero Stepway and Fluence, is carried out in the technological seats provided by the manufacturer. Therefore, when looking for drawings on the Internet or drawing up your own project, make sure that the dimensions of the mounting holes match the mounting sockets in the car.
The towing device consists of two units - a supporting frame and a connecting mechanism
See also:
How to install a towbar on Lada Priora?
Wiring connection
Connecting the electrics is the final step towards installing the Duster tow bar.
Connecting wiring to the Duster trailer hitch
Before performing this work, study the diagram for the trailer hitch, which shows where the wires of a certain color are attached. The order of work is as follows:
- install the plug socket on the trailer hitch platform. It is attached there with screws;
- release the plug for the wires, which is located in the floor of the luggage compartment;
- insert the wires into the vacated holes;
- secure their ends to the terminal block;
- connect the wire to the standard connector.
Standard Duster trailer hitch connector
When installing electrics, you should know that the terminal block fits the standard one, and the trailer hitch kit includes detailed instructions for connecting the components together. This Renault model has an on-board computer, so installing the socket yourself can lead to voltage surges, which will cause equipment failure. To avoid this problem, use a matching unit or a special electrical kit.
Connecting the towbar
Connecting the towbar to the car electrics - the final stage
After installing the metal coupling structure, you should connect the towbar to the auto electrics. To do this, you must follow the following sequence of actions:
- pack the wiring in a heat-shrinkable tube or wrap it with electrical tape;
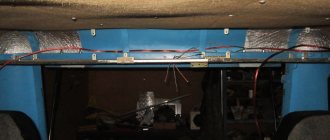
- dismantle the trunk trim;
- the wire harness is pulled into the hole for the license plate light wire;
- fuses are installed on the trunk side;
- wires are pulled from the fuses to the taillights, and the opposite end of the wire is supplied with lugs;
- install the wires through the lugs to the connecting plug under the trailer socket;
- fix the tourniquet with electrical tape.
All that remains is to check the operation of the headlights and organize a test drive with an empty and full trailer away from busy roads, changing driving modes. During a test drive, pay attention to the degree of deformation of the beam, the quality of the threaded tightening, the resistance of the hook surface to abrasion, etc.
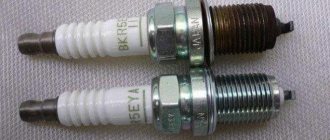
What are weldings?
Recently, another car tuning has become popular, which concerns not the body, but the wheels, during which the geometry of the wheel rim is changed at home, which allows you to install larger tires on the car. Such alterations of disks are called “unwelding”.
It is noteworthy that there is practically no benefit from such alterations. But since installing welding joints allows you to highlight the car at least a little, such tuning is now in quite good demand.
Of course, you can simply buy wheels of increased width, but they are expensive, and not all models can be fitted with them. But modification of the disk is available for any car, even the old Moskvich.
The essence of the method for making welds is simply cutting the disk and installing an insert between the resulting halves.
There are several technologies for making welding joints, and below we will consider the most common of them.
Electrical connection
After installing the towbar on the VAZ 2110 and attaching it to the body parts using the above method, you need to connect the towbar socket to duplicate important road signals behind the towbar during traffic and stopping the composite vehicle (car + trailer). In order to connect the wires correctly and safely, the car owner should always follow the diagram that comes with the factory-made tow bar. The towbar electrical socket on a VAZ suggests that it has seven places for connecting contacts.
After the wires from the car lights are threaded through the technological hole, which became accessible after removing the bumper, you can start connecting the corresponding wires. Connection diagram with decoding of the meaning of the signals and indicating the color of the wire:
- L — left turn signal, wire color — yellow.
- 54-G — rear fog light 12 V (this option may not be available), color — white.
- “31” – ground (earth, grounding, “—”, minus), wire color – black.
- R - right turn signal, wire color - green-yellow.
- 58 R - rear lights for illuminating the license plate, as well as the right side light, brown wire.
- “54” - stops (brake lights), red wire.
- 58 L - left side marker light, blue wire.
Requirements for the minimum thickness of each core, in square millimeters - from 1.5 mm 2, for the ground wire - from 2.5 mm 2.
When connecting the towbar-electrics, the terminals are counted in a circle, clockwise, starting from the top and ending with the central one (seventh).
How to make trailer brakes
Motoblock trailer brakes. The braking system facilitates and increases the safety of cargo transportation. There are many options for brakes, but as practice has shown, the most effective are motorcycle brakes.
How to make brakes on a trailer for a walk-behind tractor? Homemade trailer brakes are made from a cable, rod and drum. The drum must be attached to the rear wheel hub. The free spaces between the protrusions are filled with large wire. Next, a piece of pipe is welded to a pre-sharpened disk, which is installed on the axle. The brake pads are also attached to it, from which the cable will come to the lever. The brake is installed only on 1 wheel and this is quite enough to perform this function.
You can make any seat on a walk-behind tractor with your own hands. It can be short or oblong. It is made in the form of a box or chest, into which you can later put tools or improvised items. If the side of the cart is too low, then it is better to come up with a seat with a backrest so as not to strain the spine. To increase comfort, it is better to cover it with soft material.
If a chair or armchair is used as a seat, then 2 deep connectors are made for the legs for immersion inside. Thus, the chair becomes removable.
To attach a trailer to a walk-behind tractor, you need a hitch and a console. They can be removed from any decommissioned equipment.
The trailer device may have 1 axle, which has a weak center of gravity
It is important to install the body correctly so that there is no overstress at the coupling point. Therefore, the center of gravity must fall under the wheel axle
It is much more reliable with two-axle trailers. The weight distribution of the load falls not on 2, but on 4 wheels. They are suitable for transporting loads up to 1400 kg. You can use a car trailer.
Features of operation and care
Before each departure, it is necessary to check the device for mechanical integrity and operability of electrical circuits . It is especially important to check the strength of the structure if the tow bar is homemade and the welding quality has not passed the factory test. You can tap the joints with a hammer and determine the quality of the connection by ear. The specifics of using the device should be taken into account. Changing loads constantly test the strength of the structure, so monitoring must be constant.
It is also necessary to keep in mind that for driving a car with a towbar without an attached trailer, you can receive a warning or a fine from the traffic police. Therefore, it is necessary to disconnect the trailer hitch in time if it is not intended to be used for its intended purpose.
Making a towbar is not particularly difficult, but having the skills and ability to handle a welding machine and plumbing tools is a must. If you have experience, the hitch can be manufactured in one day and is no less high-quality and functional than one purchased in a store. The main task of the master is to ensure an exact match of the connecting holes. The cost of making a homemade towbar is significantly less than purchasing a ready-made one, so for those who want to save money, this is the most suitable option.
Source
How to properly install deflectors in winter
First, let’s ask ourselves: is it possible to install windshields in winter? Of course, it is not recommended to install deflectors in winter, since double-sided tape will not stick in the cold. But if such a need nevertheless arises, then it must be done in a warm hangar or garage, where the temperature is not lower than +10 degrees. If this condition is not observed, the deflectors will come off after a few hours. If it is not possible to use a warm garage or hangar, then it is best to contact a car service specialist or wait for the warm season!
As an introduction, we suggest watching a video that shows how to install deflectors on the front and rear windows of a car.
How to make a tow bar yourself
If not a single factory towbar fits your VAZ, try making it yourself. To do this you need to prepare:
- square steel pipe (about 1 m in length);
- several sheets of steel of the same thickness (width - 7 cm, length - 20 and 30 cm) or shorter pieces of pipe;
- bolts (M 10 - 2 pcs., M 12 - 6 pcs.), four-centimeter screws with nuts;
- socket;
- file and sandpaper;
- a metal hook, preferably with the same ball (the latter is used as a cap, retainer or towbar plug);
- wires (cores), insulating tape;
- primer and paint.
If you need to make a tow bar for your VAZ yourself so that the product looks beautiful, you should stock up on ready-made drawings or draw at least a simple diagram on paper or in a computer program. The simplest version of a homemade towbar is a horizontal bar, to which a pipe with a hook is firmly attached in the middle. For greater strength, it is also advisable to make sidewalls that are installed strictly perpendicular to the main beam.
How to make a towbar yourself (the example is given for clarity, you can choose the towbar sizes that you like, the main thing is to maintain the proportions and check the preliminary calculations “in kind” several times, that is, by measuring the rear of the car):
- Remove all items and upholstery from the trunk, turn off the power to the car and remove the rear bumper.
- Using metalworking tools and a welding machine, make a shape out of a square pipe that slightly resembles a flattened letter “P” by welding to the main piece of the towbar pipe (length - 110 cm) on the sides two of the same pieces, but shorter (the length of each of the 2 - x side parts - 26 cm).
- Strengthen the weak points formed on the welds of the metal structure by welding or screwing the corners (the width and length of each of the two sides of the strengthening corners is about 12 cm, but the final number depends on the thickness of the piece of pipe you selected).
- Drill holes for mounting to the car frame (two on each side).
When performing metal work (cutting, drilling), do not forget to take safety measures appropriate to the tools used, and immediately process (clean) the edges of metal products with sharp “burrs”.
Take the hook and drill a hole in the middle of the structure that matches the base of the hook in shape and size. Weld or screw this part to the towbar being manufactured.
Is it necessary to register a towbar with the traffic police: new rules for installing a towbar on a passenger car
Many drivers are concerned about the question: how to legally install a traction device?
Any changes made to the design of the car must be registered with the traffic police. The installation of a towbar on almost all car models is permitted by the manufacturer. This is indicated in the instruction manual.
Installation of a trailer hitch does not apply to design changes to the vehicle.
The towbar does not need to be registered with the traffic police in the following cases:
- The installation of the trailer hitch is provided by the manufacturer.
- The towbar has a passport and a certificate of conformity.
- The trailer device is installed according to the instructions given in the passport, i.e. the design of the machine has not been changed.
When installing a towbar on a car, you should be guided by the information from the operating documents for the car. If they reflect that the installed trailer hitch is certified for use as part of this vehicle, then there is no need to register the changes.
- The towbar is designed for this car.
- The compliance of the trailer hitch with the vehicle has been assessed and supporting documents are available.
- The installation is provided by the manufacturer.
Refer to the vehicle's load chart to determine whether your vehicle is approved to tow a trailer. It is located on the right B pillar of the car or under the hood. It informs you about the possibility of connecting a trailer.
If the corresponding line does not contain data, the towbar must be registered with the traffic police.
Requires registration of a trailer hitch, bolted or welded to the power elements of the machine, and necessary for serious traction loads.
When installing a towbar with your own hands, you should follow the following rules:
- Selecting a device suitable for a specific make and model of car.
- Reading the instructions for the trailer hitch.
- Preparing the necessary tools.
- Removing the bumper and its amplifier.
- Installation of beams and brackets to the body side members according to the diagram specified in the instructions.
- Fastening the socket box to the beam; connecting the electrical wiring harness to the beam with plastic cords.
- Pull the harness through the opening in the rear panel.
- Electrical installation, the connector for it is on the car diagram.
- Connection of two blocks.
- Installation of removed machine parts.
Attention! The bolts connecting the trailer hitch elements to the body must be carefully tightened. If the mounting points are rusty, they should be treated with anticorrosive
Proper installation of the trailer hitch will ensure long service life, reliability on the road and trouble-free operation.
How to connect a towbar
Installation of electronics - the final stage of towbar installation
To connect the towbar light signaling you will need a special connector. For domestic models, seven contacts will be required:
It must be taken into account that the on-board computer usually perceives the appearance of a new element in the system as outside interference and blocks it . In order to correctly connect the towbar, you will need a coordination unit. This device allows trailer lighting to operate without being switched off. The fact is that the additional energy consumption to power the turning lights, brake lights and other elements causes a slight voltage drop, which is perceived by the on-board computer as a malfunction. As a result, all additional devices are blocked. This block allows you to correctly install additional elements into the system, disabling the overload protection, and thereby ensures stable operation of the trailer alarm. In addition, the smart connect (another name for the device) switches the car's fog lights to the trailer and turns off the parking sensors.
Important selection features
Renault Duster comes in all-wheel drive 4×4 and mono-wheel drive (drive goes to the front wheels). Because of this, when buying a car from 2013, 2014, or maybe 2021 or our current 2021, not forgetting about 2015, be prepared to face some problems.
Most trailer hitches are compatible with all-wheel drive and single-wheel drive versions of the crossover. But installation will require some adjustments. For example, you often have to file a tongue on a bumper. There are versions of the trailer hitch that fit under the crossover bumper, but here you have to choose - leave the bumper intact or be able to carry a spare tire.
If this is an all-wheel drive version, then everything is somewhat simpler at first glance. You mount the brackets (in common parlance, cheeks), and then install them on the beam. But there is a nuance here. You will have to dismantle the protective screen, but you won’t be able to put it back. Although car owners claim that there is nothing wrong with this.
Connecting the device outlet
As for the connection diagram of the socket designed to provide current to the towbar, it is designed so that the second and fifth contacts remain free. The yellow trailer hitch wire is soldered to the first contact, it is responsible for the left turn, and the yellow-green wire is soldered to the third (acts as the trailer mass).
The fourth contact will be used for soldering a white wire, which will ensure the operation of the right turn, the sixth is red, responsible for the brake light, and the side lights function thanks to the blue wire soldered to the seventh contact.
Preparing car trailer wires for soldering is carried out according to the following instructions:
- The wires (with the exception of blue) protrude from the cable by 2 centimeters.
- They are stripped of 7 millimeters of insulation (blue by 13-14 millimeters, in addition, it is cut off at the end by 0.5 centimeters).
- Power is supplied from connectors located on the rear lights.
When connecting an outlet, care must be taken to ensure good insulation. If water gets on the contacts, oxidation will occur and it will become inoperative. There is a high risk of a short circuit. The insulating materials are the rubber gasket that comes with the socket and the sealant.
What should you consider when installing the device?
Installing a tow bar involves taking into account parameters such as vertical and horizontal loads. The first value is determined based on the maximum permissible pressure that the trailer exerts on the hook (the weight of the cargo is taken into account). The second is based on the maximum permissible weight of the trailer itself. These indicators must be considered for the Niva taking into account the surfaces on which the combination will move, since on unpaved roads both types of load increase significantly, which can lead to problems when braking or sliding on the highway.
Niva 21214 is often used for trips to the country, fishing, hunting, and everything goes in the trailer: from household equipment and potatoes to boats, therefore the fastening must be reliable. The modern car market offers many options for towbars for Niva 21214 and other models, including:
Part installed on the machine
- non-removable, where the hook is welded to the base;
- removable, which is secured with two or more bolts;
- quick-release, on which the hook with the ball from the tow bar is removed and stored separately (the coupling itself, intended for fixing, protrudes slightly);
- quick-release with vertical fastening - the hook is removed downwards, the fastening is not visible;
- machine with a hook that deviates under the bottom, non-removable.
Selecting a trailer hitch
Is there an option for installing towbars on Nivas if the car originally came from the factory without one? Yes. These domestic crossovers have special holes, so the trailer hitch is mounted in standard places. But you will also need to drill a few additional holes. Now look specifically at your car.
Niva car owners are offered the installation of several trailer hitch options:
- non-removable or non-removable, in which the hook or coupling ball is welded to the base;
- conditionally removable, fastened with several bolts;
- quick-release, having a slightly protruding coupling for fixation, which allows you to store the hook with the ball separately;
- quick-release with a vertical type of fastening, where the hook is pulled down and the fasteners are not visible;
I will say right away that a removable ball is more preferable for me, since this design allows you to use the trailer hitch only when necessary. Moreover, it is better to take quick-release devices, because unscrewing several bolts will take quite a lot of time.
For VAZ Niva 4×4, they usually prefer to choose the simplest towbar options. They are inexpensive and can be purchased for several thousand rubles. Although this has its drawbacks.
Alternative trailer hitch options
There are alternative solutions that I would like to discuss with you.
- Reinforced bumper with towbar. Nowadays, the Chevrolet Niva towbar with bumper protection is very popular. But no one is stopping you from installing it on the classic Niva. This is a ready-made bumper with a trailer hitch mounted into it. Products from Bosal (Bosal) or RIF will cost about 30 thousand rubles. This cost is justified because you get a bumper with a powerful gate and reinforcement, providing a high degree of rigidity and resistance to loads. Allows you to carry heavier loads. In this case, installation is carried out on conventional crossover body brackets and no modification is required;
- Square towbar. Another option for the rear bumper. It costs about 2 times less than the previous trailer hitch. But you will need to buy a ball joint separately. It is in great demand due to price, ease of use and load-bearing capacity. And it looks quite original compared to standard towbars. Just look at the numbers indicated on the trailer hitch. They indicate permissible traction loads and additionally help to make sure that what you are looking at is not a fake.
In general, the topic of the power bumper for the Niva deserves special attention.
Each towbar comes with a connection and installation diagram; the kit includes a towbar socket and instructions on how to connect the socket and all electrical components.
Some people prefer to assemble the towbar with their own hands, relying on drawings, photos and video instructions. Personally, my opinion is that this is not the best option. To assemble a full-fledged high-quality tow bar, you need to take into account all dimensions, select high-quality materials, use the appropriate wires for electrical equipment, and so on. And how much does it cost to assemble a homemade trailer hitch? If it’s high quality and reliable, then it’s about the same as a standard factory tow bar. This is an imaginary saving of money. The price will be the same, but the quality of construction will not. Plus, it is more difficult to register a homemade towbar; problems may arise during registration.
I advise you to first familiarize yourself with whether it is possible to install a trailer hitch and what the traffic regulations now say about this.
Operating rules
In order for the part to last long enough and to avoid problems with the traffic police, the following rules for operating a trailer hitch on a vehicle must be observed:
- Before installing the trailer hitch, you should clarify whether the vehicle manufacturer provides for the installation of this equipment. If you do not do this and do not register changes to the design of the car, then problems with the traffic police may arise.
- When transporting a trailer with a gross weight close to the maximum value, the maximum permissible vehicle speed should not exceed 90 kilometers per hour.
- Regularly check the tightness of the trailer hitch connections. Experts recommend carrying out this operation. Experts recommend carrying out this operation every 1000 km of the vehicle.
- To protect a product that has not been used for a long time from destruction, and to protect it from the negative effects of the environment, use a protective cap and a special lubricant.
- Scratches and chips that occur on the part during operation are covered with a special restorative composition. In addition, moisture, salt and dirt should be removed from it regularly. This is necessary to protect the trailer hitch from corrosion.
With careful use of the trailer hitch, the part will last 10 years.
Making your own tow bar
Despite the sale of ready-made towbars, motorists independently manufacture trailer hitches for the Niva. To design a product yourself you will need:
- Prepare a drawing of the future part. You can create it yourself, order it from a specialist, or download it on the Internet. The technical documentation must indicate the dimensions of all components of the trailer hitch and the type of fasteners.
- Purchase high quality materials. The use of low-quality metal will lead to rapid failure of the tow bar.
- Ensuring reliable connection of all parts of the trailer hitch to each other. One of the most popular types of homemade towbars is non-removable. This choice is explained by the relative simplicity of the design and the absence of moving mechanisms and elements in it.
The quality of a homemade trailer hitch will be an order of magnitude worse than a serial one. In addition, there will be significant problems with registering a homemade part with the traffic police. You also need to take care of proper installation. Otherwise, using the towbar may damage the rear of the vehicle.
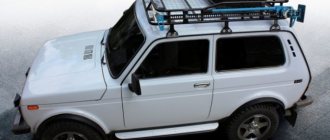
Niva is an off-road passenger car. The vehicle is used for trips out of town, fishing and hunting trips. The car also often acts as a tug for stuck vehicles. By installing a towbar, you will be able to fully enjoy the operation of your car.
Bike rack on the Car towbar – 2 Types: Bike racks and Bike racks, Installation, Holders
Using a bicycle as a means to strengthen muscles and general physical condition is commonplace, but the double benefits of walking arise if they are done in environmentally friendly natural areas. But here’s the problem: if you use only your own strength, you won’t be able to get to remote areas, which means you need to use a car to transport your two-wheeled companion.
The easiest way, which also does not require additional costs, is to place the bicycle in the trunk or interior of the car, but this option is possible if there are no passengers in the back seat and for a fairly spacious car.
If you decide to transport one or more bicycles inside the cabin, remove the front wheels, turn the steering wheel to a prone position and try to place your bike in such a way as not to damage the interior of the car and avoid additional injuries in the event of an accidental accident.
Transporting a bicycle on the roof of a car
Transporting bicycles on the roof of a car is a traditional and long-tested method. A special mount installed on the roof makes it possible to transport not only household goods, but also, with an additional mount, bicycles.
The two-wheeled vehicle is placed in a special profile mounted on the trunk and secured in a certain way.
The object of attachment to the trunk of a car is usually:
- fork, with front wheel removed;
- the frame, after installation, is secured with additional braces;
- handlebar, used when mounted upside down on a bicycle rack.
This method of moving bikes cannot be called the most successful, since when placing a heavy and inconvenient object on the roof of a car, you can scratch the paintwork of the car, and yes, a woman is unlikely to be able to perform such a procedure.
Bike racks and bike carriers
The bike rack is installed directly on the rear door or the vehicle's spare wheel located on the rear door
For each car model, you will have to select a new device and you must take into account that some models of bike racks, when placing bikes on them, can hide the car’s license plate, which is not encouraged by traffic regulations
Bike racks are a fairly simple way to secure a bicycle to the back door using special straps, but when the car moves, the mount becomes loose and you have to stop to tighten the straps. The advantage is that any type of bicycle can be transported this way.
Bicycle towbar: types and features
The most convenient, but also the most expensive way to transport one or more bikes on a car is a towbar with a special mount. It’s probably not worth installing this expensive accessory specifically for rare trips into nature with a bicycle, but when you often ride in a large group with several bikes, a towbar will be an excellent solution to the problem.
Placing bicycles on the tow bar can be of two types:
- suspended version - fastening occurs behind the frame, and the wheels are suspended.
- platform - the bike is installed on a base with the wheels secured in the gutters.
A bicycle mount on a towbar in the form of a platform allows you to transport several bikes of any size, which does not in any way affect traffic safety, since such a platform is equipped with brake signal repeaters and side lights; in addition, the registration plate will always be visible, which will avoid unnecessary proceedings with the road inspectorate. The platform allows access to the trunk without removing the bikes and is ideal for long trips.
An undoubted advantage of placing bicycles on a tow bar is the slight lifting of a rather inconvenient and heavy object when securing it. This is much easier than trying to secure a two-wheeler to the roof of a car.
Recommendations for using the tow bar
If you have correctly installed the towbar on the Niva, you should adhere to the following recommendations for using the trailer hitch:
- It is prohibited to tow cargo weighing more than 1300 kg.
- It is necessary to adhere to a certain speed limit when towing a trailer (no more than 90 km/h).
- The load on the coupling ball should not exceed 50 kg.
- At each vehicle maintenance, it is necessary to tighten the connecting threads.
- If the load extends beyond the trailer by 1 meter at the front or rear, or 40 cm from the outer edge of the side light, it must be marked with special identification marks.
You should also adhere to the rules for placing cargo in a trailer. It should be evenly distributed, that is, the center of gravity should be above the axle (if we are talking about a single-axle trailer) or between the axles (if you are using a two-axle model).
These rules should not be neglected, since in a situation where the load is shifted forward, the load on the coupling device and the rear of the machine will increase, which will lead to poor traction with the road surface. It is also impossible to allow a shift back, otherwise the rear part of the car will rise, which will also worsen the vehicle’s handling.