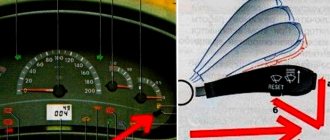
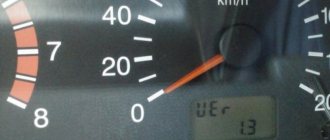
In the event of malfunctions in the operation of the vehicle, the engine electronic control unit (ECU) stores errors in memory. In the future, Kalina ECU errors can be read using an on-board computer or special equipment for car diagnostics. In addition to controller error codes, it is possible to perform Kalina self-diagnosis on the dashboard.
Advice
: To read errors in electronic units, car owners often use the ELM327 adapter (buy on Ali) and the OpenDiag application in their smartphone.
Using the Scanner
Using a scan tool is the easiest way to reset your check engine light. Here are 5 simple steps:
- Connect the scan tool to the OBD connector under the steering column. A laptop or tablet with the appropriate software is installed in the holder;
- Then turn on the car’s ignition and turn on all the gadgets accordingly;
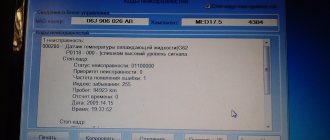
- On your mobile device, in the appropriate section, press the “READ” button to view engine error codes. We write down the codes with a pen in the order in which they were received. This will be necessary for subsequent repairs.
- We delete the error code. Press the “ERASE” button on the scanner. The Check Engine light will turn off when all error codes are cleared. Some scanning tools have many options, such as freeze frame, which captures the sensor readings. When deleting codes, these readings will also be deleted. Note: in some scanners, the option to clear codes may be automatic and the “CLEAR” or “YES” button instead of the “ERASE” button.
- Be sure to turn the ignition on before clearing codes.
In what cases is it necessary to remove the instrument panel?
Dismantling the Priora tidy is required for tuning or replacing burnt out lamps. The VAZ 2170 is a modern model, so there are not many fastenings on the panel. To disassemble you will need a set of screwdrivers. Don't forget to turn off the negative battery.
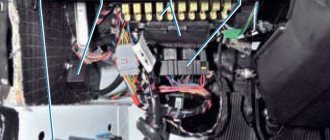
The process begins with removing the mounting block. To do this, you need to turn the latches on the fuse cover and then remove it;
Turn the marked clamps to remove the cover. It is not necessary to remove the steering wheel, just lower the steering column down. Using a Phillips screwdriver, unscrew the screws of the trim; use the same tool to unscrew the screws of the instrument cluster. Tilt the top towards you and then remove the combination from the slots. Now you can turn the lock;
Pull the cover out to remove it from the groove Sources used:
- https://priorik.ru/gorit-chek-na-priore-prichiny-nado-znat/
- https://inkam-auto.ru/raznoe/kak-sbrosit-chek-na-priore-samomu.html
- https://www.veber-service.ru/blog/4-sposoba-kak-sbrosit-oshibku-dvigatelja-check-engine.html
- https://remontvazov.com/panel-priborov
Battery disconnect method
Disconnecting the battery is an old way to reset the check engine light. Here are three steps to clear the check using this method: Step 1: Disconnect the cables from the battery. At this point, you should use a wrench to unscrew the positive and negative cables.
Step 2: Discharge the remaining electricity. The next thing you should do is press and hold the car horn for about 30 seconds. This action will help drain the car battery.
Step 3: Wait and reconnect the battery. After disconnecting the battery cables and draining the remaining electricity, all you have to do is wait about 15 minutes and then plug the battery back in. Error codes will be cleared. (Note: This method may not work on some vehicles.) If after this procedure the “check” lights up again, this may mean that the problem is still much more serious.
Air and fuel system problem codes
P0030 means that the sensor cable, which is responsible for heating the oxygen, has broken. The break is located before the exhaust gas neutralization system. If the cable of the same sensor is shorted to ground, then code P0031 occurs. If there is a break in the circuit after the neutralizer, the number 6 will appear at the end of the code.
If there are problems with a weak throttle signal, then the code P0122 appears, and a strong one - P0123. If there is a problem with the oxygen device, then error P 0130 appears. With P0133, the response to the mixture comes slowly; if error P0134 occurs, the device does not work.
If a spark does not occur in all cylinders or only in one of them, then a code from P0300 to P0304 may appear. If the detonation devices are broken, then the code is P0326. If the signal is weak in the same place, the code is P0327, and if the signal is too strong, the code ends with the number 28.
If there are problems with the crankshaft, code P0335, in this case: 0336 - the indicators are outside the limits; 0337 - short circuit; 0338 - network interruption. Errors P0342 - a weak signal is received from the phase sensor, and with P0343 - too strong. But if the number at the end is 46, then the data has gone far beyond the permissible limits. If there are problems with the coils and cylinders, then these are codes P0351-P0363.
Allow the check engine light to go off on its own.
Wait until the “check” goes out on its own. The simplest method because you don't have to do anything. The computer system in most vehicles will automatically recheck for problems that may activate the error light. If it is a minor problem, it will automatically correct itself and the check will go off. However, if the check light is still on after three days, you need to apply the methods mentioned above to reset it.
If this continues to happen despite the following reset procedures, you should take your vehicle to your nearest auto repair shop and have it diagnosed by a professional mechanic. Professional diagnostics use more sophisticated tools and can identify precise problems.
REMEMBER: You can always contact our car service center, where your car will be happy to receive professional technical assistance. You can also make an appointment with us for a scheduled technical inspection! Please familiarize yourself with our car repair and diagnostic services.
How to reset a check on a Priora yourself
Probably every VAZ owner has encountered such a problem when, out of the blue, the “chek” error comes on. Here many people immediately panic. Don't worry, there's nothing wrong with it. Firstly, this error appears when any sensor fails (here you will have to suffer and determine which one), but all this is determined by changes in the behavior of the car: dynamics, consumption, etc. Secondly, this error appears when the wrong mixture enters the combustion chamber. This can happen in two cases: some sensor is not working correctly, or low-quality gasoline. Try using higher quality fuel the next time you fill up.
However, even if you correct the problem, the “check” will continue to light up. Many people go to computer diagnostics to clear an error, where they pay about 150-200 rubles per minute. Although it’s not a lot of money, why? If you can reset the error yourself, spending the same minute on it, and you don’t have to go anywhere. Don’t know how to reset the check error yourself? Very simple, read below.
We reset the error.
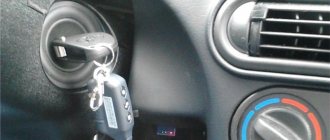
- To do this, turn on the ignition without starting the car.
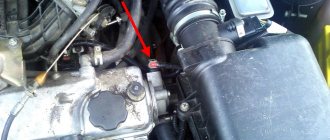
- Open the hood and remove the positive terminal of the battery.
- We wait from 10 seconds to a minute and seat the terminal back.
- Close the hood.
- Turn off the ignition.
- Turn on the ignition and start.
And then a miracle, the error light stopped lighting.
Even if you cannot decide why your check light came on, do not immediately run to diagnostics. Try to reset this error using the method described above. There are simply cases of accidental operation (there was an impurity in gasoline and the like). And then after the reset the error simply will not appear again. And if, nevertheless, there is some kind of problem, then the “check” will pop up again, after 50 kilometers.
Check Engine Light comes on when your vehicle's computer detects a problem with the powertrain. This may indicate a serious or minor complication, but ignoring it will definitely make the problem worse, leading to significant damage and costly repairs. You can avoid all troubles if you know the reasons for the signal. However, it sometimes does not turn off despite solving the problem. In this case, it won’t hurt you to find out how to reset the “check”.
Most drivers get annoyed if the check light still does not go off, even if the car problem has been corrected. In this case, your car's computer is faulty and a little intervention is required to resolve the issue.
The exclamation mark is on - what to do?
We have noticed that new topics often appear on car forums where drivers ask about the exclamation marks that are displayed on the Lada Priora panel. They rarely specify where it is lit and what is depicted on the icon. In this section we have collected a small FAQ Below are all the exclamation marks that can light up on the instrument panel of a VAZ 2170 car. The designations of these icons are as follows:
- The red exclamation mark in the circle (bottom) is lit. The indicator indicates that there is a problem with the vehicle's brake system. This is usually a low brake fluid level. Add it to the tank and, most likely, the sign will stop lighting. If this does not happen, then it is worth checking the system for damaged components. When igniting, the indicator lights up for 4 seconds and then goes off.
- The red exclamation mark in the triangle/circle (above) is lit. Modern versions use a triangle instead of a circle. The indicator tells us about defects in the operation of the brake force distributor. Use extreme caution if the light comes on while driving.
- Exclamation mark next to the steering wheel icon. When illuminated for a long time, it indicates a malfunction in the electric power steering (EPS). Like other icons, it lights up when ignited and goes out after a few seconds if the system is working properly.
If the red triangle lights up while the engine is running, then you should diagnose the brake force distributor.
Sometimes the cause of the indication is a malfunction in the electronics. Terminals are coming off, contacts are oxidized, defects in the on-board computer are a few reasons for the random appearance of icons. To avoid damaging one of the systems, check the electronics first. To do this, it is enough to dismantle the device on the Lada Priora and see if the terminals are securely seated in the sockets. If the brake system indicator lights up, first check the fluid level in the reservoir, and only then fill in new antifreeze.
Using the Scanner
Using a scan tool is the easiest way to reset your check engine light. Here are 5 simple steps:
Battery disconnect method
Disconnecting the battery is an old way to reset the check engine light. Here are three steps to clear the check using this method: Step 1: Disconnect the cables from the battery. At this point, you should use a wrench to unscrew the positive and negative cables.
Step 2: Discharge the remaining electricity. The next thing you should do is press and hold the car horn for about 30 seconds. This action will help drain the car battery.
Step 3: Wait and reconnect the battery. After disconnecting the battery cables and draining the remaining electricity, all you have to do is wait about 15 minutes and then plug the battery back in. Error codes will be cleared. (Note: This method may not work on some vehicles.) If after this procedure the “check” lights up again, this may mean that the problem is still much more serious.