- Identifying the cause
- Operating principle of DS
- Diagnostics
- First way
- Second way
- Fault repair
- Useful video
The failure of a device that measures the speed of a car is a significant problem, without solving which it is impossible to drive on the roads - it often occurs on domestic cars. To understand why the VAZ 2114 speedometer does not work, you will need to make some efforts, but such breakdowns are not insoluble.
Speedometer VAZ 2114
Identifying the cause
Unlike older AvtoVAZ models, the VAZ 2114 speedometer is not mechanical, but electronic, whose readings depend on the sensor installed on the car’s gearbox.
It is this electronic device that most often fails, which can be caused by various factors:
- lack of contact on the connector block (for example, due to water getting there);
- break in the wire supplying the sensor;
- lack of current in the supply contact.
Speed sensor VAZ 2114
Since the VAZ 2114 is equipped with an on-board computer, the first thing you can do is try to detect a breakdown with its help: having turned on the self-diagnosis process, you need to wait until it ends. If the result of the test is the displayed error P0500, it means that the on-board computer does not receive the corresponding signal from the speed sensor.
The speed sensor on the VAZ 2114 partly consists of plastic parts that can fail relatively easily, so experts recommend proactively solving the problem before it breaks down, replacing them with metal analogues available in stores.
Speedometer drive: types and differences
A speedometer is an important element in cars, as well as several other vehicles, as it is necessary to monitor speed in order not to violate traffic rules. But this is not the last function of this device.
All possible speedometers have a high-speed magnetic unit; due to the rotation of the magnets, a flow is formed, it moves through the coil, thereby facilitating the induction of eddy currents. They thereby begin to create more magnetic fields. They interact with each other, the needle of the device moves along the frequency scale, with the help of this the magnet rotates.
All speedometers are divided into three categories.
- Mechanical speedometers.
- Electromechanical speedometers.
- Electronic speedometers.
Mechanical speedometers. In this type of speedometer, the process of speed measurement and indication occurs thanks to a mechanical device. A gear is used as sensors, which is connected to the secondary shaft of the gearbox; this is the speed unit with an arrow indicator and the drum counter. Previously, speedometers were used in the form of a drum and tape. But they stopped using them quite a long time ago.
Electromechanical speedometers. In these devices, speed is measured using various electronic or electromechanical sensors that are connected to the gearbox. The speed is indicated by a milliammeter or the speed unit of a mechanical speedometer, and the distance is indicated by a counting drum, which drives a stepper motor.
Electronic speedometers. This is a development of new electromechanical speedometers; the main difference is the replacement of the odometer - in an electronic device it is completely digital.
Operating principle of DS
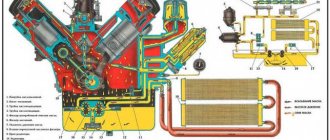
Since the DS on the VAZ 2114 is electronic, its operating principle is to generate constant pulses supplied and read by the control unit at each revolution of the car’s crankshaft.
Analyzing the frequency of the received pulses, the controller outputs the resulting speed to the speedometer while driving, and in addition, it is responsible for the operation of the engine at idle speed and the frequency of air flow bypassing the throttle valve.
Location of DS VAZ 2114
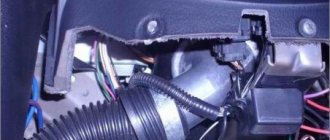
To understand why the speedometer on the VAZ 2114 does not work, you need to get to the speed sensor located in the engine compartment. To do this, you need to open the hood, remove the interfering adsorber and find the wire feeding the sensor next to the right CV joint.
The device itself will be located under the choke assembly in the direction of the supply wire, and the first step is to visually assess its condition. If the DS is still factory, with a high degree of probability its plastic rod or gear, which is responsible for driving the VAZ 2114 speedometer, will be broken (bent, missing teeth, and so on).
DS extraction
Diagnostics
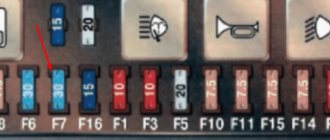
If at this stage no problems are identified, and the mechanical components of the sensor are in order, you will need to resort to more advanced diagnostics, for which the car owner will need to use a multimeter (in voltage measurement mode).
First way
The first method involves removing the DS and taking it out, after which you will need to perform the following manipulations:
- Set the multimeter to AC voltage.
- Close the contacts of the multimeter on the sensor block - one to the dashboard, the other to ground.
- Manually turn the rod at the rear of the sensor housing to start it into operation.
Checking the DS
Each rotation of the rod will provoke fluctuations on the multimeter screen, directly dependent on the speed of rotation. The absence of readings will indicate the presence of a breakdown.
Second way
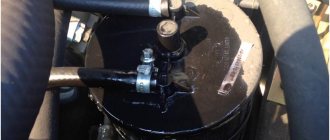
Another way to find out why the speedometer on a VAZ 2114 stopped working will require installing the car above the inspection hole so as not to dismantle the sensor, after which the car will need to be slightly raised with a jack on the left front.
Having found the desired device, disconnect the wires on the block, after which the tester contacts should be connected as follows: one to ground, and the second to the electronic control unit. You can evaluate the operation of the DS by the same voltage surges on a multimeter, for which you will need to turn the left front wheel hanging on a jack.
Diagnostics of DS VAZ 2114
Fault repair
In fact, no one is repairing the speed sensor on these VAZ models, since it is much easier and faster to replace this entire unit - it costs around 400 rubles, which is not that expensive.
In order to begin the replacement process, it is recommended to drive the car into a pit and prepare screwdrivers, pliers and a set of wrenches. If there is no hole nearby, you first need to remove the terminals from the battery, then remove the air filter and intake pipe, and then remove the terminal from the DS itself (if the car uses a cable drive for the speedometer, you need to remove that too).
Next, use a rag to clean the work area of debris, oil or dust, and then proceed directly to the replacement:
- Remove the terminal block using the button that deactivates the spring retainer.
- Using a 21mm wrench, remove the speed sensor from its socket.
- Install the new device so that its rod precisely fits into the fixing sleeve to transmit rotation.
- Tighten the thread back with a 21mm wrench, without pinching it, so as not to damage the integrity of the plastic housing of the DS.
Replacing DS VAZ 2114
The result can be assessed immediately - if the sensor does not fit into the socket, it means that its rod has not moved into the bushing, so the procedure will have to be repeated until success is achieved. After this, you need to return the removed units to their place, connect the power and check the operation of the new sensor while the car is moving. Or, if the replacement was carried out in a pit and with a jack, you can evaluate the performance of the DS using the same multimeter and rotating the hung left wheel.
Replacing the Drive Gear of the Speedometer Drive VAZ 2114
Wash the Lada Samara 4.5 gearbox, preventing water from entering the crankcase, and install it on the disassembly panel. Remove the suspension and clutch cable mounting bracket.
- box
- 1. Clutch clutch bearing
- 4. guide sleeve
- 3. input shaft
- 4. secondary shaft roller bearing
- 5. secondary shaft
- 6. retaining ring
- 7. satellite axis
- 8. speedometer drive gear
- 9. transport plug
- 10. oil drive oil seal
- 11. roller bevel differential
- 12. gear shaft
- 13. satellite
- 14. differential box
- 15. clutch housing
- 16. main drive driven gear
- 17. drain plug
- 18. adjusting ring
- 19. drive gear I of the secondary shaft gear
- 20. transmission unit for synchronizers I and II
- 21. driven gear II of the secondary transmission shaft
- 22. retaining ring
- 23. stubborn half ring
- 24. Drive gearbox III secondary shaft
- 25. transmission unit for synchronizers III and IV
- 26. drive gear IV of the secondary shaft transmission
- 27. secondary shaft needle roller bearing
- 28. secondary shaft ball bearing
- 29. stubborn plate
- 30. drive gear V of the secondary shaft transmission
- 31. Synchronizer gearbox assembly V
- 32. nut
- 33. thrust washer
- 34. Transmission drive V transmission input shaft
- 35. back cover of the case
- 36. ball bearing of the input shaft
- 37. box body
- 38. roller bearing of the input shaft
- 39. breathing
- 40. input shaft oil seal
Content
AVEO Speedometer drive.
- After unscrewing the nuts, remove the rear cover 35 of the VAZ 2113 body and the gasket.
- Secure the input shaft using special tool 41.7816.4070 and remove nuts 32 from the primary 3 and secondary 6 shafts. Unscrew the gearbox mounting bolt V on the rod and remove the 31 V synchronizer from the secondary shaft gears, the V-shaped gearbox plug, and gear 30 with the needle bearing. from the main shaft.
- Using an impact screwdriver, unscrew the mounting screws and remove the thrust plate 29 and adjusting rings from the bearings 28 and 36 of the primary and secondary shafts.
- Unscrew the four clips and remove the springs and clips from their sockets.
- Remove the bolt and nuts that secure the housing to the clutch housing and lift the housing off the pins.
- Remove the connecting rods and plugs by unscrewing the fork mounting bolts on the shift shaft shafts 2114. Pull out the axle and remove the rear gear.
READ How to Remove the Side Mirror on a VAZ 2114
- Removing the primary and secondary shafts
Remove the primary and secondary shafts immediately from the roller bearings of the VAZ 2115 clutch housing, and then remove the differential. Remove the outer shaft races and differential bearings from the clutch housing using pullers 67.7801.9529 and 67.7801.9530.
- Removing the gear selector mechanism
- Remove the transmission mounting bolts and remove it.
- Remove the shift lever mounting bolt, remove it from the rod, and remove the rod from the clutch housing.
Do not remove the selection unless required. articulated joint and gear lever, since the conical screws securing them are attached to a special glue.
- Output Shaft Parts
- 1. nut
- 3.5. stubborn plate
- 3. 5th gear sliding clutch synchronizer
- 4. Sliding bushing
- 5. synchronizer synchronizing ring
- 6. Gear V gear
- 7. Needle bearing spacer ring
- 8. needle bearing
- 9. V gear bushing
- 10. stubborn washer
- 11. ball bearing
- 12. stubborn washer
- 13. IV gear bushing
- 14. IV gear
- 15. sliding clutch synchronizer for 3rd and 4th gears
- 16. clutch sliding hub
- 17. gear III gear
- 18. retaining ring
- 19. stubborn half rings of the secondary shaft
- 20. gears II
- 21. slipping of clutch synchronizer I and II with reverse gear
- 22. retaining ring from the synchronizer hub
- 23. gear shift clutch for clutch synchronizer of 1st and 2nd gears
- 24. synchronizer spring
- 25 burglar
- 26. clamp
- 27. gear I, gears
- 28. roller bearing
READ How to Pull the Handbrake on a VAZ 2114
If it is necessary to disassemble the output shaft, secure it in the handles with soft material spacers and use a universal puller to press the ball bearing from the shaft. Likewise, the input shaft bearing is pressed. Then remove driven gears IV, III, II and I gears and synchronizers from the secondary shaft kit in the order shown in Fig. 3.14. Remove the synchronizer of 1st and 2nd gears and the retaining ring of the nails. Compress the one-piece synchronizer using a press or using button A. 40005/1 / 6. If necessary, remove the synchronizer.
It is necessary not to disassemble the secondary shaft; Do not push the built-in synchronizer away from the shaft, so as not to reduce interference in the spline connection. Do not disassemble the synchronizer as necessary to interfere with proper assembly. Do not squeeze the crankcase seals unless they are worn or even damaged.
speedometer 2110 2115
Let's look at the differences in the following order:
- Differential assembly of vase 2115
- 1. satellite axis
- 3.2. retaining ring
- 3. semi-axial gears
- 4. speedometer drive gear
- 5. differential box
- 6. satellite
- 7. main drive driven gear
READ How to Disassemble the Speedometer of a VAZ 2105
- — if it is necessary to replace the driven transmission, unscrew the bolts of its transmission and press the gearbox 7 (Fig. 3.15) from the differential box 5;
- — remove the retaining ring 4.5 from the axis 1 of the satellites and press out the axis;
- — remove the 3rd gear axle and 6th gears from the differential box;
- — if necessary, press the bearings out of the differential box using stop 67.7853.9582 and a universal puller.
- Details of the gear selection mechanism of the VAZ 2114
- 1. gear selector rod
- 4. Gear shift lever
- 3. gear selection housing
- 4. Gear shift lever
- 5. fixing brackets
- 6. Gear shift shaft
- 7. guide axis of locking brackets
- 8. reverse fork
- 9. clamp
- 10. stubborn washer
- 11. spring
Disassemble the gear selector by unscrewing the nut securing axle 6 of the gear selector lever of the VAZ 2115, and remove the retaining rings from the axle of the rear fork and axle 7 of the holding brackets, remove the rear gear 8 of the gear shift lever on axle 4 in the stand, 4 6 axles and springs 11 with thrust washer 10.
If desired, remove the speedometer drive by unscrewing the speedometer nut and pulling out the speedometer drive while supporting the drive roller.
ZAZ Tavria Speedometer Drive Restoration, Slavuta, part 1
Source