Running self-diagnosis, reading error codes, erasing errors (check engine)
Hello, tell me how to reset the error: Before starting the engine, I disconnected the air flow sensor (the connector on the air filter cover), and then I forgot to connect it and started the engine, after which it shows an error on my panel - the Engine System Malfunction Warning Light (orange) came on. . I turned the sensor back on, but the icon did not go out. How can I reset this error? Thanks in advance for your answer
Try this: To check 1. Turn on the ignition (without starting the engine), count for 3 seconds. 2. Quickly (within 5 seconds) press the gas pedal all the way 5 times 3. Immediately after the last press (release the pedal completely), count 7 seconds. 4.Press the pedal all the way and hold it until the CHECK (MI indicator) starts flashing. 5.Release the pedal and read the codes
four series of 10 flashes code 0000 - no problems detected if, for example, code 0102 - looks like this: 10 flashes // 1 flash // 10 flash // 2 flash. // – pause after reading the last error, everything repeats in a circle until you turn off the ignition.
We erase the errors that we received during check 0. Before performing step 1, the ignition must be turned off for at least 10 seconds 1. Turn on the ignition (without starting the engine), count 3 seconds. 2. Quickly (within 5 seconds) press the gas pedal all the way 5 times 3. Immediately after the last press (release the pedal completely), count 7 seconds. 4. Press the gas pedal all the way and keep it pressed until the “check” blinks in four series of 10 flashes
If the check engine light comes on on the dashboard of a Lada Kalina with an 8-valve engine, this is a fairly common occurrence. The reasons for the appearance of such an alarm signal are different, and there are many of them and most owners have already become familiar with them. Many car owners are interested in the question of how to reset a check.
In our material we will try to determine the main factors affecting the activation of this lamp. To identify the causes, you can use the diagnostic service of the service center. It is also possible to determine the influencing factor in independent mode. And how to reset a check.
How are errors diagnosed?
If problems and unusual malfunctions begin to appear in the usual operation of your car, think about carrying out diagnostics of the systems. Remember that not every machine has special pads for working with a specific professional connector, so it makes sense to use a standard connector. Why is code combination analysis so important? It is displayed on the on-board computer monitor, clearly demonstrating the problem and its location, which helps the owner to quickly carry out repair work. For a more detailed scanning of the breakdown, you can connect a special device - a scanner connected to the connector.
Self-diagnosis of the car
The system makes adjustments independently, automatically. Its structure includes other electronic devices. Thanks to special ECU sensors, the device’s memory receives information, including faults (shown in the form of numerical combinations). Most often, manufacturing companies are reluctant to provide complete information about the designation of codes and ciphers, as they consider professional inspection and care to be of better quality than independent care.
Experts recommend contacting the Lada service center to avoid fraud. Most cars are equipped with a bot controller - a unit that processes the information received by the sensors and displays it on the monitor. The Lada model does not have such a device, so it is appropriate to use scanning equipment. Let's take a closer look at the process itself:
How to diagnose via the dashboard
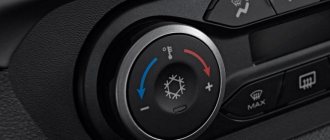
Diagnostics can be performed via the instrument panel. In order to start the verification process, it is recommended to click the button for recording the car mileage per day. Hold it a little and slowly turn on the ignition. If the manipulation is performed correctly, the instrument panel arrows (tachometer, speedometer, other indicators) will move in a circle, shifting from beginning to end. When the process is complete, switch the screen to another position using the button on the wiper adjustment surface (located at the bottom of the steering wheel). When you press it, an icon with the operating parameters of the ECU devices will appear on the instrument panel. One more thing: software with the inscription “self-diagnosis” always appears.
Step-by-step instructions for resetting the Check Engine error on Lada Kalina
In order to reset the Check Engine error on the Lada Kalina, you will need to perform the following procedure:
- Turn on the ignition without starting the car.
- Open the hood and remove the positive terminal of the battery.
- We wait from 10 seconds to a minute and seat the terminal back.
- Close the hood.
- Turn off the ignition.
- Turn on the ignition and start.
Well, that's basically it! I think most of you will be able to complete these steps without much difficulty. Well, especially for you, I want to post error codes and their interpretation on Lada Kalina cars.
Troubleshooting
The Lada Kalina has a central control unit for the injection engine and vehicle electrical system. Problems that arise during the operation of electronic and electrical systems are recorded by the unit in the form of errors and stored in memory. If there are such problems, the orange Check Engine light on the panel lights up. Some errors can be displayed on the screen installed on the instrument cluster and deciphered.
Code analysis allows you to accurately determine the incorrectly operating element and repair or replace this unit. You can check for problems more deeply and thoroughly by connecting a special scanner to the diagnostic connector. The diagnostics and list of errors are the same on a 16-valve car and on a car with a simpler 8-valve engine.
Step-by-step self-diagnosis
Checking for errors in the ECU and displaying their numbers on the dashboard is called self-diagnosis. This procedure is not complicated and can be easily done independently.
In this case, the owner of a Lada Kalina 1118 station wagon or sedan must perform the following actions:
- Get behind the wheel of a Lada Kalina car and press the daily mileage reset button on the instrument cluster (Reset).
- Turn on the ignition while holding the button pressed.
- The instrument cluster will switch to test mode, during which the full backlight will turn on, all indicator lamps will turn on, and the device arrows will begin to move smoothly in both directions along the scale.
- Using the button on the right lever of the steering column switch, you can sequentially change menu items, including self-diagnosis of devices, software version (firmware, inscription like Uer x. x) and error codes in the unit’s memory.
- It is necessary to look at the codes recorded in the ECM and determine their meaning.
- To exit the self-diagnosis mode, you need to wait about 30 seconds without performing any actions.
Kalina steering column switch button
The modernized Kalina 2 has a slightly different instrument panel design. The procedure for displaying errors is similar; codes appear in the top line of the display as a three-digit number. Below the indicator line, information about the vehicle's serial number is displayed (looks like a six-digit number).
Why is the check on Kalina flashing?
If the check on Kalina 16 valves comes on, and the system works without failures, do a step-by-step test. They brake the car and carefully listen to the sounds the engine makes. You definitely need to look at the quality and condition of the fuel mixture and oil. When there are no visual defects, but there are blinking signs, go to a service station to perform a comprehensive check. You can check the ignition system, inspect the car coil, spark plugs, and determine the quality of the fuel. If you fail to figure out the problem before it is fixed, the error will remain.
Refilling gasoline at trusted places is a guarantee that there will be no unnecessary problems with your receipt.
Let's sum it up
In a modern car, which can also be considered the Lada Kalina, most systems are equipped with sensors with the help of which the on-board module carries out control. If the check light is on, this indicates that a certain type of malfunction has occurred. The cause is found using a diagnostic device.
Sometimes the problem when the check light is on requires the connection of more complex scanning equipment to identify the breakdown. In any case, to prevent malfunctions, it is necessary to perform regular diagnostic inspections, which will avoid premature failure of expensive components. Answering the question of how to reset a check, the answer is obvious: it is necessary to diagnose the malfunction and eliminate it.
Lada Kalina check engine light is on, find out the error - autognostics
Most car owners learn about what a Check Engine is only after they have this problem. Understanding does not solve the problem, but only adds headaches, because there can be quite a few reasons why this light comes on. Sometimes you have to search for a very long time, and in some cases you cannot do without computer diagnostics at all. Today I will try to explain what a Check Engine is, why it lights up and what it threatens the motorist with.
Check Engine indicator “Check Engine” literally translates as “check the engine”, the indicator is located on the instrument panel and if it lights up, it means something is wrong with the engine. The warning light lights up based on a signal from the control unit, which has detected irregularities in engine operation. The very first “checks” were equipped with mini-computers, the main task of which was to control the carburetor, but as in the history of personal PCs, which were also originally intended to perform high-complexity computing tasks, the mini-computer of modern Check Engines has seriously evolved.
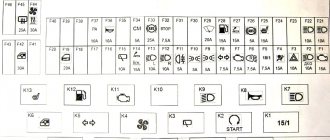
New Lada: Fuses and relays Lada Kalina / Lada Kalina (VAZ 1118, 117, 1119)
conclusions
If the on-board computer shows significantly more than 8.5 liters (and this is the average consumption in mixed mode), then this is a reason to think about the proper operation of the engine and its systems
If an increase in fuel consumption is detected on the Lada Kalina, the malfunction should be immediately diagnosed and repaired. There were cases when consumption reached 20 liters and only after that did motorists begin to do something. If the owner of a Lada Kalina cannot detect the fault himself, then it is worth contacting a car service center. The consequence of increased consumption may be increased wear of the elements of the power unit, which can lead to unplanned overhauls.
Source
The oxygen sensor has become unusable
The importance of this component of the on-board engine management system (or ECU) for any car, including the Lada Kalina with an 8-valve engine, cannot be overestimated. Over time, the lambda probe requires replacement. This sensor serves to record the amount of oxygen present in the exhaust gas stream. Receiving certain impulses from this oxygen sensor, the on-board control module adjusts the composition of the mixture, which leads to a decrease in the volume of unburned oxygen in the exhaust. Also, the operation of the lambda probe partially characterizes the level of fuel consumption.
Failure of the designated sensor initiates the appearance of the warning lamp, and as mentioned above, the reasons are different. This action is performed due to the lack of a signal from the computer required to control mixture formation. Such a malfunction entails an increase in fuel consumption and causes a decrease in the power level of the power plant. Most modern cars are equipped with two or four lambda probes.
It is not difficult to determine the fact that the oxygen sensor has failed. Here you will need to connect the scanner to the appropriate diagnostic socket of the car and turn on the reading program in the device. Faulty sensors cannot be repaired and are therefore replaced with new analogues.
The main reasons for the probe to malfunction, if the check engine light comes on, is contamination of its working element with oil impurities entering the exhaust manifold. In this case, there is a decrease in sensitivity, leading to incorrect readings.
Neglecting the problem can cause a malfunction of such an expensive exhaust circuit component as a catalyst. The cost of the sensor itself is commensurately less than the price of the neutralizer, so we do not recommend delaying the replacement of the lambda. The replacement procedure is characterized by the absence of difficulties. The main thing here is to adhere to the provisions of the relevant instructions.
Expert answer
“Check Engine” can light up for any of the reasons related to malfunctions of sensors, actuators and other devices of the engine control unit.
First of all, it is more rational to do computer diagnostics of the engine. If there is no service station in your city where you can diagnose the engine, you can test the components that are responsible for the main cause, namely, consumption in urban traffic. As is clear from the essence of the issue, the check light does not light up constantly, that is, when the engine is cold, the engine error light does not light up, but lights up periodically while driving. The combination of two reasons indicates a malfunction: To get a more accurate answer to the question posed, you need to specify the make of the car, year of manufacture, and engine type.
There are several methods for assessing the performance of the listed sensors without the use of special equipment and computer diagnostics.
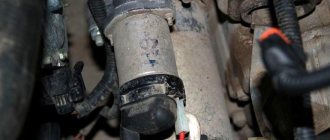
Let's start with the oxygen sensor. It is installed on the exhaust manifold. If this sensor is faulty, fuel consumption increases by 30 - 40 percent. Moreover, if the sensor heater is working properly, then the check will not light up at the time of start-up. The sensor heater circuit can be tested with a multimeter; the resistance will be in the range from 2 to 10 ohms. The multimeter is connected to the thicker wires of the sensor.
You can check the oxygen sensor by connecting a voltmeter to the thin terminals of the sensor. When over-gassing (enriched mixture), the voltage at the sensor terminals should be more than 0.7 Volts; when the mixture is lean (idling, you can artificially create a suction into the intake manifold), the voltage drops to 0.2 Volts. If the voltmeter readings are different, the sensor should be replaced. Washing and cleaning will have no effect. The sensor on the Toyota model is not cheap; you can install a universal lambda probe, including from Lada.
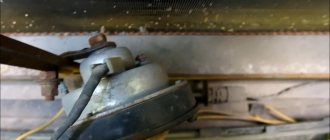
If the mass air flow sensor (flow meter) is faulty, an incorrect fuel/air ratio is formed, which can also lead to an increase in fuel consumption by 10 - 20%. In this case, there are difficulties with starting, uneven engine operation. The check is easy to do. If, after disconnecting the sensor connector, the engine continues to run as before, the sensor is most likely faulty. Washing the sensor with a carburetor cleaner sometimes works, especially if the sensor is contaminated with crankcase gases from a “rotating” engine. The flow meter is usually located after the air filter in the pipe.
The EGR valve also affects fuel consumption if it does not turn on the exhaust gas recirculation system. It can be checked by “continuity” using a multimeter (resistance from 10 to 100 Ohms).
Source
Lada Kalina error codes and their interpretation
Decoding error codes in the dashboard:
- 2-increased voltage of the on-board network;
- 3-fuel level sensor error (if a break in the sensor circuit is detected within 20s);
- 4-error of the coolant temperature sensor (if an open circuit of the sensor is detected within 20s);
- 5-outside temperature sensor error (if there are no sensor readings within 20s, indication on the LCD is “-C”);
- 6-engine overheating (the criterion for triggering the acoustic alarm has been met);
- 7-emergency oil pressure (the criterion for triggering the acoustic alarm is met);
- 8-defect of the brake system (the criterion for triggering the acoustic alarm is met);
- The 9-battery is discharged (the criterion for triggering the acoustic alarm has been met);
- E-determination of an error in a data packet stored in EEPROM
With this, I would like to finish this article about resetting the Check Engine error on the Lada Kalina! See you soon friends on our website!
Causes of 4 errors
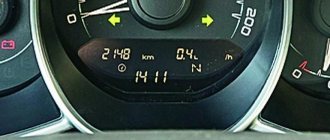
Error 4 came on on the on-board computer screen ( marked with a red arrow )
There are several reasons why error 4 appears in the ECU. Let's consider all possible options:
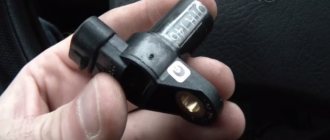
- The coolant temperature sensor has failed.
In the process of replacing and repairing the coolant sensor on Kalina
Checking the wiring and voltage supply to the sensor
All of these reasons are fairly easy to fix and are not a cause for serious concern.
How to view errors on the on-board computer?
The video shows the “self-diagnosis mode” of the Lada Kalina car, in which you can find out if there are any errors:
Elimination methods
In order to eliminate the cause of error 4 in the Kalina ECU, you should perform the following operations:
Thus, you can solve the problem yourself, but as practice shows, this does not always work out. Error 4 occurs quite often in the cold season, when the car is parked in the fresh air for a long time, and not in the garage.
Why does the “check” light up: the most common and common malfunctions
So, we figured out the general scheme. Now let's look at what problems lead to the check light coming on and the engine stalling. Often a p0300 error occurs, which indicates that a misfire (misfire) is occurring. There are several reasons for these omissions, and to determine them it is necessary to carry out a step-by-step diagnosis, taking into account certain individual symptoms.
- You should start by checking the ignition system. The most common cause of tripping is the failure of spark plugs and armored wires. Candles can wear out their service life, break down, or become heavily contaminated. Armored wires suffer from insulation damage and breakdowns. One way or another, the result is either no spark at all, or there is a spark, but it’s weak.
If everything is in order with the spark plugs and wires, you should pay attention to the ignition module or ignition coils, which may be shorting. In this case, it is better to entrust the check to experienced specialists, since unprofessional actions lead to the fact that you can burn the switch or damage other important elements.
- Having dealt with the ignition system, it is necessary to check the power system. As a rule, incorrect operation of injection nozzles or malfunctions in their operation lead to engine tripping. At the same time, the check will light up or flash.
The best option would be to check the injectors on a special stand. Such diagnostics allows you to determine the need to clean, repair or replace injectors. At the same time, specialists check the power supply to the injectors, the condition of the injector O-rings, etc.
- As for compression, a burnt-out valve often leads to an unexpected decrease in the indicator. If the valve burns out, the engine starts to run rough. In this case, tripling is constant and occurs in all modes of engine operation. Engine thrust drops significantly, and significant excess fuel consumption is observed.
Please note that in this case you cannot drive the car, as there is a high risk of damaging the catalyst and oxygen sensor (lybda probe). To confirm the diagnosis, you need to measure the compression, and to solve the problem itself, you need to remove the cylinder head, troubleshoot the head and change the valve.
Spent spark plugs and worn high-voltage wires
Candles have a direct impact on the quality of the combustion process of the mixture inside the working chambers of the engine. A failed spark plug is unable to generate the spark needed to ignite. This results in unburned fuel and air entering the exhaust manifold. Even if the engine managed to start, a misfire will cause it to operate incorrectly, characterized by vibration, jolts, failures during acceleration, etc.
Experts rightly put forward recommendations for replacing the specified elements of the ignition system every 25-30 thousand km. If the quality indicators of the fuel being refilled are far from the required level, then the replacement frequency should be reduced.
The main signs of candle failure are as follows:
- difficulty starting the engine;
- increasing the level of fuel consumption;
- incorrect operation of the unit not only at idle, but also at high speeds with the presence of side symptoms (dips, twitching, etc.).
Also, worn-out spark plugs, as noted earlier, can provoke rapid failure of the converter, so the timeliness of their replacement is one of the main conditions for the viability of this element of the exhaust circuit.
The owner of Lada Kalina 2 needs special attention to high-voltage cables and their tips installed directly on the spark plugs. The main test method is to measure resistance. Here you will need to involve a tester. The value of the required resistance can be found in any Lada Kalina service manual. If this indicator diverges from the standard value, then such a cable must be replaced.
There are also many other reasons why the check light is on. Sometimes these factors are not “intimidating” in nature, and the method of eliminating the problem identified in the process of diagnosing the problem is cheap in terms of costs. But there are also serious breakdowns, the elimination of which requires the intervention of significantly greater human and financial resources.
A flashing “Check” symbol in a Lada Kalina 2 car indicates that the driver needs to stop immediately to check the oil level in the engine (wait a few minutes first). Sometimes the unit's lubrication circuit filter may become unusable. A useful step here would be to inspect the engine for visible damage.
Self-diagnosis
Engine Ambulance
So, we have studied the main engine malfunctions and received advice on how to prevent them. Now let's talk about emergency assistance to a car that suddenly began to lose speed and is about to hopelessly stall.
If there is a problem on the road, use the emergency lights
- You need to turn on the hazard lights, press the clutch pedal all the way and, relying on the inertia of the car, carefully pull over to the side of the road. The main thing is to move the car away from the roadway so as not to create an emergency situation.
- When the engine loses its power, the brakes become less effective, so you need to press the brake pedal all the way down.
- You need to remember the parking brake and turn it on. If an engine breakdown catches you on a slope, use such a necessary thing as wheel chocks to prevent the car from falling down.
- It is important to put up a warning triangle. Nobody has yet canceled the traffic rules.
- Now we determine the cause of the problem. It lies either in the power system or in the ignition system.
We open the hood and examine the condition of all the parts. If you notice broken or burnt wires, replace them. Hoses, filter (it can be found under the bottom of the car), fuel lines - all this needs a thorough inspection. There may be a microscopic crack somewhere that is causing the failure. If there is a gasoline leak, it must be fixed as quickly as possible, because it may end in an explosion. Do not even touch the ignition key until you are sure that the leak has been completely eliminated. You also need to check the level of oil and coolant, which may have leaked along the way.
If you did not find any faults when inspecting the power system, feel free to proceed to the next stage of the test - examine the ignition system and timing belt.
Troubleshooting
The Lada Kalina has a central control unit for the injection engine and vehicle electrical system. Problems that arise during the operation of electronic and electrical systems are recorded by the unit in the form of errors and stored in memory. If there are such problems, the orange Check Engine light on the panel lights up. Some errors can be displayed on the screen installed on the instrument cluster and deciphered.
Code analysis allows you to accurately determine the incorrectly operating element and repair or replace this unit. You can check for problems more deeply and thoroughly by connecting a special scanner to the diagnostic connector. The diagnostics and list of errors are the same on a 16-valve car and on a car with a simpler 8-valve engine.
Step-by-step self-diagnosis
Checking for errors in the ECU and displaying their numbers on the dashboard is called self-diagnosis. This procedure is not complicated and can be easily done independently.
In this case, the owner of a Lada Kalina 1118 station wagon or sedan must perform the following actions:
- Get behind the wheel of a Lada Kalina car and press the daily mileage reset button on the instrument cluster (Reset).
- Turn on the ignition while holding the button pressed.
- The instrument cluster will switch to test mode, during which the full backlight will turn on, all indicator lamps will turn on, and the device arrows will begin to move smoothly in both directions along the scale.
- Using the button on the right lever of the steering column switch, you can sequentially change menu items, including self-diagnosis of devices, software version (firmware, inscription like Uer x. x) and error codes in the unit’s memory.
- It is necessary to look at the codes recorded in the ECM and determine their meaning.
- To exit the self-diagnosis mode, you need to wait about 30 seconds without performing any actions.
Kalina steering column switch button
The modernized Kalina 2 has a slightly different instrument panel design. The procedure for displaying errors is similar; codes appear in the top line of the display as a three-digit number. Below the indicator line, information about the vehicle's serial number is displayed (looks like a six-digit number).
What does error 8 mean and how to fix it
Error 8, reflected on the on-board computer of the VAZ-2114, means low voltage on the on-board network. Reasons that can cause a decrease in voltage in the VAZ-2114:
- the battery is almost completely discharged;
- erasing or “freezing”, lack of adequate operation of the brushes on the generator.
That is, you can remove error 8 and correct problems in the operation of the VAZ-2114 by charging the car battery or replacing the brushes on the generator, and all this can be done without turning to specialists, in your own garage with your own hands.
Video “Do-it-yourself diagnostics of a Kalina car”
To learn how to properly perform computer diagnostics at home, watch the video.
How to clear/reset the Check Engine error on Lada Kalina cars - this question often worries owners of VAZ cars. The fact is that most Lada owners have encountered such a problem when, for no apparent reason, the “chek” error lights up.
Here many people immediately panic. Don't worry, there's nothing wrong with it. Firstly, this error appears when any sensor fails.
Secondly, this error appears when the wrong mixture enters the combustion chamber. This can happen in two cases: some sensor is not working correctly, or low-quality gasoline. Try using higher quality fuel the next time you fill up.
Diagnostics and error codes of the Lada Kalina instrument cluster
Read
0141 Faulty oxygen sensor heater 5 0171 Very lean mixture 0172 Very rich mixture 0201 Open injector 1 control 0202 Open injector 2.7 control circuit 0203 injector 3 circuit 0204 Open injector 4 0261 Short to ground injector 1 circuit 0264 Circuit short to ground injectors 3.5 0267 Short to ground in the injector 3 circuit 0270 Short to ground in the injector 4 circuit 0262 Short to 12V in the injector 1 circuit 0265 Short to 12V in the injector 3.5 circuit 0268 Short to 12V in the injector 3 circuit 0271 Short to 12V in the circuit injectors 4 0300 Many misfires 0301 Misfires ignition in cylinder 1 0302 Misfire in cylinder 3.5 0303 Misfire in cylinder 3 0304 Misfire in cylinder 4 0325 Open circuit of knock sensor 0327 Low signal level of knock sensor 0328 Signal level of knock sensor 0335 Incorrect signal from crankshaft position sensor 0336 Signal error crankshaft position sensor 0340 Phase sensor error 0342 Low signal level of the phase sensor 0343 Signal level of the phase sensor 0422 Low efficiency of the converter 0443 Malfunction of the canister purge valve circuit 0444 Short or open circuit of the canister purge valve 0445 Short to ground of the canister purge valve 0480 Malfunction of the fan circuit cooling 1 0500 Incorrect speed sensor signal O External RAM error 0604 Internal RAM error _ _ _ _ _ _ _ _ _ _ _ _ _ _ RAM 0607 Knock channel malfunction 1102 Low oxygen sensor heater resistance 1115 Faulty oxygen sensor heating circuit 1123 Rich idle 1124 Lean idle 1127 Rich partial load 1128 Lean partial load 1135 Oxygen sensor heater circuit 1 open, short circuit 1136 Rich mixture operating in Light Load mode 1137 Lean mixture operating in Light Load mode 1140 Measured load differs from calculation 1171 Low CO potentiometer level 1172 CO potentiometer level 1386 Knock channel test error 1410 Purge valve control circuit adsorber short circuit to 12V 1425 Control circuit of the canister purge valve short circuit to ground 1426 Control circuit of the canister purge valve open 1500 Open circuit of the fuel pump relay control circuit 1501 Short to ground of the fuel pump relay control circuit 1502 Short circuit to 12V of the fuel pump relay control circuit 1509 Regulator control circuit overload idle speed 1513 Idle speed control circuit, short short to ground 1514 Idle speed control circuit, short short to 12V, open 1541 Fuel pump relay control circuit, open 1570 Incorrect APS signal 1600 No connection with APS 1602 Loss of on-board power supply voltage to the ECU 1603 Error EEPROM 1606 Sensor uneven road incorrect signal 1616 Rough road sensor small signal 1612 ECU reset error 1617 Rough road sensor high signal 1620 RFOM error 1621 1622 EPROM error 1640 EEPROM Test error 1689 Incorrect error codes 0337 Crankshaft position sensor, circuit Ground fault 0338 Crankshaft position sensor, open circuit 0441 Air flow through the valve is incorrect 0481 Cooling fan circuit malfunction 5 0615 Starter relay circuit open 0616 Starter relay circuit short short to ground 0617 Starter relay circuit short short to 12V 1141 Malfunction of oxygen sensor 1 heater after the neutralizer 230 Fuel relay circuit malfunction pump 263 Driver fault Injector 1 266 Injector Driver 3.2 Malfunction 269 Injector Driver 3 Malfunction 272 Injector Driver 4 Malfunction 650 CheckEngine Lamp Circuit Malfunction
- With the ignition off, press the Reset button (reset daily mileage). While holding the button, turn on the ignition.
- The device panel will go into self-diagnosis mode, the positions of the parts will light up on the screen, the indicators will light up, and the arrows will go the full way.
- Using the control button on the right steering column switch, we switch between modes (self-diagnosis, firmware version, error codes).
- To clear errors, you need to be in error mode and press and hold the Reset button for more than 3 seconds.
- The diagnostic mode exits automatically after inactivity for 20-30 seconds.
Decoding error codes in the dashboard:
- 2-increased voltage of the on-board network;
- 3-fuel level sensor error (if an open circuit of the sensor is detected within 20 s);
- 4-error of the antifreeze temperature sensor (if an open circuit of the sensor is detected within 20 s);
- 5-error of the external temperature sensor (if there are no sensor readings for 20s, indication on LCD -C);
- 6-motor overheating (the part for triggering the acoustic alarm has been completed);
- 7-emergency oil pressure (the aspect for triggering the acoustic alarm is completed);
- 8-defect of the brake complex of accounting programs (the aspect for triggering the acoustic alarm has been completed);
- The 9-battery is discharged (the part for triggering the acoustic alarm is completed);
- E-determination of an error in a data packet stored in EEPROM.
Many modern cars have the ability to independently read electrical system problems. Error codes on Kalina, after decoding, can reduce the time required to find a faulty unit in the electrical wiring.
Self-diagnosis codes
CAN bus errors
Airbag errors
Errors of light, mirrors and others
Video “Diagnostics of errors on VAZ Kalina”
Comments and Reviews
How to decipher error 4 on the dashboard of a VAZ Kalina car?
Hello, Vladimir. The appearance of the CheyEngin icon is a common problem in all domestic vehicles with an on-board computer. Tips for solving the problem are given below.
What does error 4 mean?
Fault code 4 indicates that the refrigerant temperature control regulator is not functioning correctly. In most cases, this code lights up on the dashboard if, within 20-30 seconds, the electronic control unit detects a break in the regulator wiring.
- After analyzing your problem, we turned to many sources on the Internet and consulted with the owners of Lad Kalin. As it turns out, the number 4 often appears on the instrument panel, this can be considered one of the most common errors in these vehicles. Replacing the antifreeze temperature regulator in the cooling system in some cases will help cause the error to disappear. However, according to most potassium growers, in fact, in most cases it does not give a good result.
- If you believe the reviews of car enthusiasts, then such an error, as a rule, appears mainly during cold weather. If there are no signs of breakdowns, then perhaps you have no reason to worry.
- It is likely that over time the vehicle has been used, the sensor itself has oxidized. As a result, a poor contact is formed, which does not allow signal transmission in normal mode. Sometimes this happens after you have washed your car. We recommend that you carry out a visual diagnosis of the regulator - if you notice that the contact has really oxidized, then it needs to be cleaned.
If there is continuity, if cleaning the contacts does not help, you need to check the car wiring. It is quite possible that the reason for the appearance of the code on the device is a broken wiring or short circuit. In the case of a break, it will be enough to replace the wires or eliminate the cause of the short circuit.
If you have changed the sensor, replaced the wire and cleaned the contact, but the problem still remains, we recommend that you perform more detailed computer diagnostics. In domestic cars, it often happens that if the control unit does not work correctly, errors may appear on the screen that in fact do not exist. To understand this, you need to completely read all the codes from the on-board computer and then draw conclusions.
Video “Do-it-yourself diagnostics of a Kalina car”
To learn how to properly perform computer diagnostics at home, watch the video.
Bad fuel
Low-quality gasoline, or as it is popularly called “bad gas,” can cause the engine warning light to appear on the dashboard. So, troubleshooting can take a lot of time and labor. In order to get rid of the effect, you will have to clean the fuel system. To do this you need to do the following:
- Remove and clean the fuel tank.
- Remove the fuel rail and wash the injectors using a special stand.
- Replace the fuel filter, because as practice shows, after low-quality fuel it becomes clogged and completely loses its service life. “Bodyaga” - bad gasoline can also be found at gas stations with high quality
Troubleshooting methods
Now that all the causes have been identified, we can begin to consider troubleshooting. But, before we begin, it is worth noting that a car enthusiast needs to have an idea of the design features of the engine if he wants to fix the problem himself. Otherwise, go directly to a car service center, in order to avoid other problems that, due to lack of experience, car enthusiasts usually create for themselves.
Sensors
Often, the reason why the check light on Kalina may come on is the failure of one of the sensors. Possible ones that are worth checking right away include: mass air flow sensor, idle speed control, crankshaft position sensor, oxygen sensor and coolant temperature sensor.
But, there is a simpler and more effective way to determine the malfunction of a particular sensor, namely connecting to the electronic engine control unit. Here you can look at the errors and, by deciphering them, determine where the problem is.
Throttle
A clogged throttle valve can often cause the check engine light to come on because not enough air is supplied to the power unit. The solution to the problem is cleaning. This process can be carried out using carburetor cleaning fluid or VD-40 fluid.
The part is removed from the car and cleaned, after which it is installed in place. It is also recommended to check the throttle position sensor, which may have failed.
Injectors
One of the common reasons for the “check” icon to appear on the dashboard is a malfunction of one or more injectors that do not spray the fuel mixture properly. So, it is worth dismantling all the elements and checking them using a special stand.
If there is none, then you can use the traditional method by pouring flushing fluid into the fuel supply pipes and activating the injectors using the battery. This way it will be clear which injector is not working well. But, experienced auto mechanics recommend cleaning and checking the nozzles on a stand, since the effectiveness of the procedure is higher.
Fuel pump and filter
Another cause of the malfunction may be a malfunction of the gasoline pump or its filter. Lack of power or contamination of the filter elements leads to the fact that an insufficient amount of fuel will enter the power unit to form an air-fuel mixture.
The malfunction can be cured by checking the functionality of the gasoline pump, as well as by replacing the filter inside the gasoline pump. It is also worth looking at the fuel filter, which could become clogged when pouring low-quality gasoline.
Air filter
A clogged air filter can cause insufficient air in the combustion chambers. So, to check this element, it must be dismantled, which is done quite simply. By inspecting the filter element, you can find out how dirty it is and whether the product needs to be replaced. So, after replacement, the check signal from the dashboard may disappear.
Spark plugs and high voltage wires
Wiring is also often the reason why the check icon lights up on the panel. This happens when the spark plug is inoperative or there is a breakdown in one of the high-voltage wires.
It is recommended to check spark plugs on a special spark plug stand. But, if there is none, then you can use the generally accepted “old-fashioned” methods. But high-voltage wires are checked using a conventional multimeter, where the resistance along each wire should be about 5 ohms. If a broken part is found, it must be replaced.
Petrol
But, in addition to the above reasons, the problem may lie on the surface. Thus, ordinary low-quality gasoline can cause the “Check Engine” icon to appear on the car’s dashboard. To eliminate the breakdown, it is necessary to drain the low-quality fuel and flush the fuel supply system. But, if you drive for a long time on such fuel, the batteries may fail, which should also be checked when flushing.