07/11/2021 26,737 Diagnostics
Author: Victor
Thanks to equipping domestic cars with on-board computers, it has become easier for car owners to find faults in the operation of their cars. To identify the problem, a person just needs to carry out diagnostics, which will show error codes. This material will allow you to find out what errors can occur in the VAZ 2114 and how to deal with them.
[Hide]
Using the Scanner
Using a scan tool is the easiest way to reset your check engine light. Here are 5 simple steps:
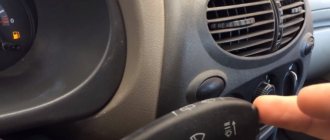
- Connect the scan tool to the OBD connector under the steering column. A laptop or tablet with the appropriate software is installed in the holder;
- Then turn on the car’s ignition and turn on all the gadgets accordingly;
- On your mobile device, in the appropriate section, press the “READ” button to view engine error codes. We write down the codes with a pen in the order in which they were received. This will be necessary for subsequent repairs.
- We delete the error code. Press the “ERASE” button on the scanner. The Check Engine light will turn off when all error codes are cleared. Some scanning tools have many options, such as freeze frame, which captures the sensor readings. When deleting codes, these readings will also be deleted. Note: in some scanners, the option to clear codes may be automatic and the “CLEAR” or “YES” button instead of the “ERASE” button.
- Be sure to turn the ignition on before clearing codes.
How to eliminate VAZ-2115 errors and what they are like
The first domestic cars were equipped with on-board computers that did not issue codes, but only illuminated the Check Engine indicator. These devices can now independently diagnose the vehicle and notify the owner of any faults. However, it cannot be said that errors on the VAZ-2115 are displayed perfectly. Often, a generator problem is presented as a serious engine breakdown, so let’s look at the most common problems.
Sources:
https://ladafakt.ru/kody-oshibok-vaz-2115-inzhektor-8-klapanov.html
Battery disconnect method
Battery Disconnections
is the old way to reset the check engine light.
Here are three steps to clear the check using this method: Step 1:
Disconnect the cables from the battery. At this point, you should use a wrench to unscrew the positive and negative cables.
Step 2:
Discharge remaining electricity. The next thing you should do is press and hold the car horn for about 30 seconds. This action will help drain the car battery.
Step 3:
Wait and reconnect the battery. After disconnecting the battery cables and draining the remaining electricity, all you have to do is wait about 15 minutes and then plug the battery back in. Error codes will be cleared. (Note: This method may not work on some vehicles.) If after this procedure the “check” lights up again, this may mean that the problem is still much more serious.
Allow the check engine light to go off on its own.
Wait until the “check” goes out on its own. The simplest method because you don't have to do anything. The computer system in most vehicles will automatically recheck for problems that may activate the error light. If it is a minor problem, it will automatically correct itself and the check will go off. However, if the check light is still on after three days, you need to apply the methods mentioned above to reset it.
If this continues to happen despite the following reset procedures, you should take your vehicle to your nearest auto repair shop and have it diagnosed by a professional mechanic. Professional diagnostics use more sophisticated tools and can identify precise problems.
REMEMBER:
You can always contact our car service center, where your car will be happy to receive professional technical assistance. You can also make an appointment with us for a scheduled technical inspection! Please familiarize yourself with our car repair and diagnostic services.
Source
How to reset a VAZ 2114 engine error if there are no errors
- Registration
- Entrance
- To the beginning of the forum
- Forum Rules
- Old design
- FAQ
- Search
- Users
people, I don’t know what to do anymore (((I once created a topic that my check light came on - they advised me to remove the clamps from the battery for a few minutes. I tried it - it goes out, but after passing two traffic lights it lights up again. Sometimes it can go out, but not for long. I drove like that with him. but he overpowered me and went to the diagnostician. as luck would have it, right before the diagnostics it went out
The computer did not show any diagnostic errors. NO ERRORS IN MEMORY. The diagnosticians threw up their hands and said perhaps it was a “loss of power supply to the controller”; it was worth leaving the service station and driving 2 kilometers, the “check” again began to hurt my eyes (((( I was late all day and had already arrived at the garage to park the car for the night, I noticed, but my The “insufficient oil level in the engine crankcase” light came on; the oil on the dipstick was not much above the middle.
but I think these two problems are not related? I've had the check light on for about 2 weeks now. And with the oil, the light came on at 100%. ) maybe I have a short circuit, where is the thread? FAQ to do this?)))))))))))00
Source
How to clear an engine error
Let's start with the fact that engine errors can occur for various reasons, since the control system includes a large number of sensors and controls the operation of individual components, systems and mechanisms. It should also be taken into account that different vehicles may differ in terms of the complexity of a particular system. On some cars, the “check” lights up, for example, only in the event of serious or critical errors (malfunctions in the operation of the air flow control valve, engine detonation error when the knock sensor is faulty, etc.).
At the same time, the check may not light up if there are problems with oil pressure, there are certain deviations from the norm in the throttle operation, etc. On simple cars the light comes on, on more technologically advanced cars in a similar situation the error “loss of engine power” or “oil pressure error” appears in the engine. For this reason, reading engine errors is a necessary diagnostic and preventative procedure, regardless of whether the check light is on or not.
Now about the reset. On many cars, especially in the budget segment, to reset the error in the ECU, you should perform the following steps:
- warm up the power unit to operating temperature;
- remove the “plus” terminal from the battery for 5-15 minutes, then connect the terminal back after the specified time;
- insert the key into the ignition switch and turn it to the last position before starting the internal combustion engine from the starter (the lights and indicators on the dashboard should be on);
- leave the key in the lock in this position for 1 minute, then return the key to its original position;
Such actions in some cases allow you to remove errors from the computer. Now you can start the engine (the check should go out after starting) and let it idle for 2-3 minutes (do not press the gas pedal while running). Now you should turn off the engine, and then repeat the procedure of starting and stopping the engine a couple more times.
Note that this method allows you to remove the “check” when the cause of its ignition was the operation of the engine with a disconnected or faulty sensor, refueling with the wrong type of fuel, ignition failures due to non-functioning spark plugs, etc. If otherwise, a problem occurred and the check light came on. The driver then found and corrected the cause and then reset the engine error.
Using the Scanner
Using a scan tool is the easiest way to reset your check engine light. Here are 5 simple steps:
- Connect the scan tool to the OBD connector under the steering column. A laptop or tablet with the appropriate software is installed in the holder;
- Then turn on the car’s ignition and turn on all the gadgets accordingly;
- On your mobile device, in the appropriate section, press the “READ” button to view engine error codes. We write down the codes with a pen in the order in which they were received. This will be necessary for subsequent repairs.
- We delete the error code. Press the “ERASE” button on the scanner. The Check Engine light will turn off when all error codes are cleared. Some scanning tools have many options, such as freeze frame, which captures the sensor readings. When deleting codes, these readings will also be deleted. Note: in some scanners, the option to clear codes may be automatic and the “CLEAR” or “YES” button instead of the “ERASE” button.
- Be sure to turn the ignition on before clearing codes.
Diagnostics using special equipment
1. Diagnostic connector
2. Connecting a wire with an adapter to the diagnostic socket
3. Connecting the wire to the computer
4. Launching software for testing
The diagnostic process using special equipment consists of checking the car using a laptop. To connect to the diagnostic connector you will need a cable with an adapter. Using this cable, we connect the computer to the connector via USB output. For testing you will also need software; the power of the computer used is not important. There are many versions of different testing programs on the Internet.
Diagnostics is performed as follows:
- It is recommended to inspect the vehicle before starting the inspection. Check the volume of consumables - engine oil, brake fluid, coolant.
- Find the diagnostic connector and connect your laptop to it. If you have a special scanner, then that's even better. But since finding a scanner is not so easy, and buying one is not cheap, you can use a laptop. Before testing can begin, the ignition must be activated. There is no need to start the power unit.
- After connection, the testing utility starts. The software interface may vary. When you launch the software, graphs or a list of parameters with numbers may appear. This information will allow you to draw conclusions about the operation of the power unit.
- The scan starts. Fault codes will appear on the laptop screen. To decrypt, use the information provided in this article. We could not describe all the codes, but we deciphered those that occur most often. Usually, when downloading a program to a computer, users are provided with a separate file describing the faults.
- After decryption, the problem is repaired.
Battery disconnect method
Disconnecting the battery is an old way to reset the check engine light. Here are three steps to clear the check using this method: Step 1: Disconnect the cables from the battery. At this point, you should use a wrench to unscrew the positive and negative cables.
Step 2: Discharge the remaining electricity. The next thing you should do is press and hold the car horn for about 30 seconds. This action will help drain the car battery.
Step 3: Wait and reconnect the battery. After disconnecting the battery cables and draining the remaining electricity, all you have to do is wait about 15 minutes and then plug the battery back in. Error codes will be cleared. (Note: This method may not work on some vehicles.) If after this procedure the “check” lights up again, this may mean that the problem is still much more serious.
4. Allow the check engine light to go off on its own.
Wait until the “check” goes out on its own. The simplest method because you don't have to do anything. The computer system in most vehicles will automatically recheck for problems that may activate the error light. If it is a minor problem, it will automatically correct itself and the check will go off. However, if the check light is still on after three days, you need to apply the methods mentioned above to reset it.
If this continues to happen despite the following reset procedures, you should take your vehicle to your nearest auto repair shop and have it diagnosed by a professional mechanic. Professional diagnostics use more sophisticated tools and can identify precise problems.
REMEMBER: You can always contact our car service center, where your car will be happy to receive professional technical assistance. You can also make an appointment with us for a scheduled technical inspection! Please familiarize yourself with our car repair and diagnostic services.
Source
How to reset errors on a VAZ 2114 yourself
Probably every VAZ owner has encountered such a problem when, out of the blue, the “chek” error comes on. Here many people immediately panic. Don't worry, there's nothing wrong with it. Firstly, this error appears when any sensor fails (here you will have to suffer and determine which one), but all this is determined by changes in the behavior of the car: dynamics, consumption, etc. Secondly, this error appears when the wrong mixture enters the combustion chamber. This can happen in two cases: some sensor is not working correctly, or low-quality gasoline. Try using higher quality fuel the next time you fill up.
However, even if you correct the problem, the “check” will continue to light up. Many people go to computer diagnostics to clear an error, where they pay about 150-200 rubles per minute. Although it’s not a lot of money, why? If you can reset the error yourself, spending the same minute on it, and you don’t have to go anywhere. Don’t know how to reset the check error yourself? Very simple, read below.
We reset the error.
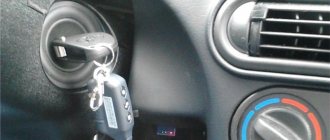
- To do this, turn on the ignition without starting the car.
- Open the hood and remove the positive terminal of the battery.
- We wait from 10 seconds to a minute and seat the terminal back.
- Close the hood.
- Turn off the ignition.
- Turn on the ignition and start.
And then a miracle, the error light stopped lighting.
Even if you cannot decide why your check light came on, do not immediately run to diagnostics. Try to reset this error using the method described above. There are simply cases of accidental operation (there was an impurity in gasoline and the like). And then after the reset the error simply will not appear again. And if, nevertheless, there is some kind of problem, then the “check” will pop up again, after 50 kilometers.
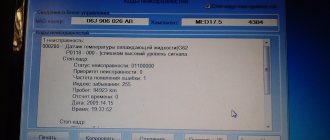
In the VAZ 2114 car, the manufacturer installed an on-board computer, thanks to which you can find out in time about the presence of a malfunction and promptly eliminate it before the problem worsens. But on the display, errors are displayed in the form of numbers - special codes that require decoding, since by themselves they do not carry any meaning.
Car self-diagnosis
The self-diagnosis procedure is performed as follows:
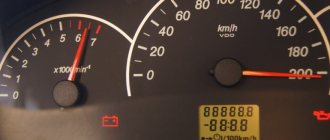
- When the ignition is turned off, the odometer daily mileage reset button is pressed.
- Then the key is installed in the switch and turned. It is rotated to the first position to activate the ignition system.
- After turning the key, the mileage reset button is released. The arrows on the speedometer, tachometer, fuel and engine temperature gauge will begin to move from the minimum value to the maximum.
- The daily mileage reset button is pressed again. An inscription with the board firmware version will be displayed on the instrument cluster.
- The button is pressed again. After this, VAZ 2114 error codes will begin to be displayed on the dashboard screen.
Deciphering the VAZ 2114 self-diagnosis error codes will help you identify vehicle malfunctions and understand what actions need to be taken.
The channel “Your Own Mechanic” talked about carrying out a self-diagnosis procedure on a VAZ 2114 car.
Resetting the "Check Engine" error
If the trouble codes have been corrected, you need to erase the Receipt from the ECU (electronic control unit) memory. Otherwise, the indicator will light up on the dashboard when there are actually no errors.
Step-by-step instruction:
- The ignition is activated, but the car engine does not start.
- The engine compartment of the car opens. Use a wrench to loosen the bolt that secures the terminal clamp to the negative terminal of the battery.
- Then you need to wait about a minute, then the battery terminal must be connected back.
- The engine compartment of the car is closed and the ignition is turned off.
- Then the power unit of the machine is started.
If the Check indicator continues to light, then you need to wait a while, it should disappear on its own. If the Check Engine light does not disappear from the dashboard, we can conclude that troubleshooting has not been performed.
User Ravil Shayakhmetov showed the procedure for independently removing the Check error from the dashboard of a VAZ car.
How can I reset errors myself?
To delete the data remaining in the memory of the control unit, a repeated self-diagnosis of all systems is performed. Once error codes are displayed, the information is recorded. Pressing the daily mileage reset button again will delete the fault data from the ECU memory.
The Glaz Szalg channel spoke in detail about resetting errors in VAZ cars.
Nuances of self-diagnosis of the VAZ 2114
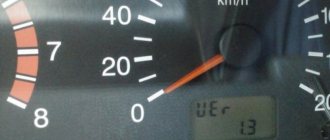
When carrying out diagnostics at specialized service stations or independently, various results and error codes can be obtained. Not all drivers know that faults can be identified without an on-board computer. An odometer is used for this. A significant drawback of such diagnostics is the addition of error numbers into a single sum. For example, if an error of 8 and 1 occurs, the odometer will display the number 9. The device's memory is not automatically cleared, so error codes will be displayed until manually reset by disconnecting the battery terminals for a few seconds.
Resetting the "checkengine" error
As you can see from the video, the error can be reset by following these steps:
The error will be reset after these steps, but if it is caused by serious malfunctions in the engine, it will occur again. In this case, the best option would be to contact a service station.
How to decipher codes
If you do not know what the data displayed on the display means, then it is pointless to independently check the functionality of the sensors. Therefore, it is important to know how to decipher combinations. The following numbers appear most frequently:
- If code 1 appears, then the fault lies in the microprocessor of the on-board unit itself. This error can be corrected by changing the computer software. It is important to use only official firmware, otherwise you will damage the entire electrical system of the car.
- If the malfunction is hidden in the incorrect operation of the fuel sensor, then 2 will appear on the display. The same number means problems with the electrical wiring, especially if it is displayed in addition to 8.
- When the voltage in the network is high, error 4 appears, and when voltage is low, error 8 appears. If you notice these data, then you need to check the generator and battery. VAZ-2115 owners most often encounter generator malfunctions. It will need to be repaired or completely replaced.
- Malfunctions in the operation of the control lamp in the diagnostic circuit are displayed on the display in the form of a combination - 12.
- Failure of the oxygen level sensor is displayed as error 13. Check the filters, most often they are the cause of this combination. Combinations 33 and 34 indicate mass air flow. In this case, you may need to replace the sensor itself. A malfunction of the controller itself is indicated by code 61 displayed on the display. Experts recommend that if one of these combinations occurs, a full check of the functionality of the vehicle components is carried out. Start with the electrical wiring.
- Car enthusiasts often encounter combinations 14 and 15, which may appear along with an indicator indicating the need to add antifreeze. It is important to interpret this malfunction correctly - the appearance of this data on the display means that the temperature in the system is increased or decreased. The reason for this may be a malfunction of the thermostat. If the node is not damaged, then the problem most likely lies in the control unit.
- Combinations 16 and 17 are output when the voltage in the on-board network is insufficient or too high. It is necessary to check all wiring for short circuits and breaks.
- Code 19 occurs if the crankshaft position sensor does not respond correctly to the test. In this case, it is necessary to check the vehicle with an external device. If it shows a combination in the range from P0340 to P0343, then the breakdown may be hidden in the controller itself.
- With error 24, the on-board computer stopped receiving data about the vehicle speed.
Determining and decoding errors on the VAZ 2114
Self-diagnosis of a car allows you to identify faults, but some of them are rarely identified. An odometer is used for diagnostics.
see also
Self-diagnosis of VAZ 2114
The sequence of actions is as follows:
- Press and hold the odometer button and turn the ignition key to the first position.
- Release the odometer button and press briefly again. As a result, the firmware version will be displayed.
- Now, to see the error codes, you need to press and release the odometer button again.
Meaning and decoding of codes
During self-diagnosis of a VAZ 2115 with an injector, only numbers or flashes that code the error will be shown on the instrument panel. When reading trouble codes from an electromechanical instrument cluster, it is necessary to record the number of flashes and calculate error numbers from them. Their purposes can be deciphered using a special list. Most of these faults can be resolved independently by replacing failed sensors.
When performing diagnostics, it is necessary to take into account that the number on the screen may indicate two summed errors. For example, 9 indicates the presence of two faults - numbered 1 and 8.
| Numeric combination | Decoding |
| 1 | ECU problem |
| 2 | Incorrect data from the fuel level sensor |
| 4 or 8 | Network power problems |
| 12 | Malfunction of the error lamp circuit in the instrument cluster |
| 13 | No signal from lambda probe |
| 14 or 15 | Incorrect data from temperature sensor |
| 16 or 17 | Problems with the network power supply, it is necessary to check for short circuits |
| 19 | Motor shaft position sensor error |
| 21 or 22 | Throttle sensor error |
| 23 or 25 | Incorrect operation of the intake air temperature sensor |
| 24 | Speed sensor faulty |
| 27 or 28 | No signal from lambda probe |
| 33 or 34 | No air flow data available |
| 35 | Idle speed control sensor is faulty |
| 42 | Ignition control circuit problem |
| 43 | Knock sensor failure |
| 44 or 45 | Violation of the composition of the mixture |
| 51 or 52 | ECU memory errors |
| 53 | Error in CO setting sensor (installed on cars without converter) |
| 54 | Octane corrector sensor (installed on cars without a converter) |
| 55 | Violation of the composition of the mixture |
| 61 | Failure of the lambda probe |
An example of error 14 appearing on the panel
Table of decoding codes for flashes calculated during diagnostics.
| Error code | Flash combination | Decoding |
| 12 | Long-pause-two short | Diagnostic circuit malfunction |
| 14 | Long-pause-four short | Engine temperature sensor malfunction |
| 15 | Long-pause-five short | Likewise |
| 16 | Long-pause-six short | Abnormally high mains voltage |
| 17 | Long-pause-seven short | Abnormally low mains voltage |
| 19 | Long-pause-nine short | Crankshaft position sensor failure |
| 21 | Two long, pause, one short | Incorrect data from the throttle position sensor |
| 22 | Two long, pause, two short | Likewise |
| 24 | Two long, pause, four short | Problem with the speed sensor |
| 27 | Two long, pause, seven short | Lambda probe failure |
| 28 | Two long, pause, eight short | Likewise |
| 33 | Three long, pause, three short | Air flow meter needs to be checked |
| 34 | Three long, pause, four short | Likewise |
| 35 | Three long, pause, five short | Idle speed outside the tolerance range |
| 43 | Four long, pause, three short | No signal from knock sensor |
| 51 | Five long, pause, one short | Memory error in block |
| 52 | Five long, pause, two short | Error in controller |
| 53 | Five long, pause, three short | Memory error in block |
| 61 | Six long-pause-one short | No signal from the immobilizer |
The data obtained allows you to quickly find the faulty element and eliminate the cause of the error.
We recommend: Popping sounds in the muffler - how to fix it yourself?
The video from the Garage channel shows diagnostics on a VAZ 2115 using a scanner and laptop.
Controller errors
The most common controller errors encountered during diagnostics are listed in the table.
| Program error number | Decoding |
| R 0030-0038, 0141 | Malfunction of the lambda probe heating system |
| R 0102 and 0103 | Incorrect signal from the air supply sensor |
| R 0112 and 0113 | Error in data from intake air temperature sensor |
| R 0115-0118 and 0217 | Problems detecting engine temperature or overheating |
| R 2122 and 2123, 0222 and 0223, and 2138 | Incorrect signal from the gas pedal and throttle position sensor |
| R 0171-0172 | Incorrect mixture parameters |
| R 0201-0204 | Faulty injectors (each cylinder has its own code) |
| R 0261-0272 | Problems with injector control |
| R 0130-0134 | Problems with the functioning of the lambda probe before the converter |
| R 0136-0140 | Problems with the functioning of the lambda probe after the converter |
| R 0300 | Multiple misfires |
| R 0301-0304 | Cylinder misfires |
| R 0326-0328 | Knock sensor failure |
| R 0351-0352, 2301 and 2304 | Monitoring the operation of ignition coils |
| R 0422 | Failure of the neutralizer |
| R 0691-0692 and 0693-0694 | Failure of the first and second cooling fan start relays |
| R 0560-0563 | Problems with power supply |
| R 0627-0629 | Indicates incorrect operation of the fuel pump control circuit |
| R 1602 | Malfunction in the engine parameters control controller |
Reset errors
To do this, go to the error viewing menu, press the odometer reset key and wait a few seconds. The number 0 will light up on the screen - the error has been reset. In this case, data about problems is stored in the unit’s memory and must be deleted. If left, the “Check Engine” light will light up in the instrument cluster.
To reset the error, do the following:
- Turn on the ignition.
- Open the hood and remove the negative terminal from the battery. Wait about a minute, connect the wire back and close the hood.
- Turn off the ignition.
- Turn on the ignition again and start the engine. The Check Engine light may come on briefly and then go off.
If the symbol remains illuminated, there is an ongoing problem with some sensor or wiring in the vehicle. It can only be found out using a special scanner. It is necessary to conduct additional diagnostics to determine the problem node. Then carry out repairs and clear any existing errors using a computer diagnostic program for the ECU.
Resetting errors on cars with an electromechanical instrument cluster is carried out by disconnecting the negative terminal of the battery from the on-board network for 10 seconds. The ignition must be turned off.
As stated above, without deciphering error codes, diagnosing a vehicle is meaningless. Therefore, deciphering combinations should also be given attention. Especially if you don’t want to pay a lot of money to specialists at the service station for this. So, let's start with the combinations that appear during self-diagnosis of the car.
Autolider42.ru: online auto parts store | Topic author: Nikolay
People, tell me what could be the reason, the VAZ 2114 engine speed increases from 1500 to 1800 and when you press the gas pedal it stalls, as if it is choking. When you press the pedal to the floor, it starts to move. And it took a long time to start up.
VALERA (Rupesa) idle speed sensor change
Alexander (Charlize) Symptoms of excess air.
no (Vajrini) Try the air flow sensor first
How to make an ignition switch on a VAZ 2106
How to open the trunk of a Mercedes w220 without a battery
How Webasto works on Range Rover Vogue