Features of the piston group of the VAZ 2109 car
Usually, after 150 thousand kilometers, visible wear occurs in the pistons group. It can be determined by some signs:
- Increased gas mileage.
- Reduction, less than 10 kgf/cm2, of engine compression.
- Increased oil consumption. 1000 kilometers are enough to reduce the oil level from maximum to minimum.
- Change in color of exhaust gases to a bluish tint.
- Oil consumption decreases slightly after replacing the oil seals. This suggests that diagnostics of the piston system and, if necessary, replacement of worn parts are necessary. The permissible wear of liners and pistons should not be more than 0.15 millimeters; in this case, you can only get by by replacing the piston rings.
You can replace the piston rings on a VAZ 2109 car without removing the engine from the car.
Tip: After installing other piston rings, the gasket located between the head and the cylinder block needs to be replaced. All other parts that fail are replaced with new ones during the assembly process.
engine assembly for VAZ 2108, VAZ 2109, VAZ 21099
1. Clean carbon deposits along the edges of the cylinder block beds. Clean the oil grooves in the beds from deposits.
2. Install the main bearing shells in the cylinder block bed in accordance with the marks made when disassembling the engine. Attention: middle liner 1 without groove. When installing the liners, their locking lugs must fit into the grooves of the beds. Lubricate the bearings with engine oil.
3. Install the crankshaft into the cylinder block.
How to disassemble the piston of a VAZ 2109 car
If the piston engine on a VAZ 2109 car fails, it must be replaced in an inspection pit or overpass. To work with your own hands you need: a set of keys, a special torque wrench, a mandrel with which the rings are crimped on the piston. Replacing a piston VAZ 2109, the video shows in detail the procedure for performing the work. It is as follows:
- The battery, air filter for air purification, carburetor, ignition distribution sensor, and ventilation hose are pulled out.
- The lubricating fluid is drained from the engine sump.
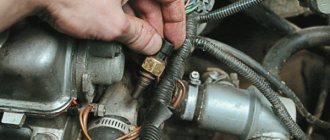
- The sensor indicating the temperature of the cooling fluid is disconnected, the plug is unscrewed from the engine block and the antifreeze is drained.
- The “stove” is disconnected from the GB.
- The hose from the vacuum brake booster is removed from the intake manifold.
- The hoses are disconnected from the front pipes on the GB.
- The bolt holding the exhaust pipe to remove exhaust gases from the gearbox is unscrewed from the clamp, and the exhaust pipe is disconnected from the resonator pipe.
- The receiving pipe going to the manifold is disconnected from the engine.
- The upper and lower nuts securing the air intake are unscrewed. The latter also holds the front part of the shield, which protects the starter from the hot exhaust manifold.
Tip: You can simplify the removal and installation of the starter shield by removing the lower eye to secure it.
- The fasteners of the protective casing are unscrewed, it covers the camshaft drive belt.
- The belt tension is loosened. To do this, it is removed from the camshaft sprocket.
- The asterisk is removed.
- The back cover covering the belt is detached.
- The screws holding the head to the cylinder block are unscrewed.
- Having unscrewed all the bolts securing the cylinder head, the latter, after rocking, comes off from the cylinder head and is removed along with the gasket.
- The cover mounted on the clutch housing is released from the fastening and removed.
- The screws are unscrewed and the engine oil pan is removed.
- The oil receiver is pulled out from the pump housing to pump oil.
- The nuts of the connecting rod screws are unscrewed and the covers on the connecting rods are removed.
- With a light tap with the handle of a hammer, the piston with connecting rod and upper liner is pulled up.
Removing the piston and connecting rod from the cylinder
- In this way, all the engine pistons are pulled out.
- The connecting rod is clamped in a vice; the jaws on the vice are made of soft metal.
- Without applying much force, carefully use your fingers to open the locks on the piston rings, remove the compression rings, two in number, from the piston one by one.
- One oil scraper ring is removed.
- The oil scraper ring expander is pulled out.
Removing the Oil Ring Expander
How to change piston rings
Using old piston rings, the piston grooves are cleaned of carbon deposits. Before replacing the piston rings on a VAZ 2109, they need to be run in the piston grooves. If the rings bite, the parts must be ground in using fine-grain sandpaper. For convenience, it is placed on glass.
Tip: Pay special attention to the second compression ring. It is quite rigid, which means it is very fragile and can easily be broken.
You need to replace the VAZ 2109 piston rings after measuring the gap between the new piston ring and the groove wall with feeler gauges. The photo shows how this is done. There is a special instruction according to which the permissible gaps for rings in the piston grooves must be within the values specified in the table.
- If the maximum permissible gap is exceeded, you will need to replace the piston rings on the VAZ 2109 yourself.
- The inscriptions “TOR” or “VAZ” should be at the top when installing the oil scraper and upper compression rings.
- The lower compression ring is oriented with the groove down.
- The rings are put on the piston in the following sequence:
- the ring lock is moved apart to such an extent that the ring can be easily placed on the piston;
- the ring lock is engaged on the piston;
- The rear part of the part is installed.
Installation of new rings on the piston begins from the oil scraper ring expander. After installation, the expander lock ring must be rotated 180 degrees relative to the ring lock. After installing all the rings on the piston, they must be oriented so that the angle between the compression top ring lock and the piston pin installation axis is 45 degrees. The lock on the lower compression ring rotates 180 degrees, and the angle between the lock on the oil scraper ring and the lock on the upper compression ring should be 90 degrees. So:
- If the ring installation technology is violated, the lubricating fluid can penetrate into the cylinder, which will lead to the formation of carbon deposits on the walls of the combustion chamber, smoke will come out of the muffler, and oil consumption will increase significantly. Rings can only be placed on the piston with special pliers or using a special device.
- When installing the unit, you need to lubricate the cylinder bore, rings and piston with high-quality motor oil.
- A mandrel is put on the piston, the rings are crimped with it, when self-installing the rings on the mandrel, you need to lightly tap the handle of a hammer.
- Inserts are installed in the bottom cover on the connecting rod. Before this, the beds in the connecting rod and in the cover for the liners are wiped dry.
- The crankshaft connecting rod journal and the surface inside the bearings are lubricated with high-quality engine oil.
- There is an arrow on the bottom of the piston, orienting it so that its direction is towards the crankshaft pulley, the piston is placed in the block sleeve.
- The piston must be recessed into the cylinder. The mandrel must be pressed against the block, and the bottom of the piston must be tapped with the handle of a hammer. At the same time, it is necessary to monitor the movement of the connecting rod towards the crankshaft journal.
- The cover is installed on the connecting rod, the nuts must be tightened with a torque of approximately 5 kgf/m.
How to break in a car after installing new piston rings:
- The car cannot be fully loaded.
- Change gears in a timely manner.
- Roads should not have long climbs.
- Constantly check the oil level.
- You can’t sit in traffic jams for a long time and accelerate sharply.
- The lubricating fluid and oil filter need to be changed after 1000 kilometers.
Gap in the lock
The slot in the piston ring is usually called a lock. This gap is necessary, but it also creates an obvious problem - at this point gases from the cylinder can easily penetrate into the crankcase. Therefore, it must have a minimum width during assembly, but not zero - due to the uneven thermal expansion of the cylinder, ring and piston, the lock may collapse, after which the ring will break.
For each specific engine, based on both the materials and the operating temperature range, the minimum thermal gap in the lock is set - when assembling the motor, we check the gap in the lock so that it is not less than the lower threshold of the rating.
Wear of the ring and cylinder leads to the fact that the ring “diverges”, the gap in the lock increases, as pressure losses increase and oil penetrates into the combustion chamber. Based on this, the maximum gap size is set, if exceeded, the ring is replaced with a new one.
Let's compare the nominal clearance values for different engines:
- VAZ-2108: 0.25-0.45 mm;
- GAZ-24: 0.25-0.6 mm;
- Honda CR-V (K20A4 engine): 0.2-0.35 mm.
What do these numbers tell us? The minimum gap limit in the new ring lock for domestic engines is close, but the maximum is higher in an engine with a lower degree of boost: the pressure loss remains tolerable. For the Japanese motor, the materials are better selected, the cooling of the upper ring is more efficient, so the minimum size is reduced, and fewer “liberties” are allowed during assembly. The maximum limit for troubleshooting is different - on VAZ engines it is 1 mm, GAZ - 1.2 mm, while on a Honda the upper compression ring is considered worn out already at a gap of 0.6 mm, with which it would still be possible to assemble a new twenty-four engine "Volga".
We recommend: Air conditioning not working? Causes
The gap in the lock is an important indicator when troubleshooting a motor. By moving the ring to different heights, where the cylinder wears out differently, you can find out the degree of wear without a bore gauge: at the top, where the ring does not come into contact with the walls, the cylinder retains its nominal diameter, and it is in this place that the gap in the lock reflects the wear of the ring. Going lower, the ring widens, indicating an increase in the diameter of the cylinder closer to the middle, then narrows again. Roughly, but quite indicatively, we calculate the difference in cylinder diameters at different heights, starting from the measured gap.
Suppose the nominal diameter of the cylinder is 78 mm, which corresponds to a circumference of 122.522 mm. The measured gap in the lock when installing the ring at the top is 0.4 mm, the length of the ring itself is 122.122 mm. Now we lower it to the center of the cylinder and measure the gap of 0.8 mm - from a circle of 122.922 mm we get a diameter of 78.25 mm. This method does not take into account the fact that the cylinder becomes barrel-shaped or ovoid, and in the middle the ring is not adjacent to the walls with its entire surface. However, the change in the gap in the lock indicates to us that the engine problem is not wear of the rings, which are easy to replace: the cylinders will need to be bored.
How to repair a piston VAZ 2109
If wear in the cylinders exceeds 0.15 millimeters, the cylinders need to be bored and the pistons and rings replaced to the following repair size:
- Replacement of a VAZ 2109 piston must be carried out taking into account the compliance of each piston class with a new piston ring.
- When choosing a ring, you need to pay attention to its markings:
- if it is absent on the parts, then the product has nominal dimensions;
- “40” - an increase of 0.4 millimeters in the diameter of the repair ring is marked;
- “80” - corresponds to the marking of an increase in size by 0.8 millimeters.
Piston repairs in a BC are performed as follows:
- Cylinder wear is checked. Using a bore gauge, the diameter of the cylinder is measured in two directions—longitudinal and transverse—in four zones.
Measuring cylinder diameter with a bore gauge
- In the area of the first belt there is practically no wear on the cylinder. Therefore, the amount of wear in the remaining belts of the part can be determined by the difference in diameters between this cylinder belt and the others.
Cylinder wear control belts
- If the amount of wear is more than 0.15 millimeters, the cylinders are bored to the closest repair size. It should be taken into account that the final operation for processing the cylinder is honing. Therefore, it is necessary to leave an allowance for processing of a diameter of 0.03 millimeters.
- After the final operation, the repair size of the piston and the diameter of the cylinder differed in the range of 0.025 - 0.045 millimeters.
- A new piston is installed.
What are piston rings and what is their function?
The engine is designed with rings at the top of the piston to ensure a seal between the piston and cylinder. Due to the significant loads that piston rings experience during operation, steel or high-strength cast iron is used for their manufacture; alloying elements are applied to the surface to increase strength.
These are elastic elements in the shape of an open circle. The kit includes two rings to create a tight seal of the cylinder working volume and prevent the penetration of gases into the engine crankcase, the so-called “compression” rings, which are installed in the first and second grooves, counting from the top of the piston. The third groove contains an oil scraper ring, which removes oil from the surface of the cylinder, preventing it from entering the combustion chamber.
An important function performed by piston rings is to remove heat from the piston to the cylinder. Thus, it is cooled by almost half.
life of piston rings is from 150 to 350 thousand km , but on forced engines or with supercharging it can be about 100 thousand km .
Replacing piston rings VAZ 2109-21099
And to finally make sure, you should unscrew the spark plug in the cylinder with low compression, drip a little engine oil inside and check the compression again. It turns out that what gets on the piston rings will fill all the gaps and make them sealed. If, after lubrication with oil, compression returns to normal, then this is definitely a problem in the rings. If not, then most likely the valve seats are leaking or the valve itself is burnt out, but that’s a completely different story. In the case of rings, I really don’t recommend changing them if the compression shows 8-9 kg - this is nothing more than “still good”. Because having replaced the rings, very little time will pass when the past symptoms will return again, because the new rings will still rub against the cylinder walls and wear them out so much that the question of boring the engine will arise. So it’s better to delay this as far as possible. So, we have identified the cause, made sure that the problem is in the rings, now we proceed directly to the replacement.
It is most convenient to carry out the work on an inspection ditch or overpass and you should stock up on tools for crimping piston rings, since the pistons will be removed, and without the proper device, it will not be possible to install them back.
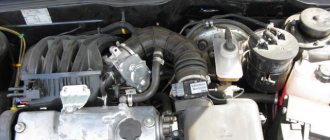
Carburetor engine
Injection engine
In this case, the carburetor throttle drive cable is removed, all hoses leading to the valve cover are disconnected, and the timing belt protective cover is removed. Then you can remove the valve cover and the following operating algorithm will be identical for both types of engines.
The next step is to rotate the crankshaft to match the marks on the gears and remove the timing belt. The crankshaft can, of course, be turned through the camshaft gear mounting bolt, but I advise turning it by the generator pulley mounting bolt, so as not to grind off the edges on the camshaft bolt. When the marks are set, use a 17 key to loosen the tension roller and remove the belt. To unscrew the camshaft gear, to the left of it you can see a pin on which we put a small tube through the holes in the gear so that it does not turn. And with the same key we unscrew the bolt and carefully remove the gear so that the key is not lost. Although it often fits well in place, it still happens when it falls out, so it is better to remove it and put it separately.
In the place where the tube was put to stop the gear, there is a bolt that needs to be unscrewed and the metal timing protection slightly bent so that the camshaft can be pulled out.
Using a 10mm socket or open-end wrench, unscrew the bolts securing the camshaft bearing caps, and then remove the camshaft itself. When removing the camshaft, try not to damage the oil seal, but the best thing to do is simply replace it with a new one.
Removing pistons and replacing rings
Now clamp the rings with a mandrel, and carefully tapping with a hammer through a wooden adapter, drive the piston back and reassemble in the reverse order. I strongly recommend that after installing each piston into the cylinder, make sure from below that the connecting rod bearing has not moved, otherwise there will be trouble! After assembly, the new rings must be run-in, that is, try not to load the engine for a while.
Instructions for correct installation of piston rings on the piston
To make it more convenient to control the process of installing the rings on the piston, it must be securely secured in a vice, this makes it easier to work and does not require outside help. Having securely secured the piston in a vice, we proceed to installation. We take a set of piston rings and select the oil scraper. It is dressed first, as it stands lower than the rest. First, the oil ring spring is installed, then the ring itself is carefully installed on the piston. It is not recommended to squeeze the oil ring too much to prevent it from bursting.
Oil ring spring
After this, we begin to install the compression rings one by one. To correctly follow the order, you should carefully look at the special marks on the rings; it indicates where the top side is.
Move the ring locks apart at 120° C relative to each other (as recommended in the instructions for installing piston rings). As in the case of the oil scraper ring, do not squeeze the compression rings too much so that they do not burst.
To ensure that the rings easily fit into the cylinder, we use a special crimping device (homemade).
The nut on the device is first loosened, then it is put on the rings and the nut is tightened. As a result, the rings are recessed into the piston grooves and easily fit into the engine cylinder. Before this procedure, it is recommended to lubricate the inside of the crimping device with machine oil so that the process of passing the rings into the cylinder goes smoothly.
The nut of the crimping device should be tightened moderately so that it rotates around the piston with little effort. Then, using a hammer, lightly tap the crimping device so that it is flush with the piston.
After this, the piston can be “released” from the vice, turned over with the yoke up, and removed (the yoke).
We take the connecting rod bearings, wipe them from the oil in which they are preserved, and install them on the connecting rod, while ensuring that the special marks (bulges) match correctly. The bearings with the connecting rod must be flush and not protrude at the edges.
Having thoroughly wiped the liners from the old grease in which they were stored, we lubricate them again with fresh engine oil. This will then make it easier to start the engine until the lubrication system pressure returns to normal. After this procedure, the piston with rings is ready to be installed in its rightful place.
For a more correct and easier installation of the piston in place, install the crankshaft in a position where the piston should be at the lowest point.
There is a special mark on the top of the piston that needs to be turned towards the “front” of the engine.
Important! The front of the engine is not always the front of the car. The engine in some cars is located transversely to the engine compartment.
Mark on the piston
The piston must be installed evenly, focusing on the adjacent pistons that were installed earlier (or have not yet been removed).
Something else useful for you:
- What is the engine volume of a car and how to calculate it
- Causes of loss of car engine power
- The engine stalls at idle or runs unstably - what are the reasons?
Using a hammer, lightly tap to ensure uniform contact of the crimping device to the motor block sleeve. When the “crimp” fits tightly and evenly to the edge of the sleeve, you need to use the end side of a hammer (the softer it is, the better) and gently but firmly tap the piston into the sleeve.
Using an oil-lubricated “crimp”, the piston and rings easily and confidently “slip” into the cylinder, then with gentle blows of the end of the hammer we “push” the piston to its lowest point until it stops.
After the piston is in place and the technician is convinced that the installation is correct, proceed to the final fastening of the connecting rod to the crankshaft.
Having turned the engine over (and it is better to do this using a special device), we begin the process of attaching the connecting rod. After making sure that the connecting rod and liner are sitting in their place (on the crankshaft journal), we proceed to the final fastening process.
To do this, take the yoke (connecting rod cover), liner and oil. Having previously wiped the liner from old grease, lubricate it with fresh engine oil. We install the liner into the yoke, aligning the marks on both parts. When installing the yoke on the connecting rod, the locks on them must match. All that remains is to tighten the yoke fastening nuts.
To properly tighten the connecting rod bolts, you must first tighten and tighten the fastening bolts by hand, and lightly tighten them with your fingers (as far as “health” is enough). Next, if you follow the rules, use a torque wrench, which will allow you to tighten the bolts securely, but without “fanaticism,” which can then affect the operation of the engine.
The tightening torque of the nuts must correspond to 50 Newton meters; a corresponding scale is available on each such wrench, and in modern versions of torque wrenches it is even electronic. Tighten the nuts gradually and evenly, first a little, one nut, then the second, and so on until a torque of 50 Nm.
As a result, the yoke installed on the connecting rod should look like this.
After these procedures it is MANDATORY! take a wrench and turn the crankshaft to check if the liner has bitten the shaft journal.
The shaft should rotate easily and freely; there is no need to apply much force to turn it, otherwise you will damage the crankshaft and bearings. At this point, the installation of the piston rings and the placement of the piston and connecting rod in place is considered complete.
The VAZ engine does not have the most complex design, so almost every car owner can independently replace any engine part, saving a considerable amount from the family budget on engine repairs. Guided by our instructions, car enthusiasts can independently replace parts not only in the engine, but also in any part of the car.
Do not forget that the repair process is carried out on a clean engine, with working tools, using original spare parts and materials (lubricants, oils, etc.). Work should be carried out in a well-lit room so that marks and symbols on parts can be clearly seen.
Video: ICE theory: installation error of a low-removable piston ring
How to correctly install rings on the piston on a VAZ 2109
The fact that the car requires replacement of the piston rings, and not some other repair work, will be indicated by the engine itself. The signs of such a malfunction appear quite clearly, so it will be difficult not to notice them. But before we talk about the symptoms, you need to understand what the rings are and what role they play in the operation of the engine.
Piston rings are elastic, open elements that are installed in special grooves on the piston body. They are made of high-strength steel or cast iron, and covered with an alloying material on top. The alloy coating further increases strength and also reduces wear rates.
Typically, 3 rings are inserted into the piston: 2 compression rings (occupying the 2 upper grooves) and 1 oil scraper ring (the lower groove). The purpose of the compression rings is to prevent hot gases from breaking through along the piston into the engine crankcase. Oil scraper - removes excess oil from the cylinder mirror, preventing it from entering the combustion chamber. In addition, the rings reduce the temperature of the piston, transferring almost half of the heat from its surface to the cylinder walls.
When the piston rings no longer cope with the tasks assigned to them due to their wear, the car engine signals this by displaying the corresponding symptoms.
SIGNS OF PISTON RING WEAR
Blue or black smoke from the exhaust pipe indicates that wear has reached a critical stage. This indicates that excess oil entered the combustion chamber past the oil scraper ring and burned there along with the fuel. Black smoke coming out of the crankcase ventilation tube indicates that the compression rings, due to wear, allow gases to escape from the combustion chamber into its cavity.
Critical wear is accompanied by a decrease in compression (the ability to maintain pressure) in the engine cylinders. This means that some of the gases formed during the combustion of the fuel mixture, which was supposed to push the piston, broke into the crankcase without performing useful work. This is what will lead to a drop in pressure in the cylinder, therefore, the engine will lose some power. Increased oil consumption is observed.
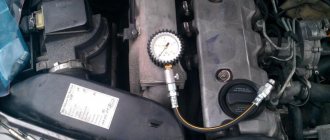
Compression is checked with a special device - a compression meter. When the nominal pressure values are unknown (there are no operating instructions), it is first measured in a dry cylinder, then a little engine oil is poured through the spark plug hole, and the measurement is made again. If the compression increases, then the rings need to be replaced. Similar signs can be observed in the case of their “occurrence”.
“Sticking” occurs when carbon deposits formed in the piston grooves prevent the piston rings from springing, resulting in a decrease in the tightness of their contact with the cylinder surface.
This problem, if the case is not very advanced, can be corrected with the help of special fuel additives. For an engine with a carburetor system, you can try cleaning it with a carbon remover spray that is injected directly into the carburetor. If removing carbon deposits from the combustion chamber has no effect, then there is only one way out - replacing the piston rings and cleaning the grooves.
When is it time to change rings?
There are three piston rings on the VAZ 2109. They are not closed rims that are located on the outer wall of the cylinder in special grooves. These parts serve to seal the combustion chamber, regulate oil flow and improve heat transfer through the cylinder wall. Two compression valves prevent gases from the combustion chamber from entering the crankcase, and an oil scraper valve removes oil from the cylinder walls and prevents it from entering the combustion chamber.
Wear of piston group parts occurs after approximately 150 thousand kilometers due to the action of gases and friction of metal parts. They need to be changed if the following symptoms are present:
- compression drop;
- increased fuel consumption;
- the appearance of bluish smoke in the exhaust gases;
- increased oil consumption.
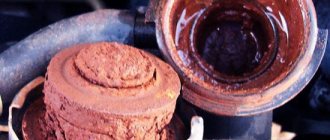
The cause of deterioration in engine performance may be coking of the piston and stuck rings. This happens when using low-quality fuels and lubricants that do not meet the manufacturers’ recommendations. During long-term operation, carbon deposits form, which covers the combustion chamber and its parts. Piston rings covered with carbon deposits “stick” and cannot perform their functions properly. In this case, they should be changed or decarbonized.
Coked piston with traces of carbon deposits
HOW TO REPLACE PISTON RINGS YOURSELF
Of course, replacing rings is a rather labor-intensive procedure. It requires accuracy and certain skills, but by and large there is nothing complicated about it (unless you remove the engine). To do this you need:
- remove the cylinder head, following all the recommendations of the car manufacturer;
- drain the oil, remove the flywheel protection and engine sump;
- remove the oil intake;
- Having turned the crankshaft, set the desired piston to bottom dead center;
- unscrew the connecting rod cover and remove it;
- pull the piston along with the connecting rod out of the cylinder, pushing it upward with a wooden strip;
- clean the piston from carbon deposits. Based on its marking, determine the piston class, purchase a new set of piston rings corresponding to it;
- Before installation, each new ring is first inserted into the cylinder to check the clearance in the lock. The gap must correspond to the value specified in the vehicle's operating manual. If it is less than necessary, then the ends of the lock are carefully filed with a file;
- The pistons are thoroughly cleaned of carbon deposits. The holes intended for draining oil are also cleaned with a suitable wooden stick. The cleaned grooves are lubricated with clean engine oil;
- The rings are put on starting with the oil scraper. On one side of the ring is marked “TOP” (up), which indicates how it should be installed in the piston. The locks must be installed at 120 degrees relative to each other. This will prevent gases from penetrating through them. You cannot put the rings on in a “twist”; such installation may be accompanied by the appearance of microcracks, which will lead to their breakage;
- Reassemble in the reverse order, simultaneously cleaning everything with a clean rag and lubricating it with fresh engine oil. Pistons must be installed exactly in the cylinders from which they were removed. Also, the connecting rod caps with connecting rod bearings must be put on the same connecting rods from which they were removed.
How to install piston rings VAZ video
Previously, they wrote on the packages how to place the rings. They don't do this now.
Since the rings are fragile, be careful when opening the package and installing the rings. Each ring is made to fit the size of the slot, so it is impossible to make a mistake.
The ring usually contains the inscription “Top” (top) or “VAZ”. If you look closely, you can see a tooth-like chamfer on the inside of the ring. This “tooth” should face down. It helps remove oil if it has passed through the oil scraper ring. It should be made in the form of an acute angle. If the angle is obtuse, this usually means a defective part.
If before there was a difference in how the ring was placed, now it does not matter - the entire surface is chrome-plated. We focus on the inscription - it should be on top.
Engine repair - Replacement of piston rings
With a sufficiently high mileage of a VAZ 2109-2108 car, compression in the cylinders begins to drop, and engine oil consumption becomes more and more. This is primarily due to excessive wear of the piston group, namely the compression and oil scraper rings, as well as the cylinders themselves.
During normal operation, the VAZ 2109-2108 engine can easily travel about 300,000 km without major repairs, and there are many owners who can confirm these facts. But often those who like to drive have to repair the engine after the first hundred thousand. This procedure can be performed independently in a garage, of course, if you have the necessary tools. And you will need the following:
Of course, if we talk about all the procedures that will need to be performed in order to get to the pistons, then you will need a lot more tools. The above is a list of those that are needed directly to unscrew the connecting rod cap and remove the piston with rings from the cylinder.
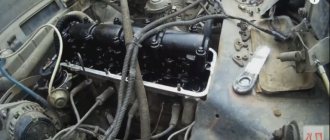
First we perform the following steps:
So, next we unscrew the two nuts securing the connecting rod cover, as shown in the photo below:
Then, without any problems, remove the connecting rod cover by hand:
Then we turn the engine crankshaft so that the connecting rod is strictly in the center of the cylinder, this will make it more convenient to remove the piston. Next, we take a hammer and use its handle to gently tap the bolts on the connecting rod, thereby pushing it out of the cylinder:
It should easily jump out of the cylinder from the reverse side:
Then you can proceed directly to dismantling the piston rings. To do this, carefully pry up the edge of the ring and remove it from the groove, as clearly demonstrated in the photo below:
Then, also carefully remove the ring in a circle to the end:
We similarly perform a similar procedure with the remaining rings. Now you can insert the ring into the cylinder and check the gap between its two ends:
The optimal gap should be from 0.25 to 0.45 mm.
The maximum permissible wear is considered to be within 1 mm. If it is larger, this indicates an urgent need to replace the rings with new ones, and also check the cylinders; it is possible that they need to be bored out. If the cylinders have not been bored and the old pistons are in good condition, then they can be left without replacing them with new ones. But in this case, it is imperative to clean the grooves from carbon deposits, and the piston itself.
Then we put the new rings back on the piston. It is worth keeping in mind that the joints of all rings are located in different places around the piston. When installing, be sure to lubricate the rings and the cylinder itself with engine oil, and it is best to use a special mandrel.
Decarbonization of piston rings
If the engine starts to smoke, there is a possibility that there are rings stuck in the piston grooves. Nowadays, there are many different modern means for decarbonizing piston rings, and many drivers use them to restore engine performance. Among the most popular compositions are:
Motorists believe that if the engine starts smoking, you need to use a decarbonizer, and the engine will work as before, without oil consumption and without smoke. Indeed, sometimes these remedies help, but only in cases where the motor has stood motionless for a long time (for example, after winter), and moisture has accumulated in it. If the car is subject to long-term preservation (put in a garage for winter storage), you should remove the spark plugs and pour oil into the cylinders, and plug the spark plug holes with plugs. With such prevention, the spark plugs will not become damp and rust will not accumulate on the sleeves.
But if, after all, a forgetful car owner has not taken preventive measures, you can use a decarbonizer. We get rid of rust in cylinders as follows:
- pull off high-voltage wires;
- unscrew all spark plugs;
- rotate the crankshaft so that all pistons are in the middle position;
- pour 45 ml of liquid into each cylinder, install spark plugs;
- leave the cylinders to “soak” for 6-7 hours;
- why do we turn out the spark plugs, turn the starter a few revolutions so that all the dirt flies out of the engine;
- We put the removed parts back in place and start the engine. At first it may smoke a lot, but then the smoke will go away.
Car owners should remember that decarbonization is not a panacea for all ills, and if the piston rings are worn out, then only replacing them will help.
How to replace piston rings on a VAZ 2109 with your own hands
Has your “nine” increased gas and oil consumption? Is there dark smoke coming out of the exhaust pipe? These are symptoms of piston wear. In this case, the piston rings are replaced. Replacing VAZ 2109 rings is a simple process. Installation of new components can be done without even removing the engine. The main thing: disconnect the interfering parts.
Let's look at how to provide access to the piston group and replace the rings. When installing new parts, there are standards for permissible clearances that are important to comply with. After installation, be sure to run the car in. But first, let’s figure out what a piston group is and what are the signs of its wear.
Decarbonization of a VAZ 2109 engine at home. The reasons for the occurrence of such a defect
The presence of any problems in the engine is indicated by: reduced engine power, excessively high fuel consumption, black smoke from the exhaust pipe. Perhaps the reason for such problems lies in the coking of the engine . If this is the case, you need to urgently decarbonize the engine, otherwise the engine may fail. Such signs cannot be ignored, because repairing the engine over time may turn out to be unprofitable, since the result of long service with soot and coked rings will most likely be a malfunction of the piston group.
Removing the engine
The engine on a VAZ can be removed if you have the necessary tools. In addition, you need to have a special lifting device available that will help remove the engine from the compartment. You can, of course, do without it, but then you need additional workers. So, let's start:
- remove the hood;
- cover the front fenders of the car with soft blankets so as not to damage the paint when removing the engine;
- drain the radiator;
- disconnect all electrical wires from the distributor, as well as from the oil and temperature sensor and carburetor;
- remove the fuel supply hose;
- unscrew the exhaust manifold pipe (muffler);
- disconnect the battery terminals;
- remove the starter;
- the air filter housing is removed;
- disconnect the generator wires;
- unscrew the engine from the gearbox;
- use a screwdriver to loosen the clamps of the heater radiator pipes;
- remove the accelerator pedal linkage;
- remove the carburetor choke cable.
Step-by-step replacement instructions
Piston repair work must be performed on an inspection ditch, lift or overpass.
What will you need?
To repair a VAZ 2109 engine with your own hands, you need the following tools:
- a set of keys;
- set of heads;
- funnels;
- extension cords;
- torque wrench;
- set of probes;
Set of gap gauges
- mandrel for pressing products on the piston;
- hammer;
- needle file;
- new repair kit.
New consumables for piston VAZ 2109
When purchasing piston rings for the VAZ 2109, you should take into account the material of manufacture and their width. It is better to purchase original products to avoid fakes.
Engine disassembly
Replacing the piston on a VAZ 2108 is carried out only after complete disassembly of the engine. Started:
- remove the fuel pump;
- remove the ignition distributor;
- take out the generator;
- remove the water pump;
- remove the oil filter;
- remove the breather cap along with the dipstick to check the oil;
- remove the oil pressure sensors;
- remove the crankshaft pulley;
- remove the flywheel;
- remove the tin plate;
- unscrew the three engine cover bolts;
- remove it;
- take the key 10 and unscrew the cylinder head cover;
- remove the gasket;
- dismantle the chain drive;
- remove the sprockets and chain;
- remove the crankshaft gear;
- unscrew the nuts of the gas camshaft housing;
- remove the cylinder heads;
- remove the pan;
- remove the rear oil seal housing;
- remove the oil pump;
- remove the drive shaft along with the oil pump gear;
- remove the oil separator;
- dismantle the crank mechanism;
- remove the cover;
- remove the connecting rods with the piston;
- remove the main caps;
- remove the crankshaft;
- remove the spacer rings;
- remove old liners.
How to replace rings yourself
Attention: Replacement of piston rings on a VAZ 2108 is carried out after installing new crankshaft liners. As mentioned above, we remove the pistons and connecting rods. On the lower heads and connecting rod caps we see steel-aluminum type liners. They are threaded in such a way that they do not turn. They are kept from this by locks that fit into the slots of the beds.
So, replacing piston rings on a VAZ 2108 is carried out as follows:
- take the connecting rod and clamp it in a vice;
- after decompression, remove the old rings (upper and lower compression).
It should be remembered that when installing new rings, the top mark should be directed towards the bottom of the piston. The mark is often the name of a company or simply a car model, applied to the ring by the manufacturer. It also happens that instead of an inscription, an edge or chamfer is used. So, in this case, you need to install the ring with this chamfer down. Replacement of VAZ 2108 pistons continues:
- the old oil scraper ring is removed;
- The expander is also removed.
Attention: Replacing pistons on a VAZ 2108 involves knocking out the pin located in the piston. To do this, place the piston on some wooden support and knock out the pin with a hammer.
- we collect everything in the reverse order;
- We take a new piston, which we select by class (the class is marked with a letter, and the piston category with a number).
Now you need to be able to correctly adjust the gap between the cylinder and the piston.
- For completely new parts, the gap should be 0.05-0.07 mm. If any of the parts are worn out, the gap may be no more than 0.15 m.
- In addition, replacing the piston on a VAZ 2108 should be carried out so that the finger enters the hole with the force of only the thumb. Also, it should not fall out of the piston if it is in a vertical position.
- install rings;
- take a feeler gauge and check the gap (or rather, it is advisable to check the gap with a set of special feeler gauges).
Attention: The ring gap should be between 0.25 and 0.40 mm. If the gap is larger, the ring must be replaced. If the gap is smaller, we arm ourselves with a needle file. We carry out the following operation: we grind off the ends of the ring, but only very carefully.
This video shows everything thoroughly. It is recommended to watch it before starting the operation yourself.
- install the rings into the piston grooves;
- We begin the orientation process.
This operation consists of correctly positioning the rings at an angle to each other. The photo below clearly shows what angle they should have:
So, you need to install them yourself, as required by the instructions:
- the upper compression ring is oriented at an angle of 45 degrees (the angle should be directed towards the piston pin axis);
- the lower compression ring should be rotated relative to the upper one in the complete opposite direction;
- the oil scraper ring lock is adjusted to 90 degrees relative to the other rings (as for the joint of the expander, it should be located on the lock side of the ring itself);
- take the upper head of the connecting rod and heat it to 240 degrees (to do this, we clamp it in a vice and process it with a special tool);
- pre-cool the finger in ice water;
- the piston is put on the connecting rod;
- using a mandrel, the finger is pressed into the hole;
What should the piston ring clearance be? Detailed analysis
A topic of interest to many car enthusiasts is how to set the gap between the piston rings, and this is especially of interest to those who are going to carry out repair work themselves. Everyone knows that any car owner (experienced or not) tries to learn more about the damage that can occur during the operation of the car, as well as the precautions to take.
What should the piston ring clearance be?
We will look at various features and specifics of the topic, and also get acquainted with the basic techniques and techniques for repairing this part.
Firstly
, the very first step will be the fact that is associated with inspecting the pistons. It is necessary to check and carefully inspect the piston for cracks or minor mechanical damage on the surface. If you notice even a small defect, you should immediately replace the piston with a new one. To avoid an unpleasant situation or a larger breakdown.
Secondly
, if your engine is disassembled, you should also pay attention to the pistons. Such preventive measures include cleaning the piston head from existing carbon deposits, cleaning and processing the grooves that are located under the piston rings.
Third
, after the piston has been cleaned, be sure to inspect the gaps between the grooves and rings. In solving this problem, a table that will indicate the nominal piston ring clearances is more suitable than ever.
This:
- The parameters of the upper compression ring should be 1-0.04-0.075 mm;
- The compression ring, which is located at the bottom, should be 2-0.03-0.065 mm in size;
- Oil scraper ring with a gap of 3-0.02-0.055 mm.
Remember that each gap has its own parameters and distance, the most important thing is not to confuse them. The permissible gap should be 0.15 mm. If it is difficult to accurately determine the distance between the piston gaps by eye, you can use a special device - a micrometer.
How to properly use a micrometer to determine the size of the piston ring gap? It is necessary to measure the diameter of the piston in several places around its circumference. Then measure the width of the grooves using special feeler gauges.
After measurements, the average value of the gaps should be calculated. If the indicators differ from each other, then the piston should be replaced, if the indicators are the same, then everything is in order.
Fourth
, measuring gaps in piston ring locks. This measurement can be performed either using a special frame or with a simple cylindrical object. Indicators and parameters of the gap should be measured using a special probe. The parameters of the gap suitable for use have the following proportions - 0.25-0.45 mm.
In this case, an error of 1.0 mm may be allowed, which may arise as a result of wear of the part. If the gap size is higher than normal, the piston must be replaced. If the measured gap is less than the specified parameters (0.25 mm), then all that is needed is to simply sharpen the ends to the desired size.
Fifthly
, measuring the gap between pistons and cylinders. This measurement is based on establishing a correspondence between the already measured diameters of the piston and cylinder. Here the standard values are from 0.025 to 0.045 mm, with possible wear of 0.15 mm.