Wear or breakage of the ball joint is a serious malfunction that negatively affects the operation of the car and requires prompt elimination.
The most common signs by which you can determine the need to replace the ball are:
- Creaking in the area of the specified part when turning the steering wheel.
- A knocking noise that occurs primarily when driving on rough roads at low speeds. This is due to the increasing gap between the pin head and the body cavity, or rather its surface.
- Lack of stable movement when driving straight. Additional features are the presence of uneven tire wear with correct wheel alignment. You cannot rely only on this symptom, since it also appears with some other problems.
Since car owners do not always have the desire or opportunity to contact the appropriate service center, and may also not have the necessary tools at hand, a number of questions arise. In this case, drivers are interested in how to remove a ball joint without a puller. We will consider this procedure using the example of several cars of different brands.
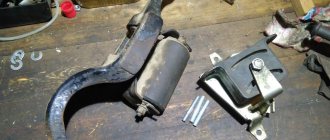
Replacing a ball joint on a Renault Logan.
Owners of this brand of car are recommended to replace not only the ball joint, but also the lower suspension arm at the same time (here, I wrote on this topic). This procedure is performed as a result of wear or damage to the unit. To carry out the operation you need:
- Hammer.
- Flathead screwdriver.
- Socket wrench - size 30.
- Dimension key 13.
- Open-end wrenches for 16 and 18.
- Two pipes of different diameters.
- Bar.
Basic steps of the process.
- The car is hung up, or its front part is raised using a jack, and the car is placed on supports.
- The wheel is removed.
- The nuts of the upper and lower bolts, as well as the connecting rod, are removed.
- The nut at the stabilizer bar link is unscrewed, then the bolt is pulled out.
- The ball bolt is removed.
- The finger is pulled out from the rotating mechanism housing.
- The bolts of the silent blocks, both front and rear, are removed.
- The lower suspension arm is removed.
- The old ball joint is removed. To do this, remove the rubber cover and the metal fixing ring from the assembly. At the end, the support is knocked out with a hammer (more details in the video).
- The new ball is installed so that its teeth fit into the grooves of the spline.
Reassemble the mechanism in reverse order.
Video instruction.
How to change it yourself: step-by-step instructions
There are two methods for replacing a ball joint on a Renault Logan - with and without removing the lever. In the first case, it is more convenient to dismantle the faulty ball joint, in the second - there is less assembly and disassembly work. In the instructions we consider both options. Basic steps:
- remove the wheel;
- remove the caliper;
- unscrew and knock out the ball joint;
- remove the lever (with the first method);
- press out the old support;
- press in a new one;
- assemble in reverse order.
Article on the topic: Repair and replacement of the gas tank on a VAZ 2108/09/14/15: how to do it quickly, accurately and with your own hands
Let's take a closer look at each point.
- There shouldn't be any problems removing the wheel. But when removing the caliper, you need to unscrew the two 18mm mounting bolts, and then release the brake pads. This can be done using a screwdriver or a small pry bar. To decompress, rest not against the disc, but against the pad. After dismantling, hang the caliper higher on the suspension spring using wire or rope.
Now we have access to the ball joint. It is secured with a bolt and nut. Immediately unscrew the nut and knock out the bolt or gradually unscrew it, pressing from the reverse side. At the mounting point on the steering knuckle there is a special slot into which you need to drive a large screwdriver (like a wedge). After which you can pull out the ball.
Drive a screwdriver into the slot of the steering knuckle and remove the ball
The next step depends on the replacement method you choose. If you decide to try to pull out the support without removing the lever, then you need to select a suitable piece of pipe or other spacer. The main conditions are that the length allows one end of the device to rest against the ground, and the other end against the suspension arm. And the diameter should be slightly larger than the bottom of the ball, so that when knocked out it will fall inward. If the boot remains intact, it is better to remove it. It may come in handy in the future, since the anthers are not supplied separately (some install them from the Gazelle, but you will have to struggle with installation).
How to replace a Lada Priora?
In this case, the role of a puller can be performed by a hammer and a reinforcement rod. To remove a worn or broken ball joint, you will need:
- The car is raised using a jack.
- The front wheel is removed.
- The two ball mounting bolts are unscrewed and the fastening nut is unscrewed (wrench 17 and 19).
- The reinforcing rod is inserted between the lever and the support body, and then pulled down.
- The pin must be hit from bottom to top in different directions so that the cone of the ball pin pops out of the lever.
- Once the cone is out, the support turns away from the steering knuckle.
- To prevent the ball from being pressed against the fist by means of a lever, the hub is supported, or the wheel is placed and the jack is lowered.
- Next, the ball joint, which is attached to the lever and knuckle, is replaced.
How to remove the ball joint
How to remove the gearbox lever of a VAZ 2110
Replacing a ball joint can turn into a rather complicated process if the element has not been removed for a long time and has already become “stuck.” A ball joint remover will be an excellent assistant for DIY repairs.
There are many options for this device. For example, an attachment with a fork-shaped end. The puller is inserted between the lever and the hub, and then driven in with a hammer until the ball pops out of its seat. The disadvantage of this design is the risk of damage to the boot.
Other options use threads to create the breaking force. If the ball is stuck quite strongly, and even a lot of force is not enough to remove it, you can hit the place near the joint attachment to the steering knuckle with a hammer.
When choosing a puller, pay attention to the size of the latter and the space that is free around the support of your car. A well-chosen ball puller can also be used to remove steering ends.
Support with rivets
If your car has never had ball joints replaced, most likely the attachment points to the control arm will be rivets. In order to remove such a ball, you need to drill out the rivets or cut them off with a grinder. When drilling, be careful not to widen the hole in the suspension arm.
Sometimes it is extremely difficult to perform such a procedure without removing the lever. In addition, it will be easier to remove the rivets if you secure the lever in a position convenient for operation.
Tools
Do-it-yourself replacement of a ball joint will be discussed using the Daewoo Sens as an example. The example is quite indicative, since Daewoo Nexia, Opel Vectra A, Astra F, Kadett have almost identical suspension structures.
For repair you will need:
- jack;
- wheel chocks, as well as safety supports for cars;
- ball puller; screwdriver, drills or grinder, if the ball joint is on rivets;
- wheel wrench for removing wheels;
- a 17mm wrench and a 17mm socket or 2 17mm wrenches for unscrewing the support mounting bolts;
- pliers for removing the retaining clip of the upper hinge mount.
Replacing a ball joint on a VAZ 2109 car.
This process is carried out not only when the ball joint is worn out, but also when there is a breakthrough in the boot. This cannot be ignored, as it poses a danger to passengers and the driver.
It is most advisable to use a lift or inspection hole for work. If you don't have one, you can use a jack. What you need to do:
- Remove the wheel on which the diagnostics revealed problems with the wheel brake.
- All structural parts are cleaned of dirt. Plus, the fastening elements are treated with a special rust removing compound. This will make installation and dismantling easier.
- Using a 19mm wrench, unscrew the nut that secures the ball joint to the suspension arm.
- Using a hammer and a pry bar, the SHO pin is pressed out of the suspension arm. To do this, the nut is not completely unscrewed, but several strong targeted blows are applied to the lever.
- Using a pry bar, the suspension arm is moved down to free the SHO pin from the lever.
- The bolts connecting the ball joint and the steering knuckle are removed using a 17mm wrench.
- The damaged ball joint is removed.
- The condition of not only the support, but also the boot is checked. Sometimes replacing the latter may be enough to fix problems. If obvious damage is detected, the ball joint is removed, a new one is installed, and the unit is put back together.
- It is necessary to pay attention to the condition of the finger. It should contain a spacer sleeve. If it is missing, it should be returned to its place, otherwise the updated SHO will not work correctly.
- The rubber boot is lubricated with grease before the reassembly process. Plus, grease will need to be applied to the installation site of the boot in the ball joint.
Ball replacement steps.
How to remove the crankshaft pulley using a puller and which way to unscrew it
In order to replace a faulty element yourself, you need to equip yourself with the following tools:
- Keys for seventeen and nineteen.
- Support removal device.
- Lift (jack).
- Crowbar or similar device.
- Balloon wrench.
To replace the ball, you must first lubricate the element with a special compound (litol). To do this, remove the protection, process the element and return the protection to its original position.
ball
First of all, loosen the holders
It is important not to unscrew them completely before installing the machine on the lift. We lift the car and dismantle the wheel. We remove the pin holders that secure it to the support itself. Using a ball removal device, it is necessary to loosen the fixation of the element. Next, using a crowbar, we pull the used support out. The new support is mounted on the pin. At this time, the assistant should gradually lower the lever, directing the element to the required position. Lower the lever and fix the finger holders.
The process is complete! Next, check the reliability of the fixation and return the car to its original position.
https://youtube.com/watch?v=yCmbcGAuNJA%3F
Thus, we replaced the ball. When carrying out work, you must adhere to the instructions provided and remember the safety requirements. With a competent and responsible approach, the work will only take a few hours. For the efficiency and quality of the work performed, it is not recommended to do the work yourself, without additional help. When dismantling and changing an element, use a high-quality and proven tool for your own safety. During inspection and repair, be extremely careful and careful, as considerable physical stress occurs. With due attention and strict adherence to the instructions, you will get the desired result. Happy renovation!
Is it possible to restore the support?
This element has 2 types of faults. Most often you may encounter the depletion of lubricant in the housing. With this development of events, restoring the ball joint to working condition is easy. Using a special syringe, the amount of lubricant in the housing is updated. Experienced craftsmen prefer graphite lubricant, but you can use another type of it, preferably with similar values. I advise you to read the article - how to lubricate a ball lubricant.
If the performance of the ball was restored using the above method, it is worth considering that it will not be possible to extend it for a long time. In cases where there is a high degree of wear, adding lubricant will not change the situation. A replacement part will be required.
The condition of most domestic roads means that car suspensions cannot last for a long time, as a result of which regular and frequent replacement of its elements is required. As for the ball joint, removing it without a puller is not a big problem. This process requires a minimal set of auxiliary tools. At the same time, the absence of a professional tool will not have a negative impact on the parts of the mechanism.
The service life of ball joints on a Lada Priora depends on the operating conditions of the vehicle, and on the quality of the part itself, that is, the ball joint. They can cover several thousand km and 30-40 thousand. Factory installed parts last quite a long time. For example, the average service life of factory ball joints is 50-70 thousand kilometers. In this article we will take a detailed look at the issue of not only replacing ball joints, but also tell you which ones are better to buy and how to check them.
Removing the ball joint without a puller - is this possible?
- Removing the ball joint without a puller - is this possible?
- What is a ball joint?
- How to remove a ball joint without a puller?
- The process of removing a ball joint without a puller
An important part of any car is the suspension. You need to constantly monitor its condition, since failure of even a small part will become a huge nuisance. One of these seemingly insignificant parts is the ball joint. It, like all machine parts, sometimes needs to be replaced, and in order to install a new mechanism, you need to remove the old one. Let's consider the issue of removing the ball joint using improvised means, that is, without using a special puller.
- What is a ball joint?
- How to remove a ball joint without a puller?
- The process of removing a ball joint without a puller
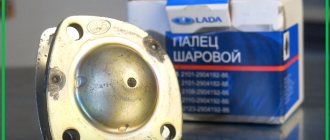
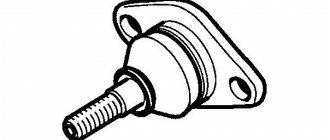
What is a ball joint?
The ball joint is a vehicle suspension element that provides a rigid and reliable fastening, while maintaining limited mobility of the arms relative to the wheel hub. When you are driving a car, the front wheels have two functions: to ensure that the car moves along the road, and also to provide the ability to maneuver - turning left and right. To maneuver and move correctly, the wheels must be positioned correctly relative to the road , that is, they must stand level, roll freely back and forth, be freely controlled by the steering wheel, and also be firmly attached to the axle.
To meet these requirements, a suspension was developed in which ball joints play a very important role. They connect the suspension arms and the steering wheel hub. Initially, the ball joint was installed only in front-wheel drive cars, thanks to which the wheels could be turned around the vertical. Since the invention of the ball joint some 40 years ago, little has changed in its design.
The ball joint mainly ensures that the wheel remains in a fixed position horizontally while it rotates vertically. The ball joint pin can move in a circle in the body, while it will swing at a small angle. That is, the ball joint performs both rotational and limited movements of the finger in the plane where it is fixed.
Often, all elements of the ball joint are made of steel. In order to reduce friction between surfaces that are in contact, the surface of the spherical recess is coated with plastic or other polymer. But there are also ball joints that are devoid of this polymer coating.
Often, such elements are installed in “older” domestic cars. Such models were equipped with collapsible supports; the gaps in them were removed by tightening the lid. There are two known ways to install ball joints. The first method is to attach it to the lever using bolts.
The second way is to press it into it. If a ball joint secured with bolts breaks, then only it can be replaced. If the pressed ball joint fails, then it will be necessary to change the suspension arm itself, in which the pressed ball joint will be in good working order. But the financial expenses in this case will be much greater, since you will have to buy not just a new support, but an entire lever.
Due to its functions, the ball joint experiences significant loads. Most machines rest on a very small surface area of the ball. Considering the total weight of cargo and passengers, poor quality of roads and decent speed, the load on the ball joint increases significantly. For these reasons, the unit wears out and fails. When you buy a new ball joint, it is better to choose a part from the original manufacturer. The market is filled with a large number of brands that produce something similar to the original ball joints, but your choice should fall on products only from trusted manufacturers.
The most common option is the front suspension, which has two ball joints, one per wheel. Most SUVs are equipped with four ball joints in the front suspension, with two of them per wheel. A very rare situation is when there are three balls. Modern cars with independent multi-link rear suspension also have ball joints on the rear wheels.
How to remove a ball joint without a puller?
Removing and replacing the ball joint is a fairly common task, which, although unpleasant, is doable.
It is impossible to change the support on a modern car and on a classic one using the same steps. The reason for this is the different design. Modern cars have more advanced ball joints. Still, if a problem arises, you must first of all understand the question: “Do I need to repair the ball joint or replace it?” In order to give the correct answer, you need to diagnose the chassis; you can do this yourself, but only if someone helps you. First you need to understand what diagnostics are. Method number one is to determine the condition of the support: lift the wheel, grab the bottom and top with both hands, and then try to shake it. This will make it possible to determine whether there is any play. The second method is more reliable. Use a crowbar or pry bar to try to get under the car. Fix it in the center between the lower lever and the edge of the support, then push it up. This way you can see the play. The third method is the most correct and accurate. You need to do the following:
1) Dismantle the ball joint and check it in your hands;
How to check a ball joint on a Priora
So, to make sure that the support needs to be replaced, it needs to be checked in several simple ways. Jack up the wheel and, placing your hands on the top and bottom points of the wheel, try to shake it. If you feel play, the ball joint may be faulty. Also, the cause of play may be the tips or stabilizer struts.
Another way to check is to drive into an inspection hole or overpass and use a mount or pry bar to check the ball play. Place the pry bar between the ball and the lever and try to shake it. A faulty ball will play easily, which indicates either high wear or lack of lubrication.
Carefully inspect the support, its boot should be intact, and it itself should be without chips or signs of deformation.
How to check the serviceability of the lower ball joint
You can check the lower balls in the same way as in the case of the upper ones, but the result will be much more effective if you use a pry bar and install the machine on an overpass or lift. It is necessary to insert the assembly between the trunnion and the lever to unload the ball joint and check the possibility of its movement. The following test methods are suitable for testing a single lever system.
Checking lower ball joints on a lift
Checking the ball video instructions
So, to check the lower ball in a single-link suspension system, you need to use a jack and a pry bar. It is advisable to drive the car onto an overpass (inspection hole) or onto a lift so that it is more convenient to carry out diagnostics. The verification algorithm in this case will be as follows:
- Place the car on an overpass (with the handbrake on) or on a lift.
- If an inspection pit or overpass is used, then it is necessary to use a jack, in particular, to hang the wheel whose support is being checked. The lift with the machine, of course, needs to be raised to a comfortable height.
- Carefully, so as not to tear the boot (this will also need to be checked), place the flat end of the pry bar between the eye of the steering knuckle (trunnion) and the support lever.
- Next, you need to carefully swing the mount up and down so as to unload and reload the hinge being tested. That is, the ball pin will move in a vertical direction.
- If the hinge is working properly, there should be no play under the mount. If it is there, it will be immediately visible to the eye and even felt to the touch. The presence of play is a direct indication that the ball joint has become unusable and requires replacement.
Checking the lower ball joint on a machine without a lift
The method of checking a ball joint without a lift can be carried out using an additional support, like a stump, capable of supporting the weight of a car or a similar structure.
Signs of a bad ball joint
- When driving over small potholes and bumps, a distinct knocking sound is heard in the suspension.
- When turning, you may hear a grinding or squeaking sound, and the steering wheel may also be harder to turn.
- The car holds the road poorly, the wheels seem to blur on the asphalt.
- If you notice that there is “rubber”, one of the reasons may be the failure of the ball joints.
In order to accurately verify the malfunction of the ball joints, you must contact either specialists or independently, according to the instructions indicated above, carry out inspection and diagnostics. If during a visual inspection you find that the boot on the ball joint is torn, this basis is sufficient to replace it. Because dust and dirt get on the ball pin, mix with the lubricant and it fails.
Removing the ball
So, you are convinced that the support has come to an end, and now you should change it. By the way, this is done not only in the event of a malfunction of this structural element. When repairing the hub, you will also have to remove the ball joint, otherwise it will not be possible to dismantle the steering knuckle. Before starting work, you need to treat the nut with penetrating lubricant. This will make disassembly much easier. We prepare the car. They put it on the handbrake and install wheel chocks. The car is jacked up and measures are taken to prevent it from falling. Remove the wheel.
To remove the ball without a puller, you will need a wrench, a pry bar and a hammer. This work is done in the following order:
- Loosen the nut securing the support pin. It should be unscrewed to the top edge of the finger. Some models have additional screws that secure the ball joint housing. If there are any, then you need to unscrew them;
- Having thus prepared the support, we proceed to remove it. To do this, we slip a pry bar under the lever and begin to push it slightly (up or down, depending on the location of the support). At the same time, we apply strong blows to the finger. That's what the nut was left for. Usually a few hits are enough.
You can use this method without fear for the remaining elements of the suspension. Even if vibrations occur, they are damped by silent blocks. This method is completely universal; it can be used on all car models with ball joints.
What is the danger of malfunctioning ball joints?
The most harmless consequence is a problem with worn tires. Management also becomes much more complicated. If you do not pay attention to the problem, then there is a considerable risk that the support will simply be torn out while moving. It's good if this happens when stopping or driving at low speed. In the event of such a breakdown while driving on the highway, you cannot avoid a serious accident.
Which ball joint to choose for Lada Priora
Today, a fairly large selection of balls is offered, from Chinese to conveyor and even reinforced ones. The choice is up to the buyer.
- BZAK BA08-2904192-01 from 250 rub. piece
- TRACK BJ70-107, 2108-2904192 from 300 RUR
- LADA IMAGE 2110-2904192-82 from 400 RUR
- AMT-Miass AM08-2904192 from 220 rub.
- BELMAG BM10-2904192-01 reinforced with fastening (conveyor) from 500 rub.
- VAZINTERSERVICE /OAT/ VIS08-2904185-10 sunset - from 350 rub.
- ASOMI, Tolyatti A110.2904.193 Comfort PRO from 500 rub.
The most expensive conveyor ball joints are from the BELMAG company; also in terms of price, the ball joints from ASOMI, which also produces front and rear struts, as well as support bearings, stand out.
Is it possible to drive with faulty ball joints?
Of course not, this is directly related to security.
- When the ball joint is dismembered, the wheel breaks and its rotation is blocked. The car instantly leaves the trajectory. The consequences can be fatal.
Weak ball joints pose a real safety hazard!
Thus, having determined the symptoms of a malfunction, conclusions are drawn about the repairability of the part. Once critical wear is detected, the ball joints must be replaced. However, their cost is quite high, especially if they are integral with the suspension arm. Therefore, many car enthusiasts prefer to make repairs.
Detailed manual for replacing ball joints
We will need 17 and 19 mm wrenches, preferably socket wrenches so as not to tear off the nuts, WD40, a ball joint remover, and a hammer.
So, jack up the car, put stops under the rear wheels and remove the wheel.
Next, using WD40, we spray the bolts securing the ball joint to the lever and the ball joint nut itself so that there is no difficulty in unscrewing them. Let’s wait a few minutes until they “dissolve” and get to work.
Using a 19mm wrench, unscrew the ball joint nut and a 17mm wrench to unscrew the nuts securing the ball joint to the lever.
Now we need a ball joint remover, it can be of several types, the principle is the same - remove the ball joint from the lever.
We take a new ball joint and, for our own peace of mind, check the grease under the boot. Carefully remove it and check - if there is no grease, fill the boot with Litol or similar grease. Be careful not to damage the boot.
The work of replacing the ball joint of the VAZ 2107 takes place in several stages
- First of all, you need to remove the wheel.
- Armed with a metal brush, we clean the fasteners of the ball joints.
- Using the intended liquid, you need to treat all connections that will unwind during operation.
- Using a 22mm wrench, unscrew the nuts. Immediately you need to make two turns on the upper and lower supports.
- We install a ball puller.
- Often both the upper and lower supports give in immediately. And the one at the top pops out first. Otherwise, you will have to use a hammer and a special steel drift to knock it out. We hit the protrusion located on the steering knuckle and thus knock out the support.
- When the upper ball joint of the VAZ 2107 can be knocked out, take the key, unscrew the nut, after which you can remove the ball joint from the fist.
- If the finger rotates, you should clamp the lever, for which it is best to use a mounting tool.
- Now you need to unscrew the fastening of the support to the upper yoke.
- 1Remove the ball joint.
- When the ball is removed, you need to carefully clean the place where it fits on the lever. Check the lever for cracks, chips, etc.
- The sealing washer should be removed from the old ball, which we install on the new support.
- Thoroughly lubricate the ball joint using Litol-24 or ShRB-4 grease.
- Install the boot and washer.
- Now you need to screw the ball to the lever. We install it into the fist and tighten the nut.
- Now we unscrew the nut of the lower ball joint of the VAZ 2107. In almost all cases, the pin begins to rotate, but in order to avoid this, it is necessary to install an assembly between the brake shield and the knuckle. Next, we make a lateral tension in the connection between the fist and the finger.
- If the previous step does not help, the problem can be solved by installing an adjustable wrench in the gap between the knuckle and the lower arm, using it to keep the finger from turning.
- Now that the nut is unscrewed, you can lift your fist up. In order to make further work more convenient, it is necessary to insert a 22 key into the slot located between the lower arm and the upper part of the fist.
- Remove the ball joint from the lever.
- We carefully inspect the lever and the seat itself, which must be cleaned of rust and dirt.
- We take a new ball, checking the presence of grease in its lower part, unscrewing the plug using a 7 key.
- If there is no lubricant, it is necessary to fill the ball with new lubricant, for which a syringe without a needle is used.
- We install the ball at the bottom of the lever in its seat, after which it is necessary to screw it to the lever.
Now the new balls are installed, and as you can see, there are no particular difficulties in this procedure. The main thing is to strictly follow the instructions described above.
Also read with this article:
We are preparing for a major overhaul of the VAZ engine
How to modify the VAZ 2107 stove yourself: expert advice
We adjust the VAZ 2107 carburetor without the help of a service station
Installation of fog lights (PTF) on a VAZ 2107
Do-it-yourself replacement of ball joints on a Priora
The first step is to lift the front of the car with a jack, having first removed the wheel bolts. Then we finally unscrew the bolts and remove the wheel.
Apply penetrating lubricant to all threaded connections. After a few minutes you can start working.
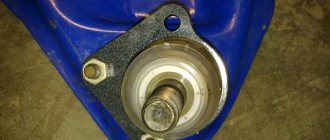
Using a 19mm wrench, unscrew the lower nut securing the pin, as is clearly shown in the photo below.
Then, using a special puller, press the pin out of the front suspension arm. We position the puller as shown below.
Now, using the puller bolt, we perform this procedure. When the pin is freed, you can unscrew the two bolts securing the ball to the steering knuckle.
If the ball is clamped, which happens quite often, then you will have to compress the rack a little, thereby relieving the lever with the support. This can be done using a jack and a brick or other support. It will look like this: we place a brick under the brake disc and lower the car slightly. The front suspension spring compresses slightly, and the pressure on the lever decreases.
Remove the ball from the lever:
Before installing a new support, you need to lift its boot and generously lubricate everything inside with lithol or other special lubricant.
We put it in place and replace the ball. We install everything in reverse order.
If you have difficulty connecting the finger to the lever, you will have to work a little with a pry bar, and also “play” with the suspension using the same jack and brick. After everything is done, we finally tighten all the bolts and fastening nut to the required torque, using a torque wrench for this.
- We tighten the support nut to the front suspension arm of the Lada Priora with a torque of 66-82 N*m.
- We tighten the fastening bolt to the steering knuckle with a force of 50-60 N*m
We install the wheel in place and perform a similar procedure on the reverse side if necessary. If you still have any questions about the photo report, you can ask them below in the comments, or look at everything in the review.
How to replace a ball joint in VAZ models with your own hands
Be sure to secure the machine to prevent it from moving. This can be done using the handbrake, wheel chocks or speed. Since you will have to be under the car, you should reliably protect yourself.
It is best to replace the supports yourself in the pit or use a jack to lift the car. At the same time, do not forget to loosen the mounting bolts at the wheel a little, but loosen them and not unscrew them completely.
After this, you must remove the nut for securing the support by unscrewing it and knocking it out. In order to knock out the support itself, you can use two methods:
To remove the support pin from the so-called steering knuckle, you will need a puller. You can see it in the photo below.
Use special tools - a pry bar, a pry bar or a hammer.
- Remove the wheel.
- Clean the ball joints with a brush.
- Treat the connections with WD-40 (or equivalent).
- Using a “22” wrench, unscrew the nuts of the upper and lower supports by 1.5-2 turns.
- Install a specialized puller for ball joints.
- Usually the ball joints can be removed in one step (first the upper one, then the lower one). If the ball stays in place without applying force, you need to reposition it using a drift and hammer (hit the protrusions of the steering knuckle).
- After pressing out the ball joints of the VAZ 2107, it is worth removing the nut that secures the upper ball joint and remove it from the fist.
- This article may be of interest: Replacing brake fluid on a VAZ 2110 at home
Tools for work.
To replace the ball, you will need to prepare. To do this you need:
- Keys and gates.
- Liquid WD-40.
- Litol or ShRB lubricant.
- Puller.
- Hammer and crowbar.
Ball location
The ball joint connects the lever and the steering knuckle.
They are located on both sides of the car on the bottom of the lever.
It is used to attach the lever to the hub.
Replacement time
When driving a car on a bad road, you will need to change the ball joints often.
- Initially, when it fails, a knock will be heard.
- Then the car will begin to pull to the side even when driving on a good road.
- Then the tires will begin to wear unevenly.
- When turning the steering wheel, squeaks may appear.
- It will become more difficult to turn the wheels.
If the finger moves freely with little hand force, the ball joint requires replacement.
Replacement
The whole process is carried out in the following stages:
- Removal . Hang the wheel, unscrew the nut on the pin, then knock the rod out of the socket.
Unscrew the 2 bolts securing the ball to the knuckle.
If there is no puller, insert the assembly and knock out the lever with a hammer.
When the bolts are tight to unscrew, you can use WD-40.
Installation
Installation is carried out in reverse order. There is no need for a puller here.
Before installation, fill the case with lubricant.
You just need to insert your finger into the socket and tighten the nut on it. You should definitely lubricate the ball inside under the boot.
Symptoms and diagnostics
A torn boot leads to the destruction of the support from the inside.
A Mazda 6 2nd generation ball joint is replaced when the following symptoms :
- in motion (especially when driving through potholes), a characteristic extraneous noise is emitted from the wheels ;
- wheel alignment violation;
- Mazda 6 GH no longer maintains straight-line movement;
- a creaking sound is heard in place of the front wheels ;
- uneven wear of front axle tires;
- When braking the car pulls to the side .
To independently identify a faulty ball Mazda 6 GH, you should install the car in an inspection hole. Using a pry bar, apply force to the supports one by one. A symptom of a malfunction will be knocking and free movement of the finger.
We service and replace ball joints Mazda 6 GH (upper and lower)
Failure of the ball joint can lead to the wheel turning outward , which poses a threat to the life of the driver and passengers of the Mazda 6 GH. At the same time, the Mazda 6 GH ball joints (upper and lower) do not break suddenly. Symptoms of problems can be detected in the early stages.
Let's consider the characteristic symptoms of a malfunction, as well as the procedure for replacing and servicing parts.