Causes of clogged strainer on Grant
It is not necessary to change the grid so often, since when refueling with normal fuel, it can easily travel more than 100,000 km. But symptoms may appear that indicate a clogged fuel pump mesh:
- poor engine start
- insufficient pressure in the fuel system
- dips when pressing the gas pedal
- the engine began to slowly gain speed
If you begin to notice the problems described above, then the first thing you should do is look at the mesh filter and, if necessary, replace it.
Fuel mesh Lada Granta, Kalina 2, Datsun, Priora, 21101 (1.6L) electric fuel pump filter
Dear customers, in order to avoid errors when sending an electric fuel pump, in the “Comment” line indicate your car model, year of manufacture, engine capacity L1.4 or L1.5 or L1.6.
The fuel pump is based on an electric motor. If the resource depended only on it (and this is roughly what happens in Western cars), then the gas pump would last for about 150 - 200,000 kilometers.
An electric fuel pump uses the fuel itself as a lubricant, and our fuel is somewhat abrasive:
— it is full of tiny particles, which over time grind down the working elements of the pump, and it begins to lose its working properties long before the electric motor fails;
- if the fuel filter is dirty enough, the situation gets even worse.
The wear rate can be reduced by timely cleaning of the fuel system and regular replacement of the fuel mesh and fuel filter.
The mesh of the electric fuel pump acts as a filter, that is, when the fuel in the gas tank is pumped into the car engine, it first passes through the mesh, which in turn cleans the gasoline from dirt and small debris, which have a very detrimental effect on the fuel system when it gets into the engine car.
The fuel mesh 21101 (1.6L) of the electric fuel pump needs to be changed from time to time, because when it is clogged, the fuel pumps into the engine with reduced pressure, that is, it passes very poorly through the clogged mesh and therefore the car drives jerkily and sometimes even poorly starts.
Wear of the electric fuel pump is accompanied by a rather interesting symptom: fuel consumption decreases. But at the same time, the engine’s throttle response also decreases, so there’s nothing to be particularly happy about.
One of the main reasons for a clogged mesh is poor quality fuel poured into the car, which may contain particles of debris, various types of deposits, etc.
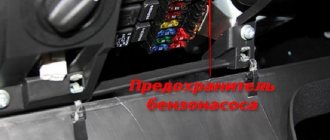
Do not delay replacing the fuel grid to avoid clogging the fuel system. The fuel pump grid is located directly in it, that is, it is located at the bottom of the electric fuel pump.
In order to replace the strainer, you need to remove the fuel pump from the tank. To do this you may need the following tools:
— Flat and Phillips screwdrivers;
— 7 mm socket and extension;
— Ratchet or crank;
— Wrench 17 (if the fittings are on nuts).
When removing the fuel pump, carefully inspect the internal condition of the tank, and if necessary, thoroughly clean or rinse it to get rid of foreign particles and formations.
After replacing the fuel grid of the electric fuel pump, turn the ignition key until the electric fuel pump pumps gasoline into the fuel system, and then start the car!
VAZ 1117-1119, VAZ 2170, VAZ 2190, Kalina 2, Largus, Datsun, Vesta, except GM .
Other article numbers of the product and its analogues in catalogues: 21101113920000.
Any breakdown is not the end of the world, but a completely solvable problem!
How to identify a problem with the electric fuel pump motor 2112 in a VAZ family car.
How to independently replace the fuel grid of an electric fuel pump with an engine capacity of 1.6 liters on a VAZ family car.
With the online store Discounter AvtoAzbuka, repair costs will be minimal.
Just COMPARE and BE SURE!!!
Don't forget to share the information you find with your friends and acquaintances, because they may also need it - just click one of the social networking buttons located above.
avtoazbuka.net
Procedure for replacing the fuel pump mesh on a Lada Granta
Since the fuel filter on a Lada Granta car is located directly in the tank, it must be removed from there. To do this, one half of the rear seat is folded back, after which the two screws securing the hatch are unscrewed. Below it is the fuel pump. To remove it, you need to do the following:
- Relieve pressure in the vehicle's power system
- Disconnect the block with power wires
- Disconnect the two fuel pipes from the fuel pump cover.
- Move to the side the retaining ring that secures the pump in the tank
- Pull out the entire module assembly
After this, you can begin removing the mesh filter without any problems.
We move a little to the side three latches - latches, which are clearly shown in the photo below.
Now we move the lower container to separate the module into two parts, first disconnect the tube, which is shown in the photo.
Now we completely separate the two parts of the module.
Now we have full access to the mesh, and it is enough to pry it with a screwdriver so that it moves away from its seat. You may have to apply a little more force than expected, but you can remove it without any problems.
As a result, we obtain a removed strainer, which, as can be seen, is quite heavily contaminated, although in this example we are considering a car with only 65,000 km mileage.
Now we take a new mesh and install it in its place in the reverse order.
Replacing the fuel pump mesh — Lada Granta, 1.6 l., 2012 on DRIVE2
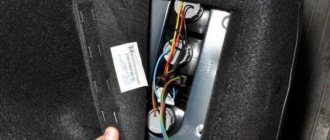
Hello to those who follow my blog. I’m generally too lazy to write, I bought a lot of new things but I can’t write about them all. Well, okay, I’ll write about them later. I’ve long wanted to change the fuel pump mesh since I bought it with 30,000 miles, but I had to install it on my brother’s two-wheeler, I had to buy myself again. I changed the fine filter last weekend, sawed it up, it was a little dirty. Now the weather was disgusting, the wind was very strong. I removed the seat, unscrewed the cover, there was enough dust. Started the car and pulled out the plug from the fuel pump to relieve the pressure. I proceeded to remove dust, armed with a brush with which I clean gas boilers))) It sweeps so well)) Then I took the silicone hose that was in my suitcase and carefully blew out all the cracks, a lot of dust flew out. I prepared some rags and started removing, the car had already stalled and turned off the ignition. Press the latches we remove the hoses and carefully bend them so that they don’t get in the way. I watched how people knock down the ring that holds the entire structure, so I didn’t want to remove it like that. I took pliers and squeezed it in a few places and the ring came off very well. I carefully removed the glass from the tank, drained the gasoline into the tank, left a little since it was dirty, I disconnected the float mechanism from the glass because the wires were short, pressed the clamps and pulled out the fuel pump. There was garbage at the bottom, there was also a little stuck on the mesh, I wiped everything off the mesh and changed everything in the reverse order, the process took about 10 minutes. We ventilated the interior and ready.
Dust, a lot of dust
Cleanliness and what I did with it
Compress
Assembled
Price: 45 ₽ Mileage: 30,000 km
www.drive2.ru
Causes of clogged strainer on Grant
It is not necessary to change the grid so often, since when refueling with normal fuel, it can easily travel more than 100,000 km. But symptoms may appear that indicate a clogged fuel pump mesh:
- poor engine start
- insufficient pressure in the fuel system
- dips when pressing the gas pedal
- the engine began to slowly gain speed
If you begin to notice the problems described above, then the first thing you should do is look at the mesh filter and, if necessary, replace it.
Replacing the fuel pump in detail with a description of each step
The algorithm of actions is as follows:
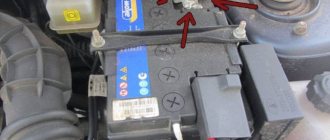
- Remove the negative terminal from the battery. A mandatory requirement if you carry out any work that affects the electrical system of your car.
- The fuel pump is located under the rear seat. The rear seats need to be raised, I remove them altogether. It comes off easily. You need to “pull the string” in the center of the seat and remove it.
Pull the loop and pull it up
Relieving pressure from the fuel rail using a screwdriver
4 bolts securing the plastic fuel pump cover
Removing hoses from the fuel pump
An alternative option for relieving pressure in the fuel rail
The main method is a little inconvenient and dangerous. Since gasoline can ignite, and if the muffler pants have not yet cooled down, it can cause a fire in the engine compartment. Therefore, there is an easier way.
- Disconnect the power supply from the fuel pump.
- Start the car and let it run until it stalls on its own.
This method also relieves pressure in the fuel rail. Its advantage is that if you have a 16-valve engine, you do not have to remove the cover from it to get to the nipple!
Procedure for replacing the fuel pump mesh on a Lada Granta
Since the fuel filter on a Lada Granta car is located directly in the tank, it must be removed from there. To do this, one half of the rear seat is folded back, after which the two screws securing the hatch are unscrewed. Below it is the fuel pump. To remove it, you need to do the following:
- Relieve pressure in the vehicle's power system
- Disconnect the block with power wires
- Disconnect the two fuel pipes from the fuel pump cover.
- Move to the side the retaining ring that secures the pump in the tank
- Pull out the entire module assembly
After this, you can begin removing the mesh filter without any problems.
We move a little to the side three latches - latches, which are clearly shown in the photo below.
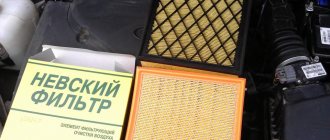
Selection of fuel filters for Lada Granta
The Lada Granta car is designed on the basis of the Kalina. Accordingly, most of the parts, including the fuel system, are identical. This car uses a classic two-level fuel purification system, which uses a coarse and fine filter. Almost all fuel-injected cars use a similar scheme. For rough cleaning there is a mesh in the gas tank. The location there prevents large mechanical fractions of contaminants from entering the fuel pump and fuel line.
Lada Granta and Kalina are equipped with interchangeable mesh filter elements. This part, depending on the brand, costs no more than 100 rubles, but without it it is impossible to imagine effective cleaning. A distinctive feature of the element is its oblique cut. Such parts were first used on the first fuel-injected VAZ 2110 cars; since then, nothing has changed structurally in them.
The only difference is that on the more modern Grant, instead of threaded connections, clamping clips are used. On the market of components for fuel systems, there are filters from different manufacturers. They can vary greatly in cost, but their price segment is low: it starts at 150 rubles and rarely exceeds 500 rubles. The question arises: what is the difference?
Filtering devices have two main parameters: the volume of fuel passed through (performance) and the level of purification.
There is no fundamental difference between expensive and cheaper products. According to experts, even the simplest element is capable of capturing particles as small as 10 microns, and the throughput is not lower than 2 liters per second. This means that paying more for the same features doesn't make sense.
Be that as it may, choosing more expensive filter models is not without certain advantages.
What are the advantages
Of course, the practical meaning of these benefits is debatable. Cleaning fuel from impurities less than 10 microns is not provided for by most car manufacturers, which means that a large filter area is not such an advantage. What is the point of this if replacing the Lada Granta fuel filter is required according to regulations, and low-quality gasoline can clog both the expensive and standard filter elements to the same extent at one time.
Cleaning the part
Replacing the Lada Granta fuel pump in some cases is not the only way to get rid of fuel supply problems in some cases. To restore the functionality of the fuel pump, it requires thorough cleaning. To do this, you need to dismantle the unit using the method described above.
Next, unscrew the lower part of the fuel pump cup. The glass has a filter mesh that needs to be removed using a screwdriver. The mesh will need to be cleaned with a rag and rinsed in solvent. After this, the remaining elements of the fuel pump are cleaned.
After cleaning is completed, it is recommended to install a new coarse mesh, as the cells on the old one may be damaged.
Before performing work, read the operating instructions so that you know in advance where the Lada Granta fuel pump is located, as well as how to attach it. It is better to carry out work in a well-lit room away from open flame sources. For protection, use gloves to avoid damaging your skin with gasoline or solvent.
Fuel pump mesh
The mesh is a coarse fuel filter and serves to protect the fuel pump from large particles of debris entering the fuel pump, which can damage it.
The mesh is located in the fuel pump glass and to replace it you need to dismantle it.
Replacing the Granta fuel pump mesh
Relieve the fuel pressure from the fuel line. We dismantle the gas pump glass and take out the pump itself, replacing the mesh in it and assembling the structure in the reverse order.
Cabin filter
The filter for cleaning the air entering the cabin serves to protect the stove parts from contaminants such as dust, dirt, leaves, etc. The Granta cabin filter is located under the frill and to replace it, the frill must be dismantled.
The cabin filter on Grant is replaced every 15,000 km.
Replacing the Granta cabin filter
To carry out the replacement, unscrew the screws securing the right part of the frill and remove it. The filter is located on the right side of the car (in the direction of travel). Unscrew the screws of the filter cover, 2 of them, and remove the cover. We dismantle the filter and install a new one in the reverse order.
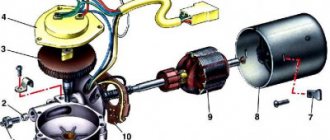
Removing the fuel pump Lada Granta
If the engine power of a Lada Granta car drops, increased noise occurs, or whines are periodically heard when the fuel pump is operating, then most likely the fuel pump has failed. First, check the pressure in the fuel supply system by connecting a pressure gauge to the fitting on the fuel rail in the engine compartment. If the pressure in the power system is higher than 400 kPa (4.0 kgf/cmg), then the pressure regulator installed in the fuel pump module is faulty and must be replaced (see “Repair of the Lada Granta fuel module.”)
If the pressure in the power system is below 380 kPa (3.8 kgf/cmg), replace the fuel filter (If this does not help, try removing the module and washing its receiver screen.
If in this case the pressure does not increase, the fuel pump must be replaced.
Tools needed to replace the Lada Granta fuel pump
You will need: Phillips screwdriver, drift, hammer.
Operations performed when removing the Lada Granta fuel pump
Removing the fuel module is shown on a car with a VAZ-21116 engine. On cars with other engines, this work is performed in the same way.
1. Reduce the pressure in the supply system. 2. Fold the rear seat cushion forward. 3. Lift the cut out parts of the carpet and the thermal and noise insulating lining above the hatch at the base of the body.
4. Remove the four screws securing the hatch cover above the fuel module...
5. ...and remove the cover.
6. Disconnect the wiring harness block from the fuel module by releasing its spring clip.
7. Disconnect the fuel hoses from the module fittings by pressing the buttons of their spring clamps and sliding the hoses along the fittings.
Disconnect the hoses from the fuel module fittings carefully, avoiding lateral forces, so as not to break the fittings. 8. Using a screwdriver, slide the spring plate of the fuel module bayonet mount counterclockwise and turn the plate until the seven cutouts in it align with the protrusions on the fuel tank flange.
9. Remove the plate.
At the factory, the spring plate securing the fuel module is tightened (or, if necessary, unscrewed) with a special tool. If it is absent, a strongly tightened plate can be moved out of place with light blows of a hammer, resting the drift on the bent upward tendril of the plate. 10. Remove the module from the tank by tilting it to the side...
11. ...to avoid bending the fuel level indicator sensor lever and turning the float on the lever. Otherwise, the indicator readings in the instrument cluster will be incorrect.
When removing the fuel module from the tank, immediately place a cleaning cloth under it, as gasoline may leak from the module’s glass.
12. Remove the rubber O-ring from the tank flange. Be sure to replace a heavily compressed, hardened or torn ring to avoid gasoline leakage.
13. Install the fuel module and all removed parts in the reverse order of removal. After installation, slightly tighten the spring plate of the module fastening with light blows of a hammer through a drift (see note above). When installing the module into the fuel tank, the installation arrow on the module cover must be directed towards the rear of the vehicle.
When connecting fuel lines, follow the direction of gasoline supply indicated on the fuel module fittings
autosecret.net