The front suspension of the VAZ-2109 requires mandatory regular inspection of the safety covers of the hinge assembly. In this case, it is worth paying attention to the absence or presence of mechanical deformations. In addition, it is necessary to find out the presence of cracks or signs of damage due to contact with foreign objects, damage to levers, braces, stabilizing support, struts and the front part of the body, especially in places where components and elements of the suspension mechanism are fixed.
The design of a car chassis using the example of a VAZ 2109
The chassis of the VAZ 2109 is somewhat different from the suspension design of earlier models of the Volga Automobile Plant. Let's look at its design - the front and rear axles separately.
- Front axle
- Components and parts of the front axle chassis
- Description of the front suspension design
- Rear axle
- Rear axle chassis parts
- Rear axle design
- How to check the health of a car's suspension
- Signs of wear or damage to the undercarriage
Do-it-yourself repair of the VAZ 2109 chassis
Every experienced motorist understands how important it is to carry out timely preventive maintenance on the most vulnerable parts of the car. These include the chassis - its diagnostics are simply necessary for the safe operation of any machine. The chassis includes: wheels, rear and front suspension, as well as a frame. These elements are subject to heavy loads not only when driving, but also when the vehicle is at rest. Therefore, chassis parts wear out faster than any other. Our article will talk about the VAZ 21099 car, the chassis of which can be repaired by any car owner with his own hands.
What problems can there be and how to fix them
The condition of the front suspension should be monitored regularly.
The most common damage is abrasion of the joint covers. These damages are classified as mechanical. Among the malfunctions of this element of the car, unevenness of the lever located on the suspension or on the stabilizer bar is noted. This may result in incorrect and inaccurate operation. In all these cases, you need to check the parts and then simply replace them with new ones. Among the malfunctions there may be minor ones that should be eliminated using a regular repair kit. For example, loosening the bolts of the stabilizer bar or the nut of the support. You should tighten them tighter.
If you hear the suspension making sounds (knocking, creaking), then this indicates more serious damage. First you need to determine where the sound is coming from. You can use a jack for this. Rock the wheel in a vertical plane; if there is a knock in the center of the wheel, then most likely there is a fairly large gap in the bearing. It is better not to change the bearing yourself, as it can be destroyed. It is better to contact a car service center that has special equipment for these purposes.
We draw conclusions: it is better to diagnose and prevent your car and protect yourself while driving than to invest in tuning.
Other causes of malfunctions and possible repairs
Replacing the front suspension or repairing it may be necessary due to the following conditions:
- If there is a large difference in tire pressure, this indicator needs to be adjusted.
- Violation of wheel mounting angles - timely adjustment of this unit is required.
- Deformation of the rubber element of the support strut - can be solved by replacing the faulty part.
- If there is a large difference in the elasticity of tires or spring mechanisms, the defective spare part should be replaced.
- In addition, it is necessary to monitor the balancing of the wheels.
To avoid premature repair of the front suspension, it is necessary to follow the recommendations for the maximum load of the vehicle, avoid sudden acceleration and not exceed the maximum permissible values specified in the operating instructions.
Front suspension VAZ 21099
For the VAZ 21099, the front suspension is the most complex element in the car, since the car is front-wheel drive. But the number of main nodes is small.
During each preventive self-examination, you need to pay attention to:
- the presence of operational defects on the balls;
- traces of deformation of the suspension by the body or external objects;
- any cracks or irregularities on the suspension;
- defects in the elements of any joints in the components of the front part of the machine, ranging from braces to levers and stabilizer, including hoses and struts;
- wheel angle, because any deformation makes work on their correct camber and toe useless;
- integrity and wear of silent blocks;
- absence of cracks and defects on the rubber bands of the stabilizer cushion;
- subsidence of telescopic suspension struts.
No parts should have cracks, bruises, traces of oil, torn fragments, or bulging rubber bands on one side.
To check the performance of the ball, measure the distance from the support disk to the lever in front. When, during the swing of the chassis, the distance varies by plus or minus 0.8 mm or more, it is necessary to change the ball joint.
When rocking, the hub should not knock - the sound means the bearing needs to be replaced.
When, when starting to move, the car begins to make a hum/vibration/unintelligible knocking sound or the vehicle pulls in a certain direction, this indicates a malfunction in the front suspension system.
How to remove the front suspension arm
Before inspecting the lever, the front part of the machine is fixed on a support (or on a pair of raised jacks), the parking (hand) brake is depressed, and the rear wheels are secured in a stationary position with “shoes”.
Using the 17th key, unscrew the four bolts and the wheel is removed. By unscrewing the ball joint nut, you can release the pin. The stabilizer bar is disconnected from the front suspension arm.
To remove it, you need to unscrew the nut, then remove the bolt connecting the structure to the body bracket.
The part must be replaced if the geometry of the lever is changed or the rubber components show signs of defects.
How to replace shock absorbers on a VAZ 21099
Quite often, restoring the front suspension involves replacing shock absorbers. If you hear knocks when driving, this most likely confirms the need for replacement. The cause of the problem lies in the deformation/breakage of the spring. Replacing coil springs (or already assembled shock absorbers) is done in pairs, using the front or rear axle.
Replacing the front shock absorber begins with disassembling the front strut. It is better not to remove it entirely, since after reinstallation the wheel alignment will be extremely difficult.
How to disassemble the front pillar on a VAZ 21099
Work begins with removing the crankcase protection. When working, have a 13-1 wrench and a 19th ring wrench available.
- The “protection” of the cap is removed from the upper mount of the rack.
- Use a specialized wrench to loosen the nut on the shock-absorbing rod (rod). It is recommended to carry out work on loosening or tightening bolts strictly on the ground/floor (not in a pit). Tightening is carried out in the range from 65 to 95 Nm.
- When putting the handbrake on and after installing the “shoes” under the rear wheels, the front of the car is raised on a jack, after which it is installed on supports. The wheels are removed from the front axle.
- The metal nut fastening (cotter pin) connecting the ball joint from the steering rod to the steering lever is removed.
- The fastener turns away. The hinge “finger” is pressed out.
- The rubber band for sealing and the hose going to the brake system are removed from the bracket.
- The location of the eccentric washer is marked in relation to the rack bracket.
- Two nuts are unscrewed, a pair of bolts are removed from the rack mounting.
- The eye of the rotary cam is brought out of the bracket.
- Three nuts are removed from the upper rack mounting.
- The work is almost complete. All that remains is to reach the front pillar through the lower part of the wheel well.
- The front strut is installed in the reverse order after removal. The eccentric is wrapped according to the marks applied with paint or marker.
- Wheel alignment and alignment are best done at a car repair shop or tire shop with special equipment.
Rear suspension
The rear suspension system is designed in such a way that repairing it sometimes requires replacing the entire central beam for the VAZ 21099 model. Fortunately, the need for such repairs is extremely rare. The central beam can be severely damaged in case of an accident.
If during the repair process you need to remove the wheels, then you need to loosen the bolts on the floor in advance. It is better to carry out work related to the removal of the rear axle with people who can hold and smoothly lower the beam.
How to disassemble the rear suspension on a VAZ 21099
How to replace a rear wheel bearing
If, while driving, the car begins to “howl” while driving, or there is a knocking sound from the rear or the rear wheel plays, this means that the double-row ball bearing is faulty. Structurally, it is designed in such a way that it does not require additional edits or adjustments.
To replace the bearing, you will need a pair of lifts, one of which will be used to remove the hub, and the other to press out the part being replaced.
- It is necessary to loosen the bolts and remove the cap from the nut on the hub. Use a socket and an extension (such as a water pipe) to loosen.
- The car is put into first gear. Jack up and remove the wheel.
- Remove the brake drum and pads.
- The hub nut is removed along with the washer.
- Once the puller is installed, the hub can be removed from the axle.
- Having clamped it in a vice, use a screwdriver to remove the retaining ring.
- We place another puller on the vacated area. The bearing must be pressed out of its seat.
- Clean the hub from stains of previously used lubricant and dirt.
- After pressing in the new bearing, do not forget to put the ring back in place. It should not show signs of wear. If necessary, it must be replaced.
- All that remains is to install everything back. The hub is put on the axle, it is pressed in using a mandrel, the nuts are not screwed in completely!
- Reassemble all the removed components and remove the jacks.
- The final tightening of the nuts is carried out only after removal from the jacks.
If you are not confident in your own abilities or do not have the minimum skills and tools, it is better to turn to specialists.
Video about replacing VAZ silent blocks:
Source
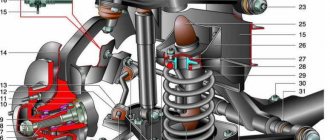
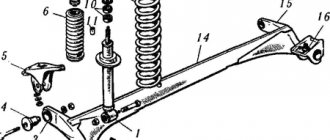
How the front suspension works
The key element of the front suspension of the VAZ 2114 is the shock absorber strut, which is indicated by number 9 in the figure below. It is secured with two bolts to the steering knuckle. Compared to the rear system, the front suspension has a more complex design - this can be seen in the number of parts. Number 11 indicates the bolt that goes through the holes in the rack bracket. It has an eccentric washer and a special belt. When the steering gear is turned, the top bolt turns. As a result, the car turns. Shock absorber struts, which carry the main load, usually fail.
VAZ 2114 front suspension diagram
TO WORK BY BIKE
May 21 and September 22, the “Bike to Work” campaign will be held in all regions of Russia, which is designed to show that riding a bicycle to work is taking care of your health and the environment.
The action will also take place in our city. It is designed to draw attention to a convenient form of transport, which many of us forget about.
Whether in the trend! Take part in the action!
Supports SS20 Classic for VAZ 2108-2110
Front strut supports SS20 Classic for the VAZ 2108-2110 families are a technological breakthrough for front-wheel drive models of the eighth and tenth families. High reliability, noiselessness, and soft shock absorption ensure durability of the entire front suspension, comfort and easy vehicle control.
Share with your friends
Applicability
- VAZ 2108-21099
- VAZ 2110-2112
- VAZ 2113-2115
Advantages of SS20 Classic front supports
- quiet operation;
- ease of steering wheel rotation;
- change in elasticity to compression (additional bumper);
- the ability to change the height of the car;
- 100% quality control;
- 5-fold safety margin of all support elements.
Guarantee
- Description
- Buy
Instead of a standard bearing in the SS20 Classic strut supports, a steel bushing is made, which is welded into the rubber support damper. This completely eliminates backlash and extraneous sounds. The weight of the machine is removed from the damping system, which eliminates the extrusion of the damping rubber and significantly increases its durability.
The use of a large diameter bearing ensures:
- durability and reliability due to thirty times the working load of the bearing (working load of the bearing is 12,000 kg, and weight distribution on the machine is from 320 to 400 kg per support, depending on the machine model);
- a significant reduction in the load when turning the steering wheel and the smoothness of its rotation;
- the weight of the machine (320-400 kg) compresses the bearing and eliminates all gaps, backlash and sounds.
The bearing is dust and waterproof, packaged - a guarantee of long service life in any climatic zone of Russia. The spring softens impacts on the bearing and, therefore, on the body. When you turn the steering wheel, the strut body, spring and wheel rotate simultaneously, while the rod and piston remain stationary. This rotation ensures uniform wear of the chrome rod and working cylinder and, accordingly, increases the service life of the strut as a whole. The noise reduction of the SS20 front support is much higher than the noise reduction of the VAZ 2108 and VAZ 2110 supports, because the rubber damper is in an unloaded state and the rubber fiber is at the lowest point of resistance. Therefore, damping high-frequency components of suspension vibrations is most effective, and it also softens shocks to the shock absorber.
Brand warranty 4 years
The guarantee is provided regardless of:
- where and when the SS20 Classic front struts were purchased;
- who installed the rack supports;
- are there any tuning parts in the suspension;
- what model of VAZ were installed on;
- are other suspension parts in good working order?
- if you “flew into a hole” in your car and at the same time managed to break the rubber damper.
The warranty for the Classic series front strut supports is provided by our company and our dealers. The service and warranty center is located in Samara; regional dealers and official representatives are issued a certificate and personnel are trained.
Rear axle
- It is also necessary to adjust the toe and camber here. It is assumed that enough money has been allocated for tuning the car. This means that the rear drum brakes have been replaced by disc brakes.
- It is also possible to install a kind of stand designed to adjust the camber of the wheels. This makes it possible to adjust parameters on the rear axle over a much larger range than can be done on the front. So, the camber can reach -1.5 degrees.
- The rear axle is subject to the same forces as the front. This means that wheel camber will be compensated in the same way as in the case of the front axle - toe, for which its value is set within +2-4 mm.
As an example for comparison, we can take BMW models with traditional rear-wheel drive. The camber of the rear axle is -2.5 degrees, and the toe-in as a compensating factor is +2 mm.
Judging by such a comparison, the improved “eight” will “run” more predictably, quickly, swiftly, even sharply. The car strictly adheres to the required trajectory, the main thing is to ensure reliable adhesion of the wheels to the asphalt. But still there is one “but”...
Firstly, the owner of the G8 now requires greater concentration and attention. In serial VAZ-2108, wheel alignment is adjusted every 10-15 km under normal operating conditions, without replacing suspension parts or special shocks
The maximum mileage between settings in our case is 10 thousand km. Of course, you can drive longer, but we must not forget that these settings are on the verge of common sense. It is also necessary to take into account the condition of domestic roads, which inevitably affect the settings. All this affects the behavior of the car, as well as the condition of the tires. Thus, a strong impact on a hatch or curb stone can lead to a change in caster by 10 degrees and toe by 5 millimeters. This will make it more difficult to turn the steering wheel in place, and the reason for this will be adjustments made without specialists. The consequence of changes in toe and caster can be “oversteer” - the car’s independent “diving” into a turn. Among other things, the above-described settings reduce the vehicle's run-out - when the clutch is disengaged, due to inertia, it travels a shorter distance, unlike the production model. All this means that timely maintenance and checking the wheel alignment settings will extend the life of your car.
- Do-it-yourself tuning of VAZ-2109 and VAZ-2108
- Tuning VAZ 21099 comparison with music
- Different approaches to tuning VAZ 2109 and 2108
- Carbon car wrap
Downloading a book
After successfully completing the payment (by any method) and returning to the KrutilVertel store from the payment system website, you will be taken to the successful payment page:
On this page you need to indicate your e-mail, where access to download the book will be sent.
If you are already registered on our website, then simply follow the link to your personal account.
The book you purchased will be in your personal account, from where you can always download it.
Please note that after making the payment, you need to return back from the payment system website to the KrutilVertel website.
If for some reason you did not return back to the site and closed the payment system tab with a message about the successful completion of the payment, please let us know - we will send you a letter indicating access to download the book.
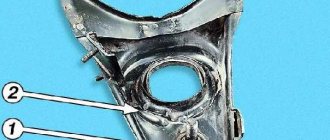
Front suspension device
The main element of the front chassis of the VAZ 2114 is the shock absorber strut, which is designated as number “9”. It is attached to the steering knuckle with two bolts. Compared to the rear system, the front suspension has a more complex design, which can be understood by the number of parts. Number “11” indicates a bolt that passes through the holes of the rack bracket; it has an eccentric washer and an eccentric collar. When the steering gear turns, the top bolt turns. The result is that the car turns. Most often, shock absorber struts fail, since they do the main job.
Replacing the front pillar on a VAZ 2108, VAZ 2109, VAZ 21099
Welcome! The front strut - compared to the rear strut, it is much more difficult to remove from the car, but if you know how to do it, then the replacement will not take you too much time, both the front and rear struts need to be changed from time to time as they fail, but you can also change the spring on the struts separately, for example from the shock absorber, this is done so that you can save a little money, but although this type of exercise does not always lead to the desired result, in this instruction you will first learn how to remove the strut from the car and how to disassemble it after that to replace individual parts.
Signs of malfunction of VAZ 2109 racks
The following signs indicate the need to replace VAZ 2109 struts:
- The first and inevitable sign indicating the need to replace the strut is a leaking shock absorber . On VAZ 2109 cars they do not sag, but shock absorber struts leak already at 40,000 km.
- The second symptom indicating the need for replacement is noises and squeaks in the suspension , especially when driving over rough terrain.
- Sometimes the beating of faulty struts is transmitted to the steering wheel, which can also indicate a malfunction.
- As a consequence of the previous symptom, the car may partially pull to the side or skid to the sides .
- When the car turns, the skidding trajectory increases, and the braking distance also increases .
To eliminate such malfunctions, it is necessary to identify damage to parts, causes of knocking and defects in the rack as soon as possible.
Visual fault diagnosis
Among the methods for identifying faults, the visual method is good because it allows you to identify minor damage to parts long before they lead to a serious breakdown. In this case, emergency repairs to the front suspension will not be required, and most importantly, there will be no risk of creating an emergency situation.
It is better to inspect the chassis parts of the VAZ 21099 on a clear sunny day. If this is not possible, you should prepare a powerful flashlight. In addition, it is necessary to have a rag and a brush with soft bristles in advance to wipe off dust and dirt from the surfaces being inspected.
- First, drive the car onto a lift or pit. If this is not possible, raise the front of the car with a jack. Don't forget to put the car on the handbrake and support the rear wheels.
- For convenience, remove the front wheels.
- Carefully inspect the protective covers of constant velocity joints, ball joints, as well as stabilizer pads and silent blocks. If ruptures, cracks or one-sided bulging of rubber are detected, replace the damaged parts.
- Inspect metal parts for cracks and bends. If problems are found, supply new spare parts.
- Check for oil leaks on the struts. If there are any, replace the shock absorbers or entire struts.
- Inspect the compression buffer and spring for cracks. Replace them if necessary.
- Measure the distance A (in the above diagram) between the support plate and the front suspension arm. If, when rocking the travel distance, the distance increases by 0.8 millimeters or more, replace the ball joint.
- Rock the hub left and right and up and down. If it sways and a knock is heard, the car needs to be repaired and the wheel bearing will have to be replaced.
Replacing suspension silent blocks
If no damage is found, don't feel like you wasted your time. Such an inspection must be carried out every 5,000 kilometers. It will help you avoid serious problems while driving.
If you don’t want to waste time, do a little tuning - install a front stabilizer from a Lada Priora during diagnostics. It is perfect for the VAZ 21099. With it, the chassis of your car will become more rigid, but the car’s stability at high speeds will improve.
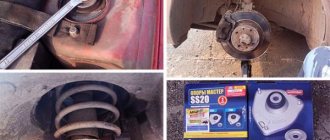
Where to start repairing the chassis? That's right, by inspecting all the components))) After the inspection, I determined what I would need to buy for repairs and made a list:
1) Steering rod puller and ball. supports 2108 zinc AK-2 = 234 RUR - decided not to take it yet 2) Device for pressing in torque rod bushings VAZ AVTOM = 146 RUR 3) CV joint boot 2108-09, 2170 internal and external BRT (set - lubricant + clamp) = 177+ 172r 4) Hinge extension 2109-10 chamomile (set 4 pcs) BRT = 155r 5) Silent block of lever VAZ 2108-10 in pack. (set of 2 pcs) boost. Savy-Sport = 117 RUR 6) Stretch bracket (crab) 2108-099 Chance+ (set of 2 pieces) = 213 RUR - I found out that these crabs are bad, they burst quickly, as soon as I have the money I’ll take good ones (mine are still intact, they look like) 7) Bushings stabilizer VAZ-2108 (set of 2 pieces) Poleur. yellow SY-20 comfort = 60r Stabilizer strut 2108 (eggs) reinforced. SEVI = 195r 9) Lubricants (solidol/litol), fastening bolts (if needed) and so on = ?r