Any driver, getting into his car, turns the ignition key to start the power plant. This simple action leads to the fact that electricity from the battery begins to be supplied to the starter and it begins to rotate the crankshaft until the power unit starts.
Such a seemingly insignificant detail as the ignition switch provides one of the most important actions for the successful start of the engine - it supplies the vehicle’s on-board network with electricity. Indeed, in addition to the starter, the ignition switch provides power to the ignition system, instrumentation, light and sound signaling devices, etc. And after stopping, it completely de-energizes them.
If we look at it in a simple way, the ignition switch is an element that does not allow the battery to discharge due to the constant supply of electricity to the on-board network, but ensures its availability only when the car is in use. Thus, the battery retains its charge for a long time.
Next, we will consider the diagram of the VAZ-2101 ignition switch, its main faults, methods for eliminating them, dismantling and installing a new lock on this car. This car was chosen because subsequent models belonging to the classic VAZ models, up to 2107, used identical ignition switches.
Operating principle
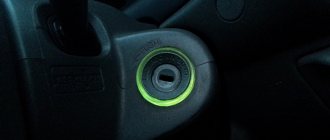
So, the ignition switch on the VAZ-2101 is an element located in the cabin near the steering column. The entire lock structure is hidden under the decorative trims of the column, so from the driver's side the lock looks like a large round washer with a slot in the center. Along the circle you can see marks - 0, I, II and III, each of which has its own effect.
Label “0” is the position in which all electrical appliances powered by the lock are disconnected from power. It should be noted that some of the equipment (interior lighting, brake light, cigarette lighter) do not depend on the position of the key in the lock; they are constantly powered by the battery. In this position the key can be removed from the lock.
Mark “I” - the position of the lock at which electricity is supplied to the on-board network. In this position, control and measuring instruments, light and sound alarms and headlights, the ignition system and a number of other electrical appliances receive power. This position is fixed, and when moving the key to it, it is not necessary to hold it.
Mark “II” is the position at which voltage begins to be supplied to the starter to start the engine. This position is not fixed, that is, the driver moves the key to this position and holds it to start the engine. After starting, the key is released and, under the action of a spring, it returns to position “I”.
Position “III” is parking. In this position, all electrical appliances are de-energized, and a lock is inserted into the groove of the steering column, which is an anti-theft device for the car.
It should be noted that the lock positions do not follow each other. So, to move the key to positions “I” and “II”, it must be rotated clockwise from “0”. And to set position “III”, the key is turned counterclockwise from “0”.
Installing a central lock on a VAZ 2107 with your own hands
Another legendary representative of the Russian automobile industry is the VAZ 2107. Despite the fact that this model went on sale back in 1982, it was removed from the assembly line only a couple of years ago.
Most car enthusiasts who own this vehicle still drive a model of earlier releases. Well, in this regard, a number of questions arise that need to be resolved.
For example, installing a central lock on a VAZ 2107 will make operating your car much more pleasant and easier.
VAZ 2107
There are many ways to solve the problem. You can just come to the service center and the professionals will do everything for you. It is worth noting that in this case much more money will be spent than if you do it yourself.
Having even the slightest idea of how this mechanism works, you can handle it on your own. Familiarize yourself with the materials in advance; for example, you can find a sufficient amount of information on the Internet. Read, watch how the central locking system is installed on a VAZ 2107, video materials. Prepare the necessary tools and get to work.
Installing central locking
Naturally, before we get down to business, we purchase the central locking kit we need. The most important things in such a kit are four motors and a control unit. The box should also contain wires, a key fob, various fuses and strips.
Central locking equipment
The easiest way to control the central locking is a special button on the dashboard. However, its installation and connection will take time. There is also a way to close and open the locks on a VAZ 2107 by pressing a button on the key fob. Well, the most inconvenient thing is turning the key in the driver's door.
Having decided which option you prefer, we assemble the necessary tool:
- Drill;
- Screwdrivers;
- Corrugation;
- Hammer;
- Knife;
- Spanners.
Working with wiring
The most important and important point of installation is the wiring. All wires must be the length you need; they must be laid in places protected from external influences, for example, water. It is also recommended to use corrugated tubes to protect the wires from chafing.
Important! Before you begin, be sure to disconnect the negative terminal from the battery!
Installing a central lock on a VAZ 2107 with your own hands begins with determining the installation location of the control unit. Consider the option of placing the controller between the shelf and the glove compartment.
Next, we lay out the wires along their lengths and decide which of them will go to the rear doors. We will pull them through the lower curb, under the plastic protective sill covers. For the front doors, we will pull the wiring under the dashboard.
We lay a +12V wire from the battery. It will power the entire device.
Wiring for central locking
Installation of motors
In order to install the motors we need, we will have to drill holes in each door. We recommend that you install VAZ 2107 locks, starting with the rear doors.
To get started, remove all unnecessary elements: plastic lining and casing. Take a drill and make a hole in the door. Through it we will subsequently pull the wiring from the stand to the door. Drill a second hole in the rack. Now let's start drawing the wires. Don't forget to use corrugation.
Rear door wiring
Now you can install the engine. When installing, do not forget to check that it does not interfere with the operation of the glass. It's a small matter. We fasten the motor rod and the lock lock rod to each other using a bar. It should be included with the central locking system. Now, actually, it's ready. Let's move on to the front doors.
Installing motors on the front doors will not take much time. In this case, we place them in the left and, accordingly, the lower right corners of the doors. We install according to the example of the rear doors and perform a test.
Installing engines on the front doors
Checking work
Before you rejoice at the completion of the work, you need to connect the control unit to the block with wires. Then return the battery terminal to its place. If the VAZ 2107 locks worked correctly, then everything is connected correctly. Congratulations. If any problems arise, perhaps somewhere during the connection the pin was switched to + or -.
There is no limit to perfection, and in the future you can connect the trunk lock to the central locking, install an alarm or power windows.
Almost all your desires to modernize your favorite car can be brought to life.
Ignition switch device
The part of the lock hidden under the lining has the shape of a cylinder with a protrusion on the side, which is a lock for the anti-theft system.
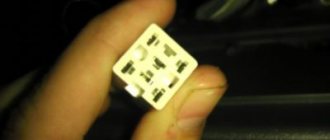
At the end of this housing there are terminals to which the wires are connected. There are six of these pins in total, and each of them provides power to certain devices.
Inside the case there is a lock secret and a contact group. The secret makes it possible to operate the lock only with a key that has a certain shape. This is another anti-theft feature, since only a certain key will allow you to switch positions.
The contact group of the ignition switch 2101 is a special washer with leads for connecting wires. On the inside of it there are nickels of these conclusions, as well as a slider that moves due to the influence of the secretion on it. When moved to certain positions, this slider closes certain nickels with each other, providing electricity to the terminals that are connected to the closed nickels.
Contact systems
The oldest and most imperfect designs, despite this, a lot of cars still use them. Even stores sell contact groups. One advantage can be identified from contact systems - low cost. Otherwise, they only have disadvantages:
- A contact breaker installed in the body of the VAZ-2106 distributor switches high voltage. As a result, contacts often burn; the device must sometimes be cleaned.
- The same contact breaker experiences heavy loads and friction. Therefore, the resource is limited by the quality of the metal used and the time of its wear.
- During operation, the gap between the contacts changes, and it affects the ignition timing - this is one of the most important parameters of the operation of an internal combustion engine.
Despite its simplicity, the reliability of the mechanisms is very low. The system requires careful care and timely maintenance.
Malfunctions
The design of the lock is quite simple and reliable, but the lock may well break. There are only two malfunctions that can happen to this element: mechanical and electrical.
A mechanical failure includes a problem with the secretion. Due to debris that gets inside the secretion and moisture, corrosion is formed, which prevents the movement of moving elements inside the secretion. As a result, the lock begins to jam when you turn the key, jams, or stops rotating altogether. This problem can be eliminated by pouring WD-40 or at least brake fluid inside. However, if it is possible to restore the functionality of the secret in this way, it will not be for long. The secret itself is not repairable, and in the event of such a malfunction, the VAZ-2101 ignition switch will eventually need to be replaced.
An electrical fault is the burning of the nickels of the contact group. Because of this, there will be no or insufficient contact between the runner and the nickel. Electrical appliances on the car will not work, and there may be no power supply to the starter. If the burning was minor, then you can try to restore the functionality of the lock by cleaning the nickels with a diamond file, followed by wiping with alcohol or gasoline. But if the nickels are badly burnt, then you will need to either change the contact group or the lock assembly.
Post navigation
Accordingly, the key closes the contact elements of the electrical circuit, helping to start the power unit of the machine. This refers to the windshield wiper system, washer motor, generator unit, heater fan, control panel devices, turning lights, ignition system, sound devices. It's easier to buy a new group in the store. The two parts of the lock are connected to each other by means of a leash.
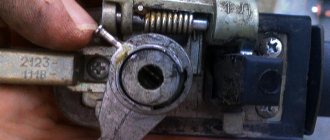
There is a flat slot on it; you need to insert an awl or a prepared nail there.
Conclusion When replacing this element, you should be very careful, since if it is connected incorrectly, the entire ignition circuit will stop working and you will not be able to start the engine.
But, if, nevertheless, a replacement is necessary, then let's figure out how to do it correctly. We suggest the following sequence of actions that will help you easily connect the ignition switch to a VAZ: Insert the key and turn it to the zero position. The secret itself is not repairable, and in the event of such a malfunction, the VAZ ignition switch will eventually need to be replaced
Disassembly consists of the following steps: Turn the lock with the back side facing you and remove the retaining ring, prying it off with a flat-head screwdriver.
On the driver's side, the mechanism has a key hole. Repair LuAZ 969/ Ignition switch LuAZ 969 M, wire in the lock - how to connect correctly
Removal and installation
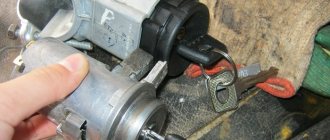
Removing this element from the car is quite simple and all you need is a Phillips screwdriver and a thin flat-head screwdriver or an awl. Before starting work, be sure to disconnect the negative terminal from the battery.
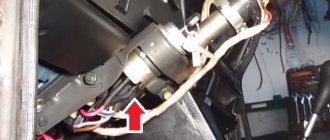
To get to the fastening of this element, you will first need to unscrew the bolts securing the lower facing panel of the steering column, and then remove it.
Afterwards, you need to unscrew the two bolts securing the lock, which hold it in its seat. In the same seat there is a small technological hole. By inserting a thin screwdriver into this hole, you need to press the latch that holds the lock, and then push it out of its seat.
Only then disconnect all the wires. On some models, the wiring going to the lock is collected in a chip that is put on the contacts of the lock. This feature will greatly facilitate the installation of a new element, since such a VAZ-2101 ignition switch does not require a wiring diagram.
| Remove the two screws securing the ignition switch (bottom view). | Insert the key into the ignition switch, turn it to position “0” (turning off the anti-theft device), press the lock with a screwdriver through the hole in the bracket and... |
| ...remove the switch from the bracket and the key from the switch. | Label (or remember the connection order) the wires and terminals of the ignition switch. Disconnect the wires from the switch. |
But there are also versions of the car in which the wiring is directly connected to the contacts, and when installing a new element with this type of wiring connection on a VAZ-2101, an ignition switch circuit will be required.
If the lock assembly is replaced, then you can connect the wiring to the new one, install it in place, secure it and cover it with a decorative panel.
If only the contact group is changed, then the removed lock is disassembled. The contact group is fixed using a locking ring, which must be pryed off with an awl or screwdriver and removed. After this you can remove the group. A new one is installed in its place and secured with the same retaining ring. After this, everything is put in place and the VAZ-2101 ignition switch is connected.
Installation of silent locks on Classic
We will replace standard classic door locks with silent chisel locks (VAZ 2108,09,10,11...). We will change ONLY REAR LOCKS!!!
For this we need:
- Internal lock VAZ 2108 - 2 pcs. (left and right)
- Set of silent locks (“chocolate bars”). - 1 PC. (the set must include 2 locks)
- Bolts for fastening locks (look similar to those that secure door hinges on classics) – 4 pcs.
- Tools:
- Drill and, accordingly, drills for it (8.4)
- File or needle file – Metal saw – Old castle
- Cable (from the lock to the internal “hook” of opening the door) - 1.5-2 meters
- Children's set "CONSTRUCTOR", a couple of parts from it... (a rod and 4 square plates for tensioning the cable will be useful to us)
- Aluminum plate or piece of dense plastic about 2 mm thick 10*6cm - 2 pcs.
- A familiar welder or thread cutting kit...
Let's get started...
On a new, just purchased, INNER lock, we saw off 2 parts:
In the right picture this is part 1 and 2
Next, we look for the PIN and also saw it off so that it falls out, and in its place there is a HOLE!!!
This can be seen better here:
There is a hole in the place of the pin, and in the hole there is a cable fastened with plates from a children's set. This is done so that the cable has an adjustable length)
Insert the cable into the hole formed. We “hook” our “hook” with the other end of the cable. After all, we will need to get out of the car... or rather, not us, but the passengers.
Next, we remove and slightly unclench the BLACK spring, if desired, you can remove it altogether, but I would leave it, you never know, it will come in handy...
Next, take a drill with drill number 4 and drill a hole (the red hole in the picture is opposite the thread for attaching the lock... insert a bolt into it (the red hole in Fig. 5), a rod (blue part) onto the bolt and screw a nut onto the bolt (it’s bad, but it is seen)
Next, remove the lock from the door of our car. We remove the rod from the internal “hook” of opening the door, and we can throw it away))), we will no longer need it. Where this rod is attached to the lock there is a rubber bushing; we carefully remove this bushing and place it on our updated internal lock (more details in Fig. 4, above and to the left of the inscription Spring).
- Next, remove the External “Handle” for opening the door.
- We take a piece of aluminum or hard plastic and a metal saw in our hands and make the following part (we make holes with a drill number 4):
We “disassemble” our door handle (we move the axis of rotation on the handle a couple of cm back) and put the RED
hole, don't mix it up. We put it on so that it rests against the moving part of the handle and moves along the axis with it.
You need to put a bolt into the blue hole, not very large, 1-2 cm (later we will put the rod on it from Fig. 4.).
In principle, the inside is ready.
Let's move on to the outside.
We take a drill, but with a drill number 8, and drill out the hole from the old lock (in the picture on the top right) so that the sleeve of the NEW lock fits in, but does not hang out. And if it dangles, then leave it like that, let it dangle.
Connection
Now about the connection. If the wires are assembled into a chip, then there will be no difficulties - we install the chip correctly on the contacts and that’s it.
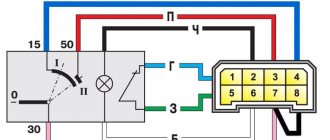
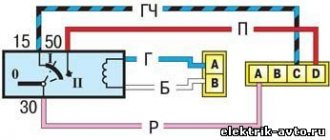
If each wire is connected separately, then you need to follow the diagram:
- To pin 50 – red wire (responsible for the operation of the starter);
- To pin 15 – blue with a black stripe (ignition, interior heating and other devices);
- Pin 30 – pink wire;
- Pin 30/1 – brown wire;
- INT – black wire (dimensions and headlights);
After connecting the wiring, everything is assembled, the terminal is connected to the battery and the functionality is checked. First you need to check whether all electrical appliances powered by the lock are working. Then check the functionality of the starter.
If something does not work, you need to remove the lock and once again check that the wiring is connected correctly, since this alone determines the operation of the devices when you turn the key.
Second phase
We remove the dashboard.
To simplify the work of laying wires, it is better to remove the dashboard completely. To do this, you need to pierce the points that are located next to the screws securing the front panel. Find the location of the wires under the dashboard and in the glove compartment. It is through them that the wires will be laid.
Dismantling old wires.
At this stage of the work, you need to remove the old power window wires and lay new ones. Next you need to connect them to the drive.
Connecting the activator wires.
Along with connecting the activator wires, you need to insulate them and lay them inside the door. In order for them to be secured, it is better to secure them to the door structure using the same electrical tape.
Laying wires.
After the work has been done, you need to push the wires on one side under the dashboard, on the other side into the glove compartment. Such work cannot always be achieved the first time; it is at this stage that you need to show skill and dexterity.
Installation of the pass-through tube.
You can install the pass-through tube into the rack on both sides using a screwdriver
This must be done carefully so as not to damage the rubber tube itself.
Connecting wires to the connector.
Next, a fuse is attached to the connector and connected to the central locking power supply. All this is installed under the dashboard.
Connecting the central locking wire to the housing.
The negative wire of the central locking must be connected to the car body. The positive wire is connected to fuse No. 1 on the battery side.
Checking the functionality of the central locking system.
After you have connected the battery, check the functionality of the mechanism - both its mechanical and electrical parts. The movement of the rods should be smooth and easy.
Restoration of the dashboard and door trim.
After making sure that everything is working properly, install the dashboard and side door trim in their place.
Video shows how to install central locking: