Briefly about the drive design
To change the chain and related elements yourself, you need to know the structure of this part of the power unit. The mechanism that drives the camshaft of the VAZ 2106 engine includes the following parts:
- a small drive sprocket is mounted on the crankshaft;
- large idler gear;
- the upper large gear is bolted to the end of the camshaft;
- double-row timing chain;
- tensioner shoe supported by a plunger rod;
- damper - a metal plate with a wear-resistant lining;
- pin - the chain runout limiter is installed next to the lower sprocket.
In older versions of the “six”, a mechanical tensioner plunger was installed, where the rod extends under the influence of a spring. The updated modification of the car is equipped with a hydraulic plunger device.
While the engine is running, the timing chain must be kept in tension, otherwise there will be beating, accelerated wear and the links jumping over the gear teeth. A semicircular shoe supporting the part on the left side is responsible for the tension.
After the camshaft sprocket (in the direction of rotation), a damper plate is installed, pressed against the chain drive. To prevent the element from jumping off the lower gear as a result of strong stretching, a limiter is installed nearby - a metal rod screwed into the cylinder block.
The drive mechanism is located at the front end of the engine and is covered by an aluminum cover in which the front crankshaft oil seal is installed. The lower plane of the cover is adjacent to the oil pan - this feature must be taken into account when disassembling the unit.
The purpose of the timing chain and its length
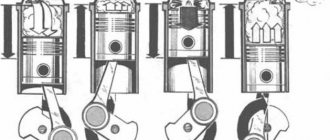
To understand the purpose of the timing chain, it is necessary to outline what the engines of classic VAZ models are. All these engines are overhead engines. That is, the timing shaft (aka timing) is located in the upper part of the engine, above the crankshaft and above the oil pump shaft.
All these shafts are equipped with sprockets, onto which the timing chain is placed. The chain's job is simple: it must transmit torque from the timing shaft to the crankshaft and to the oil pump shaft. From the crankshaft, torque is transmitted to the chassis, and from there to the drive wheels. They begin to rotate and the car moves forward. Thus, the timing chain is the most important connecting link between the three engine shafts, and any breakdown of this link will inevitably lead to either serious problems in the operation of the motor or to its complete jamming if the chain breaks.
Timing chain length for VAZ engines
If the driver decides to replace the timing chain on his “seven”, he will go to the spare parts store, where he will inevitably be faced with the question: which chain to choose?
You should know a simple rule: all engines on the VAZ “classic” are equipped only with chains. The only difference is in the length of the chains, or more precisely, in the number of links:
Purpose and characteristics of the circuit
The timing drive mechanism of the VAZ 2106 engine solves 3 problems:
- Rotates the camshaft, which opens the intake and exhaust valves in the cylinder head.
- The oil pump is driven by an intermediate sprocket.
- Transmits rotation to the ignition distributor shaft - distributor.
The length and number of links of the main drive element - the chain - depends on the type of power unit. The manufacturer installed 3 types of engines with a displacement of 1.3, 1.5 and 1.6 liters on the “sixth” Zhiguli models. In the VAZ 21063 (1.3 l) engine, the piston stroke length is 66 mm, on modifications 21061 (1.5 l) and 2106 (1.6 l) - 80 mm.
Accordingly, on power units with different displacements, chains of two sizes are used:
- 1.3 l engine (VAZ 21063) – 114 links;
- engines 1.5-1.6 l (VAZ 21061, 2106) - 116 links.
How to check the length of a chain when purchasing without counting the links? Pull it out to its full length, placing both parts close to each other. If both ends look the same, you have a 116 link part for long stroke engines (1.5-1.6L). On a short chain for VAZ 21063, one end link will rotate at a different angle.
Signs of critical wear of a part
As the vehicle is used, the chain drive slowly stretches. Deformation of the metal joints does not occur - the reason for the phenomenon lies in the abrasion of the hinges of each link, the formation of gaps and backlash. Within 1-2 bushings, the wear is small, but multiply the gap by 116 and you will get a noticeable elongation of the element as a whole.
How to determine the malfunction and degree of wear of the chain:
- The first symptom is an extraneous noise coming from under the valve cover. In particularly advanced cases, the sound turns into loud rattling.
- Remove the valve cover and check the alignment of the marks on the camshaft sprocket and crankshaft pulley with the corresponding protrusions on the body. If a shift of 10 mm or more is observed, the element is clearly stretched.
Once, during the process of diagnosing the “six” engine, I had to observe the following picture: the elongated chain not only broke the damper, but also made a deep groove in the cylinder head housing. The defect partially affected the valve cover contact plane, but no cracks or engine oil leaks occurred.
A chain stretched by 1 cm or more can jump 1-4 links along the gears. If the element “jumped” one section, the valve timing is disrupted - the engine vibrates strongly in all operating modes, significantly loses power and often stalls. A clear symptom is shots in the carburetor or exhaust pipe. Attempts to adjust the ignition and adjust the fuel supply are useless - the engine “shaking” does not stop.
When the chain moves by 2-4 teeth, the power unit stalls and will no longer start. The worst-case scenario is that the piston hits the valve plates due to a large shift in valve timing. The consequences are disassembly and expensive repair of the motor.
Video: determining the degree of wear of timing gears
Timing chain jump and its symptoms
The chain, like any other part of the car, wears out over time. Wear usually shows up as chain stretching. The cause of stretching is the so-called metal fatigue, which affects almost all parts that experience cyclic loads. Having stretched, the chain begins to sag significantly. If the driver does nothing, then sooner or later a situation will arise when the chain on one of the sprockets jumps one or two teeth forward. After this, all valve timing in the engine will be disrupted, as will its operation. Here are the main signs of a skipped timing chain:
All these signs indicate that the timing chain has not only weakened, but also jumped. And the driver needs to replace it as soon as possible. If this is not done, the engine will sooner or later seize, after which you will have to make expensive major repairs.
Replacement instructions
To install a new chain drive, you need to purchase a set of spare parts and consumables:
- double-row chain, suitable for a specific engine type;
- 3 gears - two large and one small (sold as a set);
- tensioner shoe;
- damper plate;
- power unit front cover gasket;
- high temperature silicone sealant.
If, when diagnosing problems, you find oil leaks under the crankshaft pulley, it is worth purchasing a new oil seal built into the front cover. The part is easy to change during the disassembly of the timing drive.
Why is it recommended to change all drive parts, including gears:
- over a long period, while the chain was stretching, the teeth of the sprockets also had time to wear out;
- for the same reason, the damper and tensioner linings were worn out;
- The repair operation is very labor-intensive, and it is impractical to repeat it for each worn-out drive element.
Tools and working conditions
As for the special tools, you will need a 36 mm socket wrench to unscrew the nut (ratchet) holding the crankshaft pulley. Because the ratchet is located in a recess, it is much more difficult to grab it with an open-end wrench.
The rest of the toolset looks like this:
- a set of open-end wrenches and sockets with a ratchet and a wrench;
- flat screwdrivers - regular and reinforced;
- mounting blade;
- pliers;
- hammer;
- rags, protective gloves.
It is most convenient to replace the timing chain in an inspection ditch in a garage. As a last resort, an open area will do, but then to disassemble the unit you will have to lie down on the ground under the car.
Preliminary disassembly
The purpose of the preparatory stage is to provide convenient access to the front cover of the power unit and the timing drive. What to do:
- Place the car on the inspection hole and turn on the handbrake. For ease of disassembly, allow the engine to cool to a temperature of 40-50 °C.
- Go down into the ditch and remove the oil pan protection. Immediately unscrew the 3 front bolts connecting the pan to the end cover, loosen the nut on the lower mount of the generator.
In addition to the listed parts, you can remove other elements, such as the battery and the main radiator. These steps are optional, but will help increase access to the chain mechanism.
At this stage, it is recommended to clean the front part of the engine as much as possible from dirt and oil deposits. When you remove the timing cover, a small opening will open in the oil sump where foreign particles can enter.
Disassembling the injection “six” is done in the same way, only together with the air filter housing it is necessary to dismantle the corrugated pipe leading to the throttle, the crankcase ventilation pipes and the adsorber.
Video: removing the electric fan and radiator of a VAZ 2106
Removing and installing a new chain
If this is your first time disassembling the camshaft chain drive, strictly adhere to the sequence of work:
- Unscrew the ratchet nut with a 36mm wrench. To loosen, fix the pulley in any convenient way - a mounting spatula, a powerful screwdriver or a pipe wrench.
During the disassembly process, you may encounter a situation where a chain stretched beyond normal limits has destroyed or broken the damper, and debris has fallen into the crankcase. Ideally, they should be removed by dismantling the pallet. But since the oil pump is equipped with a mesh, and waste always accumulates in the crankcase, the problem is not critical. The likelihood that part residues will interfere with oil intake is almost zero.
When replacing the chain on my father’s “six,” I managed to drop a piece of plastic stabilizer that had fallen off into the crankcase. Attempts to extract it through the narrow opening were unsuccessful; the fragment remained in the pan. Result: after the repair, my father drove more than 20 thousand km and changed the oil; the plastic is in the crankcase to this day.
Installation of new spare parts and assembly is carried out in the following order:
- Clean the adjacent surfaces of the cover and cylinder block, covering the crankcase with a rag.
- Lower the new chain into the cylinder head opening and secure it with a pry bar so that it does not fall.
Further assembly is carried out in reverse order. After attaching the pulley, it is recommended to re-check the correct position of the marks. The mark on the side of the pulley should be opposite the long strip on the front cover.
Video: how to correctly change the chain on a VAZ 2101-07
Is it possible to shorten a stretched chain?
Theoretically, such an operation is quite possible - it is enough to knock out the cotter pin of one or several links and reconnect the chain. Why such repairs are very rarely practiced:
- It is difficult to estimate the degree of elongation of the element and the number of links removed.
- There is a high probability that after the operation the marks will no longer align by 5-10 mm.
- A worn chain will definitely continue to stretch and will soon begin to rattle again.
- Worn gear teeth will allow the links to skip easily when the chain is pulled back out.
Economic feasibility plays an important role. A set of spare parts is not so expensive that you waste time and effort trying to repair the part by shortening it.
Replacing the timing chain drive will take an experienced technician approximately 2-3 hours. An ordinary car enthusiast will need twice as much time without taking into account unforeseen breakdowns. Set aside part of the weekend for repairs and do the work without rushing. Before starting the engine, do not forget to compare the marks and make sure that the mechanism is assembled correctly.
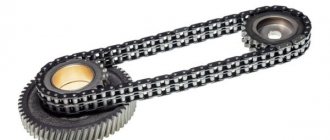
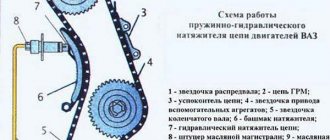
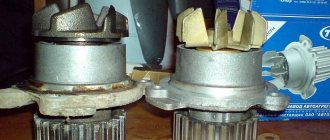
Design of the VAZ 2106, 2107 chain drive
To drive the VAZ 2106/2107, a double-row roller chain is used. It transmits force from a sprocket mounted on the crankshaft to another sprocket mounted on the end of the camshaft. The chain is a structure that develops large inertia, so a chain drive requires vibration damping. Even a well- tensioned chain retains the property of “playing” in those places where there are no sprockets or tensioners.
The chain has virtually zero ability to stretch and compress, and fairly limited flexibility. Therefore, in order to provide it with constant tension while working in its place at any speed, it has to be literally shackled, using a system of tensioners and dampers.
This problem on the VAZ 2106/2107 is solved by a damper - an additional spring-loaded clamping bar. They have a steel frame covered with a layer of durable rubber. Tensioners and dampers dampen vibration and noise quite effectively . The chain is prevented from falling off by a stop pin that is screwed into the block or cylinder head. During normal operation the chain does not touch it.
Checking the timing chain of the VAZ 2101-2107 engine
The engines of “classic” VAZ 2101, 2102, 2103, 2104, 2105, 2106, 2107 cars have a timing chain drive.
Signs of a stretched timing chain
In the event of increased noise in the engine operation on the timing drive side (the engine rumbles, the chain “slams”), unstable idle speed (the engine “troits”), a decrease in power and throttle response, “dips” after pressing the gas pedal, it is necessary, among other things, check if the chain has stretched. If it is strongly stretched, the timing phases shift (the position of the camshaft and crankshaft relative to each other).
If the listed symptoms are present, you should not delay checking the chain, as the chain guide and stop pin may break.
Methods for checking timing chain stretch on VAZ 2101-2107 engines
A stretched chain begins to have a negative impact on engine performance when stretched beyond 4 mm. Up to this limit, its tension can be adjusted with a tensioner.
Before checking, remove the engine valve cover to provide access to the circuit.
The first way to check the circuit
Using your hand, lift up the chain links in the middle of the camshaft sprocket. If the links rise above the mid-height of the sprocket tooth, the chain is stretched and must be replaced.
Second way to check the circuit
Relax the chain tension. We lift it and stretch its links in different directions with our hands. We measure the distance by which the links will move relative to each other (distance “A”). We compress the links, moving them towards each other to the maximum distance. We measure the distance between the links again (distance “B”). We subtract distance “B” from distance “A” (we determine the total gap in the two connections, which is formed due to wear of the bushings and link axes). The maximum wear is 0.7 mm, which for the links of the entire “short” chain will be 3.99 mm, and for the “long” chain 4.06 mm. This is equal to or greater than the tensile limit of 4mm.
In addition to checking the tension, we perform a visual inspection of the chain. If the bushings are chipped or cracked, the chain must be replaced.
Notes and additions
A similar check can be carried out on Niva car engines, since they also have a timing chain drive.
Reasons for replacing the timing chain drive on a VAZ 2106, 2107
The performance and durability of the timing chain drive depends on the material and quality of heat treatment of the chain and sprockets themselves. Manufacturing accuracy and cleanliness of working surfaces are of great importance. The main advantage of a timing chain drive is its long service life. On engines of the VAZ family, the chain life is from 100 to 200 thousand kilometers . If high-quality materials were used in the manufacture of components, and proper tension and abundant lubrication of the drive were ensured during operation, then the chain will last no less than the engine itself. A broken circuit is a rare occurrence. The deterioration of its condition can be monitored by increased noise when the engine is running.
Replacing the timing chain on a VAZ is necessary when its critical wear has occurred, its service life has been exhausted, and tightening it with all sorts of “cunning” methods no longer gives results. These methods include:
- increasing the length of the working part of the tensioner by pressing on a piece of tube of a suitable diameter;
- “addition” of an additional bracket to the shoe and other “bullying” of the engine.
An extended timing chain no longer ensures accurate valve timing, which negatively affects engine performance. In addition, she wears out the shoe and constantly “beats the head off” the pacifier. In addition, engine noise increases, fuel consumption increases and engine starting becomes worse. It is also worth saying that the chain sometimes breaks with all that it entails.
For work we will need: keys “10”, “13”, “17”, a special wrench for the crankshaft pulley nut (or a “36” head), a screwdriver, a mounting blade, a hammer, and a bit.
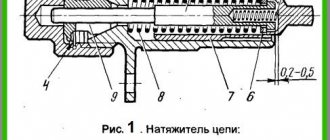
About malfunctions of the tensioning mechanism
The timing chain tensioning mechanism on the VAZ 2106 is a system consisting of three important elements:
All malfunctions of the tensioning mechanism are in one way or another related to wear or breakdown of one of the above elements:
So, tensioning a slack timing chain does not require any special skills or knowledge. This task is quite within the capabilities of even a novice car enthusiast who has held a wrench in his hands at least once. All you need to do is follow the recommendations given above exactly.
Source
Timing chain VAZ 2106
The procedure for replacing a chain drive on a VAZ 2106 car is not easy. Not every car enthusiast can cope with the task.
You will need basic car maintenance skills, special tools, and other auxiliary equipment.
Before starting work, carefully study the material base, get advice from specialists from service stations and workshops.
Description of the procedure for replacing the timing chain on a VAZ 2106
A classic of the genre, VAZ 2106 '97. This is the second time the timing chain has been replaced on this car in a month, since the first time the client brought an “original VAZ” chain produced in a nearby basement. A month later it stretched and hello again. But we have all been praising the quality of our spare parts for a long time, so we had to consult with experts in the car market and choose the chain that received the least number of complaints. Operation will show!
Along the way, we’ll change the air filter, alternator belt, tensioner shoe, damper and all the sprockets, and the song begins.
The client went on foot to get the non-weight bearing, damper and belt because he did not immediately take care of the purchase.
What happens if the chain length increases?
It will not be possible to adjust the idle speed of the VAZ 2106 engine; its operation will be uneven and unstable. You can double-check all components, including power and ignition systems, a hundred times, set valve clearances, measure compression, but problems cannot be eliminated.
Please note that in the timing chain, all links have different wear, therefore, the valve timing is constantly changing.
There is also noise from the chain, as its links fall into the sprocket. It is also possible that the damper, limiting pin or corner of the shoe may break. But the worst thing is the timing chain jumping several teeth. Typically from 1 to 5.
Even if it slips a couple of teeth, the most favorable outcome is to stop the engine. And the saddest thing is the bending of the valves. For this reason, it is necessary to monitor the condition of the VAZ 2106 timing chain and promptly replace and tension it.
Let's start replacing
We will need: a special wrench for 36 and a universal pulley clamp.
This car is carburetor, but if an injector is installed, the replacement procedure is not much different.
View under the hood.
Remove the air filter housing from the carburetor. Unscrew the three 10mm and four 8mm nuts securing the housing to the carburetor.
Be careful not to drop anything into the carburetor, otherwise you will have to remove it, and maybe the intake manifold too. Because if, with the car running, they get under the intake valve, then you can go straight to repair the head.
Remove the fuel line and distributor cap. Unscrew the eight nuts 10 securing the valve cover and remove the washers with the plates.
Remove the choke cable and throttle valve drive. Then remove the valve cover along with the gasket; it is also better to replace it.
Remove the protection from below.
Loosen the nut 19 securing the generator.
Unscrew the clamps on the pipes and remove the latter.
Loosen the clamp on the lower pipe of the pump and remove it with a slight movement of your hand.
Disconnect the power wires for the cooling fan and the temperature sensor on the radiator. We remove the radiator along with the pipes and thermostat.
Loosen the generator tensioner nut and use a pry bar to move it forward. Remove the generator belt.
Now we rotate the crankshaft by the pulley with a magic wrench of 36 and ensure that the marks on the pulley and the cover match, as well as on the camshaft sprocket and the ebb of the latter bed.
Now comes the fun part. Unscrew the nut 36 holding the crankshaft pulley. We lock the pulley with a special key and unscrew it. If there is no such thing, you can turn on the fifth speed, ask a friend to press the brake and lightly turn the key to unscrew it.
We remove the pulley. We unscrew the six bolts and three nuts 10 on the side, three bolts from the bottom of the camshaft drive cover. Let's take the last one.
Unscrew the two nuts securing the chain tensioner and remove it.
This machine was equipped with an automatic tensioner. Finally someone got it!
We unscrew the bolt securing the camshaft sprocket and, having removed it, remember or mark the hole for alignment.
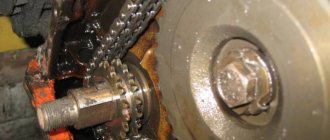
An amazing picture appeared before us.
1 – fuse that prevents the circuit from jumping.
2 – fastening the timing chain tensioner shoe.
3 – crankshaft sprocket.
We unscrew the fuse using a 10mm wrench and the tensioner fastening, as well as the bolt securing the auxiliary drive sprocket (pig).
We remove all the sprockets and the old chain. We check the matches of the marks. The crankshaft key should be opposite the ebb on the cylinder block.
We install new sprockets on the crankshaft and the drive of auxiliary units. Lubricate the new timing chain and install it in place.
We place any tool under the chain on top so that it does not fall down.
We install the camshaft sprocket in the chain in such a way that when installed on the camshaft, the descending branch of the chain is tensioned and all marks coincide. We turn the camshaft counterclockwise at a small angle and return it back by the crankshaft, this way the chain is tensioned and you can evaluate the correct installation of the marks. If the marks do not match, transfer the chain to the tooth and repeat the procedure again.
We install the chain tensioner in place and activate it. Tighten all the sprocket mounting bolts and lock them. We turn the crankshaft two turns and if the valves do not meet the pistons and all the marks fall into place, we congratulate ourselves on completing the most important operation.
Lubricate the crankshaft cover gasket with sealant and install it in place.
We install the pulley, tighten it and turn the crankshaft again and check all the marks. It’s better to play it safe than to tear your hair out all over the place and look for the mechanic’s phone number.
We unscrew the nut 13 of the distributor and, having taken it out, turn the slider so that it faces the contact of the fourth cylinder. We put the distributor in place, but remember that after final assembly we will have to turn on the ignition. We will not dwell on this, since this procedure can easily be found on the Internet. If you are interested, there is a video about installing the ignition at the end of the article.
We put back everything that was removed, in the reverse order of removal. Fill with antifreeze, start, adjust the ignition. Your first timing chain replacement has come to an end.