Such a nuisance as a burnt valve is a fairly common occurrence that occurs on both gasoline and diesel engines, and it is typical not only of old engines with high mileage. This “sore” can also occur on completely new engines. Timely detection of valve burnout can significantly reduce the cost of engine repairs and minimize the consequences. It is also important to understand that operating such a motor means seriously aggravating the problem.
Consequences of burnout
Experienced motorists say that the least dangerous consequence of metal burnout is an increase in gasoline or diesel fuel consumption. This is due to the fact that the internal combustion engine begins to malfunction during operation. As a result, more fuel enters the combustion chamber than expected by the initial settings.
More problems in the block will be caused by metal fragments that have penetrated into it. The collapsing working part of the plate crumbles under external influence. Its solid particles mechanically damage the piston group, which will result in expensive repairs.
If you ignore the formation of chips for a long time, they can soon completely and irrevocably damage the cylinder block. It will be impossible to operate such a unit, and replacing it will require significant costs.
Adjusting clearances on a VAZ 2114 engine - instructions and operating procedure
If the VAZ valves are knocking, this is a direct indication for adjusting their thermal clearances. The adjustment of the VAZ 2114 injector valves is done in the same way as on the first generation Samar carburetor internal combustion engines (2108-21099). The main task is to supply washers of the correct thickness based on the preliminary check of the gaps and observing the operating order of the valves.
Procedure for adjusting valves of VAZ 2114
Adjusting the valves of the VAZ 2114 (eight-valve injector) is carried out in the same order as measuring the gaps:
The correct procedure for adjusting valves on a VAZ 2114
If, based on the results of measurements, some gaps turn out to be normal, they can be skipped. This is a common practice, since the exhaust valves of the VAZ 2114, which heat up much more, lose clearances faster. Situations are common when the exhaust valve clearances of a VAZ 2114 have to be adjusted every 10 thousand km, while the intake valve 2114 maintains the correct clearance even after 30-50 thousand. This happens especially often when driving on gas.
The procedure for measuring and adjusting the gaps described above is recommended by the manufacturer, but you can deviate from it (nothing bad will happen), for example, if only 1 or 2 cylinders need adjustment. If the timing belt is set correctly, you can avoid looking at the marks by simply adjusting the VAZ 2114 intake and exhaust valves one by one on each required cylinder. It is only important to set the eccentric correctly: it should look up. But the method without marks is inconvenient because you have to crank the engine much more often.
It is necessary to set the gaps strictly according to the marks only on the 11186 engine (Kalina, Granta, was not installed as standard on the 2114, but is installed by some owners during a “swap”), because in this internal combustion engine the pistons can meet the valves.
After adjusting the VAZ 2114 valves with your own hands is completed, reinstall the valve cover (the studs are tightened with a torque of 2-4.7 Nm) and screw back all the removed elements.
If you have correctly adjusted the valves of the VAZ 2114, the gaps will return to normal, the engine will stop ringing the valves and will run smoother. But if everything is done correctly, the dimensions are met, and the engine still trots, rings, etc. - perhaps the camshaft is too worn out or there is play. In this case, repairs and replacement of worn parts are needed.
The big advantage of the eight-valve VAZ engines used on the Lada 2114 is that if you adjust them incorrectly, the maximum that can happen is that the engine will not start or it will work intermittently, but there is no danger of bending the valves.
On engines 21083 (1.5 l, carburetor, installed only on early 2115), 2111 (1.5 l, injector), 21114 or 11183 (1.6 l, injector) the valve does not bend even if the timing belt breaks, since their pistons have recesses of sufficient depth. In the eight-valve family of VAZ engines, only model 11186 bends the valve, but it was not installed on the 2114 from the factory.
How to determine a bad cylinder?
The essence of the simplest test comes down to sequential shutdown of the cylinders. By simulating a malfunction, we observe changes in engine operation. After turning off the boiler in which the valve has burned out, changes in operation will be minimal. What are the best ways to do this?
- Remove the high-voltage wire from the spark plug. At this time, the coil will experience increased loads, so the duration of such a stress test should not exceed 2-3 seconds. To avoid the risk of electric shock through a cracked GDP, such a check should be done wearing rubberized gloves or using pliers with plastic/rubber handles.
- Physically disconnect the injector chip. If you have specialized diagnostic equipment, this can be done programmatically by connecting to the car via the OBD-II connector.
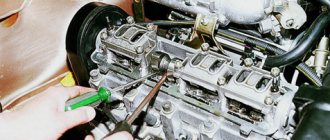
How to determine a burnt valve without removing the cylinder head
Inspection of valves using an endoscope connected to a smartphone
There are two main ways to determine a burnt-out valve with high accuracy without disassembling the engine:
- compression measurement;
- visual inspection with an endoscope.
To understand that the valves have burned out, you can carry out these operations yourself or contact a car repair shop. A budget endoscope, like a compression meter, will cost 500–1000 rubles. The mechanics at the service station will charge about the same for diagnostics. Inspection with an endoscope connected to a smartphone, tablet or laptop allows you to get a good look at the damaged valve, and a “compressometer” will show the pressure drop in the cylinder.
Before checking a burnt valve, you need to make sure there are no problems with clearances. They must be set correctly, because a pinched valve that is still intact and cannot close completely behaves in the same way as a valve that has already burned out.
To measure compression, especially on engines with an electronic throttle, you need an assistant, because at the time of testing the throttle must be fully open. The assistant will also start the starter.
How to find a bad cylinder
You can determine a cylinder with a burnt-out valve by measuring compression or removing wires/coils from spark plugs with the engine running. How to check a burnt valve on a gasoline engine by sound:
Determination of a cylinder with a burnt-out valve
- Start the engine, let it warm up and open the hood.
- Remove the wire or coil from the spark plug of the 1st cylinder.
- Listen to whether the sound of the engine has changed or whether the vibrations have increased.
- Return the wire or coil to its place, listen again for changes in operation.
- Repeat steps 2–4 for the remaining cylinders.
If the cylinder maintains pressure properly, then when it is turned off, the engine begins to work worse, trip and shake, and when connected, operation returns to normal. But if the valve burns out, the cylinder does not fully participate in the work, so the sound and vibration of the motor do not change after disconnecting and connecting the spark plug.
For diesel engines, only the option with a compression gauge is available due to the lack of spark plugs. In a cylinder with a defective valve, the pressure will be approximately 3 (or more) atm less than in the rest .
How to determine what the problem is
Since you can definitely recognize a burnt valve with an endoscope, it is better to choose this option if possible. For inspection you need:
Burnt valve in the endoscope picture
- Connect the “endoscope” to your laptop or smartphone and display the image on the screen.
- Place the mirror attachment on the camera (not necessary if the “endoscope” has a controlled head).
- Unscrew the spark plug and place the “endoscope” into the cylinder through the hole.
- Inspect the valves for defects.
- Repeat steps 3–4 for each cylinder.
Testing with a compression gauge is based on understanding what happens to the pressure when a valve burns out. For a heated gasoline internal combustion engine, normal compression is 10–15 bar or atmospheres (1–1.5 MPa), depending on the compression ratio. The pressure in a diesel cylinder is 20–30 bar or atm. (2–3 MPa) , therefore, to check it you need a device with a pressure gauge that has a wider measurement range.
How to determine that a valve has burned out using a pressure gauge is indicated in the instructions below. If the tip of the compression gauge is equipped with a rubber cone rather than a thread, an assistant will be required.
The procedure for checking burnt-out valves with a compression meter:
- Unscrew the spark plugs (on a gasoline engine), glow plugs or injectors (on a diesel engine) from the cylinder head. To avoid mixing them up during assembly, number the spark plug wire tips or coils.
- Shut off the fuel supply, for example, by turning off the fuel pump (you can remove the fuse) or disconnecting the line from the injection pump.
- Screw the “compression gauge” into the hole of the 1st cylinder or press it tightly with a cone to the hole.
- Ask an assistant to turn the engine with the starter for 5 seconds, while pressing the gas pedal to the floor to properly fill the cylinder with air.
- Record the pressure gauge readings and compare them with the normal values for your engine.
- Reset the “compression gauge” by releasing the pressure from it.
- Repeat steps 3–6 for each of the remaining cylinders.
Gasoline “compression gauge” with thread and conical nozzles
Diesel “compression meter” with a measurement scale of up to 70 bar
After taking compression measurements, compare the instrument readings for each cylinder. Normal values for different internal combustion engines are indicated above; the spread across cylinders should be within 1 bar or atm. (0.1 MPa). A sign of burnout is a significant (3 atm or more) drop in pressure.
A burnt out valve is not always the culprit for low pressure. Poor compression can be caused by stuck, worn or broken rings, excessive cylinder wall wear, or piston damage. You can understand that a burnt valve behaves this way by injecting about 10 ml of engine oil into the cylinder and re-measuring the compression. If it has increased, there is a problem with the rings or cylinder wear; if it has not changed, the valve does not hold pressure due to burnout.
Oil will also not help increase compression if it is not there due to a burnt out or burst piston due to detonation - the symptoms will be the same as with a burnt out valve. You can check the integrity of the piston without disassembling it with an endoscope or by feeling it with a long thin rod through the spark plug well.
Is it possible to drive with burnt out valves?
For those who, based on symptoms, have determined that their car has problems with the valves and are wondering: is it possible to drive if the valve is burnt out? – the immediate answer is: it is extremely undesirable, it can lead to additional costs. If the valve really burns out, the consequences can be disastrous for the engine:
- pieces of a collapsing valve damage the piston and cylinder head, peel off the cylinder walls, and break rings;
- if the intake valve burns out, the air-fuel mixture breaking into the intake receiver can flare up there and tear it (especially important for plastic receivers);
- the burning mixture, breaking through a leaky valve, leads to overheating of the manifold, exhaust pipe, gasket, leading to burnout of exhaust parts;
- a mixture that cannot burn normally in the cylinder burns out in the exhaust, damaging the catalyst and oxygen sensor;
- due to persistent local overheating, the cylinder head may fail, which will require milling during repairs or even replacement.
Let's talk about adjusting the Lada Kalina valves
Most owners of the modern Lada Kalina strive to maintain their car themselves. And if not every owner decides to install a zero-resistance air filter, then adjusting the Kalina valves is one of the mandatory operations. In order for the engine to work well, valve adjustment is required, after which the clearances become within the established norm. When the adjustment is carried out correctly, the gas distribution system functions without high wear. The camshaft, pushers, valves do their job superbly. Engine operation becomes less noisy and fuel consumption decreases. The combustion chamber remains clean, there is practically no carbon deposits. The engine starts very easily.
After every 20,000 kilometers, valve adjustment is necessary. Sometimes the interval between repairs can be increased to a mileage of 25,000 kilometers. When such work is delayed and the mileage increases, serious problems with the engine begin. The fact is that the quality of engine operation is directly dependent on the resulting valve clearance. When factory settings are violated, the cylinders do not receive enough fuel, and flammable gases are released prematurely. In fact, the operation of the entire cycle is disrupted. As a result, the engine efficiency decreases. If the thermal gap is greatly reduced, burnout of the valves is possible. This entails a very serious repair of the cylinder head. The cost of rebuilding an engine is quite high.
Why do valves burn out?
Valves burnout occurs for various reasons. For engines that require periodic valve adjustment, valve burnout often occurs due to untimely adjustment of the valve thermal clearance. On engines with automatic adjustment of the specified gap, failure of hydraulic compensators also often leads to the valve burning out.
The main causes of engine valve burnout are:
- valves are tightly clamped;
- the valve guide is worn;
- the valve stem itself is worn out;
- the engine runs on a lean mixture (especially with LPG);
The consequences of driving with a burnt-out valve are different, ranging from increased fuel consumption to burnout of the valve seat. In some cases, a burnt valve seat leads to the need to repair the seat or even completely replace the cylinder head.
A burnt-out valve can collapse at one moment, after which fragments of the valve fall into the engine cylinder. As a result, serious damage to the piston, cylinder head or cylinder head defects may occur. In the latter case, there is a risk that a large piece of the burnt valve will pierce the engine cylinder block, which is the actual destruction of not only the cylinder head and piston group, but also the cylinder block. In such a situation, prolonged operation of the engine with a burnt-out valve may lead to the need to replace the entire engine.
Causes of pinched valves
The first factor is most often observed on those cars whose owners have equipped their cars with LPG equipment (gas equipment).
Gap too small
As you know, the valve has a plate - its widest part, which is located directly in the combustion chambers. On the reverse side it is attached to the cylinder head. As the car's mileage increases, the chamfer on the surface of the plate and the mounting location begin to wear out. As a result, when the rod is raised, the pusher is pressed too tightly against the camshaft cam. This is how compression occurs.
Such a phenomenon does not bring anything good to the motor.
Processes
Consequences
The valve will begin to heat up. Thermal expansion is not compensated by the gap, and the plate will begin to fly out of the mounting location.
There is a decrease in compression. The answer is a reduction in power.
Heat removal is not carried out in normal mode. There is a negative impact on the operation of the catalyst.
Lada 2114 Basma › Logbook › Self-adjustment of VAZ-2114 valves (why it’s better to do it yourself)
Preface. Good day everyone! I recently stopped by the service center and asked to adjust the valves on my four-wheeler, a young guy with a confident look adjusted the valves, having first cooled the engine, as it should be. I drove 5-6 thousand and I didn’t like the fact that the valves began to noticeably I decided to go back for adjustment, but to a different service center. There, an oily, skinny mechanic named Kolya spent half an hour fiddling around with the adjustment and adjusted it. He reported that the gaps were not the same - some were loose, some were tightened... I left the service center and drove around a little, the valves were clattering approximately the same as before the adjustment. But the worst thing began after a thousand kilometers - there was a knocking noise in the area of the head, and with mileage it intensified - I drove 200 km - the knocking got a little stronger, I drove another 200 and got even louder... I I no longer knew where they would go, I changed the bearings on the generator and generally climbed everything under the hood, I didn’t think about the valves at all, because I had recently adjusted them. As a result, in the same service, all this fuss and fuss led back under the valve cover, Kalyan looked at the gaps, and on the exhaust valve the clearance turned out to be 0.8, instead of the required 0.35. Kalyan took out the washer, and there was a hole in it. Yes! - says Kalyan, the washer was raw (not hardened).
VALVES ADJUSTMENT METHOD. Initially, I will say that I had not adjusted the valve before and therefore did not have a set of washers and other devices. Therefore, I decided to drive up to an auto parts store (which is located not far from the house, and there seem to be no raw washers there, because the guy who owns it doesn’t have a bad reputation road) and make the settings near it. I left the car there for 2 hours (it’s summer outside, 30 degrees Celsius air temperature). I came two hours later, the engine had already cooled down as it should (and it should be 20-25 degrees). You can feel it with your hand if the engine is not warm, then you can start setting up.
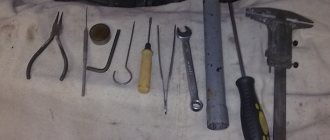
SO GET TO THE BUSINESS. 1. I bought a tool for pressing the pusher (250 rubles), took out from my tools tweezers, a set of probes, a disposable syringe with a tube (for pumping out oil), a thin flat screwdriver, a regular flat screwdriver and a 10mm wrench with a ratchet. I unscrewed the throttle cable frame (three nuts by 10), disconnected the cable itself and put it aside. Then he removed the plastic cover from the timing belt, disconnected the gas hoses and removed the valve cover (by unscrewing 2 nuts by 10) 2. Then set TDC (top dead center), turning the camshaft clockwise arrow by the bolt of the upper gear wheel (that is, in the direction in which it usually rotates. YOU CANNOT TURN IN THE REVERSE DIRECTION) and aligned the mark on the gear wheel and the belt casing.
-The gap on the intake valve must be 0.2 mm - an error of 0.05 mm is allowed. -The gap at the outlet should be 0.35 mm - an error of 0.05 mm is allowed (but it is better to avoid it)
The order of adjustment (the valves are counted from the gear wheel - the 1st is closest to the wheel, the 8th is the farthest). 1 (outlet) and 3 (inlet) 5 (outlet) and 2 (inlet); 8 (outlet) and 6 (inlet); 4 (outlet) and 7 (inlet). 5. In the TDC position, we check the gap by alternately inserting feeler gauges between the pusher and the camshaft. We determine what gap we currently have on valves 1 and 3, then rotate the shaft by about 30 degrees (special precision is not needed here, the main thing is that the camshaft cams are moved upward from the pointer, and since the large surface is round, when the convexity of the cam is moved away from the pointer it is visible to the naked eye) So we check the gap on the next pair, and so on, we turn the shaft and check the gap. 6. If the gap does not match, then push the pusher down with our tool and insert a clamp (from the valve adjustment kit) between the camshaft and the pusher.
If the car is on gas, then it is recommended to make the gap on the exhaust valves 0.05 mm larger than normal, that is, 0.35 normal + 0.05 = 0.4 mm, on the intake valves leave unchanged 0.2 mm
Source
Why is adjustment necessary?
The correct procedure depends on:
- uninterrupted operation of the LADA Kalina engine (operation with a reduced noise level in the timing belt, no errors in the camshaft sensor);
- reduction of fuel consumption to a level close to that regulated by the manufacturer;
- less wear on the camshaft cams and the pushers interacting with them.
- cleanliness of combustion chambers and valve plates due to the absence of carbon deposits.
Valve adjustment in a Lada Kalina car should be carried out with a periodic mileage of 20 thousand km or a little more.
It is not recommended to neglect this procedure, since the regulatory value of the gaps at the valves of the intake and exhaust circuits changes. This circumstance provokes a loose fit of the valve discs to the seat seats, which inevitably leads to the formation of carbon deposits, incomplete combustion of fuel, damage to the discs with subsequent burnout and other troubles in the timing belt in the LADA Kalina model. As you can see, in the absence of the required clearances, there is a violation of the correct functioning of the engine as a whole, and the only harmless point here is the owner’s acoustic discomfort due to the increased noise of the timing belt.
Note that adjustment of the valve mechanism requires 8 valve engines of Lada Kalina cars.
Frequency of valve adjustment on VAZ-2115
But quite often there is a need to adjust them much earlier, due to many reasons.
This indicator is primarily due to the quality of domestic spare parts, which wear out quite quickly even under ideal operating conditions.
The appearance of a metallic knock in the upper part of a running engine, very similar to the sound of a sewing machine, will mean an increased gap between the camshaft cam and the valve tappet. This reason is caused by increased wear of the installed adjusting washer or camshaft cam. If such a sound occurs, it is necessary to adjust the valves as soon as possible, which will avoid major problems.
Much also depends on the quality of the engine oil, which has a significant impact on the degree of wear of power unit parts.
In this case, the need to adjust the valves occurs after a mileage of 30-35 thousand kilometers, and it is quite possible that it will only be necessary to measure the valve tappet clearances.
Why is it necessary to adjust valves?
The correct valve lifter clearance ensures stable operation of the power unit at full power. Valves are divided into two types:
Read more: Psychiatrist Queens certificate for traffic police
- Intake, the main task of which is timely opening for the entry of the fuel mixture into the combustion chamber and subsequent closing, ensuring the creation of the required compression ratio. Insufficient tappet clearance causes the tappets to open too early, resulting in fuel flowing in too early and also igniting early. Too large a gap ensures that the valve opens too late, causing fuel to enter and ignite in the combustion chamber too late. All this leads to insufficient power of the power unit and rapid burnout of the working surface of the valves.
Adjusting thermal clearances in the engine valve mechanism
We measure and adjust the gaps on a cold engine. Remove the engine screen. Disconnect the throttle drive cable from the throttle assembly sector (see “Replacing the throttle drive cable”). Having unscrewed the three fastening nuts, remove the throttle valve drive cable bracket and move the bracket with the cable to the side (see “Removing the receiver”).
Use a Phillips screwdriver to loosen the clamp on the lower crankcase ventilation hose... ...and remove the hose from the cylinder head cover pipe.
Using a Phillips screwdriver, loosen the clamp on the crankcase ventilation hose (main circuit)… …and remove the hose from the cylinder head cover pipe
Using a Phillips screwdriver, loosen the clamp on the crankcase ventilation hose (idle circuit)… …and disconnect the hose from the cylinder head cover pipe
Using a 10mm wrench, unscrew the two nuts securing the cylinder head cover... ...and remove the washers.
Remove the two rubber bushings.
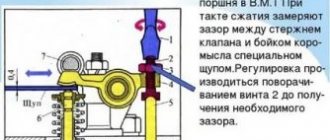
Remove the cylinder head cover. Remove the front timing belt cover (see “Checking the condition and replacing the timing belt”). The procedure for checking and adjusting clearances in the valve drive mechanism is as follows. We turn the crankshaft by the bolt securing the generator drive pulley clockwise until the installation marks on the camshaft pulley and the rear timing belt cover align (see “Checking the condition and replacing the timing belt”). Then turn the crankshaft clockwise another 40-50° (2.5-3 teeth on the camshaft pulley). In this position of the shafts, we check the gaps at the first one with a set of feeler gauges.
...and the third camshaft cam. The clearance between the camshaft cams and shims should be 0.20 mm for intake valves and 0.35 mm for exhaust valves. The clearance tolerance for all jaws is ±0.05 mm. If the clearance is different...
...then we install a device for adjusting the valves on the studs of the camshaft bearing housings.
We rotate the pusher so that the slot in its upper part faces forward (along the direction of the car).
We insert the “fang” of the device between the cam and the pusher (1 - device, 2 - pusher)
By pressing down on the lever of the device, we recess the pusher with the “fang”...
...and install a clamp between the edge of the pusher and the camshaft, which holds the pusher in the lower position.
Fixing valve tappets when replacing the adjusting washer
: 1 — latch; 2 - adjusting washer Move the device lever to the upper position
Use tweezers to pry the adjusting washer through the slot and remove it. If you do not have a device for adjusting the valves, you can use two screwdrivers. Using a powerful screwdriver, leaning on the cam, press the pusher down. Inserting the edge of another screwdriver (with a blade width of at least 10 mm) between the edge of the pusher and the camshaft, fix the pusher and remove the adjusting washer with tweezers. We adjust the gap by selecting an adjusting washer with the required thickness.
To do this, use a micrometer to measure the thickness of the removed washer. The thickness of the new adjusting washer is determined by the formula: H = B+(A-C), mm
, where “A” is the measured gap; “B” is the thickness of the removed washer; “C” - nominal gap; “H” is the thickness of the new washer. The thickness of the new washer is marked on its surface with an electrograph. We install the new washer in the pusher with the marking down and remove the lock. Check the gap again. When adjusted correctly, a 0.20 or 0.35 mm feeler gauge should fit into the gap with slight pinching. Consistently turning the crankshaft half a turn, we check and, if necessary, adjust the clearances of other valves in the sequence indicated in the table.
| Angle of rotation of the crankshaft from the alignment of the marks, degrees | Cam number (counting from the camshaft pulley) | |
| exhaust (gap 0.35 mm) | inlet (gap 0.20 mm) | |
| 40-50 | 1 | 3 |
| 220-230 | 5 | 2 |
| 400-410 | 8 | 6 |
| 580-590 | 4 | 7 |
We assemble the engine in the reverse order. Before installing the cylinder head cover...
...replace its sealing gasket with a new one.
Daewoo Sens one shade of gray › Logbook › Symptoms of unadjusted valves
Often in my practice I have to deal with such a phenomenon as insufficient attention of the car owner to the condition of the valve clearances. In most cases, customers simply put the “bolt” on a procedure such as checking and adjusting the gap. But there are valves and they need to be adjusted! We won’t turn to the “what and how” operating book for advice, but if the behavior of the motor is unclear, we’ll take a tool and check the valves.
- characteristic sound from under the valve cover - clicking, knocking, rattling and other overtones - poor starting on both a cold and hot engine - unstable, floating idle - in certain cases a “cramp” passes through the engine at idle - engine vibration - on certain rpm (in particular, about 3000 rpm), you can hear a clearly abnormal roar of the engine, plus the exhaust system responds with bad vibration - loss of engine response at lower levels - twitching at low gears when coasting - jolts, jerks when you press the gas - drop in speed when suddenly pressing the gas pedal - incomprehensible consumption
Ideally, you need to carry out this procedure yourself, but if you don’t have the desire or sufficient skill, then go only to proven, competent mechanics.
I will also share an interesting case.
Sense 1.3 arrived with a jumping temperature arrow on the dashboard. Or rather, when it’s cold, everything is fine, but when the engine warms up and its position is approximately in the middle of the scale, twitching appears. They are especially pronounced when you press the brake or turn on the turn signal. It also jumps wildly when you switch from second to third (ahh). It's funny.
We hurried and changed the sensor.
The symptoms are the same! I started digging deeper and noticed how the engine was running at idle. Shivers like a “wet dog on a cold autumn evening.” I measure the charging - 14.1 V as in the book. I measure the voltage between the positive terminal of the battery and the engine block - 17.3 V! Clearly understood. I'm looking for the mass point on the engine - it's located on the clutch slave cylinder bracket. I'm spinning it. Severe melting of the terminal, carbon deposits, lack of a tight fit and, accordingly, contact. I'm correcting the jamb - the engine is like a clock, the hand is like a factory! Peace, goodness and health to everyone!
Source
Determining valve burnout without removing the cylinder head
The first step is to determine which cylinder is not working. The testing methods are in many ways similar to diagnosing faulty spark plugs. To check, you should start the engine, after which, with the engine running at idle speed, you will need to remove the caps from the spark plugs one by one.
After removing each spark plug cap, you need to carefully monitor the idle speed and the overall stability of the engine. If the engine starts to rev more strongly or stall, then the cylinder from which the cap was removed is working. If after removing the cap the engine operation does not change or the speed changes only slightly, then the problem cylinder has been detected.
Then you need to unscrew the spark plug on the inoperative cylinder and replace it with a known good one, and also check the high-voltage armored wire of this cylinder for functionality. It would also be a good idea to check the ignition coil, etc. Subsequent starting of the engine will show whether the problem lies in the elements of the vehicle’s ignition system or whether further diagnostics are necessary.
If the nature of the engine’s operation does not change after installing the working spark plug, replacing the high-voltage wire and checking other components of the ignition system (the engine continues to rev), then there is a high probability of more serious breakdowns:
- valve burnout;
- CPG malfunctions;
Burnout of the valves means that compression in the cylinder is reduced due to a violation of the tightness of the combustion chamber (leakage during the fit of the intake or exhaust valve, destruction of the disc and/or valve seat). Wear of the cylinder-piston group and piston breakage also lead to low compression in the problem cylinder. Also, the cylinder may not work due to stuck or broken piston rings.
Now it is necessary to localize the malfunction, that is, to accurately determine the burnout of the valve or identify problems with the CPG. The most common way to determine burnt valves is to measure the compression in the cylinders.
Low compression clearly indicates a malfunction, but one caveat should be taken into account. It will not be possible to establish a burnt-out valve and rule out problems with the CPG only based on the compression indicator. The fact is that compression in the engine can decrease both as a result of a burnt-out valve, and due to broken piston rings, as well as a number of other defects. For this reason, in parallel with the compression measurement, additional engine diagnostics should be carried out.
- The easiest way to determine valve burnout after you have measured the compression in the cylinders is to pour several “cubes” of engine oil through the spark plug well. Then the compression must be measured again. An increase in compression in the cylinder after adding oil will indicate that an oil film has formed, acting as a “seal”. This phenomenon is typical in the case of piston wear. If the compression indicator has not changed, it means that the valve has burned out, since the oil in the cylinder in this case will not affect the compression in any way.
- Also, to determine whether the valves are burned out, you should inspect the spark plug on the problem cylinder. A clear sign of valve burnout is that the spark plug is completely dry, that is, it does not have a characteristic oil deposit. There may also be smoke or air coming out of the engine breather. The intensity of smoke production directly depends on the degree of wear of the CPG.
As for breakdowns that are associated with the piston, in this case the spark plug is covered with oil, and the appearance of bluish smoke can be observed from the breather. Note that oil on a candle is an indirect sign. Even if the spark plug is dry or covered with a slight soot, but smoke comes from the breather, then this symptom indicates problems with the piston or piston rings. On new engines with low mileage, there is a high probability that.
Let us add that the appearance of engine oil that comes out through the breather also indicates a malfunction of the partitions between the piston rings. Taking into account the above, you can accurately determine why the compression in the engine has decreased, identify problems with the cylinder-piston group, or determine burnout of the timing valves.
First symptoms
The exhaust gas does not push the piston with a burnt-out valve, but enters directly into the manifold. In this case, strong engine vibrations, popping noises in the muffler and characteristic noise appear. In this mode, the engine still produces few revolutions or none at all.
Due to engine tripping, fuel consumption increases significantly, since some of the gasoline is simply thrown into the air without performing useful work. The loss of fuel affects other engine components, which is why it is important to identify burnout in the early stages so as not to subject other components to wear.
Burnout of the valve leads to the complete drying of the spark plugs, and smoke begins to come out of the breather. If the piston is broken, the smoke is colored bluish and the spark plugs are covered with a copious layer of oil.
You can determine the symptoms of a burnt valve by measuring the compression in the cylinder. After the procedure, a little oil is poured into the cylinder. If the readings have not changed, then the valve is faulty. However, measurement does not always determine valve failure. Poor compression may also indicate faulty piston rings.
Checking engine compression and searching for a bad cylinder
Finding a bad cylinder can be quite simple, the method is old, but very effective
With the engine running, the explosive wires are removed one by one, while you need to pay attention to the operation of the motor. If, when removing one or another wire, the engine operation has not changed and the motor still trots, then the reason is in this cylinder
If you removed the wire, and the engine performance became even worse, and it began to work with even more interruptions, then this cylinder is working.
Next, you need to make sure that the spark plug is working and that’s not the problem. Checking a candle is quite simple; I think everyone knows these primitive methods. The easiest way is to take and swap the spark plugs or install a new spark plug and check again whether the engine operation has changed.
Afterwards, in order to eliminate the possibility of a faulty explosive wire, you need to check it, as written on how to do this.
It also doesn’t hurt to check the coil; read how to do this.
If all of the above assumptions do not come true, the valve may still be burned out.
A burnt-out valve means depressurization of the cylinder, hence a decrease in compression, so it’s a good idea to check the compression in the cylinders. Read:
. After checking the compression, it is recommended to check again, only using several “cubes” of oil. A few grams of engine oil are poured into the spark plug well and the compression is checked again. If, after pouring oil into the cylinder, the compression increases, we can conclude that the oil film acted as a sealant, as a result of which the increase occurred. This phenomenon is typical for a worn piston group; otherwise, when the compression remains low, valve burnout is quite possible.
Let's sum it up
Burnout of valves is an unpleasant phenomenon that can cause irreparable damage to the engine, but if the breakdown is detected at an early stage, problems can be avoided, and the cost of repairs will be minimal. If your car's engine requires regular checking of the valve clearance, you should not ignore this procedure, otherwise you may encounter valve burnout. Regularly monitor the condition and level of engine oil and replace it on time.
How to determine that a valve has burned out in a car engine: signs and symptoms
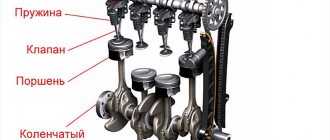
Valves ensure the implementation of working processes in the cylinder. The intake valves are responsible for supplying a portion of the fuel-air mixture, and the exhaust valves are responsible for releasing combustion products. Burnout of one valve has a detrimental effect on the operation of the entire cylinder.
Signs that the valve is burnt out
What does a burnt valve look like?
Signs of a burnt-out valve include engine shaking, smoke from the breather (the breather is a valve for venting the crankcase and releasing excess pressure) and, when the engine operates for a long time with a burnt-out valve, increased fuel consumption. Let us explain the popular concept of “motor troit”. This means a malfunction of one cylinder, which manifests itself in a loss of power and throttle response, vibration and shots in the exhaust pipe. But these signs of a burnt out valve are ambiguous.
The engine can also stall due to broken spark plugs or a weak spark.
Smoke from the breather can also occur if the piston is damaged. But there is a distinctive feature here - the color of the smoke should be bluish, and the spark plug should be covered with oil, which is associated with a broken piston. In case of burnout, the spark plug remains dry. Note that a burnt valve in a carburetor engine and in an injector gives the same symptoms, because The only difference is the fuel injection system.
How can you tell if a valve is burnt out?
If you have checked the spark plugs, but the engine still stalls, then you should proceed to the procedure for finding a non-functioning cylinder. It's not complicated. After starting the engine at idle, remove the caps from the spark plugs one by one. If the engine changes operating mode when removing the cap, this means that the cylinder is working. If the changes are insignificant, then you should look for the cause in this cylinder.
Removing the wires from the spark plugs
Next, you need to check the compression of the suspect cylinder. We measure the compression level with a compression gauge, and then repeat the measurement by pouring a syringe of oil into the cylinder. If the second value is higher than the first, then there is a problem with the piston. If the values coincide, the valve will burn out.
The valves operate at constant high temperatures (400-600°C) and significant mechanical loads. The inlet valve is in more gentle thermal conditions, because cooled by the incoming fuel-air mixture. Exhaust valves, on the contrary, heat up even more due to the exhaust gases.
Exhaust valves are more likely to burn out.
For proper operation of the valves, a clear fit of the valve to its seat must be ensured and the cooling conditions (opening-closing level) must be observed. The appearance of carbon deposits both on the valve itself and on the seat violates both requirements and leads to damage to the valve. Carbon deposits can form due to under-adjustment, wear, manufacturing defects, problems with the cooling system, elevated combustion temperatures, etc. Factory defects are not that uncommon. The part is complex and operates under constant loads, so even a slight heterogeneity of the metal can lead to destruction of the entire part.
To protect yourself from defects, buy only from trusted manufacturers!
Wear is an insurmountable obstacle for all working parts. Therefore, do not neglect checking the valves after a certain mileage! Poor valve adjustment is the creation of insufficient clearances between the valve and the seat, often referred to as stuck valves.
How will the engine work and what will happen if the valves are clamped?
How to understand that the valve is jammed
If after starting the engine runs normally, but during long operation the thrust drops - this is a symptom of pinched valves. Another sign of jammed valves can be shots into the muffler when releasing gas. Because The combustion chamber is not completely closed, compression decreases and a disruption in the working process occurs. When adjusting, it is better to exceed the permissible gap than to make it smaller.
A burnt valve must be repaired as quickly as possible!
The consequence of clamped valves is overheating, increased fuel consumption and, as a result, burnout. It is undesirable to operate the engine with a burnt-out valve; this leads to burnout of the valve seat. What the car owner will end up having to do is replace the entire head.
Knocking engine valves - causes. Let's figure out why the valves are knocking |
Smooth and uninterrupted engine operation is a sure sign of its “health” and proper maintenance.
Any extraneous sounds (knocking, creaking, thuds, etc.) most often indicate problems with the engine. One of the most common sounds that a motorist encounters is the knocking of valves; it can only be competed by an engine that is shaking. We talked about the latter in previous articles, so this time we will talk about valves, more precisely about why they knock and how to find out the cause of valve knocking at home.
As a rule, valves knock on engines with high mileage, or on power units that are in a neglected state or are regularly subjected to enormous loads. However, there are exceptions when the knocking of engine valves appears on almost new cars that have not yet expired the warranty period.
Why are valves knocking?
The main reason for knocking is an increase in the gap between the levers and the camshaft cams. If the gap between these parts increases, the cam will begin to hit the rocker, as a result of which extraneous sounds similar to a metallic clatter will begin to appear. The larger the gap, the greater the wear and damage, which will ultimately lead to complete failure of the entire power unit. It should be taken into account that the gap is set by the manufacturer; it has a certain value that is the same for all engines of a certain brand.
A smaller gap is also not good, since in this case the valve will be pinched, and after a while it may stop closing completely. Driving with valves that are clamped or not fully closed can result in engine overheating and reduced compression. We also cannot exclude the possibility of complete failure of one or more cylinders.
To prevent such a scenario, it is recommended to adjust the valves on time, every 10-15 thousand km. mileage
In addition to incorrectly adjusted valves, engine detonation can cause knocking. Detonation in an engine is a kind of explosion, the wave of which hits the cylinder walls and other parts of the piston group. These impacts can cause the valves to knock, although sometimes the metallic clatter may not be related to the valves. Characteristic signs of detonation are: increased vibration, black exhaust (or other color uncharacteristic for the exhaust), decreased power, engine overheating.
If the valves knock “hot”, that is, on a warm engine, the reason may lie in increased speed at low oil pressure, due to increased clearances which I talked about at the beginning of the article, as well as due to high wear or damage to parts. Next we will talk about how to understand exactly why your valves are knocking.
You need to check not only the intake valve, but also the exhaust valve of the engine. First of all, it is necessary to ensure the correct oil pressure and also check its condition (viscosity and lubrication characteristics).
- If the valves knock when cold, this may be due to wear on the pusher. If the tappets are dirty or leaking, they can cause limited oil flow to the valves, and as a result, you may hear a characteristic metallic clattering sound during warm-up.
- If you checked the oil pressure and it is normal, check the clearances; the valves may need to be adjusted. The gaps are adjusted using special feelers that establish a gap between the upper edge of the rod and the rocker arm, and if the camshaft is located at the top, between the pusher and the cam.
- If all your attempts to find the causes of valve knocking are unsuccessful, contact a specialist, otherwise you risk ruining the engine.
Text belongs to: AutoPulsar
avtopulsar.ru
The valve is burned out: signs and causes of malfunction
As you know, an engine uses a lot of complex systems. One of these is the gas distribution mechanism. Now many people are discussing the problems of a broken belt or a weakened chain. But few people mention such an element as a valve. It is this part that is responsible for the intake of the combustible mixture and the exhaust gases. One of the typical malfunctions is burnout. What are the signs of a burnt valve? More on this later in our article.
Why is this happening?
This malfunction occurs for various reasons. Moreover, even owners of new cars are not insured against valve burnout. A similar problem also exists on diesel engines. What are the signs of a burnt valve on a VAZ-2110? The usual culprit is tight saddles. All this will be accompanied by the characteristic “tractor” rumble of the engine. Valve clearances must be within specifications. If this is not the case, there is a risk of valve burnout.
A similar problem can happen on modern engines. The reason for this is non-functioning hydraulic compensators. If oil does not pass through them, the gap will be set incorrectly. Among other signs, it is worth noting an incorrectly configured HBO (if one is installed on the car). When driving with a mixture that is too lean, there is a risk of burning out one or more valves.
Why is this dangerous?
The consequences can also vary significantly, ranging from banal excessive fuel consumption to burnout of saddles. In more serious cases, damage to the piston and head occurs. How does this happen? A burnt-out exhaust valve, the signs of malfunction of which will be discussed below, is broken into small pieces. As a result, part of the “plate” enters the combustion chamber. This is how scuffs and other damage appear. Long-term use of such a car can lead to a complete replacement of the engine.
Signs of a burnt valve
On a VAZ-2110 and other cars, this malfunction will be accompanied by engine tripping. You will feel as if one of the cylinders has stopped working. Traction will also decrease significantly and fuel consumption will increase.
What to do in this case? If the valve is burnt out, signs of malfunction will be accompanied by low compression. The chamber will not generate the necessary pressure to push the piston. Therefore, first we take a compression gauge in our hands, unscrew the spark plugs and insert them into each cylinder one by one. It is worth noting that compression readings are very different on diesel and gasoline engines. In the first case, this parameter is at the level of 23-27, in the second – 10-12. But there are also exceptions. For example, on derated engines (old Soviet production, designed for 72 gasoline), this figure is 6-7 points.
It is worth noting that low compression can cause a worn cylinder-piston group. In this case, the valve will be in normal working condition. But how can you be sure that your measurements are accurate? To do this, experts recommend pouring a little oil into the cylinder through the spark plug well. Use a medical syringe. It is important that the oil corresponds to the parameters of the factory one (or what was previously filled).
After this, install a compression gauge and call an assistant to crank the starter at your command. The essence of the method is very simple - the oil, due to its viscosity, will close the cavities in the cylinder walls. This will eliminate the case of worn rings. If even with oil the compression readings are below normal, it means the valve is burnt out. The signs are obvious.
Checking the spark plugs
If you do not have the necessary oil or syringe at hand, you can determine the malfunction by the nature of wear of the spark plugs. To do this, they should be unscrewed from their seat and the condition carefully inspected. The candle will be dry, without oil deposits. Also, air or bluish smoke will come out of the engine breather. If this is a relatively new engine and signs of a burnt valve have been confirmed, then most likely you have stuck rings.
How to avoid the problem?
The main reason for burnout is the operation of the part under increased loads. The operating temperature of the valve is about 600-650 degrees. To prevent overheating, the gaps should be checked. Due to the short distance, friction occurs and, as a result, valve overheating.
Signs may also indicate poor quality fuel. On carburetor cars, the mixture is adjusted manually. It is important not to let the mixture become too lean. The same applies to cars with HBO. There are two main generations:
In the first case, the mixture is adjusted mechanically by adjusting the “greed” tap. Adjusting it is very simple - turn the tap until the car starts to stall. Next, unscrew it 1-2 turns. This is the most optimal setting. In the case of fourth-generation HBO, the configuration is done programmatically by specialists.
If the valve is burnt out, pay attention to the quality of the product when purchasing. A defective item will not last long. A high-quality valve eliminates various risks, scuffs and other defects. The part itself is inexpensive, but installation will require a fair amount of work. After all, to replace it, it is necessary to “throw off” the block head and further grind the seats.
Conclusion
So, we found out why the valve burns out. The symptoms mainly boil down to tripping - one of the cylinders will not work normally, as the mixture immediately evaporates out. To prevent re-burnout, you should properly adjust the carburetor or HBO, and also monitor the valve clearances. If a characteristic clatter is observed, it means that the gap is set incorrectly or the hydraulic compensators are clogged.
Signs of a burnt valve - review article
Valve burnout is a problem that owners of domestic cars most often encounter. But it would be unfair to blame exclusively the products of the Russian automobile industry, since they are also found in foreign cars, even if they are far from new. But any valve malfunction, including burnout, can lead to very serious consequences, so every car owner simply needs to be able to recognize the signs of a burnt-out valve in a timely manner in order to be able to promptly correct what can still be fixed without unpleasant surprises.
Causes of the malfunction.
The symptoms of a burnt valve are to some extent similar to malfunctions that are completely unrelated to the car’s engine. That is why insufficiently experienced car owners can spend a lot of time and effort to repair and fix something that, in principle, was not broken. As a rule, they are the last to realize that the valve has failed.
But despite all their apparent insignificance, the valves perform a very important function - they allow fuel to enter the combustion chamber and release burnt gases. That is, they are constantly in an aggressive environment - under the influence of gases and high temperatures.
It is natural that the metal from which the valve is made gradually deteriorates - the valve burns out.
Most often, the valve “flies” in very old cars, as well as in budget cars, when producing which the automaker chose price over quality. However, car owners themselves, without even realizing it, often provoke/accelerate the process of valve burnout, for example, by filling their car with fuel that is not suitable for it. But this, as they say, is a topic for a completely different article.
Symptoms of a burnt valve.
As noted earlier, the symptoms of a burnt valve are very similar to the symptoms of a malfunctioning ignition system, so many people begin to repair it first. But the engine, despite all the repair work, continues to act up and malfunction. That’s when a frantic search begins for other possible causes in the engine and other systems, although it’s all about a banal valve.
The most important symptom of the indicated problem is engine tripping, when one or more cylinders stop functioning. This happens because a burnt-out valve, when fuel burns, begins to let gases through, which do not push the piston down, but directly exit into the manifold.
You can diagnose this malfunction without disassembling the engine by following a certain algorithm of actions:
- we check the ignition - the integrity of the wires, the functionality of the distributor, the ignition timing;
- we determine the problem cylinder - we pull off the high-voltage caps from the spark plugs, the engine will start to stall if the cylinder is working, or if the cylinder is faulty, the engine operation will remain unchanged;
- Let's measure the compression: it will most likely be slightly lower than the required 11 points, by the way, this may be an indicator of not only a valve malfunction, but also a piston group malfunction.
Now a few words about how, without disassembling the engine, you can determine what exactly you are dealing with - a malfunction of the valve or piston group.
- Turn on the ignition and remove the breather hose. Warm air should come out of it, or at least a little smoke. The smoke is dense, gray, smelling of exhaust - a sign of a malfunction of the piston group.
- Remove the spark plug from the problem cylinder. If the piston is damaged, the spark plug will be in oil, and if the valve is burnt out, it will be in normal condition.
- Remove the cylinder head and replace the damaged element. If the valve is changed, then it must be ground in, and all valve stem seals must be replaced along with it.
Valve burnt out
The valves of an internal combustion engine are constantly subject to critical loads. Fuel flows through them and hot exhaust gases exit. In this situation, there is a high probability of breakdown.
If a valve burns out, the problem must be solved immediately. Otherwise, the engine will wear out.
First symptoms
Due to engine tripping, fuel consumption increases significantly, since some of the gasoline is simply thrown into the air without performing useful work. The loss of fuel affects other engine components, which is why it is important to identify burnout in the early stages so as not to subject other components to wear.
Burnout of the valve leads to the complete drying of the spark plugs, and smoke begins to come out of the breather. If the piston is broken, the smoke is colored bluish and the spark plugs are covered with a copious layer of oil.
You can determine the symptoms of a burnt valve by measuring the compression in the cylinder. After the procedure, a little oil is poured into the cylinder. If the readings have not changed, then the valve is faulty. However, measurement does not always determine valve failure. Poor compression may also indicate faulty piston rings.
Valve burnout is very similar to ignition problems. Novice mechanics are perplexed as to why the motor is vibrating, so they make a diagnosis themselves and move in the wrong direction. They buy a new distributor cap, wires, adjust the ignition, but to no avail. When you hear unwanted vibrations in the engine, the first thing you need to do is disassemble it and make sure that all elements are intact.
Causes
There are several reasons why valves can burn out:
- Manufacturing defects. The likelihood of deviations from the norm during the production of components is small, but still exists. Heterogeneity of the metal, defects in welding seams, microcracks are the first signs of defects.
- Critical temperatures. The operating temperature of the valves fluctuates around 650 °C. If the heat dissipation system is faulty, excessive overheating will cause the metal to quickly deteriorate.
- Poor quality gasoline. A lean fuel mixture leads to temperature spikes, which is even more damaging to the valves.
- Gas. Gas-powered engines are subject to greater loads than gasoline engines. Especially if the car is set to low gas supply. It is recommended to calibrate the valves every 10 - 15 thousand km.
Adviсe
Check the valve carefully when purchasing. Check the size standards and inspect the part for visible defects. Purchase spare parts only from certified points of sale from reputable manufacturers. The money saved on a cheap purchase will result in expensive repairs.
Check the valve clearances in the engine. Too short a distance is a common cause of overheating. Reduced clearance indicates wear of the valve seat. Install stiffer motor seats to prevent damage.
Thermal clearance table
Vehicle Intake (mm) Exhaust (mm)
| VAZ 2108-099, 2110-15 (8 valve) | 0.15-0.25 mm | 0.3-0.4 mm |
| VAZ 2101-07 | 0.15 mm | 0.15 mm |
| GAZ (402 engine) | 0.4-0.45 mm | 0.35-0.4 mm (1.4 valves), 0.4-0.45 mm (2.3 valves) |
Do not fill your car with low-quality fuel or lean gas in order to save money. Because of this, the engine loses some power and excessive gas consumption occurs. At the same time, regularly check the condition of the valves. Gas engines do not make as much noise when the valve is burnt out as gasoline engines.
When the first symptoms of a breakdown appear, it is better to contact a service center. Disassembling an engine with your own hands is a difficult process, especially with untrained hands. Experienced mechanics will quickly identify the problem and save you a lot of time.
Valve burnout on a diesel engine
The symptoms of a burnt valve on a diesel engine are similar to those on a gasoline engine. But the leading cause is faulty injectors. Due to overflowing injectors, the temperature in the combustion chamber increases and the combustion time of the mixture increases.
There is no concept of detonation in a diesel engine. But with early injection, no less dangerous severe combustion occurs when the pressure in the combustion chamber develops earlier than the calculated one. The walls of the combustion chamber at such moments experience increased shock and thermal loads.
Source
What is the effect of unadjusted valves?
Internal combustion engines that are installed in modern cars are quite complex mechanisms with many parts. Therefore, they require proper maintenance to function properly over a long period of time.
Unfortunately, many motorists do not pay due attention to this. For example, they do not very well understand why valve adjustment is needed and often ignore this procedure, which leads to additional breakdowns and high repair costs. In this material we will talk about what valve adjustment is, which engines need it and how it is performed.
- What is valve adjustment?
- Which engines need valve adjustment and when?
- Valve adjustment procedure
- on the topic
Lada 2114 almost black › Logbook › Repair of the cylinder head - burnt out valve... Repair of the cooling system...
I’ll say right away that the article will be of interest to those who plan to get into the engine and repair the car themselves... Spare parts were not purchased just anyhow, but from proven manufacturers over the years, I read a lot of reviews, information, and some of my own experience from the previous car.
In the last entry, I talked about a business trip to Murmansk and transportation from there to Ufa of a submarine's cabin. Let the round trip be 8500 km and, as expected, such distances do not pass without incident. But everything was almost calm (except for the starter on the second day, although it later repaired itself). But on the very last day, when we were about 300 kilometers from Ufa, the most unpleasant thing happened. The check light came on... The on-board computer showed: many misfires, misfires in the 3rd cylinder. The thrust dropped by 2 times, the idle speed became unstable and very strong engine vibration appeared, and this was all at idle speed, but while driving, you could reset the check and drive as usual. Well, the main thing here was to make it to Ufa... 50 km before Ufa, the rear wheel slammed, and the most offensive thing was that the wheel was almost new and was immediately thrown away. I thought I’d buy it in Ufa and then go home to Ekb. But it was not there. There was no such tire anywhere, the terribly rare Yokohama s-drive r14 185/55. So then I drove with a spare tire and still haven’t bought it. Arriving in Ufa, I decided to try changing the wires, spark plugs, etc. I hoped that the detonation was caused by an ignition fault. But alas... alas... -NGK spark plugs 400r -Slon wires 550r
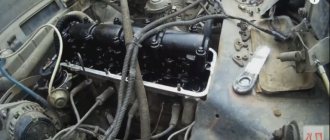
I went to a local auto repair shop to diagnose the engine. This is a big shame for the official services of a big city... At 8 pm no one was working anymore... I found a service via the Internet in some garage cooperative. There they immediately measured the compression... On 12-12-3-12 they poured oil into the third cylinder - the result did not change... at this point I turned off the injector of the 3rd cylinder and went to EKB.
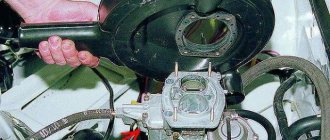
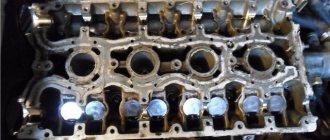
Upon arrival, I went to the garage. I took off the cylinder head and sure enough... the valve of the 3rd cylinder burned out.
Well, what can you do... Fix it, fix it... Walk like that... I went to the store and bought there: - Valves 21083 8 pcs 1125 rubles original "Lada Detail" - Cylinder head gasket 210 rubles (produced in Germany) - Manifold gasket 100 rubles - Valve cover gasket 89 rubles - Oil deflectors “Victor reinz” (a friend advised me to buy 2 sets, like one cap and I’ll definitely ruin it... but that didn’t happen) 2*160 = 320 rubles - Receiver seal 74 rubles - Crankshaft oil seal “BRT” 97 rubles - Thermostat 2110 ! “Lada detail” 485 rubles - Pump “TZA” 660 rubles - Set of pipes 2110! "BRT" 430 rubles - Expansion tank pipe "BRT" 150 rubles - Throttle valve heating pipe 46 rubles - Expansion tank 2108 "SEMZ" 190 rubles - Heater valve (YAVVA ceramics) 190 rubles - Cooling radiator (broke a fitting by accident) 1410 rubles
And all other little things like sealant, nuts, gaskets, clamps - about 550 rubles
I also took a desiccant from a friend, a two-component paste for lapping valves (made in India, they say ours is bullshit), a wrench for lapping valves, a torque wrench and a good set of tools.
First, I removed the camshaft bed, the camshaft itself, the valve lifters with adjusting washers, plates and springs... Then the difficulty arose in removing the oil deflectors, I tried to remove them with an awl and a screwdriver and thin-nose pliers, in the end it turned out to be more convenient to use a screwdriver + thin-nose pliers. I decided to leave the valve guides...
Having completely disassembled the head, I took it to the wash. There they soaked it with foam, plus washed it with carburetor cleaner. It seems to have been more or less washed off.
I started the assembly by grinding in the valves. The paste was 2-component. First, a coarse abrasive was applied to the valve and rubbed in for about 3 minutes each. Then I applied the finishing abrasive and rubbed it in until the crunch of the paste disappeared. Afterwards, you need to very carefully remove the remaining paste, dry the valve and pour kerosene or gasoline into the channel to check the quality of the grinding. Ideally nothing should leak out.
I had to redo it 3 times... The problem was that I didn’t remove the remaining paste well.
After drying out all the valves, I replaced the springs, plates and valve tappets. I mixed up the adjusting washers, but still had to go to adjust the valves.
I decided to polish the surface adjacent to the cylinder block a little. I took the skin first 400 then 1500 and a block. I also cleaned the piston block a little.
Afterwards I assembled the entire motor using a torque wrench. Nothing complicated, you just need to be careful. The most difficult thing is to screw the intake and exhaust into place... It was not very convenient to climb... But I immediately replaced the intake receiver gaskets.
Let's sum it up
Let's start with the fact that the appearance of the first signs of valve burnout is a reason for immediate diagnosis of the engine. If the engine requires periodic valve adjustment, then this procedure must be carried out strictly according to the regulations. You should not wait for the moment when noise or knocking of valves appears.
The driver’s desire to save as much as possible on fuel after installing LPG is initially expressed in the fact that the owner asks the tuners to make the car economical. The technicians deplete the gas supply, as a result the engine noticeably loses power, but there is no significant reduction in gas consumption. The fact is that to maintain a dynamic driving pace, you have to press the accelerator more actively. At the same time, the lean mixture literally burns out the valves and seats with all the ensuing consequences. A high-quality LPG setup implies an almost complete absence of difference in throttle response when driving on gasoline or gas.
Valves knock on a cold engine or after warming up the engine: possible causes of valve mechanism knocking. Fault diagnosis, useful tips.
How does installing gas equipment and switching to gas affect the engine and service life? Features of setting up gas equipment, selecting oil and servicing gas-powered internal combustion engines.
The main reasons that lead to a lean mixture. A lean mixture on carburetor and injection internal combustion engines, as well as on engines with gas equipment. Diagnostics, repair.
Why and when do you need to adjust the valves? Self-adjustment of valve clearances using a feeler gauge and shims. Recommendations.
Problems starting a diesel engine. Signs of low compression and causes of malfunction: timing belt, cylinder mirror, piston and rings. We measure the compression.
Why is it recommended to disable the EGR system on a diesel engine and how to disable the EGR correctly. Mechanical shutdown of the EGR valve and software shutdown.
The design of the gas distribution system of most internal combustion engines includes a valve system. It regulates the timely flow of air or combustible mixture into the combustion chamber and the release of exhaust gases. The valve itself constantly operates in aggressive conditions under the influence of high pressures and temperatures, which destroy the body of the part, leading to engine failure. There are certain reasons and conditions under which valve burnout occurs much faster than the design period of operation.