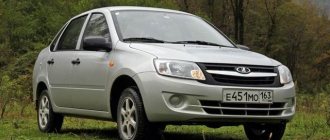
Priora connector
The main diagnostic connectors are OBD connectors. On earlier VAZ models, such as 2110, the OBD-1 connector was used. Currently, the most popular connector, which is used in all modern Lada models - OBD-2, has also been abandoned.
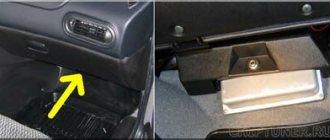
This diagnostic block in the Priora is located behind the glove box compartment; the scanner is connected to it.
What is it and features
The Lada Priora diagnostic connector makes a connection between the car’s control computer and a special diagnostic adapter or scanner. Manufacturers try to create their own connector in each car, but the functions remain unchanged:
- viewing and studying codes;
- determining the operating characteristics of the control system;
- cleaning diagnostic results;
- analysis of sensors with oxygen indicator;
- requests for diagnostic results while the vehicle is moving;
- control of actuators;
- View control indicators that were saved during fault codes.
Diagnostics
Priora diagnostics can be carried out at any service station. This allows you to identify problems with the engine, namely the culprit of the problem. It will help save money, time and effort to find the cause yourself or at random.
Such engine scanning at a service station is carried out with an expensive and advanced scanner, which is quite expensive. Checking the Priora ECU for errors in a specialized service will cost from 1000 rubles and more.
How to find out if there is a can tire on a Priora
A modern car, unfortunately or fortunately - it’s up to you to decide, is no longer the same box on wheels, with a dozen and a half wires, which a more or less literate person could figure out and even fix if something broke... A
modern car is already a computer on wheels, whether you want it or not... And even if you don’t even suspect it, it’s only because professionals are repairing your car. They are the ones who should do all the work on your car. Accordingly, it is better to entrust the installation of additional equipment to specialists.
Often, when discussing issues of additional car security, you have to “lecture” clients, explaining, sometimes for a very long time, why their car alarm should be set not for 1 hour, but for at least 10 hours, and sometimes for one and a half to two days. And often in these conversations we have to mention such a phrase as “Can tire”, which often confuses clients.
So what is CAN SHINA?
And why is it in the car?
First, the answer to the question - why? How to save copper? It is estimated that over the past five years the number of options in a car, which are mostly consumers of electrical energy, has doubled. And this happened not at all at the whim of automakers, but thanks to the growing needs of customers for comfort and legal requirements for safety and environmental protection
Everything would be fine, but the possibilities of electrical equipment are not limitless. And if earlier designers solved issues mainly related to increasing reliability, now they have to think about creating fundamentally new circuits that will either change the traditional “architecture” of electrics or allow it to adapt to the pace of scientific and technological progress.
Tires are not for wheels: The single-wire circuit still in use implies that the negative terminals of all electricity consumers are connected to “ground” - the body and other metal parts of the car, which act as the second, negative wire. However, when the total length of the actual wires connected from consumers to the positive of the generator reached half a kilometer, and their weight approached a hundredweight, it turned out that the single-wire circuit was not as good as it had previously seemed.
Therefore, multiplex wiring appeared, and with it a CAN bus (from Controller Area Network), which, while traditionally maintaining a minus on the ground, is used instead of the “fat” harnesses of the old circuit on modern car models, saturated with electric drives and electronic units.
Next, a good article explaining the principles of configuring and managing all devices in a modern car:
The on-board electronics of a modern car contains a large number of actuators and control devices. These include all kinds of sensors, controllers, etc. A reliable communication network was required to exchange information between them. In the mid-80s of the last century, BOSCH proposed a new concept for the CAN (Controller Area Network) network interface.
The CAN bus provides connection to any devices that can simultaneously receive and transmit digital information (duplex system). Actually, the bus is a twisted pair. This implementation of the bus made it possible to reduce the influence of external electromagnetic fields arising during operation of the engine and other vehicle systems. This bus provides a fairly high data transfer rate.
As a rule, CAN bus wires are orange, sometimes they are distinguished by different colored stripes (CAN-High - black, CAN-Low - orange-brown). Thanks to the use of this system, a certain number of conductors were released from the electrical circuit of the car, which provided communication, for example, via the KWP 2000 protocol between the engine control system controller and the standard alarm system, diagnostic equipment, etc.
The data transfer rate via the CAN bus can reach up to 1 Mbit/s, while the information transfer speed between control units (engine - transmission, ABS - security system) is 500 kbit/s (fast channel), and the information transfer speed of the Comfort system "(control unit for airbags, control units in car doors, etc.), information and command system is 100 kbit/s (slow channel). In Fig. Figure 1 shows the topology and waveform of a passenger car CAN bus. When transmitting information to any of the control units, the signals are amplified by the receiver-transmitter (transceiver) to the required level.
Rice. 1. Topology and waveforms of the CAN bus
Each unit connected to the CAN bus has a certain input resistance, resulting in a total CAN bus load. The total load resistance depends on the number of electronic control units and actuators connected to the bus. For example, the resistance of control units connected to the CAN bus of the power unit is on average 68 ohms, and the “Comfort” system and the information and command system is from 2.0 to 3.5 kOhms. Please note that when the power is turned off, the load resistances of the modules connected to the CAN bus are switched off.
Rice. 2. Fragment of a CAN bus with load distribution in the wires: CAN High CAN Low
Vehicle systems and control units not only have different load resistances, but also data transfer rates, all of which can interfere with the processing of different types of signals. To solve this technical problem, a converter is used to communicate between the buses. Such a converter is usually called a gateway; this device in a car is most often built into the design of the control unit, instrument cluster, and can also be made as a separate unit.
The interface is also used to input and output diagnostic information, the request of which is realized via the “K” wire connected to the interface or to a special CAN bus diagnostic cable.
Diagnostics with ELM-327 scanner
Thanks to Chinese engineers, car diagnostics have become much easier and cheaper. Not long ago, a universal internal combustion engine scanner appeared on Chinese websites, which is suitable for almost all cars with OBD-2 connectors.
The ELM 327 scanner on the AliExpress website costs from 5 to 10 dollars, depending on the version.
This gadget is divided into two types and you should pay special attention to this when purchasing. ELM 327 works with our domestic cars only on version 1.5. Therefore, you need to purchase an ELM-327 v1.5 scanner. If you purchase version 2.1, then work with domestic cars is not guaranteed.
It should also be noted that this scanner only works in conjunction with a smartphone. If you have an Android smartphone, then you just need to buy a scanner with Bluetooth only.
If your smartphone is based on iOS, then you need to purchase a scanner with a Wi-Fi module, since Apple smartphones do not allow connecting third-party devices via Bluetooth.
Computer diagnostics of cars: basic steps
To perform diagnostics, first start your tablet or laptop, and then connect the adapter or extended cable connecting the tester to the connector. It is necessary if the operation is carried out using a desktop computer to the appropriate output. After this, you just need to take a few simple steps:
- turn the key in the ignition to turn on the power. This is necessary, since otherwise the software will not be able to receive a signal from the controller and display error codes on the computer display;
- we launch the software on a tablet or laptop. If you made no mistakes when connecting and use only working equipment, a diagram of the entire electronic part of the car will appear on the display;
- We select the type of diagnostics we need from the menu (checking the engine, suspension, electrical equipment, gearbox, etc.) and start the process.
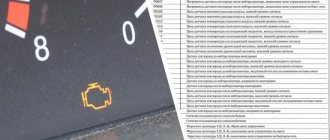
During diagnostics, the software will display only error codes detected by the on-board computer. To identify certain faults, you will need to decipher them. It’s not difficult to do, since you can easily find the meaning of all codes on any specialized website.
How to choose the right type of diagnostic work? We suggest focusing on the symptoms of a car malfunction. For example, if fuel consumption suddenly increases, you should check the engine, and if extraneous noise appears while driving, evaluate the serviceability of the vehicle’s chassis.
The route on-board computer (MBK or BC) has become an integral part of modern cars. It talks about how useful it can be, I don’t think it’s worth it, but here’s how to connect the on-board computer yourself. interests many. And also, is it possible to connect an additional on-board computer to the car?
There are many trip computers for the “ten” (State, Gamma, Multitronics, Orion, Prestige, etc.), and as a rule, instructions for the on-board computer that describe the connection process are included. But it’s not uncommon for us to receive a used bookmaker, without the documentation we need. Installing an on-board computer with your own hands is not difficult, because the necessary block for connecting the BC is already inside the dashboard. It is a 9-pin trapezoidal block. The best way to get to it is through the right dashboard window.
The pinout of the standard on-board computer connector is shown in the figure. Additional 10 and 11 contacts are not used on all BCs and are intended for connecting an external air temperature sensor. After we insert the block into the trip computer, all that remains is to connect the K-line.
Why is K-Line needed? It is through this wiring from the ECU that the most significant information for us is transmitted (error codes, internal combustion engine temperature, etc.). The K-line is located in the diagnostic block (which is used at service stations to diagnose a car) to the left of the steering wheel, not far from the gas pedal.
Our task is to connect the K-line to the on-board computer. that is, lay a separate wire from the BC block to this diagnostic block. Thus, the on-board computer will receive the information it needs and the diagnostic block will remain operational.
The VAZ 2110 diagnostic block, depending on the year of manufacture of the car, can be of two types: Euro-2 (GM) or Euro-3 (ODB-II). Where to find the K-line in the block is shown in the diagrams:
Second on-board computer in the car
It is possible to install an additional trip computer. A good example would be BC Sigma or State X1, which are installed instead of a small plug next to the SAUO block.
- Firstly, they do not have a high price (500-900 rubles);
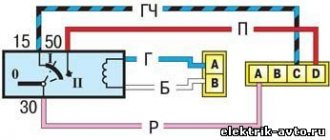
- Secondly, they have only 3 contacts (“+12V”, “ground” and K-line), so connecting them as an alternative on-board computer is not at all difficult, the diagram is as follows:
- Thirdly, they do not take up space in the dashboard.
Thus, in our car there will be two on-board computers, one performs modest basic functions, and the second for diagnosing and setting ECU parameters. Digital errors on the on-board computer are easy to decipher.
Conclusion
It’s not difficult to install a bookmaker yourself; it’s much more difficult to decide on the choice of its model. We have already discussed where to buy and which on-board computer is better to choose in a separate article. In some models, it is also possible to install an external temperature sensor. By the way, on-board computers on the VAZ of the tenth family are available for old and new panels, but if you wish, you can install the BC for the new panel in the old one.
Diagnostic application
There are several really useful applications that can be used to perform high-quality car diagnostics.
OpenDiag Mobile
It is the main and most useful application for diagnosing domestic cars. This application is designed specifically for Russian-made cars.
Advantages and disadvantages
Pros:
- Decoding of all errors and a detailed description of the malfunction;
- Online engine monitoring;
- View misfires;
- Recording LOGs;
- Forced activation of fans and much more;
Minuses:
- Absence in the AppStore, that is, it is not suitable for iOS;
- Some ECUs are chargeable;
Car scanner ELM OBD2
Although this application was not tailored for domestic cars, it works very well with them. It is an alternative to open diagnostic for iOS.
Advantages and disadvantages
Pros:
- Free application;
- A large number of different functions;
- Online engine monitoring;
Minuses:
- No error decoding;
Diagnostic connector VAZ Kalina
If in older cars fault diagnosis is carried out based on the presence of certain symptoms of a breakdown, then in more modern cars everything is much simpler. To determine a malfunction in the operation of a particular unit, it is enough to perform computer diagnostics of the car. Where is the diagnostic connector for Lada Kalina and how to check the car - read below.
The diagnostic connector is a special device used for rapid data exchange between the vehicle and the device connected to it.
The latter is, as a rule, a laptop used to read fault combinations, as well as adjust basic parameters. You can connect not only a laptop to this connector, but also any other mobile gadget via a wireless connection.
Depending on the modification of the machine, the location of the plug may vary:
- In Kalina 1 versions, the device is located on the central side of the so-called tunnel, under a decorative trim located above the cigarette lighter.
- In Kalina 2 versions it can be found on the right side, on the bottom of the torpedo.
Kalina diagnostic output
The purpose of diagnostics, as stated above, is to accurately determine possible malfunctions that may occur during vehicle operation. If any symptoms of breakdowns appear in the operation of the car, but you cannot accurately determine the fault yourself, then you can try to diagnose the car.
But this is only a general purpose; more specific reasons for the check are listed below:
- The need to perform this process usually appears when indicators appear on the control panel that warn the car owner about a breakdown.
- In practice, this procedure is often carried out in the event of malfunction of one or more units and components of the car. The completed check will allow the car owner to give an accurate answer as to whether these mechanisms have really failed or not.
- When purchasing a vehicle. Thanks to computer error recognition, a potential buyer can determine without the help of specialists how correctly the power unit, gearbox and suspension are working.
An example of diagnostics using the ELM327 scanner
Below is an example of diagnosing a car with a scanner from AliExpress on version 1.5 using an Android phone and the OpenDiag application on a Lada Priora.
All manipulations with scanning the ECU must be carried out with the engine running or with the ignition on.
We connect the scanner to the OBD-2 connector and wait until the indicators blink.
Next, go to Settings/Bluetooth on your phone. There we find OBD II and pair it with it. When pairing, the device will ask for a password code - 1234 , this code is the same for all scanners.
The next step is to go to the OpenDiag application. Click on the menu button, select the connection type and check the Bluetooth ELM box.
Next, click on the button in the upper right corner and select our device, in this case OBD II. After this the connection will occur.
The connection process is complete, then you can speed up the application itself and familiarize yourself with its functions.
Where is the Priora 16 valve speed sensor located?
Characteristics of the control and measuring device
Diagnostic connector VAZ 2110: where it is located, modernization and features
The Lada Priora has an electronic speed sensor (DS). Its design consists of a plastic housing, inside of which there is a sensitive element.
Location
In order to perform diagnostics, you need to know where the speed sensor is located. On the Lada Priora it is located in the upper part of the gearbox to the right of the exhaust manifold.
Functions and principle of operation
The main function of the DS is to determine the speed of rotation of the front wheels and transmit this data to the controller. Based on the information received, the controller regulates the quantity and quality of the fuel-air mixture that enters the cylinders. This data is reflected on the speedometer and odometer, which are located on the dashboard.
The operating principle of the device is based on the Hall effect. The DS transmits pulse signals of a certain frequency to the controller.
Errors and symptoms
You should know the main signs of malfunctions:
- increased fuel consumption;
- incorrect readings on the speedometer and odometer or their absence;
- the engine is unstable at idle;
- power decreases.
Functionality check
There are three ways to check the DS:
- The check is performed without removing the device. The voltmeter probes should be connected to the contacts of the device and begin to rotate one of the wheels. Changes in the values on the tester mean that the device is working properly.
- For the second method, you need to remove the device. One contact of the voltmeter must be grounded, and the second must be connected to the terminal that sends signals. Next, you need to rotate the DS so as to determine whether there are signals in the operating cycle. As the speed increases, the readings on the tester should increase.
- With the 3rd method, you need to prepare a control light. With the engine running, we determine “minus” and “plus” using the control. After we have found the appropriate outputs, we connect the signal wire to the control and rotate the wheel. If the “minus” lights up, then the device is working (the author of the video is Semyon Semenych).
Replacement instructions
Tools for replacement will require a 10mm spanner and screwdrivers.
The replacement procedure consists of the following steps:
- Disconnect the negative from the battery.
- We dismantle the air duct. To do this, unscrew the bolts on both sides.
- Now the speed sensor on the Priora has been found. We disconnect the connector with wires from it. Using a 10mm wrench, unscrew the fastening bolt.
- Then the DS needs to be pulled towards you. If it does not pull out, you can use a flat-head screwdriver.
- We remove the device from the gearbox housing.
- Next, install the new device and reassemble in reverse order.
Photo gallery “Procedure for replacing a DS on a Priora”
Video “Quick replacement of DS with Lada Priora”
This video shows how to replace a speed sensor on a Priora (the author of the video is alextv).
Greetings to all my blog readers and subscribers. Today we will look at a topic such as replacing the speed sensor on a Lada Priora car, as well as its location, since this is the question that interests the owners the most.
- Flat and Phillips Blade Screwdriver
- 10 mm socket head
- Ratchet handle
To easily get to the part we need, it is best to unscrew the clamps and remove the thick injector inlet pipe, which runs from the air filter to the throttle assembly.
- Unscrew the coupling bolt on one and the other side of the inlet pipe
- Unscrew the bolt of the thin hose
- Let's take everything together
After this, you can see our speed sensor, the visual location of which is shown in the photo below:
Features of dismantling and replacing the speed sensor on a Priora
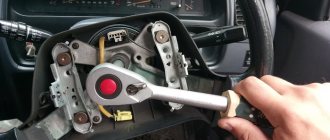
The first step is to disconnect the power wires, after slightly bending the plug latch to the side.
Then we take a 10mm socket and a ratchet and try to unscrew the sensor mounting nut, as shown in the photo.
Usually it sits quite tightly in its place, so you can pry it off with a screwdriver if necessary, and then remove it from the hole in the gearbox housing.
When installing, pay attention to the markings of the new speed sensor. It should be exactly 2170, that is, specifically for Priora
The price of a new one is about 400 rubles for the manufacturer AvtoVAZ.
| If you notice that the speedometer is showing incorrect values, then the possible cause is the speed sensor. Do you know how to replace it yourself? |
You will need: a 10mm spanner, a Phillips screwdriver.
The arrow in the photo shows where the speed sensor is located on the Priora:
Priora dashboard without bus
Welcome to ChipTuner Forum.
Theme Options
angryfly
It won’t work, on machines with firmware B547DD02 communication with the instrument cluster via CAN. On firmware B574DB03, the device is needed without CAN.
You can distinguish the devices by the last two digits of the instrument panel article number.
TFT "Priora" - 2170-71-72 produced before 06.2012 (without CAN bus)
Don’t ask me anything, I wrote everything I know.
You can copy this article to your blog, then notify me so that I can delete this entry.
First type of devices:
Kalinas and Prioras without can tires.
On the VAZ-1118 (Kalina) from 2004 to 2011, the device was installed 1118-3801010
All these devices have a 32-pin connector. You can, for example, install a Priorovskaya tidy instead of a Kalinovskaya one, but it is advisable to select the desired model (1118 or 2170).
Instead of such a tidy, you can install an expensive tidy with navigation 1118-3801010-50 for Kalina and 2112 with Europanel or 2170-3801010-50 s for Prior produced before July 2012 (without CAN bus). And they additionally need a GPS antenna and a wiper switch with a joystick (they are described below).
Addition from Shurik5891
On the first releases of 1118 devices, there are no LEDs for ABS, ESD, or seat belts.
Addition from Shandys
On Kalina1 2013 with e-gas and cable drive gearbox there is a tidy 11180-3801010-20 vdo _____________________________________ Second type of devices
Granta 1st generation
Granta appeared in 2011
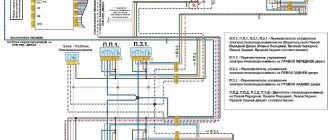
From a smart book: “The electronic engine control system of the LADA GRANTA car implements a data exchange interface between the ECM, instrument cluster and diagnostic device via the CAN bus. The CAN bus is a two-wire line: - CAN L low level line (contact “X2/D2” of the ECM - contact “7” of the instrument cluster - contact “14” of the diagnostic block); - CAN H high level line (contact “X2/F1” of the ECM – contact “8” of the instrument cluster – contact “6” of the diagnostic block). The immobilizer is integrated into the instrument cluster." Pinout of devices 2190
Priora tire can adapter
Adapter GF 921 is designed for connecting electronic instrument clusters that do not have a CAN bus (cars manufactured since July 2012). Installed on the Lada Priora family of cars (VAZ 2170-2171-2172)
The adapter is compatible with the following ECMs: BOSCH ME17.9.7;M72
An instruction manual is included in the kit.
Price when ordering in the online store.
If you live in Samara and want to purchase goods in an online store, then you will need to place an order by selecting the Delivery Method “Courier in Samara”.
The price at which the product is sold in a retail store at the address: Samara, st. Partizanskaya, 56a, shopping center "Cascade", office 206.
If the retail store price is not indicated, then the retail store sells the product at the online store price.
This is the status of the product, displaying information about the availability of the product in the warehouse.
This product is in stock at the store and will be sent to you as soon as possible without pre-ordering.
This item is currently out of stock, but we are awaiting availability from the manufacturer. Once the item arrives in the store, it will be shipped to you.
The operator will inform you when the goods arrive at the store.
This product is not in stock at the store, but we can bring it especially for you if you place an order.
Products supplied “to order” are shipped only with 100% prepayment.
The operator will inform you about the delivery time.
How to install a can bus on a Priora
A modern car, unfortunately or fortunately - it’s up to you to decide, is no longer the same box on wheels, with a dozen and a half wires, which a more or less literate person could figure out and even fix if something was broken...
A modern car is already a computer on wheels, whether you want it or not... And even if you don’t suspect it, it’s only because professionals are repairing your car. They are the ones who should do all the work on your car. Accordingly, it is better to entrust the installation of additional equipment to specialists.
Often, when discussing issues of additional car security, you have to “lecture” clients, explaining, sometimes for a very long time, why their car alarm should be set not for 1 hour, but for at least 10 hours, and sometimes for one and a half to two days. And often in these conversations we have to mention such a phrase as “Kan shina”, which often confuses clients.
So what is CAN SHINA?
And why is it in the car?
First, the answer to the question - why? How to save copper? It is estimated that over the past five years the number of options in a car, which are mostly consumers of electrical energy, has doubled. And this happened not at all at the whim of automakers, but thanks to the growing needs of customers for comfort and legal requirements for safety and environmental protection
What is CAN bus
The increasing complexity of automotive electrical equipment has led to a logical solution - the introduction of a single line to which electronic devices are connected. But not everything is as simple as it seems! Let's take a closer look at what a CAN bus is.
The CAN bus has nothing to do with car tires. The fact is that in electronics, a “bus” is a system through which data is transmitted. This is a kind of river with streams, to put it simply. As for the acronym that stands for Controller Area Network, it stands for an industrial network standard for combining various actuators and sensors into a single network.