Which brand should you choose a cooling radiator for Niva Chevrolet and how to replace it yourself?
Replacing a radiator on cars is rarely required.
This mainly occurs when the system depressurizes as a result of damage. We will analyze in detail how to replace a faulty part with a new one, what set of tools will be required to carry out this type of work, and how the features of working on cars with and without an air conditioning system differ. The Chevrolet Niva radiator is the main component of the engine cooling system. Through it, excess heat generated during fuel combustion is released into the air.
The specified level of engine operating temperature (or rather, coolant) is achieved through electric fans and a thermostat.
The heater radiator performs an important function in the heating system of every car. If the heat exchanger malfunctions, the performance of the system is disrupted, which not only reduces the comfort of driving the vehicle, but can also lead to overheating of the engine. There are characteristic signs that indicate that there are problems with the radiator and the part requires replacement.
Before you begin dismantling the radiator, you will need to drain the antifreeze from the cooling system. To do this, unscrew the bolt on the cylinder block and remove the expansion tank cap. Another option is also possible, in which you open the tank lid and disconnect the cooling tube of the throttle assembly. Instead of this tube, another hose is inserted, through which the liquid is removed.
To replace the heater radiator, you need to unscrew the bolt on the cylinder block and the expansion tank plug to drain the coolant
When a car is equipped with an air conditioning system, replacing the heater radiator at home is much more difficult, but still possible.
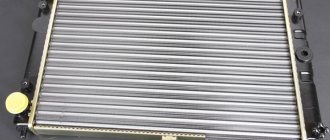
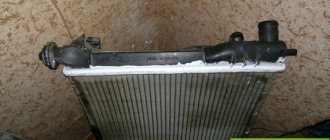
One of the most important elements of the cooling system is the radiator. It is a heat exchanger in which the temperature of the antifreeze is reduced and returned to the engine for further heat removal. The cycle continues as long as the engine is running. The device is located in the front of the car, including the Chevrolet Niva, and is therefore subject to negative influence. A leaking radiator is a sign of a malfunction. If an antifreeze leak is detected, then the radiator on the Chevrolet Niva will need to be replaced.
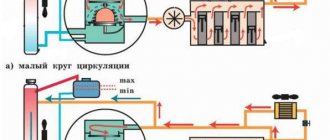
The radiator provides cooling of the liquid, which circulates in a large circle. Heat transfer occurs when antifreeze or antifreeze passes through its tubes, which come into contact with air.
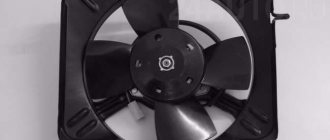
Additionally, two fans blow over the engine, each of which turns on at a certain temperature.
On the Niva Chevrolet, the radiator is installed in the front part of the engine compartment; the designers have provided good access for its replacement.
Before dismantling, you need to make sure that the radiator is broken.
Many motorists are often interested in the question of how to replace the radiator of a Chevrolet Niva stove without air conditioning. To carry out all the actions, you will initially need to unscrew the bolts located on the cylinder block. To avoid damaging the outer shell of the expansion tank cap, it must be carefully removed.
In addition to this option, experts are considering another method, more practical. For example, you need to use a new hose to remove liquid that gradually accumulates in the container.
Replacing the radiator of a Niva Chevrolet stove with air conditioning is carried out by changing the evaporator. To simplify the furnace reassembly process, it is advisable to mark all connectors using a special marker. After removing the fan, begin dismantling the regulator.
To change the regulator, you will need to disassemble the front panel. It is important to remember that after dismantling you need to check the radiator tap and all supply pipes for leaks.
The device is replaced in stages:
- Remove the glove box and disconnect the air duct.
- To simplify the process of removing the rubber tube to drain the remaining liquid, loosen the bolts.
- The structure is attached using two screws.
- Using a side cutter, remove a piece of plastic that interferes with the dismantling of the structure.
- Then a new radiator is prepared. To prevent air from passing through the cracks, glue is applied around the perimeter.
Taking into account the rich experience of car enthusiasts, it can be argued that replacing the radiator of a Chevrolet Niva heater without air conditioning can be done using a simplified technology without removing the dashboard. It is necessary to dismantle the glove compartment by unscrewing the screws with a short Phillips screwdriver, then remove the passenger footwell heating duct. Now there is convenient access to the stove pipes.
Having loosened the clamps and removed the hoses from them, you need to drain the remaining coolant into a previously prepared container. After unscrewing the two screws that secure the radiator, you need to push it towards the right door until it rests against the heated glass air duct. The next stage is the elimination of the last obstacles that prevent the removal of the stove.
Place for cutting the radiator housing
The heater radiator is an important link in the vehicle’s ventilation, heating and air conditioning system. The microclimate in the cabin and the functioning of the system that prevents icing of windows and rear-view mirrors depend on its effective operation. For a number of reasons, the heater fails. Despite the fairly high labor intensity of the radiator replacement procedure, it can be done with your own hands.
Removing and installing a stove with air conditioning is much more difficult compared to radiator models without it. The process requires dismantling a large number of components: dashboard, steering column, decorative elements. It is better to carry out replacement at a service station, where they will provide a guarantee for the work performed and the installed spare parts.
Also interesting: Suspension lift in the field yourself
When to replace a Chevrolet Niva radiator
Replacing the cooling system or its individual components is usually required due to wear or mechanical damage. Among the most common complaints when contacting a service station, the following points stand out.
- Using low-quality antifreeze or pouring water into the system. The main property of coolants is the protection of metal parts from corrosion and rust formation. When water is used in a radiator, strong carbon deposits or oxides form inside the lines, which can clog thin tubes. In case of mild damage, repair is limited to sealing one part of the system.
- Mechanical damage. The main radiator is located at the front of the car and is covered with a thin grille. Due to poor protection when traveling off-road or on country roads, the element can be damaged by a stray stone or foreign objects entering the radiator grille. At the same time, a small force is enough to cause serious damage - the thinnest plates are easily crushed, which leads to loss of heat transfer and overheating of the system.
- Natural wear and tear. During active use, the radiator is subject to constant temperature changes, which affects the condition of the metals. Additionally, the presence of increased pressure inside the lines after starting the machine is harmful. Such vibrations lead to cracking of tubes, fasteners or cooling plates.
The above cases apply not only to the main radiator; problems also arise with the elements of the stove and air conditioner.
Preparation.
First you need to make sure that the problem is a faulty radiator. In some cases, coolant leaks may be due to burst pipes. If there is no visible damage and only traces of antifreeze indicate a leak, you can try washing it. But this does not apply to cases where there is obvious damage; in this case, urgent replacement is required.
Before starting work, you need to make sure you have WD-40 fluid to unscrew rusted bolts, and you also need to have a container with a volume of at least 5 liters to drain the used coolant. During operation, you will also need to drain the used fluid from the power steering.
Preparatory work for replacement
Before replacing the cooling radiator on a Chevrolet Niva, you need to make sure that this particular element is leaking. After all, antifreeze leaks often occur at the junctions of the pipes. If there are no obvious signs of a heat exchanger leak, then a detailed inspection will be required, for which you should remove it from the car and wash it.
On Chevrolet Niva cars with air conditioning, two heat exchangers are installed. The main radiator of the engine cooling system is located closer to the engine and is larger than the air conditioner heat exchanger. The device in question on Niva Chevrolet cars consists of two plastic tanks connected to each other using aluminum tubes with cooling fins. The connections have rubber gaskets, which are responsible for preventing liquid from leaking from the device.
The radiator is cooled by the flow of the oncoming wind. When this flow is not enough, fans (2 pieces) come in to help, which are turned on by the temperature sensor and relay. To remove and then inspect or replace the device, you will need to first drain the antifreeze.
The procedure for replacing a radiator on a Chevrolet Niva is labor-intensive and requires many steps to disassemble and reassemble the car. Therefore, if this scares you, it is better to contact a service station. Before removing the Niva Chevrolet 2123 radiator, you should prepare the necessary tools and materials.
For work you will need the following set of tools:
- antifreeze;
- sealant;
- head at 8, 10, 13, 17;
- Phillips screwdriver
- power steering fluid
- container for draining the coolant.
Replacement radiator Niva Chevrolet price
The cost of such car repairs in different regions can vary significantly. For example, in Moscow, replacing a radiator will cost at least 5,000-8,000 rubles. At the same time, in the Rostov region, the procedure can be performed for 3-4 thousand rubles. At the same time, the cost of repairs may also vary among different specialists located in the same city.
Also, the cost of replacing a Niva Chevrolet radiator greatly depends on the vehicle’s equipment and additional factors such as the abundance of rust or dirt under the hood. For example, the difference between the simplest and most sophisticated versions can reach 1,500 rubles.
Only the master performing the operation can give the exact price tag.
Installation.
First you need to prepare a new radiator. To do this, we remove the rubber feet from the old one and put them on the new part, since new radiators are not equipped with them. Next, we reassemble in reverse order. During installation, it is best to position the clamps so that access to them is as convenient as possible in case of the next replacement.
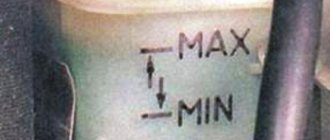
When assembling the power steering system, there is no need to pump fluid; if a small amount of air gets inside, it will escape after a while into the expansion tank. Therefore, after replacement, it is necessary to monitor the fluid level for some time and, if necessary, add it to the maximum mark.
After assembling the system, it is necessary to fill in new coolant. It must be filled through the expansion tank. After filling, it is important to start the engine so that the pump works and wait until the engine warms up to operating temperature and the thermostat opens. At this moment, the large circle will be open and you will need to add antifreeze to the system to the required level.
Radiator installation
In the process of dismantling the radiator, you have to go through all the stages that are provided for its installation. It is important not to forget to change the rubber feet (switch to the new radiator from the old one), since the new unit is not equipped with them. When connecting the pipes, you need to remember that it may be necessary to repeat this procedure again, so the clamps should be positioned so that they can be easily unscrewed with a long screwdriver.
If you removed the heat exchanger of the hydraulic booster, then air did not enter the power steering compressor, therefore, there is no need to remove it from the system. The air contained in the power steering radiator will escape through the tank.
Having installed the radiator, proceed to piping the thermostat and installing the air filter housing. Since the coolant was drained, the system will have to be refilled. Filling is done through the expansion tank. Since the thermostat is closed, the large circle will be practically empty. The liquid has the opportunity to get into it, but it happens quite slowly. It is easier to warm up the car to operating temperature, and then add fluid to the desired level.
Source
Device
The part has a classic design, typical of modern passenger cars: two tanks connected by tubes with cooling plates. The manufacturer took the path of reducing the cost, which was reflected in the materials used. The tanks are made of plastic, the tubes are made of aluminum. the parts are connected through a rubber gasket that prevents coolant leakage.
Chevrolet Niva with and without air conditioning is equipped with one radiator model. The only difference is that in the first case, the condenser of the air conditioning system is fixed in front of the honeycombs, and in the second - a guide casing.
Comparison of manufacturers
In stores you can find spare parts produced by several companies. Products differ in two parameters: price and workmanship. Let's look at a few of the most popular brands.
Hola is a trademark of the Dutch company H{amp}amp;H Group. 15 European factories produce radiators, belts, shock absorbers and other auto parts. Inexpensive products of this brand are of good quality. According to customer reviews, spare parts of this brand at a comparable price are superior in quality to Chinese products. Price - 2000 rubles.
DAAZ - Dmitrov Automotive Assembly Plant, part of the United Automotive Technologies concern, was founded back in 1967. In addition to radiators, the company produces filters, brake pads and other spare parts for Russian and foreign cars. The products of this brand are used in cars that come off the AvtoVAZ assembly line. Price - 2500 rubles.
Luzar is a Russian company that was founded in 2003 on the basis of the Lugansk Radiator Plant. Products of this brand comply with GOST-R and the manufacturer gives them a 2-year warranty. Price - from 2100 rubles.
Bautler is a British company that produces, among other things, spare parts for the Chevrolet Niva. Price - from 2200 rubles.
Reviews from car owners vary. Some consider DAAZ radiators to be the most reliable, others consider Bautler, Hola or Luzar.
Taking into account the fact that replacing a part takes a lot of time and effort, it is worth taking the sports version of Luzar. It is designed to withstand heavy loads and is therefore more reliable.
And also interesting: Niva Chevrolet instrument panel designations. Improving the Chevrolet Niva dashboard
Hola products are distinguished by the fact that each tube has its own rubber seal, rather than being fixed with a single seal. In Luzar-Sport, the honeycomb is soldered to a base that is attached to the tanks.
How to replace the heater radiator on a Chevrolet Niva with air conditioning
When using a car for a long time, you may notice the effect of glass fogging. In particularly critical cases, an unpleasant odor appears from the deflectors in the cabin. You can also notice leaks of coolant, which is the reason for everything.
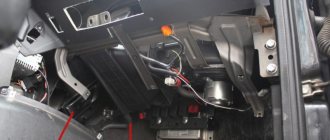
The Chevrolet Niva heater radiator is located in the center console in the place marked with an arrow. This is one of the main components of the cooling system, which, however, can occasionally cause problems, like the thermostat and the pump. If the seal of the housing is broken, coolant begins to leak into the cabin, which in most cases is noticeable even without disassembling the instrument panel.
To get to the radiator, it is better to remove the panels on the passenger side, since the device is located closer to the right side of the car.
This problem is most common in high mileage cars. There can be many reasons for the appearance, for example, low-quality coolant, a manufacturing defect in the production of a part, a blockage, or increased antifreeze pressure in the system.
At the same time, there are several signs that are characteristic of this particular problem that it is necessary to replace the Chevrolet Niva heater radiator:
- Traces of antifreeze under the driver's or passenger's carpet
- poor interior heating
- traces of greasy deposits on the windshield above the deflectors
- decrease in liquid level in the expansion tank
- the appearance of a specific chemical odor in the cabin
This procedure is based on the experience of a large number of drivers who have already replaced a part without the complex dismantling of the instrument panel. The work can be divided into several stages:
- We remove the glove box and disconnect the air duct leading to the front passenger's feet.
- Loosen the clamps so that you can remove the rubber tube to drain the remaining liquid. To do this you need to prepare a small container.
- To carry out this procedure more carefully, you can cover the interior with cloth or film so as not to accidentally spill antifreeze.
- The radiator is additionally secured with 2 screws. After removing them, you need to pull it towards you a little until its movement is limited to the air duct.
- Remove the relay cover fastener to remove it. This must be done so that the corner of the plastic frame on the heat exchanger does not interfere.
- Using a side cutter, you can bite off a piece of plastic that interferes with dismantling
- Then you need to prepare the new radiator for installation. To do this, use glue to apply thin strips of foam rubber around the perimeter of the part. This must be done so that the air does not pass through the cracks and warms up as efficiently as possible.
- Then the part is installed in its standard place
If the system is sealed, the coolant level does not change; it will always be at the same level. During engine operation, due to heating and expansion, the mark will rise slightly, but upon cooling it will return to its original position.
A case from practice: a fluid level above normal may be due to an air lock. This often happens when the filling of antifreeze or antifreeze is disrupted during repair work.
Often, due to damage to the radiator, the coolant level drops.
A malfunction can be detected by the following signs:
- the appearance of a leak on the front surface of the bumper;
- smudges under the car near the right or left headlight;
- a drop in the level of antifreeze or antifreeze and “fogging” on the surface of the radiator.
If at least one of the signs is detected, the radiator must be replaced. If repair work is not carried out in time, the leak may worsen and the car will be unusable. The repair is quite simple; you can do it yourself even without professional skills. Algorithm for replacing a radiator Most often, the radiator is replaced when a leak appears that cannot be eliminated with conventional sealant.
The manufacturer recommends installing only original parts that exactly fit in size and fit. Note: together with the radiator, you can also change the cooling fans by disconnecting them from the network and unscrewing the fasteners from the cases. Replacing the radiator of a Niva Chevrolet - work algorithm: 1. Remove the negative terminal from the battery. 2.Remove the crankcase protection and mudguard by unscrewing the fasteners.
3.Unscrew the coolant drain plug, having first unscrewed the cap of the expansion tank and switched the damper to “hot air”.
4.Remove the decorative radiator trim.
5.Disconnect the terminals from the cooling fans.
6. Unscrew the top and side bolts securing the upper casing and remove it.
7. Remove the lower casing in the same way.
8. Remove the lower hose from the thermostat by unscrewing its clamp. Carefully pry off the pipe with a screwdriver and do not tear it.
9. Unscrew the upper radiator mounting brackets and remove them.
10. Pull the radiator towards you and remove the return hose.
11. Disconnect the bolts securing the electric fan housing and pull the radiator towards you to gain access to the lower pipe. Loosen its clamp and remove the hose.
12. Carefully remove the radiator.
Assembly is carried out in the reverse order of removal. If you are going to change the fans, remove their nuts from the housing. When tightening, do not overdo it; with too much force, the plastic may burst.
Also interesting: Niva Lynx - what tuning does it offer?
Aluminum and plastic are materials that are difficult to repair if cracks or holes appear. Therefore, the main reason for replacing a radiator is a coolant leak.
There are two reasons for replacement:
- coolant leak;
- clogged tubes.
If you notice drops and smudges, you should immediately replace the product with a new one, and not try to eliminate leaks with dubious means for eliminating antifreeze leaks.
Despite advertising claims, various powders added to the coolant do little to eliminate leaks, but they perfectly clog radiator pipes. This reduces its efficiency. In this case, you need to replace the part with a new one. If this is not done, then systematic overheating of the engine will lead to the need for rapid overhaul.
Chevrolet Niva Little horse › Logbook › Replaced the radiator without losing freon.
When I received this car, the radiator was already leaking, and not weakly. Then I found out that the cause of the leak was a jammed valve in the tank cap. The radiator could not withstand the pressure and began to snot at the junction of the honeycombs and the covers. I changed the cap and there was no more leaking. And I bought a radiator but did not change it. You can add a liter every six months, just to avoid the hassle of replacing it. But not long ago, either the radiator died completely, or the cap failed, and it began to leak heavily again.
And all this lost a liter of antifreeze per night. Nothing needs to be changed. There was no desire to remove the air conditioner condenser, especially since now we have no one to refill it for me. Surely everyone who reads this text has already encountered the location of the cooling radiator on a Chevrolet Niva with air conditioning. But what are the eyes afraid to do and the hands afraid to do? I had previously removed the bumper to repair it after this incident. Using the old instructions, I figured out how I would get the radiator out, and realized that I needed to move the capacitor at least a little in order to remove the radiator from above. The fact is that the liquid line to it, a thin tube at the bottom, has a loop, and the gas line, a thick tube, is connected to a flexible hose to the compressor. It is the attachment of the upper condenser tube to the body that limits the deflection of the condenser. It is also advisable to remove the bumper frame.
In general, bending the air conditioner radiator literally a centimeter gave me the necessary window.
Once the window appeared, I immediately removed the upper pipes from the radiator.
But it is basically impossible to remove the cooling radiator without removing the fans from it, and as it is written in the old Murzilka. Using various ratchets and wrenches, S10 unscrewed the fans.
But removing the fans from the radiator did not give me the opportunity to remove the radiator. The fact is that the lower left mounting ear of the fan frame is in the way, clinging to the lower pipe that has not been removed. In general, by removing the radiator frame reinforcement, I got more space to move the fan frame. Moving the fans in the window in every possible way, I found a position in which it was possible to press the pipe with a rod and remove it from behind the mounting ear. And then everything is simple, I partially took out the radiator and gained access to the lower clamp.
Replacement on a car with air conditioning
Due to the design, the heater radiator on a Chevrolet Niva with air conditioning is located slightly differently than in the previous case. Therefore, to change it it is better to resort to some tricks.
Also, replacing the radiator of a Chevrolet Niva stove with air conditioning without removing the instrument panel will require replacing the evaporator. Therefore, in some cases, car owners prefer to carry out repairs by removing the tidy. Despite the fact that this method is more complex, it allows you not to break the tightness of the air conditioning system, so that there are no costs for refilling the car with freon.
The work can be divided into several main stages:
- You need to disconnect the battery, then drain the antifreeze from the cooling system into a special container. To remove all remaining liquid, you can blow out the expansion tank.
- The bolts securing the radio are unscrewed, then it is removed along with the slide. The screws that hold the panels and instrument panel are unscrewed. Then you should press the latches and move the panel a little so that it comes out of the grooves.
- To simplify the reassembly process, you can mark all the chips and connectors with a marker or attach beacons made of electrical tape. Then the side shield, steering wheel cover, and light connector are removed.
- The steering column is removed along with the strut
- The fan is unscrewed, then you can proceed to dismantling the stove along with the air conditioning unit
It is important to remember that replacing the heater radiator will require disassembling a significant part of the front panel, therefore, so that during assembly there are no unnecessary parts left and the system works properly, it is necessary to adhere to a clear order during reassembly and, if necessary, remember the location of the fasteners.
After dismantling, it is necessary to check the radiator and all supply pipes for leaks. If possible, you need to replace all pipes that are damaged or their appearance is suspicious, so as not to return to such a long repair procedure.
Assembly is carried out in reverse order. After all the elements are installed in place, the system is filled with coolant and for the first few days it is necessary to monitor its level. If all the work was done correctly, then the car interior will be free of antifreeze stains for a long time and warmth and fresh air without foreign odors will return.
The work is carried out in an inspection ditch. Before starting repairs, you need to prepare a new air conditioner, 10 liters of antifreeze and the following tools:
- Container for draining coolant.
- Spanners.
- Crosshead screwdriver.
- Jack.
- Wheel chocks.
- Balloon wrench.
The radiator is dismantled after the car is installed on the inspection ditch and the antifreeze has been drained from the cooling system. The work is carried out as follows:
- Remove the bumper and radiator grill (you will need to unscrew the screws and bolts).
- Jack up and remove the front wheels.
- Remove the air filter pipe.
- Remove the casing that guides the air.
- Unscrew the power steering oil cooling mount.
- Remove the headlights so that they do not interfere with the oil cooling pipes.
- Remove the crossbar that partially blocks access to the bolts holding the cooling fans in place.
- Disconnect the terminal from the electric fan unit.
- Unscrew the nuts and bolts holding the fan mount and carefully remove it down.
- Unscrew the screws securing the condenser tubes to the car body.
- Move the pipes and power steering oil cooling system forward.
- Loosen the clamps and remove the pipes.
- Remove the radiator.
On Chevrolet Niva cars with air conditioning, when replacing the radiator, instead of removing the guide casing, you need to unscrew the fastening of the spool and condenser, and then move the latter forward. Otherwise, the procedure is no different.
Chevrolet Niva “250 grams” › Logbook › Replacing the cooling radiator on a Shniva with air conditioning.
I removed the washer reservoir and air cleaner along with the mass air flow sensor and pipes. I removed the “eyelashes” of the optics.
Having unscrewed 4 bolts each, I dismantled the right and left optics. (it is convenient to remove the connectors after the headlight is moved forward, connect it on the installed one).
I unscrewed the oil cooler pipe and moved it to the side.
I realized that there is not enough space. I took out the air temperature sensor and removed the bumper amplifier. And placing the dishes, he began draining the antifreeze.
I unscrewed the 3 bolts securing the air conditioner condenser and the bolt securing the air conditioner spool (on the right in the area of the thermostat),
Having unscrewed the fastening bolts, carefully without excesses, he moved the air conditioner radiator forward.
Disconnected the upper and lower pipes from the thermostat and engine head.
I disconnected the connectors (3 pieces) from the fan block and cut the cable tie. Pushed the radiator forward
and disconnected the drainage (thin) and upper pipes from it.
Carefully, so as not to damage the radiator, the air conditioner began to push the cooling radiator along with the fans attached to it in the direction of the left optics. He bent over and the remnants of antifreeze were sweating from him. My wife called me for dinner. The radiator was left in disarray until the next evening. Everything took about 2.5-3 hours.
Second evening. Replacement and assembly.
Coming home from work and warming up, the garage continued the process. The radiator, along with the Carlsons and the lower pipe, was removed without any problems.
I slowly unscrewed the fan block from it and attached it to the new radiator. Carlson did not install a plastic reflector on the right diffuser on the right. I put the entire structure back in reverse order.
Before installing the structure in place, I put new pipes on the radiator. I place the screw clamps so that they can be tightened.
I spent a long time fiddling with this process. Once the pipes were installed and tightened, antifreeze was added. While the antifreeze was leaking into place, I continued the assembly. I didn't take any photos. Well, you understand everything in reverse order. It was problematic to install a bumper amplifier for one person (“grub” in our opinion). He kept falling down. Tired of it. I left everything until tomorrow. it all took about 2 hours. Third evening. Final assembly.
I discovered that there were puddles of antifreeze under the car. For a long time I couldn’t figure out where it was leaking from. I felt and looked through everything. It turned out that the drainage holes under the radiator cross member were clogged, the old drained antifreeze accumulated in the cavity and slowly flowed out of it, giving me unpleasant moments. Cleaned it up. I drained it and continued. To prevent the opposite end of the bumper amplifier from falling, I secured it with a luggage rubber band.
Added antifreeze. I slowly installed all the parts in their places. Started it up and checked it. Everything is normal.
Comment
RomanIsaev:
Since 2013, the air conditioner condenser has been installed in a different location. Behind the radiator. According to RomanIsaev, it will not be possible to bend the air conditioner radiator.
Where is the heater radiator located on the Chevrolet Niva?
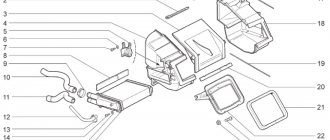
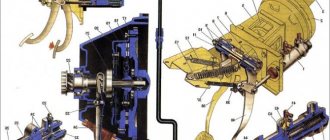
The heating system of a car consists of a number of elements, without which its normal functioning is impossible. One of these is the stove radiator. Sometimes problems occur with the heat exchanger, to eliminate which it is necessary to dismantle the unit. The radiator is located in the cabin behind the heater control unit.
Body interior heating system: 1 — ventilation duct; 2 — air duct for heating the windshield; 3 - intermediate body; 4 - intermediate air duct; 5 — air intake filter housing; 6 — heating system fan; 7 — central cabin ventilation nozzle; 8 — facing of the control lever panel;
Read news about the new Niva
- Pump for Chevrolet Niva - Auto workshop online
- Niva Chevrolet installation of air conditioning - Auto magazine MyDucato
- Niva Chevrolet installation of air conditioning - Auto magazine MyDucato
- Why the Chevrolet Niva air conditioner does not turn on: reasons and installation (diagram), belt replacement
- Niva Chevrolet installation of air conditioning - Auto magazine MyDucato
- Niva Chevrolet air conditioning installation - Online auto workshop
- Replacing a Chevrolet Niva heater radiator with air conditioning without removing the panel
- Niva Chevrolet installation of air conditioning - Auto magazine MyDucato
Replacing the heater radiator in a Chevrolet Niva, photo and video tutorial
Today we are undergoing repairs on a well-known Chevrolet Niva 4x4, produced in 2005, on which the heater radiator needs to be replaced. The mileage of the car is 139 thousand km. A problem arose: antifreeze from the heater radiator began to pour out under the front passenger’s feet. The owner drove for some time simply adding coolant, but soon the pressure became stronger and stronger, and a replacement was necessary. We will show you a detailed photo and video tutorial on how to do it yourself.