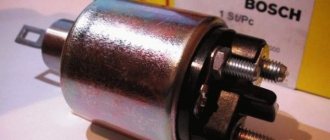
Purpose and principle of operation of the solenoid relay
On most vehicles, the retractor is mounted in the same unit with the starter, and is designed to control the freewheel. At the end of the clutch there is a gear that rotates at the moment of starting, but during its operation such rotation is not allowed, as it leads to damage to the starter or on-board electrical network if the starter starts working in generator mode.
To do this, the retractor extends the clutch only when it is necessary to start the engine, after which it returns to its original position, removing the gear from engagement with the flywheel. The peculiarity of the solenoid relay is that the starter can only operate when it is activated. This is done to prevent tooth fractures when the rotating gears of the clutch and flywheel meet.
Inside the relay there is a coil with an armature, which is acted upon by current after the circuit is closed. The magnetic field that arises around the coil moves the armature towards it, compressing the return spring and pushing the lever, which moves the freewheel. When the engine starts, the electrical circuit of the coil opens, the magnetic field force disappears, and the return spring pushes the armature with the clutch to its original position.
Signs of a malfunctioning retractor
The following signs may indicate a retractor failure:
- After starting the engine, the starter does not turn off; it rotates at high speed and has a characteristic buzzing sound.
- After turning the key in the ignition switch, a click occurs, indicating that the device is activated, but no rotation of the starter is observed. Sometimes, if there is a break in the coil, the armature is stuck in a certain position, or there is no power, there may be no click.
- After turning the key in the lock, the starter begins to idle without affecting the engine flywheel.
Checking the solenoid relay
It is possible to determine the functionality of the retractor without removing it from the car starter in the following way:
- Check the wiring going to the relay for a break.
- If the wiring is in good condition, the operation of the traction relay is checked. To do this, turn the ignition key and listen for the click; its absence indicates a malfunction of the relay.
- If the activation click is heard, but the starter does not rotate, a possible cause of the malfunction is burnt contact plates. To check the assumption on the relay, disconnect the terminal coming from the lock, after which, using a screwdriver, connect the terminal coming from the battery with the terminal that goes to the starter. The result will be the supply of electricity to its engine, bypassing the relay. If rotation begins, the retractor is faulty.
- Checking the voltage going to the starter will allow you to determine what the problem is - in the wiring, battery or starter. The multimeter is connected to the positive terminal of the relay, where the battery voltage is suitable, and the negative terminal of the device is connected to ground. When the ignition is turned on at this moment, the voltage should be 12 V. If the value is lower, it is enough to start the engine, but it is enough for the relay to operate.
Possible problems
Then you need to connect a conductor with a cross section of 2-4 mm2 to the second wire, and this to the positive terminal of the battery. If the generator does not respond at all, the following are possible:
- the solenoid relay coil is burnt out;
- the generator brushes are worn out;
- breakage of collector contacts;
- rupture of the armature winding;
- the connection on the thin conductor is broken;
- the contact of the car engine housing with the ground is broken.
Breakage and lack of contact can be checked with a multimeter in resistance testing mode. An infinity reading indicates a break.
If the relay has worked, but the starter motor does not rotate, then you need to check the + 12 V voltage at the conductor output with a tester.
Switch the multimeter to ohmmeter mode and check the relay for open and short circuit (winding resistance). The measurement is made between the conductor and the housing. The readings should be between 3-20 ohms, depending on the type of starter.
If all else fails, then you need to remove the starter and continue diagnostics in the removed state.
Checking the retractor relay with the starter removed
It is more convenient to check the functionality of the relay with the starter removed. But before dismantling, several operations are performed to identify the problem:
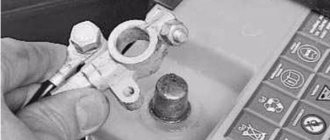
- Check the reliability of the terminals, the condition of the battery, remove oxides from the contacts and terminals of the battery.
- Make sure that the wiring is securely fastened to the starter with nuts. If corrosion is noticeable, clean the contacts with fine sandpaper.
- Check the condition of the starter enable relay.
The starter is removed after disconnecting the wires that go to it and unscrewing the mounting bolts. In some cars, this operation will take a lot of effort, since the unit may be located in a poorly accessible engine compartment.
After removing the starter, it is cleaned of dirt, the oxidized contacts are treated with sandpaper, and the test begins in the following order:
- The unit is placed next to the battery, from the terminals of which there are wires with “crocodiles”.
- The positive and negative terminals are connected to the corresponding contacts on the retractor.
- The free end of the negative wire is touched to the starter housing and the result is observed:
- If there is a distinct click in the relay, then it is working;
- If the retractor does not show “signs of life,” it needs to be replaced or repaired.
Lada 2108 Lastochka ツ › Logbook › The starter or relay does not turn on the starter
In the morning I get into the car and turn the key to the start position in the ignition switch. Aaand nothing. Nothing happens at all. The silence is complete. Nothing turns, nothing clicks. Damn, the first thought immediately flashed that the ignition switch had outlived its purpose, or the starter. Or even all of them together. Moreover, in the first position of the key, the entire tidy lights up, the indicator lamps work. Wipers, heater, turn signals - yes please! I turn the key to start again, the voltmeter needle deviates slightly, i.e. The voltage is going somewhere. When turning, the headlights and heater turn off. Also strange. Weight! very similar to lack of mass. But where? Just last night everything was still ok. What could have happened overnight? There are only questions in my head, but only one word comes to mind - AvtoVAZ) I opened the hood, looked at the terminals on the battery, everything is normal. I called my father-in-law and found out how to check the starter. I decided to start with the most expensive part. Although I recently replaced it, with our quality of spare parts, I would not be surprised if it suddenly gave up.
So, how to check the performance of the starter:
My engine started easily and naturally. He exhaled slightly, which means the most expensive element in this system is no longer in use. But until the last minute I decided not to get into the ignition switch until I checked everything. I'll still have time. I called a friend, he says that it’s most likely a castle. On his 8 it constantly broke down, almost every six months. I came to work and Googled it. It turns out that my car also has a starter relay. And it could easily have outlived its usefulness. It is located to the left of the vacuum chamber. After work (I started the engine with a screwdriver), I went to a car store and bought the same relay (80 rubles). Mine was still USSR, and covered with a white coating. It seemed logical to me to change it.
But nothing has changed. When I turned the key, there was silence. this is true. True, when I unscrewed the USSR-vskoe, a small wire fell out from somewhere. I was wary, what kind of bullshit is this?!
How to check the functionality of the relay? We open the fuse box, look for the same relay there, and swap them! Sorry I found this information late. The relay made in the USSR turned out to be working)
Check the wiring from the ignition switch to the starter.
I went home again, had some tea and thought. This means either a lock or a relay. But is the relay new? Only it doesn't even click when you turn the key. This means it won't turn on. On the Internet I found a diagram of the starter activation relay, there are two thick wires, this is a plus for the starter. They close when the relay starts to operate. One red thin one is the control from the ignition switch. And minus black, it just goes to ground. I ran to the car with a multimeter, turned the key and watched what happened. Red turned out to be normal, the signal is coming. But black goes too! How so?, it must be a damn mass! I remembered the black wire that had fallen out, apparently the previous owner had put a lot of things together this way.
That's it, the starter turns half a turn)
But this kind of nonsense doesn’t suit me, I tried to find where the black wire goes, but I couldn’t find the ends. I just get lost in the windings. I searched on the Internet and couldn’t find it either. Maybe I was looking wrong? Knowledgeable people, tell me where the other end is. For now I'm driving like this.
Repair of a collapsible solenoid relay
The manufacturer equips starters with a non-separable or collapsible retractor device. If a non-separable relay breaks down, it must be replaced, but a dismountable relay can be repaired. The described method allows you to check the solenoid relay of all VAZ models: 2101, 2102, 2103, 2104, 2105, 2106, 2107, 2108, 2109, 21099, 2110, 2111, 2112, 2113, 2114, Niva, Lada Priora, Kalina, Granta, Vesta and most foreign cars. Disassembly and repair of the relay is carried out in the following order:
- Unscrew the nuts securing the housing cover.
- If necessary, the ends of the windings are additionally soldered.
- After removing the cover, inspect the power contacts:
- If they burn, the damaged part is cleaned with sandpaper;
- When worn out, replace.
- The device is assembled in the reverse order and tested for functionality.
- The repaired relay is installed back on the starter.
Reading time: 4 minutes.
If the starter does not rotate, then it is worth checking the starter brushes and windings. And how to check the starter? To do this, you will need to take a 12-volt light bulb with wires that should be connected to ground and the brush holder. And if the light comes on, this indicates that the integrity of the brushes has been compromised, and they need to be replaced.
The starter refers to the main part of the car. And despite the fact that the car is able to drive more than one kilometer, with this damaged part, it will be almost impossible to start it. Many car owners are faced with situations where, when trying to start the car engine, silence is heard in response. And if checking the battery allows you to understand that it is in working condition and everything is fine with the wiring, which means that the culprit of the trouble was the starter solenoid relay or some other reason.
Main causes of malfunctions
Starter malfunctions can be classified as follows:
- Mechanical - these damages are characterized as normal wear and tear of starter parts and components. The causes of these damages are prolonged use of the device or in case of failure to comply with basic rules;
- Electrical - determined by the supply and distribution of power. Most often, checking the operation of a starter with such problems is associated with diagnosing open circuits, short circuits between turns, burning of the working surface or closing plates, which are caused by the passage of increased current through the contacts.
How to check your work
Not every car owner knows how to check the starter in a garage. This task is not difficult and includes:
- Checking the functionality of this device;
- Checking the traction relay;
- Check the integrity of the windings and the condition of the brushes;
- Check the operation of the bendix.
Having removed the starter, you need to carefully clamp it in a vice and take several wires with a little resistance. The wires are connected to the bottom terminal and the case, and the wire coming from the case is connected to the plus and minus of the battery. If the device is working properly, it will begin to rotate. Then, most likely, you will need to replace the draft relay.
Checking starter elements
How to check the starter? If this part does not rotate, then it is worth checking the brushes and windings. To do this, just take a 12-volt light bulb with wires that should be connected to ground and the brush holder. And if the light comes on, this indicates that the integrity of the brushes has been compromised, and they need to be replaced.
Also, using the same light bulb, you can check the starter winding by connecting the ends of the wires to its body and to the winding terminal. This method of checking operation requires connecting it to a battery.
To check the working condition of the armature interturn closure, it is recommended to use a special stand. Any detected malfunction will require replacement of damaged parts and elements, which will normalize the operation of the starter.
Continue checking the starter
What to do if the starter turns on, but the engine itself does not turn over? This problem indicates the need to replace the bendix. How to check the starter to identify the causes of Bendix slipping. Most often, these reasons may be:
- Thickened or dried grease;
- Weakening of springs;
- Reducing the diameter of the rollers (otherwise called diametric wear);
- One-sided wear of the rollers - the appearance of rubbed flat edges.
The solenoid relay supplies current to the starter motor (starter rotation) and at the same time the bendix is pushed out. The solenoid relay has several causes of failure:
- Housings;
- Magnet with windings;
- Anchors;
- Contacts;
- Return spring.
The reasons for the failure of this part may be:
- Physical deterioration;
- Burnt out contact plates;
- Components destroyed;
- The windings burned out.
If the solenoid relay is faulty, it can be determined:
- The engine starts, but the starter itself constantly rotates and does not turn off. At the same time, a characteristic sound is heard - a buzzing sound;
- There may also be another situation: after starting, the starter rotates, but the engine does not start;
- The next point: turning the key in the ignition switch to its original position. In this case, you can hear the click of the starter being turned on, but it does not rotate.
Of course, if you do not have confidence in your own abilities, then it is best to contact a specialist who will determine why the starter retractor relay is not working and will be able to determine other reasons that characterize the starter malfunction.
As a rule, if the battery is normal, but the starter does not work and the engine cannot be started, then the most common cause is a failure of the solenoid relay. For this reason, a general check of the starter and retractor relay is necessary.
In this article we will look at how the starter retractor works and works, what signs indicate that there are problems with this element, and also how to check the starter retractor of a car.
Read in this article
VAZ 2109 starter repair
The most unpleasant surprise is when the car breaks down before it can start. Only the starter can be to blame for this. There is no need for diagnostics here and tricks won’t work here. A starter malfunction is visible to the naked eye and cannot be interpreted in two ways. Only dismantling and repair.
The VAZ 2109 is not a spaceship, but it’s hard to remove the starter with bare hands, and experience won’t hurt either. The car is quite reliable and easy to operate, but, as a rule, almost all nines have an impressive mileage.
Since the starter is the most loaded unit in the starting system, it fails quite often. If used incorrectly, even more so. Therefore, repairing the VAZ 2109 starter is not a tragedy, but rather a pattern.
- Starter device
- Removing the starter
- VAZ 2109 starter repair
- Solenoid relay
- Starter brushes
Starter device
Without removing the starter from the car, we are unlikely to be able to carry out a proper repair of the VAZ 2109 starter, so it must first be dismantled. But before that, let’s briefly touch on the design of the starter so that it is clear what we are talking about.
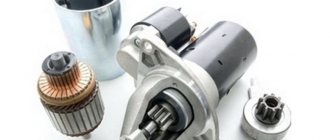
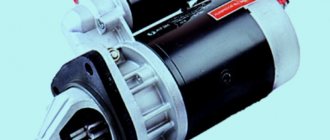
The starter is an ordinary powerful traction electric motor, consisting of the engine itself and a retractor relay - a device that is responsible for engaging the starter teeth with the teeth of the car engine flywheel. The figure shows its general structure, and we will get to know it in more detail after disassembling it:
- Manifold cover.
- Engine housing.
- Drive cover.
- Bendix.
- Electric motor shaft.
- Solenoid relay.
- Terminals.
- Armature winding output.
This is a general design of the starter, but it is already clear how the unit works - when you turn the ignition key, voltage is supplied to the starter terminals, the solenoid relay is activated, which engages the starter Bendix gear and the engine flywheel, the electric motor turns over the internal combustion engine, it starts, and after that gear retractor and bendix mechanism move the gear into place. That's it in a nutshell. Now let's start dismantling.
Removing the starter
We will be able to detect and eliminate the cause of the malfunction only when we remove and disassemble the starter. For removal we will need the usual tools and a set of sockets. We carry out the process in this order:
- Disconnect the negative terminal from the battery and disconnect the block with the wire from the connector on the solenoid relay housing.
- Using a 13 key, remove the wires from the starter terminals.
- Remove the crankcase protection and unscrew the starter housing from the cylinder block.
- With a slight movement, remove the starter and place it on the operating table.
VAZ 2109 starter repair
As a rule, the main malfunctions of the starter are breakdowns of the retractor relay, wear of the bushings and wear of the electric motor brushes. In rare cases, the winding may short out due to overheating, but then the characteristic smell will immediately alert you to such a problem.
First, let's arm ourselves with a regular tester and check the starter windings and the functionality of the solenoid relay. Everything is clear with the windings - if they do not ring, either rewind or change the starter. With a retractor relay it is more difficult.
Solenoid relay
We supply 12 volts to the positive terminal of the relay, while the negative terminal can simply be pressed against the body. If the relay works, everything is fine. If not, it’s most likely due to oxidized contacts or a worn mechanical part. Then the relay levers and racks must be lubricated and the contacts cleaned.
We check the resistance on the windings of the solenoid relay. On the pull-in winding, the ohmmeter should show 0.55 Ohm, on the holding winding - 0.73-0.79 Ohm. To rewind relay windings, you need special equipment and a special wire. This is done only in specialized workshops. We will also not rewind the windings, and in case of a break we will simply replace the solenoid relay.
Starter brushes
Very often, the cause of starter failure can be wear of the brushes. There is only one way to check this - remove the brushes and measure their wear. The length of the brush should not be less than 10-11 mm, if less, replace them with new ones.
If we have already removed the starter, then it makes sense to look at the condition of the armature bushings of the electric motor. They are sold as a repair kit and are replaced by pressing with special mandrels. But this requires complete disassembly of the starter and the entire electric motor. This should be resorted to only if all the basic actions that we have performed have not produced any results.
This happens extremely rarely. The VAZ 2109 starter is a fairly reliable unit and, with timely maintenance and normal operation, can serve for a very long time.
Starter retractor relay: device and principle of operation
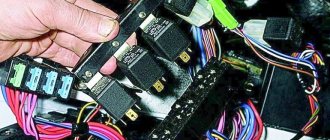
Let's start with the fact that the specified relay is an important element in the starter device. First of all, the starter has two relays. The first is responsible for turning it on and is located in the engine compartment (often in the fuse box). The second relay is a traction relay, located on the starter itself.
Its task is to synchronize the starter circuits when starting the engine and redistribute electricity between the starter motor and the relay electromagnet. Also, the specified relay brings the Bendix gears to the teeth on the ring. After starting the engine, thanks to the relay, the Bendix gear returns to its original position.
So, the starter traction relay, which car enthusiasts call a retractor relay (due to the return of the Bendix gear to its place), is not distinguished by a complex device.
Among the main components are:
- relay housing and contacts;
- relay contact disk;
- magnet (has a retracting and holding winding);
- anchor (core) with starter relay rod and fork drive rod;
- return springs;
The relay is based on a retractor coil, which is shaped like a cylinder and is an electromagnet. Inside of which there is a movable core, while the turns of the holding coil are wound on top.
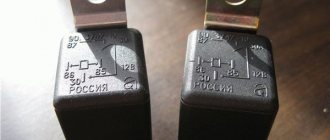
One side of the core has a rod extending beyond the body that pushes the starter fork. There is a hole at the end of the rod; there may also be a crossbar, which depends on the car model.
On the other side there is a rod, at the end of which there is a contact disk for the starter relay. The retractor relay body itself looks like a rubber cup into which 2 contacts are pressed. The contacts have threads where the terminals are attached with nuts.
There is a lip between the contacts on the outside of the cover to avoid short circuits. The cover is attached with screws to the end part of the relay so that the contacts come out opposite the contact disk, which is located on the core rod.
The traction relay is installed above the starter and securely attached to it. If there is such a need, removing the relay is quite simple. The only thing is that the starter itself will also need to be removed.
As a rule, the starter relay comes in the form of a dismountable product that can be tested and repaired, and there are also non-dismountable options. In this case, the relay is only replaced with a new non-separable or collapsible one if necessary.
How to repair the retractor?
To carry out repairs, the car enthusiast will need to disassemble the mechanism, guided by the following diagram:
- first remove the nut holding the wire connecting the lower contact of the retractor with the starter winding;
- then the housing is disconnected from the starter (this is easy to do using a regular screwdriver).
The back cover is screwed to the relay body. It needs to be removed (unscrew the bolt) in order to be able to clean the contacts using a needle file. This solves the problem of soot formation.
After disassembling and repairing the mechanism, it is recommended (as they say, “in passing”) to check it for a break or short circuit. To do this, connect an ohmmeter between the bolt that sends voltage to the starter and the control contact (checking the winding) or between the housing and the control contact (checking the coil). If there are no faults, the device should show the following values:
- 0.75 Ohm for holding coil;
- approximately 0.55 Ohm for the pull-in winding.
Home →
Device →
Electrical system →
Starter →
How does an annealed relay work?
The principle of operation of the relay is that after closing the contacts in the ignition switch, it triggers the starter power relay, which then transmits voltage to the retractor winding. As a result, a magnetic field is created, which causes the armature to move inside the winding.
In turn, this retraction of the armature, thanks to the rod, affects the starter fork and causes it to move, thereby moving the bendix (overrunning clutch). As a result, the starter gear meshes with the flywheel ring. In parallel, the movement of the armature helps the disk mounted on the rod to close the contacts of the retractor relay.
It turns out that while the armature is moving, the starter is connected to the flywheel and at the same time directly connected to. Next, current flows through the starter motor (motor), and the motor begins to work, starting the car engine.
When the starter is turned on, the retractor coil is switched off, and the electric current passes to the holding coil. In this case, this coil holds the anchor in its extreme position.
This coil reduces the power consumption of the retractor relay; much energy is not spent on restraining the armature compared to retraction. This allows you to significantly reduce battery energy consumption when starting the engine.
After the engine starts, the starter circuit is broken, the traction relay winding remains without electric current, and the spring returns the starter armature to its original position. Likewise, the bendix and contact disk will be retracted from the starter relay contacts.
In other words, when the winding is de-energized, the starter is disconnected from the flywheel and is also disconnected from the battery. After the engine starts running, the starter is completely disconnected from the power supply and from the engine.
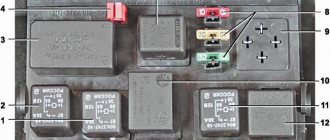
How to replace the starter switch relay on a VAZ 2108-VAZ 21099
1. If you carefully read the above text, you will immediately guess how to remove this relay, but we will still instruct you, find this relay in your car (the location is shown in the photo above), you see a block of wires connected to it, then disconnect it, and after it is removed and set aside, take a wrench in your hands and unscrew the relay mounting nut with it and then remove it, by the way, if the work is done in the rain or in very wet weather or if you are simply afraid of a short circuit in the wiring (B In this case, all the wiring will burn out and will require replacement), then protect yourself by disconnecting the wire from the minus terminal on the battery; if you don’t know how to do this, then study “this article”, it says everything in the first paragraph.
To check whether the relay is working or not (We don’t recommend buying a new relay just like that, always check everything), you can use two different methods, the first is that you have to remove the cover from the mounting block and pull out from there a relay with exactly the same marking as you have a relay for turning on the starter, after removing these two relays, replace these two relays and try to start the car, if it doesn’t start, then it’s not the relay and you need to look for the problem either in the starter itself or in the ignition switch, the second method implies that you will find the wire bring the jumper (Indicated by a blue arrow, the wire can also be used) and its conclusions to the wire block, namely to its contacts “30” and “87” (These are the lower and upper contacts of the block, take a closer look at the relay on it, they are marked or for clarity, take a look in the photo they are indicated by a red arrow, although there is a block from a completely different car, but it is almost the same and on it you can understand where these two contacts are located), if the car starts immediately (Don’t forget to remove the jumper when it starts to start) then it’s all in relay, if not, then look further (When you do the second method, do not forget to turn the key in the ignition until all the devices light up)!
For more detailed information about checking relays using the classic example, see the videos below:
That’s why initially they don’t make such a relay on tens, it’s a very necessary thing, my friend has a 99 and I never remember that it couldn’t start the first time, but I have a ten and I have to constantly turn this starter and it even happens sometimes that it doesn’t It caught on the first time, now I’m going to install the same relay in my business car for five minutes, but it helps a lot.
my ten is 12 years old and it has never failed to start without a “starter start relay”... you need to look after the car and most importantly, everything that you buy and install on it from the store and the market as a new part or option is all defective and not in good condition ))) as long as the car has parts from the factory, it is alive. as soon as you start changing something, then problems await you)))))
what modification or name of this relay? I typed in the search for the starter start relay, it only found the solenoid relay, thank you in advance
Hello, Leonid! Any standard 5-pin relay, only the tenth one is different.
Starter solenoid relay: fault diagnosis and repair
Let's start with the fact that the starter solenoid relay of a VAZ or any other foreign car can often fail for the same reasons. Considering that this element is reliable and durable, its breakdowns are the result of wear or high loads.
Typically, the driver may encounter the fact that the retractor relay does not make any sounds after turning the ignition key, the relay clicks every other time, etc.
One way or another, in such a situation, the starter retractor may be damaged. This is not surprising, since the starter relay operates with high voltages of up to several hundred amperes. As a result:
- the power contacts of the starter relay on the side of the contact disk burn out;
- the holding or retracting winding breaks;
- the return spring is deformed;
- a short circuit occurs in the windings;
- mechanical damage to parts in the solenoid relay device;
To accurately determine the cause of the malfunction, it is necessary to diagnose the relay. Considering that the relay operates on the principle of an electromagnet after voltage is applied to the starter windings, it is important to find the problematic element. To begin with, you can pay attention to external signs.
In the case when the starter does not turn, it is quite possible:
- the retractor relay works, but the starter does not start to rotate;
- the solenoid relay and starter do not work;
So, the fact that the relay has been activated is indicated by a click that can be heard at the moment the armature is pulled inward. It turns out that by turning the key in the lock and noticing a click, we can assume that the relay is working properly.
Otherwise, that is, when the starter relay does not click, either electricity is not supplied to it, or the relay itself has failed. By the way, it also happens that the solenoid relay works, but the starter does not turn. In this case, the reason is burnt relay contacts.
To check this, you need to take a screwdriver and close the protruding parts of the contacts with it. If after a short circuit the starter starts to turn, then the reason is burnt contacts. If the short circuit does not help, then the fault is related to the starter itself.
The same thing happens when the starter and relay do not work at the same time. In this case, there may be several problems, starting with a break in the switching circuit or failure of elements in the ignition switch and ending with breaks in the winding of the solenoid relay, loss of contact with the ground of the coil, and others.
It also happens that the solenoid relay is activated, but at the same time extraneous sounds are heard (knocking, something rattling, etc.). Usually the reason is that the contact of the windings is poor. You can check it by measuring the resistance with a multimeter. Normally, the resistance of the pull-in winding should be about 0.55 Ohm, and the holding winding 0.75 Ohm.
If the readings are lower, then this indicates a short circuit within the winding, while a high resistance will indicate poor contact with ground and/or terminals. If you suspect a winding break, you can check using test lamps and a battery.
By connecting a light bulb to the winding, check whether it lights up. If it lights up, then everything is in order with the winding, but if it doesn’t light up, this indicates a break. The only thing is that this method does not allow identifying a short circuit due to the fact that minor deviations in resistance do not affect the brightness of the control lamp.
In any case, if a problem is detected, the solenoid relay is either repaired (collapsible type) or replaced (non-dismountable). The collapsible relay is removed from the starter, after which it is often necessary to solder the winding terminals. Then all contacts are checked, and if they burn, they are cleaned with fine sandpaper.
In a situation where the winding leads fall away from the housing, they are soldered in place. Also, during disassembly, parts of the relay that are worn out are identified and replaced. As a result, repairing the solenoid relay allows you to restore the functionality of the part. However, if this is possible, it is better to immediately replace the starter relay with a new one, especially considering its quite affordable price.
Starter relay VAZ 2109 carburetor where is it located
Starter fuse for Lada Granta
Dear visitors of the “Cars” website! We will be very grateful for your comments on the video clip “Where is the starter relay for the VAZ 2109 carburetor?” registration is not required for this. We also ask you to let us know if you have any problems playing the video.
Apart from one, the thickest negative bus of the battery - internal combustion engine, no other massive negative wires have anything to do with the starter itself and do not affect its starting.
Sandpaper in pants, sandpaper car mechanic
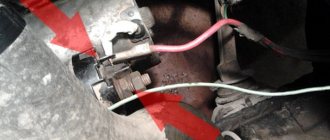
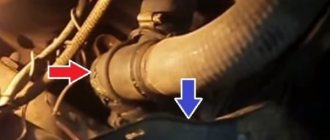
A problem appeared with the starter, first with jumping voltage on the instrument panel, digital voltage indicator and instrument lighting, but not constantly, but occasionally. The starter started normally, but there was a problem with wear on the internal contact surfaces of the copper bolts of the retractor relay, which was corrected by turning them 180 degrees. After a short period of time in warm, dry weather, the starter showed no signs of life. And now how the malfunction behaved in order 1. the dashboard was working VAZ 21015, the starter does not respond to turning the ignition key 2. Checking the ground with a multimeter on the engine and the minus terminal was connected 3. The problem was solved by checking the voltage between the pluses on the battery and the minus directly on the engine block . When the ignition was off, the voltage was normal; when it was on, it dropped to 10 volts. Cleaning the burnt contact point on the engine and the negative wire to the starter eliminated the starting fault. In 15, the connection points to the bolt were poorly chosen, since the leakage of coolant along the threads caused the contact area to burn with black soot, which was not visually detectable.
The disease of many tens and Chevys Due to losses in the line and contacts of the lock, the retractor does not have enough current to reach the nickel to the contacts. It is advisable to relieve the starting contacts of the ignition switch. Install the relay in the engine compartment, run the standard wire from the solenoid to the relay coil, and run the direct + from the battery through the fuse and the relay contact to the solenoid. There is no need to change anything in the standard wiring
Tell me, during a crisis, is your work also going well, or not so much?
Mikhail, unloading relays are not installed to protect the starter, as you say. And to protect the ignition switch contacts from burning due to the passage of high current through them. And the so-called Kulibins you call do it correctly by installing an additional relay. Finishing what was not completed at the factory.
What are the reasons when you turn the key, and in response the bendex cuts off? Bendex, retractor, or bad contact somewhere?
Thank you, it helped
I did all the manipulations and bought a new starter, hurray it worked
3 minutes of conversation about nothing, then conclusion: clean and stretch the mass. He didn’t click or say anything sensible... what the hell with these explanations when it was easier to record the sound, how the retractor doesn’t push. PS: not Bombit
verbal diarrhea
Even if you turn it on, if the starter requires repair, it won’t help. He clicks, but he can’t scroll through 0. It is cheaper to repair than to buy a new one.
new starter, worked for two days .. and everything is fine .. nothing helps
THANKS A LOT
Well, electricians experts, explain the reason for the silence of the starter... got behind the wheel, key to start - silence, got out, hit the starter with a pipe, got behind the wheel, key to start, clicked and started... what is the reason?
A lot of unnecessary words But thank you.
In cold weather the Bendix often slips. 4 - 5 - 6 times works fine. Why? And how to deal with this?
I had such a problem on 99, it was solved by stripping the thick black negative wire on the starter.
Solenoid relay design
To understand how to identify a malfunction, you first need to understand the design and operating principle of the retractor relay, as well as the starter relay, since they are located in the same housing.
So, there is a housing, inside of which two coils are installed - retracting and holding. On the one hand, the body is covered with an ebonite or plastic cover. Three terminals for connecting wiring are installed on the outside of this cover.
One of the terminals is intended for connecting the “positive” wire from the battery, the second is for supplying electricity to the starter motor, and the third is for connecting the relay to the ignition switch.
On the inside of the cover there are two contact plates of the “positive” terminals.
Schematic diagram.
Inside the housing with the coils there is an armature, spring-loaded on one side, and a starter relay rod.
On the outside of the armature there is an eyelet, with which it engages with the Bendix fork and gear.
Principle of operation
It all works like this: when the engine is not running, the armature of the retractor relay is pulled out of the housing due to the action of the spring on it. The same spring holds the Bendix and gear through the fork in a position where there is no engagement.
When the ignition key is turned to the start position, the solenoid relay is first activated.
The electrical energy supplied to the coils of the solenoid relay ensures the appearance of a magnetic field inside the housing.
This field acts on the armature, and it, overcoming the force of the spring, enters the body, after which the retracting coil is turned off and ceases to create a magnetic field, but in the retracted position the armature is held by the holding coil with its magnetic field.
In this case, the armature pulls the fork, which in turn moves the bendix forward along the rotor shaft, and its gear engages with the flywheel ring.
The armature, entering the housing, pushes the starter relay rod, and, moving, closes the contact plates of the positive terminals with each other.
Electricity from the battery is supplied to the brushes of the starter motor, and its rotor begins to rotate. And since the gear has already engaged, the rotor begins to rotate the flywheel.
After starting the power plant and turning the ignition key back, the power to the holding coil stops, its magnetic field disappears and the armature comes out of the housing under the influence of a spring.
At the same time, it disengages the bendix through the fork and stops acting on the relay rod. He, in turn, moving away, opens the contact plates, and the starter is completely turned off.
Malfunctions
Troubleshooting a traction relay is not that difficult. It should be noted that its operation is accompanied by a click - this is the result of the armature being retracted and the gear being engaged.
When you turn the key, this click is clearly audible. Thus, the absence of a click may indicate a break in the coils, lack of power, or the armature being stuck in one position.
If, when you turn the ignition key, a click is heard, but the starter itself does not start or starts but spins very slowly, this may indicate that the contact plates are burning.
Continued operation of the starter after starting the power plant will be accompanied by a characteristic buzzing sound.
It is possible that the armature is stuck in the retracted position and cannot return back, so it keeps the bendix gear engaged and continues to close the contact plates.
VAZ 2106 starter connection diagram
- starter;
- generator;
- accumulator battery;
- pull-in winding of the traction relay;
- ignition switch;
- traction relay holding coil
| 1 – drive side cover; | 14 – relay cover; |
| 2 – retaining ring; | 15 – contact bolts; |
| 3 – restrictive ring; | 16 – collector; |
| 4 – drive gear; | 17 – brush; |
| 5 – overrunning clutch; | 18 – armature shaft bushing; |
| 6 – drive ring; | 19 – cover from the collector side; |
| 7 – rubber plug; | 20 – casing; |
| 8 – drive lever; | 21 – shunt coil of the stator winding; |
| 9 – relay anchor 2106; | 22 – body; |
| 10 – holding winding of the traction relay; | 23 – stator pole fastening screw; |
| 11 – pull-in winding of the traction relay; | 24 – anchor; |
| 12 – relay coupling bolt; | 25 – armature winding; |
| 13 – contact plate; | 26 – intermediate ring. |
Checking the solenoid relay
Checking the functionality of this element is not so difficult. Moreover, you can check it even without removing the starter from the car. For example, let's take a VAZ-2110 car.
So, the starter on this car does not work. First you need to check the wiring going to it for a break.
If everything is in order with the wiring, you need to find out whether the traction relay works at all.
To do this, you can ask someone to turn the ignition key, and listen for yourself to see if there is a click. If it is missing, it is faulty and needs to be replaced.
If there is an actuating click, but the starter itself does not turn, it is possible that the relay does not operate due to burnt contact plates.
You can check whether this is true using a regular screwdriver. The terminal coming from the ignition switch is disconnected from the relay.
You can check the voltage going to the starter with a multimeter, but this will most likely make it clear whether the problem is in the starter or in the wiring and battery.
To do this, a multimeter is connected to the positive terminal of the solenoid relay, to which voltage from the battery is supplied. Connect the other negative wire of the multimeter to ground.
If it is lower, perhaps the battery is simply discharged and its energy is not enough to start the engine, but at the same time its charge is enough to operate the relay, but there is not enough energy to rotate the rotor.
For what reasons can the starter relay fail?
Most often, failure of this device is caused by burning of its contacts. The phenomenon is very common, due to the fact that a high current flows through the relay (from 80 to 300 A). Because of this, a spark gap may form, which causes the contacts to burn. This in turn leads to low conductivity of electrical energy.
Also, a break in the winding is often noted on the solenoid relay. In cases where such a disaster occurs in the middle of the winding, the driver has no choice but to buy and install a new device. But when a break occurs in the soldering area of the winding and contact, the situation can be corrected by replacing the damaged area.
Replacing the solenoid relay
The solenoid relay is not repairable, and in the event of a malfunction, it is simply replaced.
The only thing that can be changed is the anchor. Replacing this element on a VAZ-2110 is a simple operation; it is more difficult to remove the starter itself from the car.
To replace, you will need to remove the starter from the car. To do this, the car is driven into a pit, since it can only be reached from below. If the car has a crankcase protection, then it is removed first.
With the starter already removed, the two bolts securing the retractor relay are unscrewed and it is removed, while the armature along with the spring remains on the starter, since it is hooked onto the fork with its eye.
Before installing a new element, the old anchor is removed from the fork and a new one is installed in its place.
Next, the new relay is placed on the starter and tightened with mounting bolts. To consolidate the material covered, we recommend that you watch a training video on how to repair and troubleshoot the starter solenoid relay.
I suppose many drivers have found themselves in a situation where the engine flatly refused to start? This problem especially often arises among owners of old Lada cars, and in domestic cars in general, because they do not want to work normally. It's good if the battery is dead. No, this, of course, is very bad, but it is much better than the covered wiring, the entire starter or its solenoid relay, because the battery can be recharged from any car by throwing in the wires, and serious problems will arise with the rest. However, in order to avoid getting into such a nasty situation, it would be nice to know how to check the starter solenoid relay
- will be useful for any driver in the future.
Consequences of a broken starter relay
If the first relay breaks, this does not happen often, but if it happens, it is most often due to overloads, or if the wires are faulty. The starter will not be able to come into working order and it turns out that the car will also fail (you won’t start it, and this is exactly the problem I encountered. Read on to find out how to fix it). The only tools we need are a 8mm wrench. This will be enough for you and you won’t need anything else! If only, just in case, take with you another wrench, for different situations.
Preparation for testing and necessary tools
In order to properly reach the solenoid relay with your hands, you need to take care of access to it. If you still have a foreign car, then you will have to drive the car into a hole, an overpass, or, in extreme cases, jack it up as much as possible in order to crawl under it, because in most foreign cars this part is accessible only from below, and if you are the owner of a miracle of the domestic automobile industry , then everything is much simpler and easier - just open the hood. Having found the solenoid relay, look for the terminals on it. This is not difficult to do, because there will be a wire on one of the terminals - this is the positive terminal.
A multimeter must be connected to this positive terminal in voltmeter mode. This is done easily and simply. Connect the red (positive) wire of the multimeter to the relay terminal, and connect the black (negative) wire to the vehicle ground. After connecting, either secure the wires in this position, or call a passerby, a friend, a relative (underline the tedious) so that he (she) starts the engine. And you look at the readings of the device, which should produce a stable 12 volts when the starter clicks repeatedly.
Display errors and testing
The starter can deceive you, because it can click even at lower voltage. By the way, if it (voltage) is below 12 volts, then you need to charge the battery and/or check the ignition switch. In this case, all that remains is to resort to checking directly. To do this, turn off the engine, disconnect the wire from the relay (the one that comes from the ignition) and use a screwdriver to short-circuit the positive terminal. This is a simple way to apply voltage directly to the starter relay.
If the car did not start at all, then such actions can directly start it instantly. By the way, if the car starts when connected directly, then either the ignition switch is closed and needs to be changed, or the relay is rotten and also needs to be changed. That's all the checks. As you can see, there is nothing complicated or secret in this matter, and even a novice car enthusiast can cope with such a task.
Really good and competent mechanics, if the starter or relay breaks down, strongly recommend replacing the entire assembly rather than buying and installing individual parts. The fact is that the relays and the starter work in unison and detailed replacement of individual parts can cost, if not more, then the same amount. The question is, why buy part of a unit when you can buy the whole thing for the same money?
The procedure for checking if the engine does not start is always the same. First, the battery charge is checked, then the ignition itself, and lastly the starter with its retractor relay. No need to do the opposite, just waste extra time.
And one last thing. If the entire unit fails, do not rush to throw it in the trash. Many offices completely replace their filling, and the money is cheaper than buying a new one. The economy will be modest, but it will be there.