One of the reasons for poor heater performance is the heater radiator. During the operation of the car, it begins to leak and is no longer able to transfer the required amount of heat to the interior. Depending on the year of manufacture and configuration of the Lada Priora, the process of removing the stove (radiator) can vary greatly.
Lada Priora wagon Indesit › Logbook › Replacing the heater motor of a Priora Panasonic 18+
Before viewing further material, remove pregnant children from screens, as well as pets and people with fragile psyches. Thank you.
While Nissan drivers are trying to make the cabin warmer living in Siberia, Subarovods check the engine every 5 minutes, even while driving, and Toyota drivers are foaming at the mouth to prove that their cars are the most reliable and the best in the world, Tazovods make dirt, correcting their misunderstandings, which were created by people with inflamed consciousness. This story is just about the pelvis and the fight against the chariot of hell...
Once a pelvis driver was driving along the road in his deadmobile along roads that no one even thought of clearing from snow, since winter came in December as unexpectedly as possible and don’t complain at all, everything is under control, the pelvis driver was rattling with its entire interior and even internal organs. Lo and behold, the windows around him were fogged up as if yesterday it was New Year’s Eve in his village and more moonshine was drunk than a deadmobile consumes per hundred meters of gasoline. The music player is quieter, and the stove doesn’t even make any sounds. Well, that’s it, we’ve arrived, but there’s so much snow that you can’t even pull over to the side of the road, then you just have to wait until spring until it all melts away. I found a place, turned, stopped, not a single sign of life from the stove. But the pelvis operator has many years of experience, especially since the engineer is apparently as stupid as they work at AvtoVAZ, since he immediately realized where something was and how. The hood was pulled, the stove was hit with a fist, and it came to life. The verdict was immediately rendered right there in the snowdrift - the brushes ran out in 8 years. Next, the motor’s operation became unstable, and a decision was made to repair it. Siberia, frost...
What saves the pelvic gland in difficult times? Drive2 of course and Google friend. When I started reading about replacing the heater motor on a Panasonic system, I started to feel sick, but they pumped me out and I came to my senses. I was thinking right now that I would take everything apart, change the brushes and continue driving along the ruts and snowdrifts of my native village. But the pelvis was naive...very. Well, the handshake is still specific.
I hope this BZ will be of some use to people, the same mentally ill people who decided to buy a similar chariot with overseas units, shoved by engineers from one place to another. There is a lot of information, of course, in the vastness of Drive2, but not everything is clear until you yourself plunge into the abyss of stupidity of such decisions. To begin with, I will say that in order to get all this mess out from under the frill without loss, you need to lower the condenser, unscrew the pipes, drain the coolant, remove the vacuum seal, the brake pedal and other related little things. But we are Russian people, since we took up such a stroller, we need to solve problems more simply.
1. Remove the right side of the frill, the insulation of the shield, under which all this trouble is located.
2. Next, we begin to furiously shred this disgrace and throw it screaming around the garage. The main thing is to find everything later.
Source
Life hack: gear motor and other components of the Priora car heater
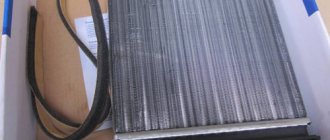
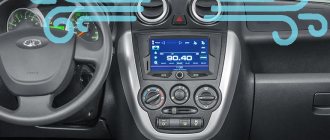
If the windshield of a Lada Priora car is fogged up and looks as if it was smeared with greasy hands after eating pirazhki - driver, beware, your heater is leaking! Maintaining normal temperature in the cabin at different times of the year is necessary in order to feel comfortable behind the wheel. In winter, the stove on the Priora saves you from freezing, which provides the heat a person needs. But you need to take care of it and prepare it for winter in the summer, because being left without heating in winter is not the greatest pleasure. The sore spots in the system that break down more often than others are the gear motor and the heater damper. Priora is a warm car - the original DAAZ is very good, it warms, and is warm in winter, because its radiator has the correct structure and fluid circulates inside. If you install the Chinese Luzar, you will freeze at -20 - I checked it personally. I put this luzar on, then took it off. The heater radiator is available for cars with and without air conditioning. The structure of the node is slightly different.
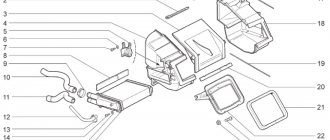
The stove block of the Priora car is indicated below in the figure. As you can see, in addition to the block, the entire assembly consists of many spare parts. On the Priora, the stove has a conventional design - having taken the time to diagnose, you need to completely check the entire system in order to make an “investment” in the future - in winter you will need to look for a heated garage for repairs. If the Priora blows cold air or does not heat well, these are signs that something is wrong inside, and this malfunction needs to be sorted out.
Replacing the radiator of a Priora stove with air conditioning
In this case, there are some nuances, although the procedures are similar. You will need to perform the following manipulations:
- The rubber seal of the windshield trim is removed to gain access to the fixing elements.
- The sound insulation of the engine shield in the middle part is dismantled (you must first remove the fastening hoses). Then the fixing screws and screws are unscrewed, and the insulating layer is removed to the side.
- You will need to remove the foam seal and remove the heat exchanger cover, which is secured with three screws.
- The pipes are dismantled by loosening the clamps and lifting the elements up. Next, pull the stove radiator towards you until it comes out of the grooves.
After installing the new part, installation is carried out in the reverse order. The main difference that replacing the radiator of the Priora stove, where the air conditioner is installed, is that you do not need to drain the coolant.
The principle of operation of the stove - what it consists of on Priora, article numbers
For the VAZ-2170 restyling, two types of heaters were installed - with a Panasonic control controller or with an NSS control controller. The last type contains the following parts:
- air recirculation damper gearmotor (21700-8127300-10);
- Priora car heater fan (motor) (21700-8118020-10);
- air filter (21700-8122090-00);
- motor speed controller (2170-38127025-10);
- heating system damper motor (21700-8127200-10);
- heater radiator (21700-8101060-10);
- outlet hose (21700-8101208-00);
- outlet pipe (21700-8101200-10).
As for the second option from Panasonic, the device around the radiator of the heating system on the Priora is slightly different:
- recirculation valve (21700-811908-00);
- fan (stove motor) (21700-8118020-10; 21700-8118020-00);
- vacuum hoses with check valve (21700-8119100-00);
- solenoid valve (21700-8119130-00);
- air filter (21700-8122020-00);
- inlet pipe (21700-8101200-00);
- damper gear motor (21700-8127200-00);
- radiator temperature sensor (21700-8101250-00);
- radiator (21700-8101060-00);
- outlet hose (21700-810120800).
The pre-restyling car has a lot of parts from the “tens” - even the gearmotors are different. Much was inherited from the VAZ-2110, and the first cars before restyling were almost completely equipped with its heater. The assembled stove for the VAZ-2170 Priora pre-styling received catalog number 2111-8101012-10, a more updated version – 2170-81010-12. Price from 5500 rubles.
The device is as follows:
- air flow reducer (2170-81271-00);
- air temperature sensor (inside the car) (11186-81280-50);
- control unit (switches that are built into the central console to set operating modes) (21703-81880-20);
- resistor for setting the motor speed (2123-81180-22);
- heater motor (2111-81180-20);
- damper gear motor (2110-81272-00);
- air filter (2110-81220-20);
- radiator (2110-81010-60).
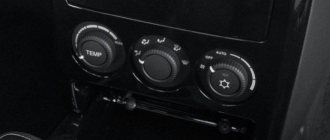
The heating radiator of the Priora car can operate in two modes: automatic and manual.
- The manual mode is performed when a person independently sets the desired temperature in the cabin on the control unit.
- The automatic mode operates almost constantly - the required and actual air temperature is checked and the control controller issues a command to change the damper angle, supply hot or cold air to bring the temperature to the set level.
When the driver adjusts the settings on the control unit, the resistor sends a signal with the necessary data to the motor. The fan can produce maximum power, although the resistor will not be used to its maximum. The same process with the direction of air - the driver sets it, and the gearmotor sets the desired position of the damper.
By its principle, the heating device “lies next to” the engine cooling system. When the driver turns it on, the heater tap opens, and hot coolant moves through the pipes, which passes through the radiator of the Priora car’s heater and returns back. This increases the distance over which the coolant circulates.
Therefore, turning on the heating is one of the ways to cool the engine. It will really become hot in the cabin, because all the heat will be directed there, and the engine will give off this heat more and more, the temperature of the coolant will drop.
Malfunctions
For normal operation, the heating system needs: tightness, integrity of parts and normal antifreeze. The first step is to check the relay and fuse - after all, this unit contains electrical appliances inside. If the unit's electrical network is not in contact with the ECU, there is no point in turning the controls on the heater control unit.
The heater fuse on Priora has the number F9. In order to get to it, you need to remove the plastic plug above the driver's left knee (under the headlight switch) by unscrewing three bolts around its perimeter.
Replacement: how to remove (change) the stove on a Priora with and without air conditioning
Replacing a stove completely is rarely done; components are mostly changed. Often the main reason for disassembling the heater on a Priora car is replacing the heater radiator. When it ceases to be airtight and no longer works as efficiently, it is necessary to begin repairs. In order to remove the heater on a Priora car without air conditioning, you will need a set of wrenches (socket and socket wrenches) and a Phillips screwdriver. As the system is disassembled, it is worth inspecting all parts and replacing worn ones. Perform the work according to the instructions:
- Remove the negative from the battery.
- Remove the lower windshield seals and engine sound insulation.
- Loosen the clamps that hold the pipes adjacent to the heater core, and then disconnect them. First place a basin under the pipes to drain the coolant. After the liquid has poured out, cover the pipes with a rag.
- Start wiring. Unclip the latch and disconnect the motor wires. Then de-energize the additional resistor.
- The wires that go to the damper drive motor are secured with a clamp. You need to bite it and then disconnect the wire.
- Next, we proceed to dismantling the heater itself. Take a “ten” socket wrench, remove three screws with it, and remove another screw with an “8” wrench.
- Next, move the wiring harness from the heater to the side (attached to a small bracket).
- Now, from the passenger compartment under the dashboard, unscrew the third nuts securing the brake pedal with the “13” key, and then move it to the side.
- Pull the block towards you.
- Install a new heater instead of the old one if necessary.
- When you are concerned that the heating is not blowing correctly - not in the required mode - you will have to check everything again during dismantling.
- To remove the heater on a car with air conditioning, follow these steps:
- Also remove the negative terminal, then the lower windshield seal, and the engine sound insulation.
- Unscrew the screws covering the heater radiator.
- Also carefully remove the pipes: the coolant must be drained into a prepared basin.
- Slowly and smoothly pull the radiator up until it comes out of the mounts.
- Install the new radiator in the reverse order.
Lada Priora has Panasonic or Halla air conditioners. They differ only in the fastening, so there will be no difficulties when replacing the heater radiator.
Source
Replacing the heater radiator on a Priora with air conditioning
After some time, the manufacturer began to equip its cars with air conditioning (climate control), for example, HALLA or Panasonic (article: 21703-8101012). The design of the new Priora heater from a maintenance point of view turned out to be much more convenient. Now, to replace the stove, you do not need to dismantle the frill, windshield wipers, heater or vacuum brake booster.
It is only necessary to: remove the sound insulation of the engine shield, remove the engine air filter hose and the seal in the area of the heater radiator hoses. All! Drain the antifreeze and remove the radiator towards you, towards the engine.
Video instructions are attached:
Thus, replacing the radiator of a Priora stove depends not only on the type of heater, but also on the chosen method of replacing it. How did you remove the heater radiator on your car? Which method suits you best? Let us remind you that solutions to other problems with the stove can be found in this article.
Keywords: Lada Priora stove | air conditioner Lada Priora
+7
Share on social networks:
Found an error? Select it and press Ctrl+Enter..
Replacing the Priora Heater Motor with Air Conditioning
In general, about a year ago I bought a new stove fan at the BBC store, also known as “avto49”. But it was so crooked and so new that after installing it, the last thing I wanted was to take everything back and go change it. And the defect was that the blades and rim of the fan themselves (which are plastic) were deformed and, accordingly, not centered, because of this strong vibrations occurred during rotation. At 1 (sometimes we were lucky at 2) speeds this did not appear, so we decided not to take it back.
I didn’t like the situation with the fan, I wanted to change it, but I didn’t get around to it before winter. Then the frosts came, I really didn’t want to get into the car (garage without heating =), so I had to suffer and warm up the interior at 1st speed =
Now that it’s warmer, I finally got around to it and below I’ll write a short epic of what happened and how it happened))
I couldn’t find any clear instructions on the Internet without understanding the gender of the muzzle, so I acted “according to circumstances,” i.e. I unscrewed everything that was in the way and tried to get it out)) By the way, a lot of leaves were clogged in the air intake, the stove was not blowing from all the holes, so I also bought a cabin filter and went to change it)
I replaced the stove fan on a Priora with a minimum of disassembly and without draining anything)). By the way, my car is 2007. no air conditioning.
I have a lot of foliage accumulated there. I saw on the drive that they attach a fine mesh to the air intake, but unfortunately I didn’t have one, so I couldn’t implement this idea.
First, as usual, I unscrewed the filter grille
I removed everything else, everything is extremely simple and clear
Lada Priora Hatchback KosmosS › Logbook › Replacing the heater motor with Panasonic air conditioner
I drove for the last month and suffered with my air conditioning.
The symptoms were bleak; the air conditioner either worked or didn’t.
In other words, the air conditioner worked properly, but the heater motor
He was obviously shirking his own work.
Especially when you drive on smooth Russian roads))
Symptoms: the motor refuses to operate in all positions of the rotation speed control handle.
At first there were floating speeds, later it completely died out, and from time to time it came to life on bumps.
I thought there was a bad contact in the connector. I got to the connector, everything is ok.
If you lightly hit the fan body, it comes to life and continues to work normally, which means the reason is in the motor itself, and not in the control unit or connector contacts
I was completely fed up with this and now I dared to change it...
It turns out this is very difficult to do and spare parts
you need the original. Panasonic ept)))
To be honest, it got me, it’s either the original regulator or the motor (((
Replacing the heater motor on a Lada Priora with Panasonic air conditioning
Replacing the heater motor
Replacing a Priora stove motor with Panasonic air conditioning
Maybe this is the replacement
and not faithful, but frisky!
LADA Priora heater gearmotor with and without air conditioning: how to remove, where is it located
If your car's heater fails on the road, it doesn't bode well. Neither the car nor the driver. Especially if it’s far from home, and it’s thirty degrees below zero outside. Any driver can find himself in such a situation, including the owner of a Lada Priora.
The heating system in this car is implemented quite successfully, but it has one extremely weak point: the gearmotor. The reliability of this device leaves much to be desired, and it can become a source of headaches for the driver.
However, a broken gear motor can be replaced with your own hands. Let's figure out how this is done.
Purpose of the heating gear motor on the Lada Priora
A gearmotor is a device consisting of several plastic gears driven by a small electric motor. The task of the gearmotor is to open and close the heater damper depending on the position of the regulator on the dashboard.
Geared motors on Priora are made only in plastic, non-separable housings
The plastic from which the gears are made deteriorates quite quickly. After which the driver is forced to change the gearbox. This device cannot be repaired, because, firstly, it is not possible to find spare parts for it, and secondly, it is not so easy to open the plastic housing of the gearbox without breaking it. So there is only one option left: replacement.
THIS IS INTERESTING: Removing the Chevrolet Niva bumper
The gearmotor on the Lada Priora is located near the expansion tank, under the windshield.
The gearmotor on the Priora is located under the windshield near the expansion tank
It is built into a niche on the wall of the engine compartment and covered with a thick layer of sound-insulating material. This material will have to be removed, since otherwise it will not be possible to get to the gearmotor.
Signs and causes of gear motor failure
There are two signs of a gearmotor failure on a Priora. Here they are:
- when starting the heater, a loud grinding or knocking noise is heard from under the dashboard, which becomes louder as the heating fan speed increases;
- inability to adjust the oven temperature. The heater blows either only hot air or only cold air. The position of the temperature regulator on the dashboard does not matter in this case.
All of the above happens for very specific reasons. Here are the most common of them:
- one or more teeth on one of the gear motor gears has broken. The tooth fragments rotate together with the damaged gear and hit the plastic housing of the gearbox from the inside. As a result, a characteristic dull grinding or knocking sound occurs, which is clearly audible in the cabin; The gears in the Priora gearmotor are made of very fragile plastic and break quickly
- The gear motor burned out. This usually happens due to sudden voltage surges in the on-board network. For example, when the battery in a car died and the driver tried to “light up” from another car, but at the same time mixed up the contacts; A burnt-out gear motor can also cause malfunctions in the Priora heater.
- There were problems with the power supply to the motor. The gearbox itself and its motor may be in good working order, but electricity is simply not supplied to the gearmotor. This can happen for a variety of reasons, but the most common is a blown fuse that supplies power to the gearmotor.
First of all, it should be said that replacing the gearmotor on a Priora with and without air conditioning is done in the same way, since the gearbox is located quite far from this device. It should also be noted that today there are several known ways to remove the gearmotor from a Priora.
One of them involves removing only the trapezoid along with the wipers and expansion tank, the second allows you to get by with removing only the tank. But to use these methods, the driver must have extensive experience in self-repair, otherwise problems are inevitable. Therefore, the third method will be discussed below, with the complete removal of all necessary parts.
Yes, it will take more time from the car owner, but it is almost impossible to break anything. Now it's time to decide on the tools. Here's what we need:
- new gear motor for Priora;
- 2 screwdrivers - flat and Phillips.
Sequence of work
First you will need to perform a few simple preparatory steps. It is necessary to disconnect the throttle valve assembly and move it slightly to the side.
To get to the Priora gearbox, the sound insulation will have to be removed
Then use a Phillips screwdriver to unscrew the screws holding the sound-insulating material.
- There is a wiring harness next to the gearmotor.
It is mounted on plastic holders that open manually. The tourniquet is pulled aside. The wiring harness is mounted on two plastic holders that can be opened manually - Now the brake pedal bracket can be carefully bent upward.
After this, access to the self-tapping screws on which the heater is held is opened. They need to be unscrewed and the heater itself needs to be pushed forward a little. The heater is held on by three screws. It only needs to be moved a few centimeters - There is a heating damper position sensor next to the gearbox.
A block with wires is connected to it. It is removed from the sensor manually. You need very long fingers to reach the block on the damper sensor. - Access to the gearbox is completely open.
Using a flat-head screwdriver, gently press the spring retainer so that it moves down a couple of centimeters. To open the spring lock, you will have to move it down a couple of centimeters - The gearmotor itself is held on by three self-tapping screws, which are unscrewed using a Phillips screwdriver.
The gearmotor is held on by only three self-tapping screws, unscrewed with a Phillips screwdriver - The gearbox, free from fasteners, is removed from its niche, replaced with a new one, after which the Priora heating system is reassembled.
The gearmotor, freed from the fasteners, is carefully removed from the niche
One mechanic I knew used a very original device to remove the gear motor - an ordinary one and a half liter plastic bottle. This bottle was cut obliquely so that it looked like a semicircular scoop.
This thing was carefully slipped under the gear motor, and only after that the fastening screws were unscrewed. When I asked why such complications were needed, the answer was: so that the screws do not fall into the engine.
Taking a closer look, I realized that this solution makes sense: if the unscrewing screw accidentally falls into the engine pan, it will be almost impossible to get it out of there.
Important points
There are a couple of nuances, without mentioning which this article would be incomplete:
- The old gearbox should be removed very carefully. A long shank sticks out of it. If you remove the gearbox at an angle, you can damage the edge of the hole for the shank. If this happens, installing a new gearbox will not be so easy. Therefore, advice: when removing the gearbox, it should be pulled in a plane parallel to the floor;
- When buying a new gearbox at a car dealership, you should only buy the original VAZ one. Yes, its quality leaves much to be desired. But this is still better than buying a fake gearmotor, which the spare parts market is literally flooded with now. You can spot a fake by price. A normal gearmotor on a Priora costs 700 rubles and more. And a fake rarely costs more than 300 rubles.
So, replacing a heating gear motor is not a very difficult task and even a novice driver can do it. If a person has held a screwdriver in his hands at least once, he can handle it. All you need to do is follow the above recommendations exactly.
Source: https://legkovmeste.ru/avto/motoreduktor-pechki-priora.html
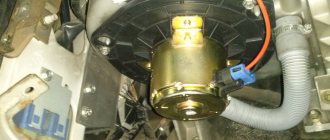
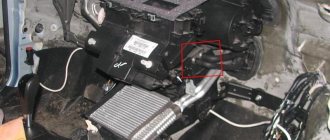
Removing the heater fan on a Priora is difficult, but possible.
Remove the right side of the engine compartment bulkhead trim. The heater fan motor is visible, but you can’t get to it: the outer plastic casing of the air conditioning unit is in the way and can only be removed by dismantling the entire air conditioning unit assembly (draining the antifreeze, removing the vacuum brake booster, draining freon from the air conditioning system, etc.).
We make a cut on this casing in the indicated place, which will make it possible to remove the right side of the casing and get to the heater fan
The heater motor is in our hands.
We assemble in the reverse order
How to remove the heater radiator on a Priora without air conditioning
Since the beginning of production, AVTOVAZ has installed a heater from the “ten” on the Priora (catalog number: 21110-8101012). The disadvantage of this design was that the heater radiator is removed towards the vacuum brake booster, which allows this to be done. As a result, the heater assembly has to be dismantled.
The procedure is as follows:
- Remove the wipers.
- Remove the frill (wind flap).
- Remove the soundproofing of the engine shield.
- Disconnect a bunch of connectors with wires.
- Unscrew the heater mountings.
- Divide the heater into two parts (left and right).
- Remove the right side of the heater (in the direction of travel).
- Move the left side to the side to gain access to the heater radiator.
- Drain the antifreeze.
- Replace the heater radiator.
The whole procedure took several hours. This is shown in more detail in the video:
There is another way to replace it. To gain access to the heater radiator, instead of the heater housing, it is necessary to remove the vacuum brake booster along with the brake pedal. This allows access to the left side of the heater (in the direction of travel) and to the radiator itself.
Video instruction:
Replacing a Priora stove with a Panasonic air conditioner
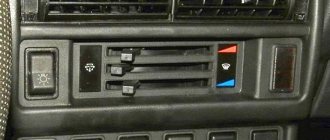
with air conditioning
Panasonic
oven
works in maximum mode, changes the rheostat (resistance. Tweezers, steel wire, vacuum cleaner and luck will help you! Yesterday I performed this terrible procedure, replaced the HALLA plate motor, to remove the motor, I had to unscrew the Koneji pipes, and with the help of wire cutters I had to bite off a couple of rigids on the motor housing to get it off because the motor mounts, but I immediately bought a new one, but I cut the housing under the mount, filled it in, and then the piece that I broke broke and leaked sealant, although then I I had to top up 1,500 rubles, but it’s cheaper than completely disassembling the oven. I was told that only 6,500 3,500 motors would work
I just pulled it out and illuminated the flashlight with a thin wire). The condenser tubes are angled slightly toward the engine, but don't overdo it. And whoever talks on the board to remove it won't work. The passenger airbag is in the way and doesn't lead to another seizure!
When I did the soundproofing, I cleaned the dashboard. Try it, it may be easier than a heater)))))
Place your hand in the glove box and locate the flap that opens and removes air from the cabin and throws out any leaves and debris.
There is no need to cut anything out of the radiator tubes and remove the engine bay guard, which is located next to the cabin filter and you can pull it out
Replacing the Priora stove motor
heater fan for VAZ Priora
with your own hands.
The operating parameters of this microchip can be changed. It regulates the settings of the ignition timing, the volume of fuel in the cylinders, exhaust control, and the level of toxicity of exhaust gases.
The operation can be carried out in two options:
- Integrating a new chip with your personal firmware (program);
- Configuring and modifying an existing chip. It is turned off, and after the procedure the chip is mounted back.
The best option is to give the car to a reliable service that has been verified by you personally. An experienced professional will perform the procedure accurately and with the least side effects on engine performance. If you are confident that you can do everything yourself or a professional is working with you, then you do not need to use a car service. But a few recommendations before performing the firmware will help you in the upcoming task.
The DIY modification procedure takes place using firmware equipment in several stages: the ECU is connected to a laptop or PC via a connection cable with a suitable connector. Software with modules and settings of the Lada car
Replacing the heater motor on a Prior without air conditioning.
That is, to carry out chip tuning, you must have:
- A working computer with software support;
- Connection cords to the Priora ECU;
- Loaders and adapters;
- Software and modules.
If the settings are performed correctly and competently, the performance characteristics of the engine will be optimized and fuel consumption will be reduced.
How to change the heater radiator on a Lada Priora
In fact, every motorist who owns a Russian vehicle discovers a malfunction of the car’s heating unit specifically in winter. After all, only with the advent of severe cold does a person begin to think about how to avoid freezing while driving a car. Naturally, everyone uses a stove for this. But what should those for whom this same device does not work properly do? After all, only the heater is able to ensure that the normal temperature is maintained in the cabin, allowing for comfortable movement. In this article we will look at only one reason why the heating device stops working, we will learn about the principles of repairing and replacing the heater radiator installed in a Lada Priora car.
If the motorist is sure that the heater core needs to be replaced, it may take a lot of time to remove the faulty object, because most likely, in the process it will be necessary to change not just a blown fuse, but to carry out more serious repair work. True, one should not immediately despair because of one’s own ignorance; the material contains a carefully written annotation that helps everyone understand how to replace the stove radiator in a Priora with and without air conditioning.
Replacing the radiator of a heating unit in a Priora that is not equipped with air conditioning
Replacing the heater radiator on a Priora without air conditioning may make sense in this case if warm air does not begin to flow into the cabin, while the heater itself is working. If, in addition to the above dilemma, there is also a water leak from under the Priora stove, the motorist will have to urgently remove the poorly functioning unit in order to solder the latter. From time to time, repairs are impractical and you have to replace the old device with a new one.
So, first, you need to start by removing the negative terminal from the battery. The fact is that the issue here is not only about the safety of the master himself, but also about additional insurance, which allows him to avoid several nasty surprises that, if handled carelessly, can appear not only with wiring, but also with electrical equipment.
Replacing the Priora stove
To work, you will need a standard set of tools, which includes socket wrenches 10 and 13, side cutters, a Phillips screwdriver, and a wrench 8. In both cases, you will have to disconnect the heating system hoses; the remaining coolant will pour out of them, so immediately place containers under the pipes heater Then the liquid can be returned to the system.
With air conditioning
- First of all, we need to remove the rubber seal of the windshield to gain access to the parts; Remove the windshield trim to gain access to the heater system parts
- Let's move on to soundproofing the engine shield.
We need to dismantle its middle part, having previously removed the hoses from the mounts. The sound insulation is secured at the bottom with 3 screws, 2 nuts and a washer, and at the top with 3 self-tapping screws. It is recommended to use a tool extension as some fasteners may be difficult to reach; Removing the fastenings - After dismantling the protection, you will see a foam seal that covers the heater radiator; Remove the trim and move on to soundproofing the engine
- To remove the cover, we need to unscrew 3 screws - 1 you will find in the middle, and 2 others - along the edges; Unscrew the fasteners and gain access to the radiator
- We reached the pipes. To remove them, we need to loosen the clamps and lift the pipes up. Be careful not to tilt the hoses down;
- Pull the heater core towards you until it comes out of the fastenings.
As you can see, dismantling the radiator in a Priora with air conditioning does not require draining the antifreeze. Coolant will only come out of the expansion tank and the heat exchanger itself. Removing the radiator in a VAZ 2170 with Panasonic air conditioning follows the same scheme, only a few fasteners may differ. Now you can replace your worn-out heater with a new one!
Without air conditioning
- Work begins by disconnecting the negative terminal of the battery. We remove the windshield trim along with the windshield wiper arms, as these elements will interfere with operation;
- The next step is to remove the coolant supply pipes to the engine injectors;
- The windshield trim is held in place by seven screws.
Unscrew it to completely remove the element; - Now we move on to the hood seal, in its center you will find a tightening screw - unscrew it;
- The engine noise insulation closes the passage to the heater system - pry up the plugs with a flat screwdriver and unscrew the plugs;
- We unscrew the screws and dismantle the sound insulation.
Remove both covers; We remove both parts and go to the interior to dismantle the radiator - Let's move on to the radiator pipes.
We loosen the clamps and dismantle them, having prepared a container for antifreeze in advance. Plug the pipes so as not to drain all the antifreeze; - You need to remove all the wiring that goes to the stove;
- Next, remove the wire holder and take it to the side, now we go to the Priora’s interior;
- Armed with a 13mm wrench, unscrew the bracket fastenings along with the brake pedal.
We move the details to the side; - We unscrew 3 screws and gain access to the radiator;
- Replacement is carried out in reverse order.
Clean the heat exchanger and inspect it for damage. If cracks are found on the plastic elements, then you will no longer be able to repair the part - only replacing the stove radiator on a Priora, which is done in the reverse order, will help here.
instructions for replacing a leaking stove:
Lada Priora Sedan Leviathan Moya › Logbook › Replacing heater pipes, expansion tank and plug
Hello everyone! Autumn has begun, I put off the problem of ossified stove pipes for a long time, but the problem reminded itself of itself. The other day I started the engine and opened the hood to see if everything was okay. By the way, I definitely do a visual inspection once a week on average. So, I opened the hood and saw drips. I checked the battery, otherwise there were problems - it was normal. After that I tried it on my tongue - I dipped my finger a little and on my tongue - antifreeze!
I touched the pipes and found the leak:
There is no point in pulling the clamp - the pipe is completely wooden. Since I didn’t travel very far, I rode like that until the evening. I drove about 10-15 km in total, including visiting car shops. I bought everything at Podshipnik: - pipes (pair) - 200 rubles. ;— Felix Euro antifreeze 3 liters;— clamps;— Priorovsky expansion tank (without air conditioning); (540 rubles - something a little expensive, the store has turned down the price, on the internet the average price is about 350);
— a cap for the tank (115 rubles and I bought it not on that day, but in the morning in Sputnik)
Antifreeze:
Pipes: In the evening in the garage I removed the engine protection, unscrewed the plug on the engine jacket and drained almost 5 liters of antifreeze. I caught almost everything using a funnel and a five-liter bottle of drinking water. (By the way, I parked the car in the garage at lunchtime. I worked on a COLD engine!) Then I threw off the old wooden hoses and installed new ones. I partially dismantled the frill and removed the old tank, installed a new one. Tightened all the clamps and filled in 3 liters of clean antifreeze.
The missing part was filled with antifreeze from a five-liter container. I put the protection back in place. In the morning I decided to replace the plug as well. I changed the tank because it was very suspiciously starting to come apart at the seams. Well, I changed the plug because of this. Maybe there was too much pressure. In my former car, I generally drove on atmosphere - since the valve in the tank cap was deliberately gouged)). But in Priora I don’t do this - the temperature in traffic jams rises to 103-105.
Idk, let there be pressure.
Well, a few photos:
Full sizeWet
Full size tank marking
I didn’t take a photo of the full size, and there’s nothing special to see here - renovation
Full size, you can see how it's coming apart at the seams
Full size is a little closer
Full size plug
Full size!
It turned out to be the full size - I bought the same one. The seller said that this is a normal option. But my ex was already starting to rust, so I replaced it
Full size identical plugs
Full size filled in level. By the way, now the level has gone down a little - it has become approximately in the middle of min-max. In the new tank, at least the level has become visible and the antifreeze is bubbling)))
Full size now dry!
How to replace the heater fan on a VAZ 2170-VAZ 2172?
When replacing the fan, if the cabin filter has not been replaced for a long time, then it can be removed and replaced with a new one, it doesn’t cost a lot of money in car dealerships, but just so you don’t have to get into the car (Still, to change the heater fan, you need to go to that place choose where the filter is installed), you can immediately change it if it is too dirty and thereby drive in the near future with clean air in the car!
Replacing the heater motor on a Lada Priora with Panasonic air conditioning
heater motor on Lada Priora
with
air conditioning
. Read also: What kind of oil to fill in Volvo S80
Lada Priora with air conditioning
The electrical circuit of the Priora stove with air conditioning is somewhat different from the option discussed above, because in this case another complex mechanism is added. There are two types of air conditioners installed on Prioras:
- "HALLA" is produced in Korea;
- Panasonic is made in Taiwan.
To immediately determine the brand of the air conditioner that is installed in your car, you need to pay attention to the button in the center of the control unit. Panasonic air conditioners have a power button, but Halla does not have such functionality.
The layout of the Priora heater with air conditioning differs depending on which company the equipment is installed. We have identified the main and most significant differences:
- The Panasonic compressor uses a 120 cubic meter rotor blade. cm, and in Halla it is axial, with five pistons, with an inclined washer and a volume of 160 cc. cm.
- Panasonic uses a condenser with a receiver and a fan attached to the body, while the Korean equivalent uses a condenser with a receiver and two paired electric fans attached to the radiator. The refill volume in the Halla air conditioner is 100 g larger.
- The air distributor in Panasonic uses a standard original one, located in the cabin, while in the analog version it is equipped with a gearmotor.
Device principle
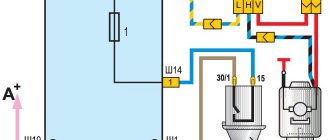
Next, let’s look at the Panasonic air conditioner circuit, which consists of the following components:
- The compressor is a single-pass rotary with three blades. This element builds up the required pressure and maintains the circulation of the refrigerant. The compressor is located under the generator.
- A condenser is a heat exchanger that provides cooling to a gaseous refrigerant by turning it into a liquid state. This mechanism is located on the radiator frame.
- The evaporator is also a heat exchanger; its purpose is to cool and dry the air before it enters the cabin. This device is located in the heater housing.
- The receiver has the shape of a metal cylinder, which is connected to the capacitor. This mechanism ensures the accumulation of liquid refrigerant and separation of moisture and debris. There is a filter drier inside the receiver.
- Pipelines.
This is the element that is added to the Priora stove with air conditioning. Now that you know the structure of the stove in the Lada Priora, troubleshooting will be much easier.