This modification migrated from the previous Niva
, where I have worked without complaints since 2012, I’m not adding anything new here, even the hoses and clamps are all old.
I got the idea after looking at and testing a similar solution from a person on the Niva forum
with the nickname Captain, who implemented such a system for himself and his friends.
With such a stove, there is no need for a fashionable electric pump from a gazelle
. When I looked, I was simply stunned by what I saw - I arrived on the street -30, while driving in my Niva I was frozen until I was blue in the face, we went up to his friend’s cooled car (2131 crocodile), started it, stood on the street, climbed under the hood, chatted while the engine was warming up, Alexander got into The car turned on the heater, and I went to the passenger door, opened it and the pancake began to warm up from the emanating heat from the passenger compartment. I was simply shocked. I got into the car, closed the door and was even more stunned - I couldn’t hear the stove motor at all. Extremely impressed, almost shouting at the boarding party, I rushed to the store for spare parts, and then to the garage
In preparation for the “white flies” season, I installed a modified stove, and its modification consisted of the following: 1) a significant reduction in noise; 2) increase in fan performance; 3) increased heat transfer from the radiator.
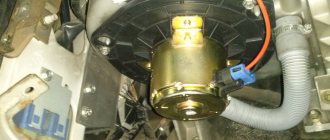
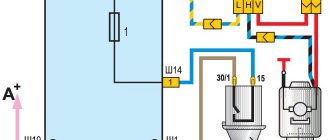
And now first things first. Reducing noise and increasing fan performance is achieved by installing a heater fan from a VAZ2108 in the boot. An increase in heat transfer is achieved by installing a heater radiator from Shniva (it has a larger number of fins because it is designed for a much larger interior volume) and it is free of blunt flange connections and a heater valve from a VAZ 2108 (its flow area is much larger than that of a classic one). For one thing, I decided to install a thermostat from Shniva in order to get rid of the tube that I don’t like that goes from the stove along the block, but this is not all the charms of the Shniva-thermostat, its highlight is that the stove with it heats much better due to the fact that the cooled return The stove entering the thermostat cools its thermoelement, thereby closing it and hotter coolant flows into the stove.
Thanks to this, we get rid of the steeply curved hose to the stove, which is so inconvenient to change.
Now about the nuances of the installation process.
The beginning is usual: the protection is removed, the coolant is drained, the main thing is to take care of the generator and cover it with a plastic bag, and it is convenient to drain it by disconnecting the intake manifold heating hose.
Do-it-yourself modification of the stove on Niva 21213 is necessary if the car’s heating system malfunctions. There is no point in delaying this, because uneven thermal regulation leads to foggy windows or icing. In any of these cases, the view of what is happening on the road deteriorates. The malfunction causes wear of individual elements of the device or manufacturing defects.
Fault Diagnosis
The stove supplied as standard will need to be modified for preventive purposes. The procedure will not take much time, but it will prevent many problems in the future. Driving experience suggests that the first severe frosts will undermine the “health” of the device. The list of main weaknesses is as follows:
- the optimal operating temperature range for model 2121 is from -5 to +10°C;
- inability to warm up the air in the cabin if outside is -8°C or lower;
- when the blowing power increases, the temperature does not increase;
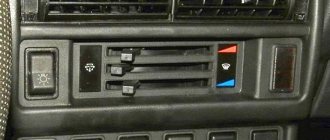
- When driving in 2nd gear, the noise from the Niva's stove becomes significant.
That is why it is better to take the necessary measures in advance. The driver has few alternatives. On the one hand, everything remains in its place. The heating device is used at minimum power. During mild winters this is still tolerable, but with the onset of real cold weather the conditions will become unbearable. On the other hand, it's easy to spend a few hours rectifying the situation.
Further developments proceed as follows. If the heating in the car is running at ½ power, you can limit yourself to minor repairs. The main thing is to make sure that there are no noises or extraneous knocks, otherwise the Niva 21213 should immediately go for a technical inspection.
The presence of an unpleasant sound indicates the need to replace the device. A specialized retail network offers ready-made options for heating mechanisms for Niva. If desired, it can be assembled independently.
The second option is considered more preferable. When you assemble it yourself, you have the opportunity to literally personalize the stove. To do the work yourself, you will need to visit a specialized store or market to buy spare parts.
Technical details of the procedure
The efficiency of the new heating system on Niva will be determined not by the cost of the purchased parts, but by their quality. To operate, you will need the following elements: a car resistor, a figure-eight heater and a “snail”. It is a mistake to believe that only “original” spare parts are suitable for repairing a heating device. The main requirement is technical compatibility.
If in doubt, a drawing of the heating system will provide clarity. The further procedure is as follows:
- Cut a new mounting hole. This is done carefully, because the reliability of the heating system’s operation depends on the quality of the preparatory process. It is recommended to place the engine as low as possible in the air duct, otherwise the device will rest against the hood. This should not be allowed to happen, otherwise the stove fan will not last long.
The heating system of a new model is checked by test switching on. It is recommended to switch modes smoothly. The device must remain on each of them for at least 5-7 minutes. The driver’s task is to make sure that the operation of the system is not accompanied by extraneous noise and vibration.
Removing the radiator of the VAZ-2121 stove
The procedure for removing the heater radiator on a VAZ Niva does not require any special skills or abilities. It is important to prepare the necessary materials and tools in advance. Most instructions for repairing car heaters contain a recommendation to drain the coolant before starting work. In practice, many car enthusiasts limit themselves to draining only that part of the antifreeze that is located in the radiator itself and the nearby pipes of the cooling system.
Preparing tools
To replace the radiator, you will need the following tools:
- pliers;
- slotted screwdriver;
- Phillips screwdriver;
- a set of markers for identifying wires;
- spanner set to “7”;
- socket wrench set to “10”;
- socket wrench set to “7”;
- socket wrench set to "10".
Procedure for dismantling the radiator
All operations must be performed in the following sequence:
- Unscrew the left self-tapping screw securing the storage shelf.
The self-tapping screw is unscrewed with a Phillips screwdriver
The right side of the shelf is attached to the upholstery
The central part of the shelf is unscrewed from the front panel
The right edge of the shelf moves down freely
There is a special spike on the left side of the shelf
The lower part of the panel is also fixed with a self-tapping screw
The process is shown on the right side, the left side is similar
The panel is moved to the side
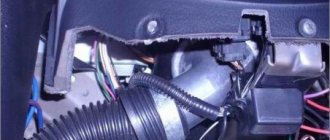
The wire blocks are detached to remove the entire radio panel
After disconnecting the wires, the panel can be easily removed
Loosening the clamp is shown using the example of the lower pipe; a similar operation is performed with the upper
The screws are unscrewed with a socket wrench with a “7” head
The removed seal allows you to remove the radiator pipes from the engine compartment
The fastening nut is unscrewed with a “7” key
The rod is removed from the crane lever
The rod is disconnected from the fan casing
The staples are pryed off with a slotted screwdriver
The casing with the fan is moved to the side
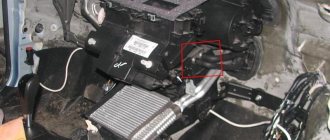
After removing the fan, the radiator is carefully removed from its compartment
The tap and pipes are turned off with a key to “10”
The removed tap is checked for leaks
The bottom nut often falls out and gets lost
Disconnect the outgoing pipe.
The two fastening nuts are unscrewed with a “10” wrench
After dismantling, you should carefully inspect the radiator for blockages in the grille and leaks from the tubes. Based on the results of the inspection, a decision is made on the possibility of repair or installation of a new radiator.
Video: installing a radiator
The process of replacing the heater radiator on a classic Niva has been studied far and wide by many car owners. In fact, the procedure is similar to the entire family of AvtoVAZ classics. However, caution and safety precautions should be observed when working. After completing the repair, before driving on public roads, you must make sure that all components and mechanisms of the vehicle are operating normally. Only then should you begin daily use of the machine.
When starting to tune a VAZ 2131 Niva, every SUV owner must choose one of two options. The first method is budget-friendly; it involves minor modifications to the engine and increased interior comfort. The second option is more expensive, it is aimed at upgrading the suspension of the Lada 2131 4x4 for off-road driving. Let's look at what both methods of improving the VAZ are, and what they give us in the end.
Original parts vs analogues: practical advice
As mentioned earlier, such a choice does not affect the quality of the heating system. At the same time, car mechanics make several reservations. For those who plan to use VAZ stoves, it would be useful to check the power system. It is different for some modifications. That is why all actions are consistent with the drawings.
It is permissible to use the VAZ 2108 heater, provided that two recommendations are followed. Firstly, the mounting socket is 1-2 cm larger than the size of the device. The additional area will reduce the vibration impact. Secondly, the switch is installed taking into account the specifics of the VAZ heating system. You will have to tinker less when minor modifications to the system are needed.
The ventilation system is updated in 1-2 hours, depending on the degree of wear of the engine.
If the factory-installed “snail” has no signs of physical wear, you only need to replace the heater “engine” itself.
It’s worse if the factory equipment of a Chevrolet model has manufacturing defects. A complete replacement of the device is recommended. This will save time.
The operation of the heating system determines the comfort and safety of driving. The driver constantly monitors the system's performance. If extraneous noise appears, it is necessary to urgently carry out a technical inspection.
Heater VAZ 2121, 21213, 21214, 2131 modernized, in collection. with body
The heater is designed for installation on VAZ 2121, 21213, 21214, 2131, Lada 4×4 cars.
The heater is a plastic housing with a built-in electric motor and air blower.
It has a number of advantages over a standard heater:
- The motor is easy to install. Practical silent operation.
- Three-position switch.
- Increased heating speed and air flow into the cabin.
The serial motor with a fan in the cabin can be removed (removal/installation steps are carried out in accordance with routine maintenance), but if you want to have a spare option, you can leave it. In this case, the old motor with an impeller will provide some resistance to air movement
Heater assembly Airflow mode switch Wiring harness Fasteners Air flow distributor
1. The serial motor with a fan in the cabin can be removed (removal/installation steps are carried out in accordance with routine maintenance), but if you want to have a spare option, you can leave it. In this case, the old motor with the impeller will provide some resistance to air movement. 2. If desired, the standard heater can be kept in working order as a backup. In this case, it will be necessary to connect an additional positive wire to the new heater and take into account that the simultaneous operation of both heaters will create an increased load on the vehicle’s on-board electrical network, which is extremely undesirable.
By clicking on the button you will receive all the information on delivery and payment of the method convenient for you to receive the goods. Our employees will calculate for you the most profitable method of delivering the goods you have chosen.
Pickup for everyone who is convenient in Moscow to independently pick up and pay for the goods you have chosen.
Delivery by mail or EMS Post. It is preferable for buyers who live in areas where there are no branches of transport companies nearby. Some goods can be sent by mail (restrictions on weight and dimensions). We will advise you on a more convenient delivery method.
We deliver by courier only in Moscow and the Moscow region. The buyer provides the address and telephone number of the place of delivery of the goods, full name. person responsible for receiving the goods, his phone number. When transferring the goods to the Buyer (Representative), the quality, quantity, and completeness of the transferred goods are checked.
Delivery by transport companies is the most convenient and profitable and often the only way to receive the spare parts you ordered. We work with any Transport companies convenient for you. Which are located in Moscow.
Radiator of the Niva stove
The heater radiator of VAZ 2121, 2131 is not a critical vehicle component. But in cold weather, driving a car with a faulty heater is unlikely to be a pleasure. In addition to the sheer coldness in the cabin, the windows may fog up, which leads to poor visibility, and this is a matter of safety for the driver, passengers and other road users.
Structurally, the radiator is a heat exchanger, or more simply put, a battery, whose task is to heat the air passing through its grille. Externally, it looks the same as a similar unit on other cars.
The same type of heater radiator is used for “Niva” and “classic” VAZs
The Chevrolet Niva radiator is not suitable for the VAZ-2121, 2131 family. This should be taken into account when selecting spare parts in the store.
Radiator location
The heater radiator on the Niva is located under the dashboard behind the center console between the driver and right passenger seats. This is the standard location for the heater in most cars. Compared to many other car models, access to the radiator in the Niva is quite simple. This will take about 10–15 minutes for a semi-skilled specialist.
Radiator design and functions
The stove radiator is a unit in which heat is transferred from the heated liquid to the surrounding air. It consists of two horizontal rows of tubes intersecting with vertical metal plates (ribs). On the sides, the structure is limited by panels that provide the functions of tanks. The incoming and outgoing pipes of the cooling circuit are connected to one of the tanks.
There are two unconnected cavities inside the tank. Antifreeze enters through the inlet pipe into the cavity connected to the upper row of tubes. On the other side of the radiator there is a return tank, through which antifreeze flows into the second row of tubes and moves in the opposite direction to the second cavity of the tank and the outgoing pipe. After leaving the radiator, the antifreeze enters the main cooling system of the car. Antifreeze circulating in the tubes ensures heating of the entire grille, thanks to which heat transfer from the radiator reaches maximum effect.
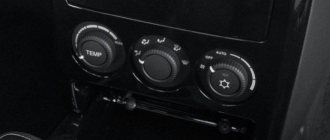
The radiator is installed in the instrument panel console in a plastic casing and sealed around the perimeter with foam tape. Air heating depends on the degree of opening of the valve that regulates the flow of liquid through the radiator. The valve is installed at the radiator inlet and is controlled by the upper lever on the center console.
Cold air comes from the external environment, passing through a hot radiator, heats up and enters the car interior
The main and only function of the heater radiator is to heat the air flow entering the cabin through the air ducts.
Radiators are made of aluminum or copper. The aluminum product does not hold temperature well. A copper radiator works more efficiently, but is more expensive. The advantages of a copper radiator include its maintainability: the ability to seal cracks in the tubes.
Fault Diagnosis
The stove supplied as standard will need to be modified for preventive purposes. The procedure will not take much time, but it will prevent many problems in the future. Driving experience suggests that the first severe frosts will undermine the “health” of the device. The list of main weaknesses is as follows:
- the optimal operating temperature range for model 2121 is from -5 to +10°C;
- inability to warm up the air in the cabin if outside is -8°C or lower;
- when the blowing power increases, the temperature does not increase;
- When driving in 2nd gear, the noise from the Niva's stove becomes significant.
That is why it is better to take the necessary measures in advance. The driver has few alternatives. On the one hand, everything remains in its place. The heating device is used at minimum power. During mild winters this is still tolerable, but with the onset of real cold weather the conditions will become unbearable. On the other hand, it's easy to spend a few hours rectifying the situation.
The presence of an unpleasant sound indicates the need to replace the device. A specialized retail network offers ready-made options for heating mechanisms for Niva. If desired, it can be assembled independently.
The second option is considered more preferable. When you assemble it yourself, you have the opportunity to literally personalize the stove. To do the work yourself, you will need to visit a specialized store or market to buy spare parts.
When purchasing, original parts or analogues are selected. The main thing is that they have a quality certificate. Otherwise, they cannot be installed. It would be useful to rewrite the technical data of the vehicle so as not to exceed the parameters recommended by the manufacturer.
Technical details of the procedure
The efficiency of the new heating system on Niva will be determined not by the cost of the purchased parts, but by their quality. To operate, you will need the following elements: a car resistor, a figure-eight heater and a “snail”. It is a mistake to believe that only “original” spare parts are suitable for repairing a heating device. The main requirement is technical compatibility.
If in doubt, a drawing of the heating system will provide clarity. The further procedure is as follows:
- Cut a new mounting hole. This is done carefully, because the reliability of the heating system’s operation depends on the quality of the preparatory process. It is recommended to place the engine as low as possible in the air duct, otherwise the device will rest against the hood. This should not be allowed to happen, otherwise the stove fan will not last long.
The heating system of a new model is checked by test switching on. It is recommended to switch modes smoothly. The device must remain on each of them for at least 5-7 minutes. The driver’s task is to make sure that the operation of the system is not accompanied by extraneous noise and vibration.
Fan replacement
Experienced car owners recommend not stopping there and continuing to modify the stove by tuning the fan.
Some people suggest getting rid of the fan installed by the manufacturer and installing a figure eight fan instead.
If you also decide to carry out such a replacement, you need to additionally decide whether you will leave the original control of the stove or also replace it with a “eight” analogue.
Having decided on the second option, take care of purchasing the following additional items:
- fan speed switch;
- additional resistor for the stove.
So, after you have completely prepared all the necessary components, you can proceed directly to the process of modifying the fan.
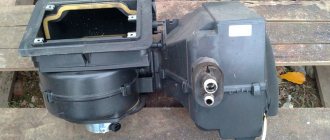
Initially, you should dismantle the old air supply box. Unfortunately, despite the fact that this requires unscrewing only four nuts, it will not be possible to do this without outside help. Your partner will need to hold the screws under the hood while you unscrew them using a wrench.
Original parts vs analogues: practical advice
As mentioned earlier, such a choice does not affect the quality of the heating system. At the same time, car mechanics make several reservations. For those who plan to use VAZ stoves, it would be useful to check the power system. It is different for some modifications. That is why all actions are consistent with the drawings.
It is permissible to use the VAZ 2108 heater, provided that two recommendations are followed. Firstly, the mounting socket is 1-2 cm larger than the size of the device. The additional area will reduce the vibration impact. Secondly, the switch is installed taking into account the specifics of the VAZ heating system. You will have to tinker less when minor modifications to the system are needed.
Comprehensive modification of the stove/heater of Niva 4x4 (VAZ 2121, 2131)
Having set out to increase the efficiency of my car's heater, I re-read the available methods on the forums, and realized that these methods have some drawbacks that did not suit me. For example, installing a fan from a VAZ 2108 allows you to increase the air flow through the heater and blower nozzles, but this air is taken from the street, it is icy, and therefore the interior begins to warm up only after the engine has completely warmed up. In addition, this method requires significant modifications to the design of the heater, as well as the cost of purchasing a fan. Next, I’ll tell you how to modify the stove on the Niva with your own hands without investment and in a short time.
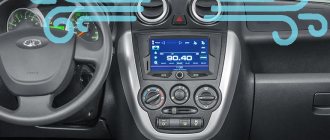
Improvement No. 1. We take air from the cabin
The main disadvantage of the Niva heater is that all the air into the heater radiator comes from the street, and when the air intake flap is closed, air circulation and heating stop completely. To eliminate this drawback, I disassembled the heater (I had to drain some of the antifreeze and disconnect the heater radiator pipes), and in the side wall of the heater housing, opposite the wall where the radiator tubes exit, I made a hole in the shape of a rectangular trapezoid. I did it in such a way that there was 1.5-2 mm of the body wall left to the boundaries of the plane in which I made the hole, and 6-8 mm from the side of the stiffener for attaching the petal valve. I made the hole using a drill, marked it, drilled along the contour of the small diameter holes, then connected the holes using a knife, then filed the edges of the resulting hole, giving it its final shape. The area of the resulting hole was approximately 25 square centimeters. It is through this hole, when the heater air intake flap is closed, that air is drawn from the passenger compartment.
Since the salon is a closed space, air circulation occurs in a closed circle, and the warming up air of the salon, passing through the heater radiator, becomes increasingly hotter at the exit. Despite the small size of the hole, due to the absence of a supply of icy air from the street, the time for warming up the interior to a comfortable temperature and melting icy glass is reduced by 4-5 times, and it is possible to achieve a comfortable temperature even in severe frost.
To prevent cold air from entering the cabin through the hole when the air intake flap is open and the heater fan is turned off, a petal valve is installed on the hole on the inside of the heater housing, which does not interfere with air intake from the cabin. The petal valve is a rubber band cut from a car chamber (preferably from a truck), 1.5-3 mm thick, in the shape of a hole, but slightly larger, and attached to a bolt in such a way that it can freely bend inside the heater body, opening the access of air from interior, and fit snugly against the wall of the heater housing, blocking the hole for the passage of cold air into the cabin, past the heater radiator.