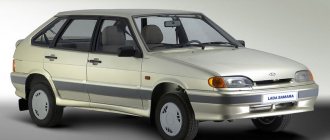
Welcome! Bulbs in the headlight - they burn out over time and become unusable, therefore, as such, light bulbs are one of the consumables that are changed frequently and require mandatory replacement in case of burnout, since if there is no light, then driving normally at night Not sure it's going to happen. By the way, you have already noticed the title of the article, that is: “Replacing all the lamps in the headlight,” and not everyone knows what kind of light bulbs are included in the headlight, as when buying a car, as a rule, people do not bother about repairing it and thus little what they understand about it, so we explain! The front headlight includes, firstly, a turn signal lamp, secondly, a low beam and headlight lamp, and thirdly, a high beam lamp, and the front headlight is also necessarily equipped with a side light lamp; we described in detail how to replace all these lamps in this article.
Note! To replace the lamps, you will need to stock up on: If possible, only a clean rag to wipe the back side of the headlight, or you can not wipe anything, but simply use gloves to replace!
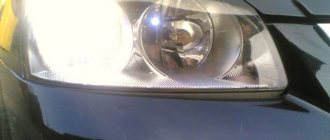
Which bulb is located where in the headlight? To understand this issue, you first need to look at the photo below, this photo shows the left headlight removed and disassembled from a VAZ 2110 car, as you can see, the arrows indicate where exactly which lamp goes, namely the red arrow is the low beam lamp, and The blue arrow is the high beam light bulb.
Note! This is not a whole headlight block (a headlight block is when the headlight comes in its entirety, together with the turn signal, that is, in a word, just a standard healthy block that includes the main light headlight, which is shown in the photo above, as well as the headlight in which the turn signal itself is located)
When do you need to change a particular lamp in a headlight? In fact, this is all done at your discretion, but there is just one thing! When the headlight is not on, driving in the dark is very dangerous, since the road on the side where the headlight is not on is not illuminated, thereby you are putting yourself and other people at risk, which can even cost your life.
And also, recently, as many already know, the prices for fines have increased, and therefore driving with a headlight not on is quite expensive, since constantly paying for the same violation will not make anyone happy, but will only disappoint.
How to replace all the lamps in the front headlight, also known as the headlight unit, on a VAZ 2110-VAZ 2112?
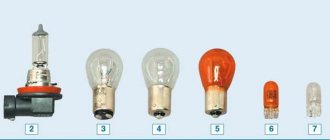
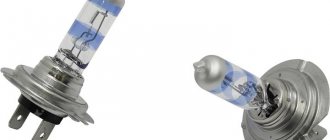
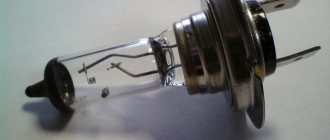
Note! Before you start, you should definitely know some nuances that relate to light lighting in a car, namely, the low-beam lamp and the high-beam lamp are absolutely identical, so if you come to the store and hear the answer: “Do you want a low-beam lamp or a high-beam lamp? ?”, then in this case, explain to the seller or leave the store, because both of these lamps are installed identical from the factory on these models, namely, the lamps are installed only “H1”!
We also need to clarify one nuance for you, the car of the VAZ 2110 family spent a lot of time refining it, adjustments were made to it, injection engines were installed in it, etc. So, the optics were also subjected to minor changes, for example, the rear cover of the headlight at first was installed on the ten with a rotation mechanism; the same thing as on the nine was installed and has not changed to this day, we will write about this in more detail in the article so read more carefully!
We also note that on 8-valve engines the headlight is much easier to replace in both the right and left headlights, because there the engine is less voluminous and thus takes up less space compared to a 16-valve engine, as well as the left headlight (If you look as the car moves), it is replaced with a slightly heavier one on the right, since a battery is installed on the left side of the engine compartment, which in some cases will prevent you from replacing the light bulb, if you need to, then remove the battery from the car, on how to remove the battery see the article: “Replacing the battery on a VAZ”!
And in conclusion, a few words about how to handle a new lamp, namely, never touch the glass bulb with greasy fingers, or indeed even clean hands, because this touch can significantly reduce the service life of this lamp and you will soon have to replace it, Therefore, to prevent this from happening, it is recommended to replace all lamps with clean gloves!
Replacing the low beam lamp and dimensions:
1) In order to replace this light bulb, first take a cloth (at your discretion) and use it to wipe the back of the headlight to remove dirt and dust to make it more pleasant to work.
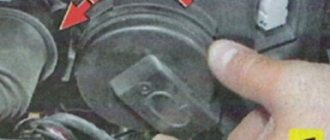
2) Then, with your hand from below, press the latch that secures the back cover, and thereby carefully lift this latch up and thereby completely remove it.
Note! This latch, as already mentioned earlier, is removed in different ways on different models, so if you have this latch with a rotational mechanism, then in this case you will see arrows on it, so follow these arrows with your hand, turn the latch in the desired direction and then it is very easy will be removed from the rear of the headlight assembly!
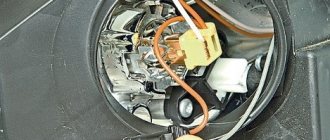
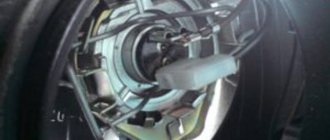
3) Next, you will see before your eyes this picture (see photo below), you see in the photo a block with wires, which is indicated by an arrow, so carefully disconnect this block by hand and then lower it down so that it does not interfere (This block will hang in this case on the wires).
4) Then, when the block is disconnected, you will see the low beam lamp which will be secured by a metal latch. In order to remove the headlight, press your hand on the tip of the metal latch and thereby disengage it from the latches indicated by the arrow, and after disengagement, fold this latch to the side.
5) Now grab the base of the light bulb with your hand and then remove it from the headlight, and after removing it, replace it with a new one and assemble all the removed parts in the reverse order of removal.
Note! When installing, be sure to ensure that the holes on the light bulb socket align with the holes on the headlight unit itself; for more details, see the photo below:
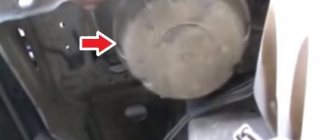
6) By the way, regarding the side lamp, this lamp is located just below the main light, namely in this place where it is shown by the arrow:
7) In order to replace this lamp, simply grab the wires that are connected to it with your hand and carefully remove the bulb from the headlight by the wires.
Note! If possible, then try to remove the headlight not by the wires, but by its base part itself, and if that doesn’t work, then carefully pull it out, as was said a little earlier, by the wires!
 And finally, remove the lamp itself from the chamber, to do this, grab the lamp with your hand, press slightly and turn it, and after it disengages, remove it from the chamber.
Replacing the high beam lamp:
In order not to describe everything in detail, we’ll just say a few words. Firstly, the back part of the cover from the high beam lamp is removed in exactly the same way as from the low beam lamp, so for all the details on replacing this lamp, see the section above on replacing the low beam lamp, because replacing both lamps is carried out almost identically, why practically you ask? Let's explain! In the place where the high beam lamp is located, the design is essentially the same, but there is no side light lamp there, so when the back cover is removed, all the insides look like this:
Replacing the turn signal lamp:
1) In this case, everything is very simple, first of all, you will need to understand where this lamp is located, so that it is more clear to you, see the photo below:
Note! As you already understood, in the photo the arrow indicates only the chamber or, as it is also called, the lamp base, but the lamp itself is not visible, so in order for you to be able to see it and easily remove and change it, grab this base part with your hand and then turn it it clockwise by a small degree, and thereby remove it from there!
2) When the base together with the lamp itself is removed, grab the light bulb with your hand (Indicated by the arrow) and then slightly press on it and turn it counterclockwise and remove this lamp.
Note! When you install a new lamp, make sure that it fits into the grooves, one of them is indicated by an arrow in the photo, and when it fits in there all the way, turn it so that it locks, and after fixing, check that it doesn’t fly out of there!
Important! When you buy a new lamp for either low beam or high beam, be sure to look at the markings that are placed on the base of the bulb, because cars may have bulbs for low beam, for example H1, and for high beam, for example H4, and therefore if If you also install an H1 lamp on the high beam, then both headlight units will shine differently! (Different lamps can only be installed by the previous owner of your car, because from the factory, as mentioned a little earlier, the same H1 bulbs were installed on both the high and low beams)
By the way, before changing the lamp, check the fuse that goes to it; perhaps it has simply blown and because of this the lamp does not work!
Additional video: For more information on how to replace all lamps, see the interesting and instructive video below:
The vast majority of motorists are faced with the need to replace lamps on a VAZ 2110. Factory components sooner or later wear out or do not initially meet the driver’s requirements. This applies in particular to low beam bulbs, which may not suit the needs of motorists for several reasons. Such as:
- too dim road lighting;
- rapid wear, breakdown;
- inappropriate shade of color (for example, headlights with a white and bluish glow are well suited for driving during adverse weather conditions).
Since the driver needs to drive with low beam both at night and during the day, the bulbs in the system become unusable relatively quickly.
If the low beam lamps on a car break down, according to the law, it is required to urgently replace it - for driving in the dark without the lamps on, you will face a fine. In addition, it is unsafe for you and other road users.
In order to choose which types of low beam lamps are suitable for installation on a VAZ 2110, you need to understand how the electrical circuit of your “ten” functions. The following components are connected to it:
- light switch, located in your car on the panel at the front of the car;
- headlight mode switch, which you can find on the steering column;
- relay for switching the modes of lamps located between the high and low beam bulbs;
- fuses (4 pieces), which are located on the installation block and ensure the operation of the light electrical circuit;
- signal lighting that notifies the motorist that the high beam is operating.
For the VAZ 2110, as well as models 2111 or 21124, it is important to choose lamps that will illuminate the road and prevent eye fatigue when driving in the dark.
LED lamps - why they are better
Many foreign cars these days are equipped with LED lamps instead of the usual incandescent lamps. Such lamps are installed in rear lights as brake lights, side lights, and turn indicators. This is no accident. This light gives the driver behind him additional time to make a decision and perform a maneuver. Advantages of LED lamps:
- longer service life, higher light output;
- The LED lights up many times faster than a conventional lamp. This is an additional 5-6 m at a speed of 100 km/h.
- Incandescent lamps fail earlier most often due to strong vibration, especially considering the quality of Russian roads. In terms of this indicator, LEDs are much more durable and vibration is not a problem for them.
Here is a video review that will be useful to watch. This shows the operation of the LED lights at the rear.
Thus, their components will not be difficult. All you need to do is strictly follow the photo instructions. You can save significantly on car repairs if the car owner does the work himself with his own hands. You need to remember the rules that must be followed when resorting to doing the work yourself:
- carry out a thorough diagnosis;
- follow advice and recommendations for repairs;
- use high-quality factory-produced parts;
- check the operation of the machine systems after repair.
But there will be no problems if you do everything as the instructions advise. Today in stores the price of tail light bulbs, as well as the headlight kit itself, is not so expensive. So it’s important to try to replace it yourself.
Types of lighting
To ensure reliable and long-lasting headlight performance, car enthusiasts can choose from LED, xenon, halogen or conventional incandescent low beam bulbs
The following types of lamps are popular among owners of the VAZ 2110, as well as 2111 models:
- Philips Vision. Capable of providing a third more light than halogen models. They are also significantly superior in quality and durability to the factory lighting of many car models. Often these are the lamps that are installed in machine production, which is an indicator of the high quality of the model. In terms of price-quality ratio, they are considered one of the best options for VAZ;
- Philips VisionPlus. The model is a modernized Philips Vision type. It illuminates the road surface 60% better than the standard halogen model, which provides greater light output;
- Philips X-treme Vision. It is the most powerful lighting component because it increases luminous flux by 100%. It is not installed during the production of the VAZ, so it must be purchased separately;
- Osram Night Breaker Plus. With them the light is 90% brighter. In addition, the glow of the product is 10% whiter than conventional models. This allows you to significantly (up to 35 meters) increase the length of the illuminated road surface. Also, the products last 50% longer than ordinary halogen varieties;
- Philips Diamond Vision 5000 K. Capable of increasing the brightness of light by 20% relative to the standard lighting in the VAZ 2110. The low beam in the headlights when using such products becomes as close as possible to natural light in the daytime. They are more expensive than most of the presented models;
- Osram CoolBlue 5000 K. High color temperature provides bright white (but close to daylight) illumination, which does not tire the driver and is familiar to the eyes.
Device
Low beam lamps are a component of the VAZ 2110 headlight units, which also include high beam headlights. In addition, lighting devices also include PTF (not available on all models, but, in principle, many install PTF on their own) and various backlights.
Standard lamps for low beam and PTF are produced by the Avtosvet plant, located in the city of Kirzhach. These lamps are halogen, but today many people believe that LED lamps are much better, although their cost is also higher than Kirzhach.
Lighting replacement technique
If you have already decided which lamps you plan to install on the headlights of your VAZ, you need to replace them. If you are going to do it yourself, the easiest way to install new lighting in the headlights will be relevant for you.
To do this, follow several steps:
- Dismantle the rear casing (box), which is located on the headlight unit of the car.
- Disconnect the wires from the terminal block under the housing cover.
- Remove the spring that secures the bulb to the headlight unit.
- Rotate the holder of the lighting product and pull it out of the headlamp.
After this, you can make a replacement in the lighting system, following the reverse algorithm.
In some situations, it is not necessary to replace the lamp on a car - the contacts in the lighting system may oxidize. Some car enthusiasts do not know that in certain cases, when the light is not on, the wiring connections in the blocks come loose. And sometimes the reason for the deterioration of surface illumination can be a banal fogging of the light diffuser due to a violation of the tightness. Replacement of equipment is not necessary - it is enough to repair or wipe the components of the light system.
In the case where the low beam provides insufficient illumination, the low beam lamps of the VAZ 2110 need to be replaced as soon as possible. It goes without saying that driving a car with non-working lighting, especially in the dark, is unsafe, and the legislation provides for this. Replacing low beam lamps on a VAZ 2110 can be easily done independently. In addition, you can leave the solution to this issue to specialists. This question is individual, and the decision must be made depending on the availability of skills. Although there is nothing complicated about this replacement.
Replacing the Dashboard Lights of a VAZ 2109 ~ AUTOTEXNIKA.RU
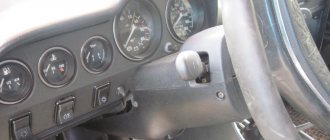
Repair of a high panel VAZ 2109 So, you have a need to remove the instrument cluster on a VAZ car with a recently appeared high panel.
First, we disconnect the negative cable from the battery. Replacing the ignition switch of a VAZ 2109 - YouTube. Replacing lamps in the dashboard Styling the interior lighting of the VAZ 2110, replacing light bulbs. Replacing the steering rack on a VAZ 2109 - LuxVAZ. Next, we also disconnect the speedometer cable from the corresponding drive located on the gearbox.
Now you can remove the switch that regulates the outdoor lighting by prying it up with a screwdriver. And you can now disconnect the connector from the switch and push it directly into the dashboard trim. Well, to replace the lamp that illuminates the switch, you need to squeeze it with a screwdriver
antenna from the socket. — We continue, removing both the socket and the lamp from the switch. — We remove the lamp from the socket. — We pry it with a screwdriver and take out the emergency light switch. After disconnecting the connector from the switch, you need to push it deep into the
dashboard
.
Now you will need a Phillips screwdriver. With its help, you will unscrew a pair of fastening screws for the dashboard console trim
. Replacing a light bulb in a panel of light bulbs in a panel in the dashboard. Well, we remove the trim. Now we turn to the cigarette lighter, removing the heating element, and also remove the ashtray directly from the socket.
To dismantle instruments, you can use two methods: 1. You can remove from the dashboard
shield. 2. Or remove the panel trim along with the shield.
VAZ 2109 replacing backlight bulbs in the instrument panel
If one or more light bulbs
in the instrument panel have stopped functioning, it is necessary to check the integrity. SO, LET'S REMOVE THE INSTRUMENT
PANEL
PANEL. There are two ways to dismantle the instrument cluster: remove the instrument panel panel or remove the
panel
assembly with the panel.
We remove panel panel.
—Again, using
a screwdriver,
you need to press out 2 spring brackets.
All this is done through the radio socket. - Using the same screwdriver, you need to press out the plastic antennae (two) directly to the dashboard. - Lift the panel, after which you will have to press out the remaining third fastening bracket. - Now we disconnect the connectors from the cigarette lighter, as well as all forms its illumination, after which you need to remove the dashboard panel.—
We attach plastic antennae, as well as spring brackets, to the dashboard trim.— When dismantling the trim together with the shield on both sides of
the panel
, you need to remove the side nozzles of the ventilation system.— Take a Phillips screwdriver to unscrew one self-tapping screw on each side from the side fastening of the cover. — Now you need to unscrew 1 self-tapping screw of the main fastening from the cover, again through the radio socket. After pressing out the antennae of the lower fastening of the shield (lower), you need to remove the cover together with the shield. To replace the lamp illuminating the switch, it is necessary to remove the socket together with the lamp from inside the shield, turning it in the holder.
— Squeeze the “petals” of the cigarette lighter... — Pull it out, and then remove it from the dashboard trim
.— Using a Phillips screwdriver, you need to unscrew both screws directly to the panel. — Now move the combination away from
the dashboard
. Your next action will be to unscrew such an element as the cable union nut on the speedometer.
That is, of course, if you have a car with a carburetor engine. Our task is to disconnect the cable from the speedometer, first unscrewing the nut (cap nut). Well, you can now remove the speedometer drive cable. It comes out through the space in the front panel
. Disconnect the connectors. Replacing light bulbs in the dashboard -. Replacing rear struts (shock absorbers) on VAZ 2110, 2112, 2114, Kalina, Granta, Priora, 2109 and 2108 - Duration: 18:27. And remove the instrument cluster.
Well, assembling and installing the instrument cluster must be done in the reverse order. If you have a Peugeot car, then you will be interested in visiting the Peugeot 207 car owners club. Here you will receive the most important and interesting information on the repair, maintenance and operation of the car. Car news and reviews, new products from the global car market.
How it all works
First of all, if the question arises of replacing the lamp responsible for the low beam, you should understand the reasons that could cause the malfunction. It was as a result of this that the light bulb stopped burning. The VAZ 2110 is equipped with a headlight unit, inside of which there are direction indicators and also low and high beam lamps. The electrical wiring provides two special plugs for connecting both one and the other type of headlights.
Note. There are differences between the two sets of headlights. In one version, the headlight unit contains two single-filament lamps for operation of both high and low beam lighting, and the second option involves one double-filament lamp.
To understand the operating principle of the VAZ 2110 electrical circuit, you need to understand which elements take part in it:
- It is impossible to imagine normal operation without an external light switch (it is located in the cabin on the front panel);
- Equally important is the headlight switch located on the steering column;
- And there’s nothing to say about the low and high beam relay;
- In addition, four fuses are important, which are located in the mounting block and are responsible for normal operation;
- And, of course, the high beam warning light.
Ideas for tuning headlights and their implementation
One of the options for tuning VAZ 2112 headlights with your own hands is to install alternative optics. It is reliable, improves the quality of light, increases functionality, and changes the appearance of the car. With the help of design, headlights can be given different shapes. In addition, you can tint the headlights to match chrome, paint them dull black or any other color.
Angel eyes headlights on the VAZ 2112 have become very popular lately. They are built into the headlight unit, giving the car an unusual appearance. They install sticks on dozens of headlights.
Tuning VAZ 2112 headlights can involve installing additional protection in the form of grilles or by gluing armored film. This will protect the optics from mechanical damage. You can install a mesh type plaster.
.Asks
: Vasily Polunkin.
The essence of the question
: the low beam on the VAZ-2112 has stopped working, what should I do?
Good afternoon. I literally just got out of the car and saw darkness. The left low beam light does not light up. On the right it’s burning, but I had some kind of cloudiness there, it’s hard to see. I swapped them, left to right, the right one shines, the left one doesn’t.
Then I wonder why the left headlight does not light up. The far one on the left works, but the near one does not. What to do?
The following two tabs change content below.
An expert on Lada cars with many years of experience. I own a Lada Granta car, I collect cramps based on the Priora. Sometimes I stay overnight in the garage. My wife is more jealous of cars than of women.
If nothing happens when you turn on the low beam. Nothing, even the indicator on the instrument panel does not light up, which means the power button is faulty.
Fuse
In most cases, if any electrical circuit on a car stops working, the fuse is to blame. Most likely there was a power surge and the fuse was blown.
Location of the fuse for the left and right low beam lamps
- F2
– 7.5A – Left headlight (low beam) - F12
– 7.5A – Right headlight (low beam)
Fuses are important components
Turning on the headlights must be accompanied by illumination of all four filaments of the exterior lighting lamps. When one or more of the lamps do not light, you need to check the integrity of the fuses located in the fuse box. This can be done from inside the car. Each of the fuses performs a protective function, having its own purpose:
- One is responsible for the low beam of the left headlight;
- The other is for the high beam of the left headlight;
- The third is for the low beam in the right headlight;
- The fourth is for the high beam of the right lamp and warning lamp;
Common optical problems and how to fix them
Problems with automotive optics can be divided into mechanical and electrical problems.
During operation, automotive optics are subject to mechanical stress. It can be damaged by small and large stones, sand, branches of bushes, etc. The easiest way to eliminate damage is to replace the headlight or flashlight. To do this, you need to know how to remove the headlight on a VAZ 2112. But you can restore the optics with your own hands.
The following mechanical problems are possible:
- cracks and scratches on the glass surface;
- damage to fasteners;
- violation of tightness.
Scratches and cracks can be eliminated by grinding and polishing. Destroyed fasteners are replaced with new ones. If the seal is broken, the optics sweat, so it needs to be restored, as visibility deteriorates and the contacts oxidize. For serious mechanical damage in the form of chips, tools are selected depending on the degree of damage.
Before repairing, you should study the material used to make the optics. Depending on this, you can use cold or conventional welding.
When it comes to electrical problems, the most common cause is burnt out light bulbs. In this case, they need to be replaced.
If the reason is not the light bulbs, then the following malfunctions are possible:
- fuse is blown;
- The switching relay does not work;
- contacts are oxidized or burnt;
- switch is faulty;
- The integrity of the wiring is broken; ground is missing.
If the brake lights of the VAZ 2112 do not light up, the turn signals do not work, or the light has completely disappeared, you need to sequentially check all the elements that are part of the lighting system, including the fuse box and power supplies.
Easy lamp replacement
If the check shows that the fuses are intact and their contacts are not oxidized, you need to get out of the car and check the integrity of the lamps:
- open the hood;
- remove the rear casing;
- disconnect the wire block;
- remove the spring (which secures the light bulb);
- remove the light bulb holder by turning it;
- replace the light bulb with a new one.
Checking and adjusting relays
If the lamps are intact, you should check the two relays, which are marked accordingly on the equipment diagram. The cause of their malfunction may be oxidation of the contacts or their burnout, which can be eliminated by regular cleaning. If, however, the relay is completely out of order, then it is necessary to replace it.
Replacement and adjustment of other elements responsible for low beam
After checking and making sure that all of the listed devices are in working order, you will need to check the reliability of the connection in the blocks included in the electrical circuit of the head lighting. In addition, you should check the fastening of the headlight wires. One such fastener is located on the left side, next to the battery on the same mount as the air intake. The second one is on the right, in the same place where the adsorber is located.
Note. If the above measures do not help, you should first remove the switch that regulates the headlights. After this, remove the switch responsible for the external lighting. Then check the status of their contacts.
In addition to those malfunctions that may be associated with the headlight electrical circuit, the headlight lens may fog up. This may be a consequence of water getting under the headlight during washing or after rain, which is a consequence of insufficient tightness of the lens glass. Knowing what reasons affect the performance of the low beam lamp, you can easily fix it.
Replacing the low beam lamp by removing the headlight unit
If the cause of the malfunction of the lamp lighting is determined and there is a need for replacement, then to remove it you need to dismantle the headlight unit. The main difficulty will be the decorative trim (eyelash). To be able to get to it, you need to remove the headlight mounting nut. In particular, for the VAZ 2110 you need to loosen the front bumper and remove the headlight.
Note. The work should be done indoors, otherwise the plastic becomes brittle in the cold.
Further actions should be carried out in the following order:
- Disconnect the negative cable from the battery;
- Disconnect the two electrical connectors of the headlight unit;
- If there is a fender liner, you need to unscrew it from the bumper side (usually it is fixed with 2-3 self-tapping screws);
- Using a 10 mm wrench, you need to unscrew the two bolts that hold the headlight on top;
- Next, you should unscrew the bolts that hold the decorative radiator grille (usually two bolts);
- Then, lifting the grille, release two latches on the right side;
- Remove the grille.
After removing the grille, you can continue the process of removing the headlight:
- Unscrew the lower headlight mounting block;
- Unscrew or slightly loosen the bolts of the upper headlight mounting;
- Carefully, use a screwdriver or your fingers to pull the edge of the decorative trim (eyelash) away from the headlight;
- In the resulting gap you can see a plastic latch (with its help, the edge of the eyelash is attached to the edge of the wing). You should very carefully remove the tongue from the place where it engages with the wing. This can be easily done with your fingers.
- Then, slide the cover towards the center and remove it.
Note. It is recommended to lubricate the eyelash with silicone lubricant before removing it. Lubricate along the entire arc of the attachment to the bumper.
- Next, you need to use a screwdriver to unscrew the nut that attaches the headlight to the bracket;
- Then take out the headlight unit;
- Next, use a screwdriver to pry the hydraulic corrector cylinder retainer, then turn it and remove it from the housing.
Note. If there is a need to replace the headlight glass, then you need to unfasten the six fastening latches and remove the glass, after first removing the sealant layer.
To continue the process, you should do the following:
- Turn the turn signal bulb socket counterclockwise and pull it out together with the bulb;
- Carefully press the lamp inward and turn it counterclockwise, gradually removing it from the socket;
- Turn the headlight cover counterclockwise, then remove it;
- Disconnect the electrical wire from the low beam lamp;
- Lightly squeeze the spring clamp and remove its antennae from the grooves;
- Pull the spring clip upward and then remove the low beam lamp.
Note. When working with halogen lamps, under no circumstances should you leave any greasy marks. It follows from this that it is better to work with gloves, but if contact still occurs with your fingers, then the lamp must be degreased with alcohol.
After this, you need to screw a new working lamp into place.
Replacing high beam lamps and parking lights
If there is a need to replace the main beam lamps of the headlights and dimensions, then to remove them you need to unscrew the second headlight cover. Then do the following:
- Disconnect the electrical wire from the high beam lamp;
- Remove the spring clamp antennae from the grooves;
- Remove the high beam headlight bulb;
- Disconnect the electrical wire from the side light lamp and remove the socket with the lamp;
- Remove the faulty lamp from the socket and replace it with a new one.
Assembling and installing the headlight unit must be done opposite to the dismantling process.
Note. The direction of the headlight beam can be adjusted by turning the screws. These screws rotate the optical element in the horizontal and vertical planes.
Adjusting the headlights
After the low beam lamp has been replaced and the headlight unit has been installed in place, it is recommended to adjust the headlights. This procedure is important for vehicle safety.
Note. During operation, there are usually no significant changes in the headlight adjustment, but if the car is burdened, the adjustment should be adjusted.
To adjust the headlights, you need to do the following:
- Find a horizontal, flat area and place the car so that the screen (the wall of a building or garage) is about 5 meters away from it;
- You need to place an assistant in the front seat or put some kind of load weighing about 75 kg;
- On the screen, draw a mark in the form of a horizontal line at 600 mm and another one, 75 mm below the first one. This is the distance that should be from the center of the headlights to ground level;
- You need to draw three more lines on the screen. One of them is axial. The distance from it to the centers of the right and left headlights was the same. The second and third lines should correspond to the centers of the headlights and be at a distance of 554mm from the center line;
- Next, you need to set the headlight hydraulic adjustment handle to a position characteristic of the minimum load;
- Cover one of the headlights (with cardboard or plywood);
- Turn on low beam headlights;
- Adjust the direction of the beams of light from the open headlight;
Note. The direction of the light beams is adjusted using screws with plastic heads, which are located on the rear wall of the headlamp. The bottom line on the screen must coincide with the upper boundary of the light spot, and the point where the horizontal and vertical sections of the light beam intersect must coincide with the vertical line of the center of the headlamp.
Next, in the same sequence, open the low beam lamp of the second headlight. The process of replacing the low beam lamp and adjusting it can be considered complete. It is recommended to watch this video before the replacement process.
Workflow Description
Let's consider two options - when you only need to replace the low beam lamp on a VAZ 2110 and when you need to remove the entire structure for repair and maintenance.
Replacing the lamp
To carry out this process, you do not need any additional tools; it is enough to purchase new lamps, their type H1 60/55 Watt for combined options and H7 55 Watt for individual designs.
Important! It is better to change the elements in two headlights at once, since the light may differ, and car enthusiasts have noticed that if one new lamp is installed, the second one fails much faster
The LED low beam bulb for the VAZ 2110 is an excellent solution, characterized by high quality work and durability, the only significant drawback is the high price
The workflow is as follows:
- First of all, you need to open the hood and secure it. since access to the element body is not hampered by anything, you do not have to further disassemble any systems in order to increase the convenience of the process. The only thing is that you need to remove the battery on the right side.
- We recommend wearing gloves. because there are a lot of protruding elements under the hood that can scratch your hands.
- Before starting work, it is imperative to remove the terminal from the battery. this is necessary when carrying out any work on the electrical equipment of the car to prevent damage to the system and avoid electric shock.
- Replacing the low beam bulb on a VAZ 2110 begins with removing the plastic plug. located behind the installation site of the lamp we need. Everything here is very simple and quick: carefully turn the element counterclockwise about half a turn and remove it.
The plug must be intact and fit tightly to the body, otherwise moisture and dust will get inside, which will cause malfunctions in the system and corrosion on metal elements
- Next you need to remove the connecting block. this is also done very simply: press the latches on the sides of the housing and pull the assembly away from the headlight. You cannot pull the VAZ wires. since you can break the contacts, and the latches will not release the chip from the seat. After removal, move the assembly to the side so that it does not interfere with you in the future.
- After this, you need to carefully unscrew the latch. To do this, simply press it on both sides and remove it from engagement with the hooks on the body. Everything is very simple, and you can easily figure out how to do this when you see the design with your own eyes.
The spring clamp holds the lamp as tightly as possible and securely fixes it in its place
- When all the above work has been completed, all that remains is to remove the lamp from the housing and replace it with a new one. At the same time, always hold it by the base; touching the glass part is strictly prohibited, since oil from the skin causes overheating of certain areas and rapid failure of the element.
- Assembly is carried out in reverse order. after this, the same process is repeated with the second headlight, usually all work takes no more than half an hour.
Removing the headlight
Sometimes it is necessary to repair individual elements or replace the entire headlight; there are also cases when the connector cannot be removed and to dismantle it it is better to remove the entire structure.
The process is performed in the following sequence:
- First you need to remove the radiator grill so that you can get to all the fasteners.
- Next, you need to unscrew three bolts to free the housing; their location is shown in the photo below.
All fasteners are easily accessible
- From the side of the wing, use a screwdriver to carefully pry up the decorative trim located below; when you release it from the latch, carefully snap it off until it comes out completely.
- Below you will see another bolt with a 10mm head that secures the headlight unit to the bracket; it also needs to be unscrewed.
- Next, pull the housing forward, after which you need to grab the hydraulic corrector housing and carefully turn it clockwise 90 degrees, after which this unit can be removed from the housing.
This is how the hydraulic corrector is removed
Advice! If you need to disconnect the turn signals, then everything is simple - unscrew two screws in the rear.
Finally, if you need to replace the glass, then unsnap three latches at the top and bottom, after which the sealant is carefully cut off with a sharp knife and the damaged element is removed. After this, the ends are cleaned, a new compound is applied, onto which the glass is placed and fixed with clamps.
Replacement of all headlight bulbs on a VAZ 2110-2112: low and high beam, dimensions and turns
As for replacing light bulbs, this process is very simple; even novice motorists can do more complex work. The video in this article will help you understand the process in great detail.
Other faults
It is not so rare that the culprit of a problem is the two relays responsible for the headlights. The most common reason leading to relay malfunctions is contact oxidation. In this case, most often the lamp does not burn steadily, but blinks.
It is enough to clean the contacts, and the relay will work properly again. If the reason is burnout and failure, such a relay is replaced with a new one.
Another possible problem is in the network. You need to check all the contacts of the wires going to the headlights, PTF, as well as instrument lighting.
If this does not help, then remove the switch - the headlight dimmer, then the exterior lighting control and check their contacts.