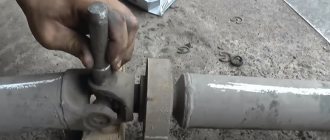
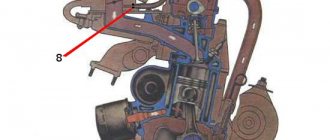
Heating and ventilation system
1 – deflector;
2 – air duct for heating the windshield; 3 – air supply cover; 4 – radiator; 5 – radiator casing; 6 – heater tap rod; 7 – outlet pipe; 8 – underwater pipe; 9 – heater tap; 10 – air distribution cover; 11 – heater fan electric motor; 12 – fan impeller; 13 – additional resistor; 14 – internal ventilation duct; 15 – lever of the air distribution cover; 16 – control lever bracket; 17 – air supply cover control handle; 18 – heater tap control handle; 19 – draft of the air supply cover.
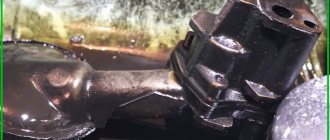
Heater operation diagram
1 – air distribution cover; 2 – fan electric motor; 3 – impeller; 4 – heater tap; 5 – underwater pipe; 6 – outlet pipe; 7 – radiator casing; 8 – air supply cover; 9 – hood;
10 – deflector; 11 – air duct for heating the windshield; 12 – drive rods; 13 – control lever bracket; 14 – control handles; 15 – radiator; 16 – internal ventilation duct; 17 – lever of the air distribution cover.
The heating system is liquid. Coolant from the engine cooling jacket is used as a coolant. The system consists of the heater itself, a bracket with control levers and air ducts. The heater housing contains a radiator with a tap, an electric fan and two air dampers.
The valve and air intake damper are connected by flexible rods to the levers of the control unit. The extreme right position of the upper lever corresponds to the full opening of the valve and the maximum flow of coolant through the heater radiator.
With a similar position of the lower lever, the outside air intake damper is fully open, which corresponds to the maximum air flow through the heater. Rotating deflectors on the instrument panel allow you to direct air flow to heat the windshield, front door glass and interior. The lower damper (air distribution cover) is not connected to the heater control unit.
We open and close the flap using the lever attached to it on the left (driver's) side.
The air flow rate through the heater is controlled by a three-position switch. They can set one of two operating modes of the electric fan – minimum and maximum.
ATTENTION! Do not turn on the electric fan when the air intake damper is closed and the heater tap is open.
Features of the heating equipment on the VAZ-2106
Problems with the stove on VAZ-2106 cars are not so common, since this unit is considered relatively reliable. But in some situations it is necessary to intervene in it, carrying out partial repairs or performing a full replacement of failed heater elements. To properly carry out repairs or replacements, you must first become familiar with the diagram and structure of the stove.
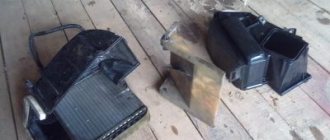
Replacement of individual stove elements
Car enthusiasts often ask about the VAZ 2106 car, how to remove the stove for maintenance or service work. Such questions arise in connection with the need to repair the stove and subsequent assembly. To replace the heater radiator and heater tap, you need to prepare a set of plumbing tools and new spare parts for the heating system to be replaced:
- Moving the lever to the right, open the heater tap, and then drain the coolant from the system.
- In the mechanical compartment under the hood, unbend the fastening bracket for the vacuum type hose and the wiring kit that goes to the panel, put them aside so that you can get to the heating hoses.
- We slightly unscrew the fasteners of the hoses to the heating radiator tubes and dismantle them.
- We unscrew the 2 bolts securing the seal to the shield, and then slowly dismantle it, remembering that spacer-type bushings are installed there.
- We dismantle the fan device of the stove.
- We dismantle the heater radiator, leaving it hanging on the heater faucet rod and remove the tubes from the hole in the shield.
- We unscrew the fasteners of the stove tap rod and disconnect it.
- We remove the heater radiator from the “six” along with the pipes and the heater tap.
- Having removed the fasteners, we remove the pipe from the heater radiator and the flange gasket from it.
- Having removed the fasteners, remove the stove valve along with the gasket and the pipe from the heating radiator.
- Having unscrewed the fasteners, we remove the pipe from the stove faucet along with the gasket.
- If necessary, after a visual inspection of the gaskets, they must be replaced.
- We are installing the stove.
If a car owner, in order to improve the functionality of the device, decides to modify the VAZ 2106 stove, then this will require its dismantling. The determining technological operation will be a change in the installation angle of the bulkheads with the preliminary production of updated configurations followed by installation.
All implementation of such operations will significantly change the direction of the air flow, and the stove will begin to operate with increased efficiency. To create such a “tuned” stove, you need a standard set of tools, as well as carpentry tools and a cutting torch to give the updated bulkheads the required configuration.
Source
Device elements
The stove on the VAZ-2106 includes the following main components:
- deflectors;
- stove tap rods;
- air intake covers;
- windshield air ducts;
- radiator;
- radiator casing;
- outlet pipes;
- underwater;
- stove tap;
- air distributor cover;
- electric fan motor;
- fan impeller;
- additional resistors;
- air ducts of the internal ventilation system;
- distributor cap lever;
- brackets;
- lid control handle;
- crane control handle;
- draft of the air supply cover.
These elements represent a heater device on a VAZ-2106 car.
Design and operating principle
The cabin heater on the VAZ-2106 car is a compact unit, the main components of which include:
- stove motor;
- fan with impeller;
- radiator;
- damper for air flow distribution;
- stove faucet with control levers.
IMPORTANT! If leaks were found in the radiator circuit of the VAZ-2106 stove, then, if possible, replace the radiator with a new one. Repairing it is difficult, plus it does not always bring positive results. This is more of a temporary measure.
The design of the stove on the VAZ-2106 car is quite simple, but for beginners, coping with the tasks of repairing it may be an impossible task. This is wrong. Especially if you are familiar with the device and design features of the heater.
- The standard, that is, factory heater for the VAZ-2106, has a relatively compact size, but effectively cools the liquid and warms up the interior. This is noted by many owners of domestic classics. Switching on and control is intuitive.
- The VAZ-2106 uses the most common heating system design among the Russian automobile industry, and in some places even the Soviet one. The basis is the liquid cooling system of the main engine.
- The main elements of the heating system are the stove, connections to control elements (faucets, levers), lines and a radiator.
- The heater dampers and valve are connected to the control device using an elastic and flexible rod.
- When the upper element is moved to the upper limit position, the valve opens completely, which ensures the maximum amount of coolant entering the heating system through the radiator.
- If the lower control device is moved to a similar position, then the air intake damper will be open to the limit. This way, maximum air flow will be directed through the stove into the heating system.
- Deflectors made of plastic can change the airflow angle in the VAZ-2106 cabin. Thus, the driver and front passenger regulate the direction of the air flows created during heating or normal ventilation.
- The air distribution cover is not connected to the heater control system switch. This damper allows you to adjust the degree of closing or opening using a lever device. This design provides additional comfort to the driver of the VAZ-2106 when regulating the operation of the heating system.
- The device includes a three-position toggle switch designed to regulate the volume of air flow passing through the stove. The regulator allows you to choose between two ranges of rotation of the heater fan - from minimum to maximum.
How to independently repair or replace the stove on a VAZ-2106 car
With the onset of the cold season, it is very important that the car's interior heater functions properly. The same applies to the “six” and other modifications of the VAZ family, in which the stove is designed almost identically. There are frequent cases when the heating system malfunctions and ceases to perform its main function. The reasons for this can be different, ranging from a clogged radiator to a broken fan. In this article we will look at how to repair the stove on a VAZ-2106 or, if necessary, replace its functional elements. This information will help you carry out all repair work yourself.
VAZ 2106 stove repair
Heating the VAZ 2106 never caused any particular problems if all elements of the heating system worked smoothly. The stove lasts a long time and requires almost no maintenance, so in winter you can always rely on it. Mechanics are mechanics, and sometimes even the most reliable and proven units malfunction, and the 2106 stove is also subject to aging.
Content:
Signs of a malfunctioning stove
It's cold in the cabin, that's all the signs. And if you go deeper and study the issue in more detail, then the first signs of a malfunction of the stove and the heating system as a whole can be considered:
- antifreeze leak;
- increased noise of the stove fan;
- difficult adjustment of curtains and heater tap;
- the blowing air temperature is not high enough.
As a rule, the stove fails suddenly, and at the most inopportune moment. Then you have to find out the reasons and eliminate them, and no matter how reliable the VAZ 2106 is, repair of the stove is inevitable.
Causes of malfunction of stove 2106
Fundamentally, the design of the stove is very simple, which is why it is reliable. The stove consists of
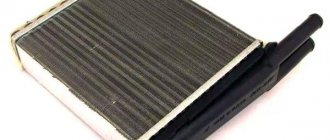
- Heater radiator.
- A fan consisting of a motor and an impeller with a casing.
- Stove tap.
- Distribution valve.
The stove diagram is shown in the photo, and it hardly requires any explanation. Despite its rather compact size, the stove successfully does its job, but there may be reasons, which we will discuss later on eliminating. The causes of heater malfunctions in most cases are antifreeze leakage, failure of the heater motor and failure of the heater tap.
Antifreeze leak
It is simply impossible not to see an antifreeze leak from the system, because it will literally leak under your feet. First of all, we find the place where the antifreeze is leaking and think about how to deal with this problem.
The main culprit, as a rule, is the stove radiator. Older models have copper radiators, and if that's what you have, you're in luck. It can be tinned, washed, and it will be as good as new. If the stove radiator is made of aluminum, there is little use in repairing it. If there is absolutely nothing else to do, you can try to restore it - put a patch of epoxy resin if it bursts in the area of the pipe, or try sealing it with a sealant if a leak has formed in the honeycomb. But there is no guarantee as to the result of the work, so it’s easier to change it.
Replacing the VAZ 2107 heater motor.
Hello. Over time, the grease in the bushings of the heater motor dries out, which causes creaking, whistling or howling. Or the stove stops blowing altogether due to the fact that the windings of the stove motor are burned out. In these cases, the VAZ 2107 heater motor is replaced and how to do this, read on. I do not recommend lubricating the bushings of the heater motor because... The effect will not last long, and the procedure for removing the motor is quite lengthy. It is better to replace it immediately, so as not to climb into the same place twice.
How to understand that it is the heater motor that is not working, and not a broken switch button or a blown fuse, read the article “The VAZ 2107 heater fan does not work”
How to remove the VAZ 2107 heater fan.
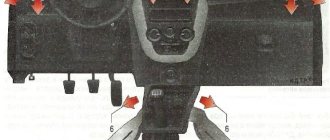
And so, let's start by removing the radio, if you have one. The next step is to remove the beard. Sequence of actions to remove it:
- We unscrew the 4 screws of the shelf, which is located at the feet on the passenger side.
- Remove the panel with the clock and cigarette lighter.
- Unscrew the two 10mm nuts.
- Unscrew the two screws screwed into the tunnel.
- We disconnect the pads from the buttons and the beard is removed.
Let me show you photos of where and what needs to be unscrewed.
Unscrew the four screws securing the shelf.
We remove the panel with the clock and the cigarette lighter by prying it with a flat screwdriver on both sides and pulling it out towards you.
Unhook all the wires from the clock panel and unscrew the two 10mm nuts.
Now at the bottom, where the buttons are located, on the side facing the rear passengers there is a plastic plug. We unscrew it with a flat screwdriver and see two screws. We unscrew them.
We disconnect the wires from the buttons and move the beard to the side, now nothing is holding it.
Here you can see the heater fan housing. To get it, you must first disconnect the side air ducts.
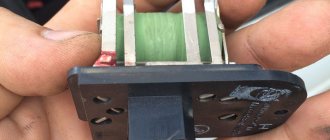
The stove motor is located in the lower part of the housing. To get it out, use a flat screwdriver to carefully remove the four iron brackets. Be careful when removing brackets ! They can fly away and get lost!
After removing the brackets, the stove body is simply pulled out.
The wires going to the heater motor will prevent us from completely pulling out the housing. We disconnect them.
The motor is attached to the body with two iron brackets, snap them off and you're done! You can replace the VAZ 2107 stove fan.
How to install the heater motor in a VAZ 2107.
If you are faced with a choice: install a cheap one with bushings or a more expensive one with bearings - choose a better motor with bearings, it is a little quieter than a bushing motor and will last much longer.
Before installing a new motor, make sure that there is grease in the bushings or bearings; if there is no or little grease, then the bushings are lubricated with silicone grease, and the bearings with ordinary lithol.
Replacement and assembly are carried out in reverse assembly order.
That's all! If you have any questions, ask them in the comments.
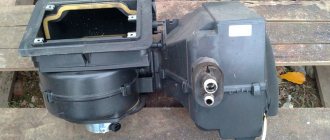
Self-replacement of the heater in a VAZ 2106
Parts of the interior heater of the VAZ 2106
- 1 — air distributor cover.
- 2 — fan housing.
- 3 – additional resistor.
- 4 — fan impeller casing.
- 5 — heater radiator housing.
- 6 – housing cover gasket.
- 7 — air supply hatch cover.
- 8 – clamping bracket for fastening pipes.
- 9 – spring holder for fastening the fan casing.
- 10 – radiator gasket.
- 11 — heater radiator.
- 12- heating tap.
- 13 – fan impeller.
- 14 – electric fan motor.
- 15 — spring bracket for mounting the electric motor.
- 16 – rubber cushion of the electric motor.
- 17 — bracket for fastening the air distributor cover.
Procedure for replacing the heater VAZ 2106
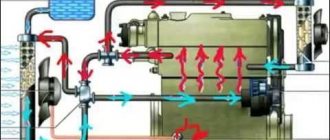
The vehicle interior is heated by engine coolant. The heater design details are shown in the diagram. Many car enthusiasts only think about the heating system when it gets cold. But sometimes the heater can remind you of itself with an unpleasant smell in the cabin and the appearance of puddles of antifreeze under the feet of the driver or passenger in the front seat. This means that the heater core is leaking and needs to be replaced. This work can be done with your own hands. To do this you will need:
- open-end wrenches for 7 and 10;
- flat and Phillips screwdriver;
- Antifreeze supply is approximately 1.5 liters;
Replacing the heater radiator VAZ 2106
Open the heating valve and remove the vacuum hose and wiring harness
- Having moved the heater control lever to the right all the way, open the heating tap and drain the Antifreeze from the heater radiator;
- in the engine compartment, release the fastening of the vacuum hose and wiring harness and move them to the side, thereby providing access to the heater hoses;
Release the clamps, remove the hoses and gasket
- loosen the hose clamps and remove them from the pipes;
- then unscrew the two bolts that secure the seal to the shield;
- carefully remove the sealing gasket from the radiator pipes so as not to damage it;
If the stove in a VAZ-2106 car does not heat - reasons and their elimination
Quite often, the owner of a “six” while driving may encounter the following, very unpleasant situation. The heater is on, you can hear the fan running, but instead of warm air, for some reason cold air enters the cabin. As soon as you notice this, stop immediately and check the coolant level. To do this, open the hood and look at the expansion tank. As a rule, the stove stops supplying warm air precisely because of a sharp decrease in the coolant level.
If this guess turns out to be correct, the first thing you should do is check the tightness of all hoses and pipes. In addition, inspect the radiators for possible leaks. A problem of this kind encountered along the way becomes quite a serious problem, because it is very difficult to find the required pipe somewhere on the highway. Soldering a leaking radiator under such conditions is also problematic.
It is unlikely that any driver takes spare pipes with him on the road. If the problem is in them, then you can temporarily fix it with adhesive tape or tape - they will probably be found, if not in your car, then in those passing by. There is also another option.
Provided that the length allows, the pipe is cut off, cutting off the damaged part, and put on again. However, if the leak is in the middle, then this will definitely not help.