Description of the cooling system design
Parts of the carburetor engine cooling system: 1 - heater radiator; 2 — coolant drain hose from the heater radiator; 3 — hose for supplying coolant to the heater tap; 4 — coolant drain pipe from the cylinder head; 5 — bypass hose; 6 — expansion tank; 7 — connecting hose of the expansion tank; 8 — coolant supply hose to the radiator; 9 — radiator cap; 10 — electric radiator fan; 11 — radiator of the cooling system; 12 — sensor for turning on the electric fan; 13 — coolant drain hose from the radiator; 14 — coolant pump; 15 — hose for supplying coolant to the pump; 16 — thermostat; 17 — coolant temperature indicator sensor; 18 — coolant drain hose from the inlet pipeline; 19 — heater valve; 20 - coolant drain pipe from the heater radiator
The cooling system maintains optimal engine thermal conditions by regulated heat removal from the hottest parts. The engine cooling system is liquid, sealed type, with forced circulation of coolant and an expansion tank.
The car's interior heater radiator is connected to the cooling system. The heated coolant from the cylinder head flows through a hose through an open tap into the heater radiator, and then (through the fluid outlet pipe) into the coolant pump.
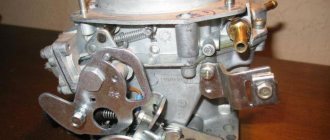
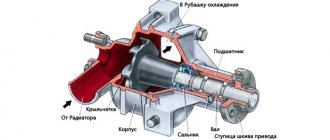
The coolant pump is centrifugal and driven from the crankshaft pulley by a V-belt drive. The pump consists of a body and cover made of aluminum alloy. The cover is secured with nuts to four studs screwed into the pump body. A sealing gasket is installed between the body and the cover. The pump shaft rotates in a double-row sealed bearing. A pump drive pulley flange is pressed onto the front end of the roller, and a cast iron or plastic impeller is pressed onto the rear end.
The radiator is vertical, tubular-plate, with two plastic tanks and an aluminum core. The radiator is mounted on two rubber pads and secured to the body with two bolts. The filler neck of the radiator is sealed with a plug and connected with a hose to the expansion tank. The radiator cap has an outlet (steam) valve, pressed by a spring to the seat of the filler neck, and an inlet valve through which the radiator is connected to the expansion tank. The inlet valve is not pressed against the seat and has a gap of 0.5-1.1 mm, which ensures the inlet and outlet of coolant into the expansion tank during heating or cooling. If the temperature suddenly increases or the liquid boils, the inlet valve does not have time to release liquid into the expansion tank and closes, disconnecting the system from the expansion tank. When, due to further heating of the liquid, the pressure increases to 50 kPa, the outlet valve opens and part of the liquid begins to flow into the expansion tank. The expansion tank is closed with a plug with a rubber valve that maintains pressure in the tank close to atmospheric pressure.
Parts of the injection engine cooling system: 1 - heater radiator; 2 — coolant drain hose from the heater radiator; 3 — hose for supplying coolant to the heater tap; 4 — coolant drain hose from the throttle body heating unit; 5 — sensor (control system) of coolant temperature; 6 — hose for supplying coolant to the throttle body heating unit; 7 - expansion tank; 8 — coolant supply hose to the radiator; 9 — connecting hose of the expansion tank; 10 — radiator cap; 11 — radiator of the cooling system; 12 — electric radiator fan; 13 — coolant drain hose from the radiator; 14 — coolant pump; 15 — hose for supplying coolant to the pump; 16 — thermostat; 17 — bypass hose; 18 — coolant temperature indicator sensor; 19 — coolant drain pipe from the cylinder head; 20 — heater valve; 21 - coolant drain pipe from the heater radiator
Main elements of the VAZ 2114 cooling system
The most important elements of CO are:
- Radiator.
- Pump (water pump).
- Pipes.
- Thermostat.
- Cooling Fan.
- Expansion tank.
- Expansion tank plugs.
The reliability of the CO operation and maintaining the required temperature of the power unit mainly depends on the serviceability of these parts. If they fail, the engine may overheat with all the ensuing costly consequences. But the role of sensors is also great. They also have a noticeable effect on the correct cooling of the motor.
Operating principle
When the engine starts, antifreeze circulates under the action of a water pump. Initially, its movement is carried out along a small contour (circle) with the thermostat closed. However, it does not enter the radiator. This allows you to speed up the process of warming up the engine to optimal operating temperature.
When the antifreeze heats up, the increase in its volume is compensated by the expansion tank. It is into this that the hot auto fluid enters, which then returns to the cooling circuit.
After the engine warms up to a temperature of 85-95 degrees Celsius, the thermostat opens and the technical fluid begins to circulate through the radiator, that is, in a large circle. In this case, the cool antifreeze located in the radiator enters the power plant jackets and cools it to the optimal temperature.
Fan
In the event of further heating of the power plant (if it does not have time to cool), at the command of the temperature control sensor, an electric fan is turned on, which forcibly cools the radiator and motor until the liquid has cooled to a certain value, after which it turns off. In this way, the required temperature of the technical solution and the engine is constantly maintained.
During cold weather, you can direct part of the hot antifreeze to the “stove” radiator. This ensures heating of the internal volume of the vehicle due to excess heat taken from the hot substance.
Cooling design of car drive
The hydraulic cooling system of a car is a group of devices and pipelines connecting them, as well as channels in the internal combustion engine block, which allow the heat received from the parts to be removed from the parts during the operation of the mechanisms.
Structure of the cooling system in the VAZ-2107:
- radiator;
- expansion tank;
- water pump;
- thermostat;
- fan.
The main task of the cooling structure is to maintain the optimal temperature when the engine is running, regardless of operating conditions, by removing part of the heat produced in it through the coolant. Cars use an intermediate cooling layout:
- heat from the engine;
- coolant;
- heat exchanger, such as a radiator.
Consequently, the cooling design prevents overheating of the engine and a decrease in temperature below the optimal value, which ensures stable operation of the motor, good lubrication of rubbing parts, and reduction of gaps when parts come into contact. In the car model 2107 with an injector, a heated throttle body is installed
The heat received from the engine can be used to heat the car. This task is implemented by a second heat exchanger of similar design, in which the process opposite to the cooling radiator occurs. Heated air from the heat exchanger is supplied to the vehicle interior.
The structure of the VAZ-2107 carburetor engine cooling system consists of two circuits:
- circulation of coolant in a small circle inside the engine;
- the contour of a large circle, which includes the radiator and expansion tank.
Thermal comfort of a modern engine requires cooling consisting of two independent circuits - for the block and the cylinder head. This allows the cylinders to reach high temperatures to improve their lubrication, since the oil viscosity is lower and frictional resistance is also reduced. The temperature of the block head also decreases, which protects the engine from detonation combustion of fuel.
A modern view of regulating the temperature conditions of the engine using the so-called smart cooling system 21074 with an injector includes:
- electronic control of the pump regardless of engine operation;
- fan with adjustable variable speed;
- coolant temperature sensors placed in the cylinder head gasket to monitor engine operating conditions;
- multifunctional valve instead of a traditional thermostat.
Such a device quickly and flexibly regulates the fluid temperature in the current operating mode of the engine. Its maintenance consists of the following operations:
- control and periodic replenishment of the amount of refrigerant;
- checking the tightness of the hydraulic system;
- coolant suitability test;
- periodic replacement of antifreeze;
- monitoring the operation of sensors and indicators.
Coolant suitability
The refrigerant is checked based on monitoring its freezing point. This temperature increases over time as the glycol content in the liquid decreases, which evaporates faster than water. Control can be carried out by measuring the density of the liquid with a hydrometer.
Measuring the density of antifreeze can also be done using an optical disc tester - a refractometer. This instrument uses the relationship between the concentration of glycol in a liquid and the refractive index of light. A drop of the material under study is applied to the prism of the device, and it is observed where the boundary between the white and blue fields lies. Two scales are used for two grades of glycols.
This is interesting: Internal CV joint of Honda SRV and Accord cars
General characteristics of the VAZ 2107 cooling system
The VAZ 2107 engine of all models has a sealed liquid cooling system with forced circulation of coolant (coolant).
Purpose of the cooling system
The cooling system is designed to maintain the optimal temperature of the power unit during its operation and timely, controlled removal of excess heat from heating components. Individual elements of the system are used to heat the interior during the cold season.
Cooling system parameters
The cooling system of the VAZ 2107 has a number of parameters that affect the operation and performance of the power unit, the main of which are:
- amount of coolant - regardless of the fuel supply method (carburetor or injection) and engine size, all VAZ 2107 use the same cooling system. According to the manufacturer's requirements, its operation (including interior heating) requires 9.85 liters of refrigerant. Therefore, when replacing antifreeze, you should immediately purchase a ten-liter container;
- engine operating temperature - The operating temperature of the engine depends on its type and volume, the type of fuel used, the number of crankshaft revolutions, etc. For the VAZ 2107 it is usually 80–95 0 C. The engine is heated to operating condition depending on the ambient temperature for 4–7 minutes. If there is a deviation from these values, it is recommended to immediately diagnose the cooling system;
- coolant operating pressure - Since the cooling system of the VAZ 2107 is sealed, and antifreeze expands when heated, a pressure exceeding atmospheric pressure is created inside the system. This is necessary to increase the boiling point of the coolant. So, if under normal conditions water boils at 100 0 C, then when the pressure increases to 2 atm, the boiling point rises to 120 0 C. In the VAZ 2107 engine, the working pressure is 1.2–1.5 atm. Thus, if the boiling point of modern coolants at atmospheric pressure is 120–130 0 C, then under operating conditions it will increase to 140–145 0 C.
Engine cooling system VAZ 2107
Why am I going into detail about the cooling system? but because, like many things on Rus-auto, the “rectal-oriented design” method was used in its creation. Done through the ass, in short. Therefore, many technical solutions were worked out at zero-eleven, and crawled to 7ku. Something crawled in the collection, something as an idea.
So, the cooling system.
What didn’t suit me about it initially? First of all, the so-called “top recharge”. This system is fed from the expansion tank through a double valve in the radiator cap. First of all, I was not happy with the following: if the expanded liquid goes into the tank due to excess pressure in the system, then it can only get back when a vacuum appears there. But it would be necessary right away. Especially if leaks appear and the system becomes leaky. In this case, no vacuum is created, and the liquid is not drawn up... And quite often a paradoxical situation occurs: almost everything has leaked out of the cooling system, but the tank is full.
What to do and how to fight? Convert the system to “bottom feed”. This scheme is on all normal foreign cars, on front-wheel drive VAZs, on Gazelles.
It works like this: the bottom of the cooling system is connected to the bottom of the expansion tank. The top of the cooling system is connected to the top of the expansion tank. There are no valves between the tank. Unhindered exchange of fluid and air. Here the system of communicating vessels begins to work, and the level of liquid in the tank is always exactly equal to the level of liquid in the cooling system at any given time. Moreover, if there are leaks, the liquid from the tank will immediately go into the cooling system.
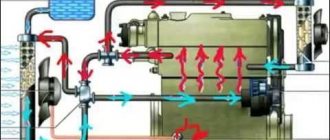
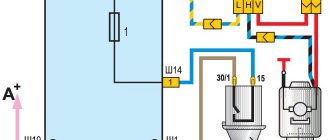
operating diagram of a system with bottom feed. The diagram was made for another car, so the tee in the lower pipe is shown. The valve in the radiator cap must be open.
To maintain pressure in the system, the radiator cap slides onto the tank. The tank is made airtight, and the pressure relief valve is already in its lid.
Therefore, if we see a tank with a valve in the lid on a car, we have a cooling system with bottom feed.
moreover, because The bottom of the tank is now connected to the bottom of the cooling system, then there is no need for a radiator neck, because The slurry can be poured through the tank. This is also a typical feature of such a system.
The brass radiator was “finished with a file” for this purpose: brass tubes were soldered into its top and bottom to connect with hoses to the top and bottom of the expansion tank. The drain plug was cut off; instead, a drain tap was soldered to the very bottom so that everything would drain.
The brass of the radiator was cleaned with a soft disk metal brush for a drill, to a “cat’s balls” state. Soldered with a 100W soldering iron and LTI-120 flux
the hose from the top of the radiator was tightly inserted into a drilled hole at the top of the expansion tank. There is an exchange of air there, therefore, the upper hose is thin, and it is called “steam exhaust”.
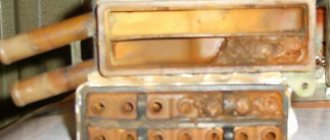
Later, the store came across an expansion tank from Shnivy; it already has a pipe on top and a plug with a valve in the lid.
left-top of radiator
bottom left of the radiator
and this was also my main mistake in ideology. It is not advisable to heavily modify finished parts. The radiator leaked the following winter, and all this beauty had to be thrown away.
the next radiator was already made of plastic-luminium, and additional connections were in the form of hose adapters.
bottom feed adapter into the drain plug of an aluminum radiator. The left part is connected to the right with a short rubber hose. I specially made the part separate so as not to guess the position of the drain valve, but first screw the left part into the radiator, then place the right part with the faucet down, and only then connect them with a hose
early photo, there is also the original expansion tank, and a steam outlet pipe stuck into its top
tank from Shnivy. Both hoses from the tank to the radiator are clearly visible
tank from Shnivy. Both hoses from the tank to the radiator are clearly visible
lower radiator feed unit
Checking the tightness of the system
When inspecting pipelines, it is necessary to check whether the hoses fit tightly on the radiator and engine components. You should also inspect the thin hoses for the interior heating and throttle body to make sure they are not cracked.
Replace hard ones immediately. It is necessary to make sure that the ends of the hoses are deeply stretched onto the pipes, otherwise they may become disconnected. Also check that the clamp bolts are tightened well.
Rusty clamps can loosen the fastening while driving; this is dangerous at full operating pressure in the hydraulic system. If there is corrosion, they need to be replaced. Cracks along the hose are the result of aging. Damage to the inner surface impedes fluid flow.
Signs of air in the cooling system
The presence of an air lock in the engine cooling system causes serious consequences, including overheating of the engine and its failure. The presence of a plug will immediately manifest itself in the form of uneven heating of the engine. The air in the system restricts the passage of coolant in a large or small circle. The fact that the plug is present helps reduce the heat exchange between the engine and the antifreeze, so there will be an increase in temperature above the maximum level, which is unacceptable.
The plug can also prevent the passage of fluid to the heater core, so driving the car in winter will be cold. Heated antifreeze does not pass to the heater radiator through the cooling system of the VAZ 2107, so when it is turned on, a stream of cold air will blow into the cabin.
It is contraindicated to operate the machine in this condition until air has been removed from the system. To remove it, several different methods are known, which are described in detail in the material.
Reasons for the formation of air pockets
The formation of a plug in the cooling system is also called airing. This phenomenon occurs in the pipes and hoses, whereby their throughput capacity is lost, thereby causing overheating of the engine and boiling of the coolant. Before you remove the plug from the system, you will need to understand the reasons for its occurrence.
It is necessary to identify the causes of airing in order to prevent its reoccurrence. So, let's look at the reasons for airing the cooling system of the VAZ 2107 injector:
- Incorrect coolant replacement. This is a common reason why a vehicle owner is faced with the problem of a traffic jam in the system. If the reason is improper replacement of the coolant, then after releasing the air from the system, the problem will be solved.
- Air jams also form due to depressurization of the system. You can detect such defects yourself by checking each pipe connection. If there are coolant leaks, the clamps or pipes should be replaced if there are signs of wear. Removing the plug is possible only after the causes have been eliminated, that is, you first need to tighten all connections or replace the pipes.
Cooling system
Conventionally, the entire system can be divided into individual parts and considered separately:
Radiator
– reduces the temperature thanks to a constant flow of cold air. In fact, it acts as a huge air conditioner or fan. Without it, it is impossible to cool the liquid, and therefore the operation of the engine, in general. High probability of car explosion. Along with it, it is possible to install an oil cooler. They are designed to cool oil and lubricants. There is also a radiator for cooling exhaust gases. The operation of this part is extremely important.
Heat exchanger
– this part, on the contrary, heats the air. It is designed to heat the air inside the system. Thanks to him, the car is easy to start in the cold season. The liquid absorbs hot air, gradually heating up.
Due to the fact that the coolant circulates in the engine, all processes in the system occur very quickly.
Pump
– ensures fluid movement and circulation. Prolonged stagnation causes it to boil and the engine to overheat, which leads to numerous breakdowns within the system. Coolant circulation is the main process in the engine, which ensures its proper operation, heating and cooling.
Thermostat
– regulates the amount of refrigerant. By controlling its level, we have the most convenient way to regulate temperature.
The temperature sensor performs a regulatory function. He, like the brain, is responsible for the timely operation of cooling mechanisms.
Diagnosis of system leaks
One of the main malfunctions of the system is a violation of its tightness. This is evidenced by:
- constant decrease in the level of antifreeze in the expansion tank;
- specific smell of technical solution;
- wet tracks under the car.
Insufficient volume of technical fluid contributes to engine overheating. Leak locations are determined by visual inspection of the engine compartment or interior (if the seal of the heater radiator or heater valve is broken).
Attention! Technical fluids used to cool the engine are toxic. Therefore, when working with them, it is necessary to comply with safety requirements. It can only be drained from the engine into a specially prepared container with a volume of at least 5 liters.
Save:
↑ Checking the level and density of the liquid in the cooling system
The correct filling of the cooling system is checked by the fluid level in the expansion tank, which on a cold engine (at 15–20°C) should be 3–4 cm above the “MIN” mark marked on the expansion tank.
WARNING! It is recommended to check the coolant level on a cold engine, since its volume increases when heated and the fluid level can rise significantly in a warm engine.
If necessary, check the density of the coolant with a hydrometer, which should be 1.078–1.085 g/cm3 for Tosol A-40 liquid. At low and high densities (no more than 1.085–1.095 g/cm3), the crystallization temperature of the liquid increases, which can lead to its freezing in the cold season.
It is necessary to add distilled water when the liquid level in the tank is below normal and the density is above normal. If the density is normal, add liquid of the same density and brand as is in the cooling system.
If the density of the liquid in the cooling system is below normal, add Tosol-A liquid.
Do-it-yourself repairs
Anyone who has basic knowledge of how the cooling system of the VAZ-2107 works, plumbing tools and is able to determine the cause of the problem can try to fix the breakdown on their own. The driver will be able to cope with replacing a damaged wire or pump belt without any problems. But if you are not sure of the diagnosis or there is a suspicion of a serious breakdown, it is certainly better to put the car in the hands of a specialist.
Improperly carried out repairs can create many serious problems. First of all, the driver should know that a malfunction of the car’s hydraulic system will very quickly lead to complete destruction of the engine.
Electric fan
We are talking about the fan that is installed on the cooling radiator. It works quite rarely. It turns on only when the temperature at the radiator outlet is exceeded. A sensor is installed in this place, or, to be more precise, a thermal switch. It consists of a bimetal plate, which at a certain temperature is deformed, changing its geometry. In this case, the contacts connected to this plate mechanically are closed.
It is worth noting that the cooling system of the VAZ-2107, malfunctions of which can be eliminated fairly quickly, is still not very perfect. The sensor, according to the manufacturer, is capable of switching large currents and has an impressive service life. But it is better to have a degree of protection - switching on should be done using an electromagnetic relay, which is controlled by a sensor. This way you can increase the resource many times. In addition, it is necessary to have a button in the cabin connected parallel to the sensor. With its help, you can force the fan to turn on.
Expansion tank
Installed on the body in the engine compartment. It is necessary to maintain the fluid level in the engine cooling system. When antifreeze heats up, it expands and increases in volume. When cooling, the reverse process occurs. With all this, it is necessary that the liquid always, regardless of temperature, be kept at the same level. This is what the tank is for.
Its functions are the same as those used in heating structures of houses for the operation of boilers. Without it, the cooling system of the VAZ-2107 will not be able to work. The carburetor also needs to be heated, so the height of the reservoir is the same as that of the fuel injection device. Please note that there are marks on the expansion tank indicating the minimum and maximum liquid levels. It is necessary to adhere to the golden mean.
Liquid pump
It is installed in the front of the car. This is a fairly convenient location, unlike later models. The most important thing is that the drive is carried out from the generator belt, which is not covered with covers. But this is where the advantages end, and the disadvantages begin. So, a liquid pump has inlets and outlets to which pipes are connected. And each joint is a theoretical place for fluid flow. The tightness of the connection can be broken at any time.
The bearing installed in the pump housing does not inspire confidence either. It often breaks, causing an unpleasant whistle. As with replacing the thermostat, it is necessary to completely drain the fluid from the system when removing the pump. The cooling system of the VAZ-2107 engine, as mentioned, has two circuits. And the liquid pump allows for the movement of antifreeze through the pipes. At the same time, cooling occurs much more efficiently, because the liquid does not stand still.
Replacing the radiator Lada 21074 (VAZ 21074)
Units and pipes
For high-quality cooling of vehicle mechanisms, the following units are included in the design of the hydraulic system:
- Water pump or pump - for circulating coolant. Pumps are used that are driven by a belt together with a fan, a toothed belt, or an electric drive, regardless of the motor.
- A fan that serves to improve heat exchange and increase the air flow passing through the radiator. Typically, fans of an axial design are used (the air flow flows along the axis of the fan).
- Connecting pipes. For example, there are four pipes of the VAZ-2107 cooling system (injector), each with its own name and application:
- outflow, or lower;
- leading, also called upper;
- water pump coupling;
- bypass pipe or corner.
Periodic replacement of refrigerant
The period for replacing the fluid is indicated by the manufacturer in the operating instructions. In older engines, the replacement interval is usually 2 years or 60 thousand km of the vehicle. In new engines, this period is increased to 5 years or up to 120 thousand kilometers of total mileage.
To replace the cooler, it is necessary to drain the used one. To drain, you need to perform the following operations:
- wait until the engine cools down, otherwise there is a risk of burns;
- open the radiator cap;
- install a wide vessel under the radiator;
- Unscrew the drain plugs in the radiator and engine block.
When replacing coolant, and especially when changing its type, it is necessary to flush the hydraulic system. Flushing involves supplying water with a hose to the radiator filler neck and passing it through the entire hydraulic system. During the procedure, you can start the engine so that the running pump participates in the flushing process.
After emptying and flushing, the drain plug must be tightened. Slowly fill the radiator, block jacket and pump to the maximum level. When the radiator cap is open, you must start the engine to remove air from the pipeline. Only when you are sure that the air has been removed can you tighten the plug tightly.
After filling with antifreeze, you must leave the engine running for another 10 minutes to check the tightness, as well as the time it takes to reach the desired temperature (signaled by turning on the radiator fan).
Flushing the system
Regular cleaning is necessary. It is not difficult to do; you just need to use a special solution designed for this purpose. Pour it into the system, start the engine and let it warm up to operating temperature. After this, turn off the engine, drain the solution and repeat the procedure 2-3 times, only use clean water. Solutions intended for washing are very aggressive and can destroy rubber and metal with prolonged contact.
Please note that before draining the liquid from the system, you must wait some time for the temperature to drop to a safe value - about 50 degrees. If there is damage, carry out repairs. The cooling system of the VAZ-2107 has two drain holes - on the radiator and the cylinder block. And don’t forget to open the stove tap when flushing so that the solution gets into the radiator. The price of this procedure at service stations ranges from 500-700 rubles. It's not that much compared to renovations.
Replacing coolant on a VAZ 2107
Replacing antifreeze for VAZ 2107 carburetor
Replacing antifreeze in the engine cooling system is an event that is performed at certain intervals in order to maintain efficient operation of the cooling system. Today you will learn how to drain and change antifreeze on a VAZ 2107 and why this is done. The cooling system of many modern cars is liquid. That is, heat transfer is carried out by a liquid that circulates through a system of tubes and, cooling in the radiator, returns back to the engine to receive a new portion of heat. The VAZ 2107 engine cooling system initially used water, but later, due to reduced resistance to negative temperatures, it was replaced with antifreeze. Antifreeze, compared to water, has good resistance to frost and does not freeze at all. In addition, it is not a source of scale, which means it does not clog the cooling system. In the process of constant temperature exposure, antifreeze may lose its properties. That is, first of all, its boiling point decreases and becomes equal to the boiling point of ordinary water. Secondly, such liquid can easily freeze and cause a cracked reservoir, and in the worst case, a cracked cylinder block. That is why antifreeze must be changed at least once every six months during seasonal vehicle maintenance in order to avoid undesirable consequences. In order to drain the antifreeze, it is not enough to simply turn off the taps. To begin with, you need to understand that antifreeze is a toxic substance, which means it can pose a danger to humans if handled incorrectly. In this regard, there are a number of rules that must be followed without fail: To properly drain the antifreeze, you must prepare an empty container with a capacity of at least 10 liters. The most desirable condition is the presence of a wide cavity and not a deep bottom. The fact is that there is not enough space under the car in height, but there is enough width. That is why many drivers use the most ordinary aluminum trough for these purposes. As soon as you have prepared everything you need, place the car on a flat surface, or best of all, on an inspection hole and place a trough under the radiator. Open the hood and unscrew the cap from the expansion tank. This is necessary to make it easier for the liquid to come out. After this, unscrew the tap located on the radiator. If you have an old-style copper radiator installed, then this tap acts as a fan activation sensor and is designed for a 30 wrench. To remove it, you first need to disconnect the contact wires from it and then unscrew it. Now all that remains is to wait until all the coolant has completely drained out of the radiator. To speed up this procedure, you can shake the front of the car. Next in line is the cylinder block. On the side of the spark plugs there is a special drain bolt of 13, which must also be unscrewed. But before you do this, you must first move the trough under the engine and then unscrew the bolt. Wait until the old antifreeze drains from the engine and move the trough to the side. Screw all drain valves and plugs into place. Along with the coolant, it is customary to change sealing materials. In this case, remove all pipes and clean them of old sealant. And degrease. Apply a new portion of sealant to the inside of the pipes and the outside of the steel frames and connect them. Once all the pipes are in place, tighten the iron clamps and secure them. Now it's time to fill in new antifreeze. To do this, open the radiator cap and insert a funnel there. Remove the plug from the cylinder block and ask your partner to pour in antifreeze in small portions. At this time, tighten the bolt, and as soon as antifreeze flows out of the BC, immediately tighten the bolt. This is necessary to prevent the creation of air jams. Then pour antifreeze into the radiator until it is completely filled. Next, without screwing the cap on the radiator, pour antifreeze into the expansion tank until it reaches the radiator. After this, screw on the tank cap. The last thing to fill is the tank to a level that corresponds to the norm. After all procedures, screw the lid on it. Check the operation of the cooling system, start the engine and warm up to operating temperature. If the cooling fan works and the temperature drops, then the system is fully operational. That's all. This is how easy it is to replace antifreeze on a VAZ 2107 car. As you noticed, to perform this procedure you do not need special knowledge and skills, or the presence of specialized equipment. All you need is a standard car set of tools and a garage.
Efficient system operation
From time to time it is necessary to carry out maintenance of the entire vehicle and the cooling in particular. Flushing is very important, since even a small amount of water or dust can lead to the formation of scale on the walls of the jacket. Unfortunately, some motorists commit the sin of adding water, which causes scale to appear. Just imagine that the inside of your engine looks exactly like the heating element of an electric kettle.
Many recipes are used to flush the cooling system. Some do this with carbonated water, while others buy special washing liquids in stores. But if you think about it, even a light rinse with clean water will bring results. Please note that the solutions are aggressive. And if you don’t drain them for too long (or don’t wash them well), then leaks are guaranteed.
The cooling system flushing scheme is simple - drain the old antifreeze and fill in the flushing fluid. Warm up the engine to operating temperature and let it cool. Drain the solution and rinse the cooling system of the VAZ 2107 with water. If necessary, repeat the procedure 1-2 more times. But you shouldn’t get carried away either. Do not forget that you need to open the heater tap so that its radiator is also cleaned.
Sources
- https://avtika.ru/shema-sistemy-ohlazhdeniya-dvigatelya-dlya-vaz-2107/
- https://PortalVAZ.ru/vaz-2107-princip-raboty-sistemy-oxlazhdeniya/
- https://ravon-r2.ru/vaz-21074-sistema-ohlazhdenija-neispravnosti/
- https://AvtoKart.ru/dvigateli/rabochaya-temperatura-dvigatelya-vaz-2107-karbyurator.html
- https://auto-gl.ru/sistema-ohlazhdeniya-vaz-2107-ustroystvo-2-sposoba-proverki-germetichnosti-i-remont/
- https://prometey96.ru/modeli/shema-ohlazhdeniya-vaz-2107.html
- https://vaz-remzona.ru/sistema-ohlazhdeniya-vaz-2107/