Installation of a handbrake sensor and a neutral gear sensor in a Lada Priora
My signaling does not give me rest, or rather, its incomplete, clumsy installation, so while I have free time, I don’t waste it. After connecting the autostart, it was discovered that the handbrake signal sensor was not working. This was manifested in the fact that the signaling system did not respond to the lowering of the handbrake lever during auto start. Although, according to the autostart device, disabling the handbrake should turn off the engine started by the autostart and not start the autostart when the handbrake is lowered. I again reached into the signaling unit and began to look where the orange-violet wire of the handbrake sensor goes. It turned out that it was stupidly attached to the black wire going to ground - this explains the fact that the signaling system sees the handbrake always raised! I unhooked it from the ground and ran the wire to the handbrake limit switch. It was possible, of course, to remove the tidy and cut it into the handbrake signal wire, but I decided that if I threw the snot, then it would be directly to the limit switch, so as not to pick at the factory cord.
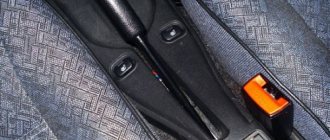
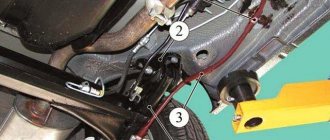
The desired handbrake sensor wire.
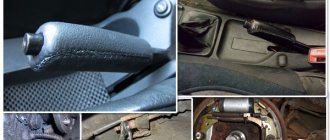
Handbrake limit switch (sensor).
All manipulations had to be performed with one hand inside the armrest. It’s very inconvenient, and the standard wire for the handbrake switch is short. What saved me was the gap for the handbrake lever to move - a screwdriver and thin-nose pliers could fit into it. The principle of operation of autostart on a manual car implies the use of logical neutral when performing the procedure for preparing for autostart: in other words, arrived - turned on neutral (the engine is running) - pulled the handbrake - pressed the button with the key on the signaling key fob - pulled the key out of the ignition - within 20-30 sec. got out of the car and closed it. If everything is done correctly, the alarm will turn off the engine and the autostart will work. It’s not convenient, especially if you need to pull out some other things, or if after the autostart procedure you have to open the car, then it will no longer start with the signal. It’s a different matter with an automatic transmission; at any moment, without unnecessary procedures or manipulations, you press the key, and the car is already warming up. You can, of course, use such an autostart algorithm on a manual transmission, but this is fraught with possible autostart while the gear is engaged, and with corresponding consequences. After connecting the autostart, I decided to come up with something to use it in automatic transmission mode. The button output for breaking/connecting the jumper on the signaling unit is no longer available, because You can forget to press it just like you forget to put the gearshift lever in the neutral position. I started surfing the Internet, hoping to find something like a neutral sensor for front-wheel drive VAZs, although I had never heard of it. And miraculously, the search engine returned several links to the neutral sensor, including Drive! I looked through all the posts, thanks to everyone, but the same link was used everywhere as the primary source: # I decided to make such a sensor for myself! I went to radio supplies and bought the smallest reed switches (18 mm), a piece of PCB and a magnet.
The source site also has a drawing with the dimensions of the sensor, but due to the fact that my rocker joint is different from the one in the pictures in the source, I had to create the sensor from scratch.
My backstage. People suggested that it was from Granta. I saw one like this on Kalina.
The result was three options for a textolite plate for the sensor. All are visually the same, but we had to adjust the distance between the holes and the length of the plate.
Instructions: how to tighten the handbrake on a Priora - price of parts
Since ancient times, some Taz drivers used first gear to prevent the car from rolling away, even with a handbrake, my dad always taught me to set the speed. But this can end badly if you don’t turn off the speed and start the car. Over time, the parking brake, due to constant use, stretches the cable, you can tighten it a limited number of times, then you have to remove it, because tightening it is already useless.
He stops holding the car and is not fixed. You can tighten the handbrake on the Priora with just two 8 keys in the hole. This is usually done in your garage. Replacing the drive and handbrake cable on a Priora will require additional keys. Of all the brake systems of the Priora car, the parking one stands out separately. It saves you from unpleasant surprises - while it is working, the car will not roll away in the parking lot. When the handbrake doesn't hold, you should start repairing it right away, maybe you just need to tighten it. Lada Priora received the part as early as 2108 - it has not been changed since then.
When the driver raises the handbrake handle higher and higher to hold the car in place, this indicates that the parking brake system is not working. Most often this can be solved by tightening it, just tighten the cable and the handbrake will hold. There may be several malfunctions in the parking brake system of a Priora car; read the article to the end and find out about them.
Handbrake (parking brake) on Priora - article number and price
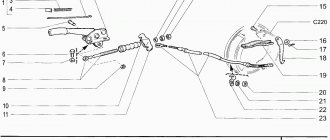
The assembled parking brake system of the Priora car has the catalog name “Handbrake drive” - number C170. Main components:
- cable bracket: 2108-03508214-20, 30 rubles;
- handbrake cable: 2110-03508180-01, price - 400 rubles;
- parking traction axis: 2110-03508073-00, price - 500 rubles;
- laying of parking rod 2110-03508089-00;
- parking drive rod: 2108-03508089-00, price - 250 rubles;
- parking brake lever (assembled): 2110-03508012-00, price - 600 rubles. Button – 2110-03508039-00;
- lever assembly with rod: 2110-03508010-00, price - 1300 rubles;
- traction protective cover: 2108-03508046-00, price – 40 rubles;
- cable equalizer: 2108-03508075-10, price – 50 rubles.
Removing elements of the parking brake system
We replace the parking brake cables when they are broken, pulled out, or stuck inside the sheaths, when adjusting the parking brake fails to keep the car stationary on a slope - up to 25% inclusive. We remove the parking brake lever to replace it or to replace the lever rod. The cables should be replaced simultaneously - left and right. We show the replacement of the left cable. Move the parking brake lever to its lowest position. We unscrew the locknut and the adjusting nut from the parking brake lever rod (see “Adjusting the parking brake”).
Remove the cable equalizer from the parking brake lever rod.
We take out the front cable ends from the equalizer and remove the equalizer.
Remove the end of the left cable sheath from the bracket.
The cables cross in front of the bracket.
Using a socket or a 10mm wrench, unscrew, not completely, the nut securing the bracket to the rear suspension beam... ...and remove the cable sheath from it.
We remove the cable sheath from the holder on the rear suspension beam mounting bracket.
Use a screwdriver to bend the bracket... ...and remove the cable from the holder on the body.
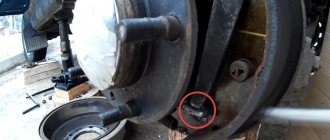
We remove the cable from the second holder located on the body in front of the fuel tank. Disconnect the rear end of the left cable from the parking brake drive lever (see “Replacing the rear wheel brake pads”).
We remove the cable tip from the hole in the brake shield... ...and remove the left cable. Similarly, remove the right parking cable cable. We install the cables in the reverse order. After replacing the cables, we adjust the parking brake (see “Adjusting the parking brake”). To remove the parking brake lever, unscrew the locknut and the adjusting nut from the parking brake lever rod (see “Adjusting the parking brake”). Remove the cable equalizer from the parking brake lever rod (see above). Remove the floor tunnel lining (see “Removing the floor tunnel lining”).
Basic faults
According to the law, a malfunction of the handbrake is accepted in two cases:
- If, at a 16% slope, the handbrake does not hold the equipped car (without cargo and passengers, but with a full tank of gasoline, the driver’s weight is taken to be 75 kg).
- If, on a 23% incline, the handbrake does not hold the vehicle at full load (the maximum permissible vehicle weight has been reached).
In reality, more often than not, a malfunction of this brake mechanism of the Lada Priora is noticed not by measuring the steepness of the slope, but by clicks. When another click of the handbrake is added to the usual “set of sounds” when leaving the car, every car enthusiast understands that it’s time to tighten the cable.
But the problems don't end there. For the parking brake system they can be as follows:
- The cable has stretched too far. Over time, it undergoes deformation. It can be tightened, but to a certain extent.
- The cable broke. When the “limit” is reached, the mechanical device will have to be replaced.
- The handbrake indicator on the dashboard does not light up or go off. This is due to the sensors.
- The lever button is stuck.
Why do you need a parking brake light?
Most of the indicators found on the machine's console are alarm indicators. They show that the car has some kind of breakdown or something is faulty. In such a situation, you need to use the services of a car service center, where they will give your vehicle computer diagnostics and offer the necessary repairs.
Initially, if the handbrake light is on, this is not an indication of malfunctions or errors. Just a car on the handbrake, the indicator lights up when the handbrake is raised. If the lever is lowered, the light stops lighting. It is easy to understand that the indicator on the dashboard is connected to the brake mechanism.
In principle, you can see that the handbrake light comes on even with a slight change in the position of the lever. Lift it just a little, without reaching the first click. And now the contact has already closed, and the indicator lights up.
There is no light signal provided that the lever has reached its extreme horizontal position. And if the car starts moving, but the indicator is still on, it means that you did not lower the handbrake all the way. This circumstance confuses most motorists.
However, the glow of the indicator may also indicate some damage to the braking functions of the vehicle. In reality, the role of the light bulb is not only to signal the position of the lever. It also informs the driver about various malfunctions: the mechanism cable has stretched or the volume of “brake fluid” in the hydraulic system is insufficient. There may be a number of other factors that cause the indicator to light up.
How to tighten the handbrake on a Priora
Adjusting the handbrake on a Priora car is done in 7 simple steps, see them below. Normal operation of the handbrake lever is considered to be two to four clicks. Typically, an increase in clicks occurs every 20-30 thousand kilometers. The stroke of the lever must remain normal, so it must be tightened in time. It is not at all necessary to immediately buy a new set for Priora, because you can handle the tightening yourself.
Before tightening the cable, prepare the following tools:
- head "13";
- keys “13”, “10”;
- ratchet;
- technical lubricant.
Carry out the work according to the instructions:
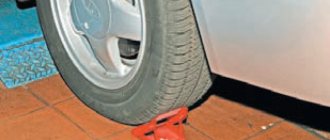
- Place the car in a pit. If this is not possible, you can raise the rear of the car and then support it. It will be inconvenient, but this method will also work. Lower the handbrake lever and put the car in gear.
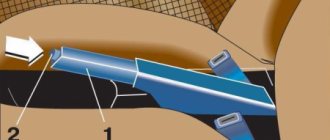
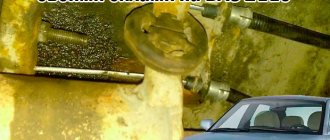
- Remove the metal cover under which the cable equalizer is hidden. Its tension is adjusted there. Remove the cover fastening bolts using keys.
- Coat the handbrake lever rod with lubricant to make adjusting the tension of the mechanical device easier.
- Loosen the stem locknut.
- Pay attention to the stem nut. If the handbrake needs to be tightened, reducing the number of clicks to normal operation, turn the nut clockwise. If you need to increase the number of clicks, turn the nut counterclockwise.
- Try tightening the handbrake. It should prevent the rear wheels from turning.
- Reinstall the metal cover.
Pulling up the handbrake
It is likely that you just need to tighten the parking brake on the VAZ 2110 to fix the problem.
- Drive to the inspection hole, from where it is most convenient to make adjustments. Another option is a lift. You'll find something here. This way you can easily get to the necessary nodes.
- Make sure the brake lever is in its lowest position.
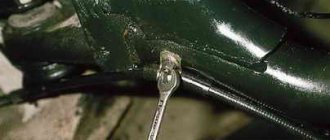
- Take two keys. You will loosen the lock nut first and tighten the adjusting nut second.
- Tighten the adjustment nut until the cable is properly tensioned.
- It is strongly recommended to hold the rod when tightening the adjustment nut with pliers.
- Now make sure that the lever makes full travel in 2-4 clicks, no more.
- If after checking everything turned out to be good and the working stroke is correct, tighten the equalizer locknut while holding the adjustment nut with a second wrench.
- Release the handbrake lever down and turn the rear wheels by hand. Rotation should occur evenly without any jamming.
- But if the adjustment did not allow the cable to be tensioned, then the element must be replaced.
How to change the handbrake on a Priora - step-by-step guide
Replacing the handbrake cable is needed when a regular tightening is no longer an option; you will have to change the cable or drive. In order to replace the cable on a Priora car, prepare a Phillips screwdriver and a set of keys.
Replacing the cable is carried out as follows:
- Place the car in the pit, lower the handbrake, and engage the gear.
- Jack up the rear of the car, put supports on it, and remove the wheels. Further actions will be described on one side, they will need to be repeated on the other side.
- Loosen the main muffler and hang it up. Do the same with the resonator.
- Slightly loosen the handbrake rod locknut. Remove the cable equalizer.
- Remove the cable end by pulling it through the special bracket.
- Remove the brackets that hold the cable in place.
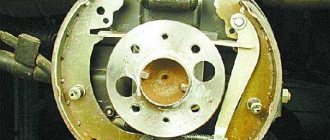
- Using a screwdriver, press down on the actuator lever to move it further away from the brake pad. The lever should move to the forward position. After this, you can disconnect the cable tip from the brake lever.
- Loosen the nut on the rear beam that holds the cable, and then pull it towards you.
- Pull the cable through the bracket that is attached to the body, then through the brake shield.
- Check the parking brake and make adjustments. If necessary, tighten the nut more.
In order to change the Priora handbrake lever, you will need a set of keys, pliers, and a Phillips screwdriver.
Hand (parking) brake system on VAZ 2110
In fact, the VAZ 2110 handbrake is quite simple. The principle of its operation is not based on anything complicated. The mechanical drive is a cable. When the parking brake handle is pulled, the driver also tightens the cable and creates uniform tension on the wheel pads.
If the handbrake malfunctions, it is recommended to perform an adjustment. And if it does not help, then repairs are carried out by replacing the faulty cable. On a car like the VAZ 2110, adjusting the cable is as simple as replacing it. If this malfunction is ignored, the car may move on its own, or you, on the contrary, will not be able to move.
You don’t have to go to a car service center to solve your problem. If you have some experience, understand the essence of the handbrake, and also apply the data from the repair and operation manual for the VAZ 2110, you can do everything yourself.