The best sunroof for UAZ roofs - from a bus, from a PAZ
Last fall, I cut into the roof of Bukhanochka what many consider to be the best hatch for a UAZ - a ventilation and emergency hatch from a PAZ bus.
I know many people want one, but are afraid to install it themselves. Have you ever heard of cutting such a huge hole in the roof? Usually, to ventilate the Loaf, they install a universal hatch from the Gazelle. Everyone saw this on a minibus, something like that. But I moved on.
Why?
The Gazelle hatch seemed a bit small to me. Yes, it may not be bad for ventilation. But it doesn’t make it possible to climb out onto the roof at all.
For what?
Sometimes you need to climb out onto the roof. For example, you need to quickly take one or two photos, and then go back to the summer steppe. For example, you need to urgently leave a car that is rapidly going under the ice. I hope that this does not threaten me, but it would be better if there was another door in the ceiling.
The installation of the hatch in the UAZ itself is very simple and even somewhat interesting. Agree, it’s not every day that you have to cut out an opening almost a square meter in the roof of your favorite car. Some people are afraid to drill a hole for the antenna...
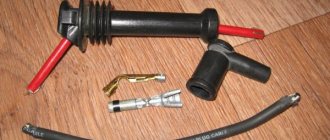
Step one. We need to get the hatch itself somewhere. We need one cover and fittings from the bus (on the right). You need to make the frame (on the left) yourself or buy it from handy dudes. I didn’t bother - I bought a ready-made kit.
Step two. Selecting a location for installation. In order to catch the center of the roof, a sewing meter is very helpful. Rummage through your wife's junk and you'll definitely find it.
Many here will say that I chose the wrong place. They say that the hatch in the UAZ-ik needs to be cut in the center so that you can hunt from the car. Like, the car drives carefully through the land, and two hunters from the passenger compartment lean out of the hatch and shoot doublets of geese. Geese, of course, are obliged to fall into the same hatch.
I answer, this is not my option. First of all, I don't hunt. I like to eat something I get, but I don’t get it myself, I’m lazy. Secondly, hunting from vehicles is prohibited. You can’t drive a UAZ and shoot geese and roe deer from the hatch. It's bad to do that. Thirdly, I need the hatch in the access area, and not somewhere in the cabin.
In short, right above the hood is the right place.
They say that the incoming flow of draft from such a trump deflector will definitely tear off the driver’s ears and tear his cheeks, but this needs to be checked.
Step three. Hole marking. Trying not to breathe and not to move the hatch, which the entire garage cooperative set up evenly, we trace the outline with a marker. Then, having asked the machine for forgiveness, we drill an entrance for the jigsaw.
There is no turning back.
We spend ten minutes using a jigsaw and a grinder. For ten minutes we reassure ourselves that the matter was not started in vain, and the hatch is aligned straight.
Ready! Now you can proudly lean out of the car to your full height. This is much better than simply opening the universal hatch on a gazelle.
... you stand proudly, you dominate...
Then it's a matter of technique. We attach the frame and are glad that everything matches. Drill holes for attaching the frame.
We tighten the nuts a little, and push polyurethane joint sealant under the frame.
It's better to work with a partner here. One wipes away excess quickly drying sealant. Another pulls out the nuts at a waltz pace. If, on my advice, you were puzzled by sealing the seams of the body, there will be no problems, the sealant will obey you.
It turns out something like this. Beautiful, right?
We did the hardest part. There's not much left at all. We put a seal on the frame.
We fasten the hatch brackets.
Ready! Now you have a car with a sunroof. You can open it a little - outside air will come in. You can recline it completely and climb out onto the roof.
But climbing on the roof is strictly not recommended. In the process of cutting into the hatch, we removed one normal amplifier, which was somehow connected to the rest of the body, and one abnormal one, which was held at one welding point and was not attached to anything at all.
The roof of the loaf needs to be strengthened.
The technology is again not complicated. We make an amplifier from a square pipe that repeats the profile of the roof to the best of our ability. Two pieces. Before the hatch and after the hatch. It will not be worse.
We press the amplifiers to the roof with something hydraulic...
... and then we grab it semi-automatically. First, we weld the amplifier itself to the roof. Yes, the paint in the weld areas will burn a little. I'll have to take some paint and cover it up.
Then we spot weld the amplifiers themselves. Without this, they will not have any rigidity at all; we cut three of the four sides.
We push body sealant into the places where the amplifier does not fit tightly to the roof. There will be less vibration and a little more rigidity.
It turns out to be some kind of picture. Sunroof, roof reinforcements, welding and sealant. We don’t pay attention to geometry, that’s how a phone takes panoramas.
To attach the cladding, we cut out special dies along the contour of the frame. We'll talk about them later when we install the ceiling.
Advantages of a hatch on a UAZ
In the 90s, sunroofs on the roofs of cars, which could mainly be found on foreign cars, began to gain particular popularity. Today, hatches are not as popular as before, but still they have not been forgotten and continue to be used for their purpose. The advantages of such devices on cars are:
Installing a hatch on a UAZ: do it yourself or in a workshop
The best option for installing the product on your car is to entrust the job to professionals. But as you understand, professionals will ask for a decent fee for such work. Therefore, many car enthusiasts, out of curiosity, strive to tackle the issue of installing the device on a Patriot with their own hands. Although this is not so easy to do, it is possible. Moreover, you should not doubt your abilities if you have the makings of a master.
The design of the product plays a big role, because the presence of several bends at the joints can cause some problems. Therefore, when choosing a product, make sure that you can install such a hatch yourself. Having chosen a new hatch for your UAZ Patriot SUV, you can begin the installation process.
Installation of a hatch on a UAZ Patriot
Do-it-yourself installation of a sunroof on a UAZ Patriot is done in the same way as for many other types of cars. The process involves performing the following operations:
After both frames are secured, you can install the glass part of the hatch. It is installed on special canopies that allow you to open and close the product.
If the design provides for adjusting the glass pressing density, then it must be adjusted. Otherwise, you may end up leaking into the cabin through the roof during rain. That’s actually the whole process of installing a sunroof on the roof of a UAZ Patriot SUV. Now such a product will decorate the roof of your car, which practically does not require diagnostics.
The cost of installing a hatch on a UAZ
Depending on the design of the product closure and the quality of workmanship, hatches differ in cost. The cheapest hatch on a UAZ Patriot costs about 8-10 thousand rubles. That is why most drivers resort to installing such a product themselves in order to save money after purchasing such a purchase. When driving off-road, it is recommended to drive with the sunroof closed, as it is very easy to damage, especially if there is no roof rack. Also, when driving on unpaved roads, dust cannot be excluded from entering the interior, albeit in small quantities.
Source
Modernization of the intake and exhaust tract
It is necessary to remove obstacles to the flow of air and the exit of exhaust gases from the power unit. Obstacles form where the gaskets are installed. The absence of thresholds allows the working mixture to flow freely into the combustion chamber. To improve air permeability, UAZ owners install air filters from other vehicles.
Suspension and transmission
Modernization of the transmission and chassis of the vehicle improves off-road performance. To increase comfort, the UAZ 469 is equipped with a spring front suspension with disc brakes.
To modernize the chassis, standard axles are replaced with military ones. This allows for increased ground clearance. Military axles have a lower gear ratio, which has a positive effect on cross-country ability. Instead of standard wheels, the car is equipped with larger tires. Tire tread must be designed for driving on poor quality surfaces.
ATTENTION: Installation of wheels of increased diameter entails the need to modernize the wheel arches.
From the above it follows that tuning the UAZ 469 allows you to improve the technical characteristics of the car. You can upgrade your car for hunting, fishing and long-distance travel. After modernization, the car becomes unique.
The UAZ 469 is an all-terrain off-road vehicle that entered mass production in 1970. Initially, the model was intended as an army transport for the rapid delivery of infantry to their destination, but after removal from service the vehicle began to be sold to the civilian population, with virtually no changes in design.
Today, live examples of the UAZ 469 are a budget option for off-road transport, which is why they are used for amateur fishing and hunting, as well as extreme tourism.
How to install a hatch with your own hands - step-by-step instructions
For example, after a few years of use, a car sunroof may become leaky, resulting in leaks and stains on the ceiling. In addition, the price of the issue plays a big role, not everyone can afford to install a hatch, the product itself can be expensive, and if you also take into account the cost of installation work, then it’s completely the lot of the rich. Today I will talk about what to do when there is a desire, but there is no opportunity, that is, how to install a hatch with your own hands.
A little about hatches. Nowadays, you won’t surprise anyone with a sunroof. This is a popular type of tuning, and for many, this option is provided by the manufacturer, so demand creates supply; in car shops there are a huge number of all kinds of hatches, starting with primitive ones - the usual manual lifting (clackers), ending with advanced ones, which cost accordingly - lift-and-slide with electric drive. Car sunroofs come in the following types: lifting (not suitable for those with a roof rack), sliding, lift-and-slide. In addition, hatches differ in the type of material from which they are made, usually it is either glass or metal.
Hatch installation is most often done in two main ways:
The second option is twice as expensive, but also about half as complicated.
Important note! It is best to buy sunroofs that are provided for your car model, in this case there will be no problems with installation and operation. If you take some alternative version of the hatch, you can have a good time with its installation and further operation. In addition, in the first case you will have instructions in your hands, according to which you will be able to take into account all the smallest details.
Now let's talk about how to install the hatch.
1. First of all, you need to cut out a pattern for the hatch, which will later be used to mark the roof. Cardboard or any other material with a similar structure is suitable for this.
2. When the pattern is ready, go to the salon and remove everything that could interfere with your work: lighting, wiring, etc.
3. In order to insert a jigsaw, a hole is needed; it can be made using a drill and a drill of the required diameter.
4. In order to avoid damaging the paintwork during the hole cutting process, place cardboard or seal everything with Magyar tape.
Note : It is easier for two people to cut a hole in the roof, while one makes the cut from the outside, the other pulls the headliner from the inside.
5. Once the hole is cut, go around the edges with a file.
6. Then arm yourself with a sharp utility knife and carefully cut a hole in the ceiling of the car, following the contour of the hole in the body. The assistant's task, sitting in the cabin, is to press the upholstery to the body.
Attention! Do not press the upholstery with your hands under any circumstances; a partner standing outside can injure you; use a clean rag and a wooden block for this.
The hole itself should be slightly larger than the one on the outside, in order to make it more convenient to attach the inside of the hatch frame to the metal.
7. If you had to remove a body stiffener, I recommend strengthening the body using vibration material or metal fasteners.
8. Treat the edges of the hole made with paint or some kind of anti-corrosive agent; this will prevent the metal from rusting.
9. Glue the gasket and apply a thin layer of transparent silicone sealant along the edge of the hatch.
10. Now you can install the hatch in the opening, adjust the position and check everything before you start fastening everything with screws.
11. Tighten the long screws first, then the short ones, tighten the corner screws last.
Installing an electric sunroof differs from installing a conventional one in that it requires additional space for the electric drive and wiring, and there is no specific place for this purpose. This is individual for each car. If necessary, you can get power from the ceiling wiring.
Tip : After completing the installation of the hatch, I do not recommend throwing away the cut out roof element. It often happens that after installation, car owners are disappointed in this option and want to return everything as it was. Considering this fact, I recommend that you think very carefully before installing a hatch, since a lot may depend on this decision in the future. For example, when selling, many refuse to buy a car with a sunroof, and when undergoing maintenance, inspectors often find fault with the fact that a sunroof is not provided for in the design. In general, weigh everything carefully and draw conclusions; the most important thing in this matter is not to regret what you did!
see also
Comments 21
I cut myself in, put glass sealant on 3m, glued it on dead, and nothing runs.
Hello Albert. Here on the sable I saw a plastic bucket under the hatch. It doesn’t seem to be a bad topic, and it doesn’t flow. And on the edge, at a showdown or where to look for a hatch from a foreign car, they even sell it with pieces of the roof. If anything there will be a semi-automatic soon.
I have a hatch. But I have never used it. Besides, sometimes it leaks and you have to somehow seal it, and that’s when I remember about the hatch. A useless gadget, with one thing, if it is not reclining. I look at mine, I tolerate it, but in my head I’m thinking about converting it into a reclining one, otherwise it’s of no use to me.
I will install a hatch under the trunk; that’s why I’m not putting it in yet.
Well, if there is no special stamping in the roof for the sunroof, then the installation turns into a rare hemorrhoid, because it does not want to seal (because of this, I had a lot of problems with the crooked hatch that I received the car with), and if the trunk is high enough, it does not interfere, but I wanted to make myself a low one (a bit higher than the roof) but with a cutout for a hatch.
The whole problem is that I don’t have a stamping on the roof for the sunroof, so I’m wondering how to put it all together and make it look beautiful and functional.
Well, if it doesn't bother you, I'll wait for the photo!
The whole problem is that I don’t have a stamping on the roof for the sunroof, so I’m wondering how to put it all together and make it look beautiful and functional.
although here you can see how they compacted everything. www.drive2.ru/l/3927062/ and now it’s still filled tightly with a tube of sealant
but mine fits tightly around the perimeter, there is no such gap, and the roof is the same as yours. I have a centimeter extender included in my kit. and the hatch itself was coated with auto plasticine (non-hardening sealant).
Well, I suspect that it did not fit tightly due to the fact that someone with a crooked hand installed it. In general, this is a really useful thing, I can’t imagine how I lived in an old car without a sunroof, considering that this year it’s the only thing that saves me from the heat
This summer I’m getting out of this situation in a different way: I open the firecracker and put it on the spare tire, and so that it doesn’t open while moving, I fasten it with a rubber belt to the spare tire gate. True, sometimes the exhaust is overpowering, but somehow you have to hide from the heat, especially when you’re stuck in traffic jams.
At a rest stop
We are already accustomed to modifications in terms of cross-country ability of “loaves,” but converting this “minivan” into a camper is a novelty. A furniture set is screwed to the partition between the first and second rows: a wardrobe, drawers for kitchen utensils. There is a sink, a container for clean and dirty water, and a single-burner stove. And here are the pull-out tables. Everything is thought out, everything functions. You can order a connection to a household power supply - it will come in handy when camping.
The mechanism of the folding bed is welded and assembled neatly: nothing gets stuck anywhere and can be quickly disassembled.
The mechanism of the folding bed is welded and assembled neatly: nothing gets stuck anywhere and can be quickly disassembled.
Washbasin, sink, gas stove - everything is like in the best houses.
Engine tuning
The UAZ 469 engine can be replaced or some of its parts can be modified.
The following engines are most often used for replacement:
Installing one of these engines is the most preferable option, since this will increase the car’s power and reduce fuel costs. In addition, these motors are ideally designed for the UAZ 469 car and there are no problems with their installation.
There are a number of foreign-made engines that will significantly increase the power of the UAZ, but their installation involves a complete change in the front part of the car, and therefore is not considered advisable.
Many owners are trying to upgrade a car's stock engine. To reduce fuel consumption, the front axle is often disabled, which makes the car practically unsuitable for off-road use.
One of the effective ways to increase engine power is chip tuning. To do this, the electronic engine control unit is connected to the on-board computer and the appropriate software is installed on it. To carry out this procedure, you should contact a specialized automotive service.
Tuning UAZ 469 for hunting and off-road
When upgrading a car for hunting, it is necessary to pay attention to improving the vehicle's maneuverability in difficult areas of rough terrain. The car must be adapted for off-road travel and meet the functional requirements of the hunter.
External tuning
When preparing a car for hunting, it is necessary to make body parts resistant to impacts from branches or stones. To do this, the lower part of the UAZ body is sheathed with metal sheets. Thin sheets of aluminum or stainless steel are suitable. Once the sheets are installed, coats of primer and paint can be applied.
REFERENCE: Some owners install a metal roof rack on the roof. It allows you to transport cargo and protects the car roof from damage.
Branch protection
When traveling through forested areas, the UAZ windshield is protected from impacts from branches. The protection is made in the form of two metal cables.
Headlight protection
To protect the headlights and radiator grille from branches and stones, a “kengurin” is installed. It is a frame made of metal pipes and rods. The product is attached to the bumper or directly to the car frame, and protects the front from impacts.
You can make the frame yourself or buy a ready-made version. You can make a frame in two ways:
Winches for UAZ 469
Tuning the UAZ 469 for off-road requires the installation of winches. They are installed on the front and rear bumpers of the car.
IMPORTANT: The UAZ vehicle must be equipped with winches with a high-strength steel cable. The pulling force of the device should not be less than 5 tons.
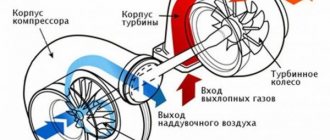
The winch is a device consisting of an electric motor and a reduction gearbox. There are different models of winches. Some of them have remote controls. The winch is attached to the bumper or frame of the car.
A standard bumper will not withstand the load when using a winch. Therefore, owners install reinforced bumpers. They can be purchased or made by yourself.
Advantages of a hatch on a UAZ
In the 90s, sunroofs on the roofs of cars, which could mainly be found on foreign cars, began to gain particular popularity. Today, hatches are not as popular as before, but still they have not been forgotten and continue to be used for their purpose. The advantages of such devices on cars are:
Installing a hatch on a UAZ: do it yourself or in a workshop
The best option for installing the product on your car is to entrust the job to professionals. But as you understand, professionals will ask for a decent fee for such work. Therefore, many car enthusiasts, out of curiosity, strive to tackle the issue of installing the device on a Patriot with their own hands. Although this is not so easy to do, it is possible. Moreover, you should not doubt your abilities if you have the makings of a master.
The design of the product plays a big role, because the presence of several bends at the joints can cause some problems. Therefore, when choosing a product, make sure that you can install such a hatch yourself. Having chosen a new hatch for your UAZ Patriot SUV, you can begin the installation process.