Wipers do not work on VAZ 2108, 2109, 21099
Failure to operate the windshield wipers is a very common malfunction on VAZ 2108, 2109, 21099 vehicles. Its main causes are problems with the electrical part and mechanical failure of the windshield wiper elements. Let's consider a situation where the wipers have completely failed and do not react in any way to moving the lever in the right steering column switch.
List of malfunctions leading to failure of wipers on VAZ 2108, 2109, 21099
At the beginning of the electrician:
— the fuses in the mounting block have blown;
For the old-style mounting block - 17.3722 these are No. 5 and No. 4, for the new ones 2114-3722010-60, 2114-3722010-10, 2114-3722010-18 - F16 and F7. Fuses No. 5, F16 – cleaner, No. 4b A7 – washer.
If the fuses blow, there may be a short circuit in the electrical circuits of not only the windshield wiper, but also other circuits protected by them. See “Fuses and circuits of mounting blocks they protect for VAZ 2108, 2109, 21099”.
— the windshield wiper relay has failed (52.3747, 525.3747);
The relay should click when operating. If this is not the case, either it itself is faulty, or its contacts have oxidized. Sometimes, to restore its functionality, it is enough to take it out and put it back in several times. We replace the faulty relay with a new one.
You can check its serviceability by moving the steering column switch to the uppermost position. In this position, the brushes should work even if the relay is faulty.
Assignment of windshield wiper relay contacts for checking it: input – 15, output – S.
— the steering column switch for the windshield wiper operating modes is faulty;
The purpose of the switch terminals for checking it is: current input - 53a, 1st speed - 53, 2nd - 53b, intermittent mode input - 53e, intermittent mode output 53.
The faulty switch should be removed, disassembled, the contacts cleaned, or replaced with a new one.
— the connectors in the electrical circuit of the windshield wiper have come off;
In the mounting block these are X1, X2, X3, X4, X11, next to the mounting block there is a connecting block for the electric motor, a block on the steering column switch.
— the contacts in the connectors of the electrical circuit of the windshield wiper have oxidized;
We disconnect all the connecting blocks one by one and clean the contacts with a small needle file. It is better to start with the electric motor block next to the mounting block, as it is constantly exposed to moisture. Here you can check the connection of the “mass” wire of the electric motor.
It will be useful: What is the difference between the Lada Largus and the Lada Largus Cross: similarities and differences
— the windshield wiper motor brushes are severely worn or stuck;
The commutator against which the brushes are pressed may also burn out.
You can check the serviceability of the wiper motor by applying voltage to it directly from the battery. Input: 1st speed - gray wire from the mounting block, 2nd speed - gray-orange wire from the mounting block. Input for intermittent operation - gray wire from the mounting block.
— the brushes are frozen to the glass;
— after a long period of parking, the brushes stuck to the windshield;
— the windshield wiper drive levers are damaged, jammed or incorrectly installed after repair;
— the teeth of the plastic gears in the electric motor gearbox are damaged.
Notes and additions
— Other malfunctions of the windshield wiper (the blades do not work in intermittent mode, stop during operation, do not work synchronously, etc.) of VAZ 2108, 2109, 21099 cars are described on our website in the article “Malfunctions of the windshield wiper of VAZ 2108, 2109, 21099 cars.”
— Fuses, connection block, ground mount, wiper relay
Replacing the windshield wiper motor of a VAZ 2108
Before starting specific actions, it is necessary to find out the reason for the breakdown of the VAZ 2108 windshield wiper. Check the functioning of all parts of the windshield wiper design. If you need to replace the VAZ 2108 windshield wiper motor, you will need to correctly remove and install the electric motor.
Diagnostics
— If you suspect that the VAZ 2108 windshield wiper drive motor has failed, then first check the operation of the fuse.
— Then make sure that the steering column switch is working properly.
— The fuse mounting block contains a circuit breaker. Remove it. If the resistance between the terminals is zero, you need to change the breaker.
— If the problem is a broken grounding, then you can check it as follows. To do this, turn off the windshield wipers and measure the resistance between the fourth motor connector terminal and ground. The reading should read zero.
— Replacing the VAZ 2108 windshield wiper motor is necessary if, during the low-speed wiper mode, the voltage at terminal 5 and the battery is different.
The voltage should be the same.
Replacing the windshield wiper motor of a VAZ 2108
— First, disconnect the negative cable from the battery. You can read about this on the AvtoMalinovka website; the auto articles are very informative.
— It is necessary to fix the position of the blades on the windshield. Do this with a wax pencil. Now remove the windshield wiper arms by unscrewing the nuts.
— Next you need to open the fairing cover.
— Disconnect the electrical connector and the wiper motor. Now unscrew the windshield mounting nuts. From the space under the fairing, remove the motor assembly with rods.
— Unscrew the mounting bolts of the motor drive crank and remove it. Turn the entire assembly over to face you. Now, by unscrewing the mounting bolts, you can disconnect the windshield wiper motor from the rod assembly.
— Now you need to replace the windshield wiper motor of the VAZ 2108. You can do the installation in reverse order.
Video. An example of how wipers work with a broken (dead) trapezoid (windshield wiper) motor.
club2108.ru
Disassembling the electric motor of the windshield wiper VAZ 2108, 2109, 21099
Let's disassemble the windshield wiper electric motor that was previously removed from the car.
This will have to be done if it needs repairs. For example, replacing a licked gearmotor gear, cleaning limit switch contacts, replacing brushes or an electric motor armature, etc.
Required Tools
— Keys for “10” and “13”
Disassembling the electric motor of the windshield wiper VAZ 2108, 2109, 21099
— Disconnect the crank mechanism (levers) from the wiper motor
To do this, use a key set to “13” to unscrew the nut securing it and remove it by sliding it off the axis.
— Disconnect the wiper motor bracket
Using a “10” wrench, unscrew the three nuts securing the bracket and remove it.
We disconnect the crank and bracket of the electric motor of the windshield wiper of VAZ 2108, 2109, 21099 cars
— We disassemble the purifier gear motor
Using a Phillips screwdriver, unscrew the three screws securing the protective cap of the gearmotor and remove it.
We remove the protective cap of the windshield wiper gearmotor of VAZ 2108, 2109, 21099 cars by unscrewing the three screws securing it
Disconnect the lock washer of the gear motor gear shaft. We pry it off with a screwdriver and remove it. We also remove the two washers under it.
Remove the lock washer from the gear motor gear shaft and two simple washers under it
Using a Phillips screwdriver, unscrew the screw securing the wire clamp and remove the gear motor cover.
Remove the cover of the windshield wiper gear motor and take out its gear
We remove the gear motor gear.
— We disassemble the windshield wiper motor housing
Using a Phillips screwdriver, remove the two screws securing the motor housing to the gearmotor. Remove the screw retainers. Remove the housing by sliding it back. If necessary, we replace faulty parts (brushes, armature) with new ones or known good ones.
Disconnect the electric motor from the windshield wiper gear motor and disassemble it
We assemble the windshield wiper motor in the reverse order. When assembling, there are some features without knowledge of which it is not possible to produce it properly. One such feature is described in the notes and appendices.
Notes and additions
— When assembling the windshield wiper electric motor of VAZ 2108, 2109, 21099, it is necessary to install the brush levers in their original position. To do this, we connect the block of wires to the electric motor, turn on the ignition, turn on the windshield wiper with the steering column lever and wait until it stops. Turn it off. We fasten the crank in this position.
Replacing the trapezoid and the wiper motor (windshield wipers)
The design of the trapezoid on VAZ 2109-2108 cars is quite reliable and it is almost never necessary to replace it, or only in exceptional cases. But you will need to remove it if you need to replace the wiper motor. This part fails much more often. Carrying out this repair yourself is quite simple and for this work we will need the following tool:
- open-end or socket wrench 24
- socket head 10
- extension
- ratchet
- flat screwdriver
Dismantling and assembling windshield wipers
Then the bolts securing the wiper gear with the electric motor are unscrewed. At this stage, it is recommended to unscrew the two screws securing the motor wires. Then disconnect the wiring from the fuse and remove:
It is recommended to label the last parts. This will allow you to quickly and correctly install them in place. The next step involves removing the three screws that secure the gearbox cover. When disassembling the last unit, the adjusting screw must not be unscrewed. Otherwise, the axial clearance of the armature shaft will be disrupted.
It is necessary to take into account that the trapezoid system is presented in the form of a single structure that cannot be disassembled. Therefore, if the traction fails, this unit is completely replaced. It includes the following elements:
As for assembling the wipers, this procedure is carried out in reverse order. In this case, you need to be careful and consider the following:
If it is impossible to repair the “nine” with your own hands, then it is recommended to seek help from a car mechanic.
VAZ 2109 wiper motor
Sources
- https://mashinapro.ru/273-dvorniki-na-vaz-2109.html
- https://vaz-remont.ru/pochemu-ne-rabotaet-zadnij-dvornik-vaz-2109-poisk-i-remont-neispravnostej/
- https://expertvaz.ru/21099/dvorniki-stekloochistitel-ne-rabotaet.html
How to Check the Wiper Motor of a VAZ 2109
Checking and removing the windshield wiper motor VAZ-2109
An element such as the engine responsible for operating the windshield wipers on a VAZ-2109 car does not occur often, but if this happens, it must be replaced.
It is essentially simple, but the procedure itself is time-consuming, especially for those car owners who do not have the proper experience.
First, you need to turn off the system. To do this, simply disconnect the negative terminal on the battery.
- place the windshield wiper arms in a vertical position;
- remove the nuts from the rollers;
- remove the protective caps;
- tighten the nuts (one side), the mounting brackets on top;
- disassemble the rubber sealing washers;
- in the engine compartment, the wiring harness has been removed from the connector;
- unscrew the bolts that hold the lower part of the bracket;
- the mechanism rollers are removed from the holes;
- unscrew the nut that secures the windshield wiper handle and remove it;
- remove the bolts that hold the windshield wiper and motor in place;
- disconnect the wires from the bimetallic fuse and remove the engine from the bracket.
All that remains is to remove the retaining ring and washers from the gearbox shaft and install the new motor. Reverse assembly.
For convenience, it is recommended to slightly move the oven fan to the right. Without this, the wiper cannot be removed. You will also need to remove the fuse box cover and any relays located there.
Before removing the wiper itself, you need to move it slightly to the left.
The pads are best numbered to avoid confusion during assembly.
Disassembling the gearbox
If the cleaner does not work due to contamination of the gearbox, it is easy to clean. But under no circumstances unscrew the adjusting screw installed in it. in the event of an unpleasant event, you most likely will not be able to properly return the anchorage gap.
The procedure looks like this:
- remove the protective panel from the gearbox;
- remove the transmission;
- they remove the cage nuts after unscrewing two bolts;
- The gearbox housing is disconnected together with the brush holder from the engine;
- the anchor is removed and cleaned with a compressor.
Removing the rear wiper is usually done the same way, but you will need to remove the door trim to get to the wires and other parts.
Engine repair
Many people think that replacing the engine with a foreign car from a similar engine will solve the problem with the slow operation of the windshield wiper blades, but in fact, the “original” motor is quite easy to clean and lubricate.
If the post causes speed, you should check how easily the armature rotates: if the movement is difficult, you should expect damage or very high wear on the brush. They are easy to exchange for new ones.
This will also help clean the manifold. For this you will need sandpaper. They talk about the need for this procedure:
- visible contamination;
- noticeable scratches;
- grooves on the metal.
The armature or gearbox in combination with the engine assembly must be replaced if the manifold is severely worn or burnt out.
Speed control is necessary if the windshield wiper blades operate very slowly. This is facilitated by:
- inappropriate (very “thick”) lubricant;
- gear wear;
- deformation of rods.
Eliminating these problems basically makes the windshield wipers work faster and, in addition, significantly.
Connection diagram
If you're stuck, this chart will let you know what you're doing wrong.
- Jamit gearbox (1);
- thermobimetallic fuse (2);
- engine (3);
- washer valve (3);
- mounting block (4);
- ignition switch (5) and relay (6);
- switch (7);
- Wiper relay K3 (8);
- "A". The wiper blade contacts are marked;
- "B". output to the 30th contact of the generator;
- A. 2nd speed;
- b. 1st;
- C. spring switch;
- g and d. his contacts;
- filter capacitors. C1, C2;
- chokes. L1, L2.
15.4 Checking the wiper motor
Checking the wiper motor
The wiper motor is located in a waterproof housing under the windshield, and the rear wiper motor is located in the rear gate. To check, remove the corresponding backing. The wiper motor will be considered in the future and the rear wiper will work properly.
- First find out whether the faulty motor is a cleaner motor or voltage. To do this, proceed as follows.
- Disconnect the multi-core connector from the wiper motor.
- Use an auxiliary cable to supply voltage from the positive terminal of the battery to terminal c. (The negative pole of the engine is connected to the battery minus through the housing).
- The wiper motor should now operate at stage 1 (slow). If it doesn't work, it means the engine or 1st gear is faulty.
- Connect the positive cable to the terminal and to the left of the terminal with . The motor should now run quickly in stage 2.
Checking the rear wiper
- Connect the positive battery cable to terminal A and the ground to terminal B of the plug and check that the engine runs.
- Then disconnect the ground from terminal B and immediately connect it to the motor frame. The engine should stop and stop.
- Connect the auxiliary cable from the positive terminal of the battery to terminal B. Connect a ground from the negative terminal of the battery to terminal a. Terminal B is located at the bottom left, terminal and at the bottom right.
- The wiper motor should operate in step 1 (slow). If this does not work, the engine or first stage is faulty.
- Connect the negative cable to terminal C. Terminal c is located above terminal and . The motor should now run the second steps (fast).
Checking the rear wiper
- Connect the positive battery cable to the terminal and . the grounding cable to terminal b and make sure that the engine is running.
- Then remove the ground from the terminal. b and immediately connect to the engine housing. The engine should stop and stop.
- If the windshield wiper motor is faulty, install a new one, see Section. Heater, lighting system, household appliances . Section Removal and installation of the rear windshield wiper motor .
- Connect the front wiper motor connector.
Engines do not work on VAZ 2108, 2109, 21099
Wipers failure. "janitors". a very common malfunction of VAZ 2108, 2109, 21099 cars. Its main causes are problems with the electrical part and mechanical failure of the wiper elements. Consider a situation where the windshield wiper blades are completely out of order and do not respond in any way to the movement of the lever in the right steering column switch.
Motor repair
Many people think that replacing the motor with a similar one from a foreign car can solve the problem with the slow operation of the wipers, but in fact, it is often enough just to clean and lubricate the “original” engine.
If the speed of operation causes complaints, then it is necessary to check how easily the armature rotates: if movement is difficult, damage or excessive wear of the brushes should be suspected. They are easy to replace with new ones.
Cleaning the collector will also help - this will require fine sandpaper. The need for this procedure is said:
- visible contamination;
- noticeable scratches;
- grooves on the metal.
It will be necessary to replace the armature or gearbox along with the complete motor if the manifold is too worn or burnt.
Motor malfunctions and solutions
Let's look at what to do if the windshield wiper motor does not work, and what can cause such problems. There are several options:
1. The electric motor does not work, the bimetallic fuse is inactive, and the fusible insert responsible for powering the wipers is intact. In this case, you need to check the serviceability of the wiring, the quality of connections of all contacts, determine any existing damage and eliminate them.
If everything is fine with the wiring, then you should check the wiper switch. If it acts up, just replace it. The engine itself may not work - this often happens when brushes stick or contact connections burn.
In this case, you need to repair the windshield wiper motor - inspect it, replace faulty elements, and clean dirty components. It is important to check the integrity of the wiring that connects the electric motor and the block.
The next step is to check the bimetallic fuse, which needs to be cleaned, and if repair is impossible, simply discarded and replaced with a new one. If this does not help, check the motor armature winding for integrity. If there is no chain, then it is necessary to replace the armature or the entire mechanism as a whole.
2. The bimetallic fuse works, the motor does not start, and the power fuse constantly blows. The first thing to do is check the integrity of the levers. Often they do not work due to deformation or freezing of the brushes to the windshield.
The worst thing is if the cause of such a problem is a short circuit in the armature circuit. Here, repairing the fault is possible in only two ways - by installing a new armature or replacing the gearbox.
3. Interrupt mode does not work. Here the problem is either the relay or the wiper switch. In the first and second cases, it is better to replace the faulty element.
4. The wipers do not stop in interrupt mode. The reason is a relay failure or a malfunction of the limit switches. In the latter case, the gear cam of the gearbox simply does not press the spring plate. The problem is solved by bending it a little.
Connection diagram
If you encounter any difficulties, this diagram will help you figure out what you are doing wrong.
- wiper gearbox (1);
- thermobimetallic fuse (2);
- motor (3);
- washer valve (3);
- mounting block (4);
- ignition switch (5) and relay (6);
- switch (7);
- K3 front wiper relay (8);
- “A” – the contacts of the wiper pads are marked;
- “B” – output to pin 30 of the generator terminal;
- a – second speed;
- b – first;
- c – switch spring;
- d and e – his contacts;
- noise filtering capacitors – C1, C2;
- chokes – L1, L2.
VAZ 2109: windshield wiper repair - correct execution
Windshield wiper (“janitor”) VAZ 2109
Windshield wipers are designed to clean the windshield from raindrops in bad weather, as well as from dust and dirt and provide the driver with good visibility. At the same time, windshield wiper blades, when installed correctly, clean a large area. The quality of glass cleaning largely depends on how tightly the brushes are pressed against the glass. Of course, we should not forget that the windshield wiper (due to its design) does not clean the entire surface of the windshield, because of this, visibility in snowfall or heavy rain is significantly deteriorated. If there are failures (malfunctions) in the operation of the wipers, you will have to repair the windshield wiper of the VAZ 2109. Do not be afraid to perform this simple procedure yourself, use our article and save your money.
Brush fault
This is the most common reason for windshield wiper repair. Even expensive and high-quality brushes are changed once a year due to natural wear and tear or hardening of the rubber bands caused by weather conditions.
Brushes come in three types: hybrid, frameless, frame. VAZ 21099 cars are equipped from the factory with frame metal blades with a rubber windshield wiper. If desired, the elastic band can be changed to silicone. This type of windshield wiper fits more tightly to the car glass, cleans better, and does not freeze in the cold.
Every driver, even a novice, can change wipers. When starting work, it is advisable to cover the glass with a cloth. This will prevent scratches.
Algorithm of actions when replacing wipers:
- the brush lever is placed vertically and carefully removed from the glass;
- when you pull the brush down, the plug opens (at this time you need to secure the holder well);
- the pre-prepared cleaner is put on the knitting needle and the plug is closed. New brush installed.
How to remove
First of all, it is necessary to de-energize the system. To do this, simply disconnect the negative terminal on the battery.
- set the wiper arms to a vertical position;
- unscrew the nuts and remove them from the rollers;
- remove protective caps;
- twist the nuts (one on each side) securing the brackets at the top;
- dismantle the rubber sealing washers;
- in the engine compartment, remove the wiring harness from the connector;
- unscrew the bolts holding the lower part of the bracket;
- the mechanism rollers are removed from the holes;
- unscrew the nut securing the windshield wiper crank and remove it;
- dismantle the bolts holding the wiper gearbox and the motor in place;
- disconnect the wires from the bimetallic fuse and remove the engine from the bracket.
All that remains is to remove the locking ring and adjusting washers from the gear shaft and install a new motor.
Assembly is carried out in reverse order. To make it more convenient to work, we recommend moving the stove fan slightly to the right. Without this, it will not be possible to remove the windshield wiper. You will also need to remove the fuse box cover and all the relays located there.
The windshield wiper itself must also be moved slightly to the left before removal.
It is better to number the adjusting washers so that they are not confused during assembly.
Possible washer malfunctions
In order for the wipers to work properly, a constant supply of water is necessary. To automate this process, a washer was made. There may be the following reasons for its failure.
- The steering column switch has failed. To check this, you need to close the two contacts located under the steering wheel. Front contact 53ah-w, rear contact 53ah-wh. After this, measure the resistance. In case of low resistance or breakdown, the switch must be replaced with a new one.
- The washer pump does not supply water. It needs to be changed.
- The wire connecting the switch to the pump has broken.
- The injectors are clogged with dirt. They can be cleaned with a sharp needle.
- Relay K3 does not work.
- The hose broke.
How to remove
First of all, it is necessary to de-energize the system. To do this, simply disconnect the negative terminal on the battery.
- set the wiper arms to a vertical position;
- unscrew the nuts and remove them from the rollers;
- remove protective caps;
- twist the nuts (one on each side) securing the brackets at the top;
- dismantle the rubber sealing washers;
- in the engine compartment, remove the wiring harness from the connector;
- unscrew the bolts holding the lower part of the bracket;
- the mechanism rollers are removed from the holes;
- unscrew the nut securing the windshield wiper crank and remove it;
- dismantle the bolts holding the wiper gearbox and the motor in place;
- disconnect the wires from the bimetallic fuse and remove the engine from the bracket.
Let's start the renovation
Our instructions are suitable for the VAZ 21099 repair and replacement of windshield wipers. The windshield wiper mechanism on the VAZ 2109 and other models is removed if a complete replacement is necessary (if they are completely out of order), for repairs or to perform other work when its presence interferes with the progress of their implementation. You will need a set of open-end wrenches and a set of screwdrivers to repair the windshield wipers on a VAZ 2109 yourself, proceed in the following sequence:
- Disconnect the negative battery terminal wire
- We turn both levers of the wiper blades to a vertical position, unscrew the nuts securing them
- Remove the blade arms from the windshield wiper rollers
Unscrew and remove the windshield wiper arms
Note: If suddenly you cannot remove the lever by hand, unscrew the nut securing the wiper arm, but not all the way, to avoid damaging the thread.
Using pliers (pliers), pull the lever off the slots, then completely unscrew the nut. Remove the windshield wiper arm.
- Remove the protective caps, one on each side.
- Unscrew one nut from the upper bracket mounting on both sides
- Remove the special leveling rubber washers located on both sides
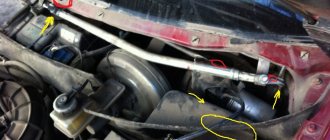
- Open the hood of a VAZ 2109 car, disconnect the connector with wiring from the block
- Then we move the heater fan to the right side along the compartment located in front of the windshield; if this is not done, the fan will interfere with us, remove the windshield wiper.
- Remove the cover from the fuse and relay box
- We remove all the relays from the mounting block: since they interfere with the removal of the wiper
Disconnect the connector from the block. We take out all the relays so as not to interfere with the removal of the wiper
- Unscrew the lower mounting bolt from the wiper bracket.
- Squeeze the plastic wire holder and remove it from the slot in the body
- Remove the holder from the wires so as not to lose it
- We remove the rollers of the wiper mechanism from the holes located in the body
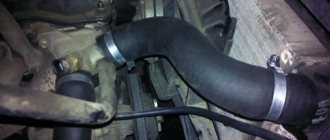
- We move the windshield wiper so that its motor is in the wide part of our compartment located in front of the windshield (this is where the heater fan is installed)
- We turn the windshield wiper and remove its motor from the compartment
- Move the wiper towards the fuse and relay box
- We take it out of the compartment
- Unscrew the nut securing the crank of the wiper mechanism
- Remove the crank from the wiper gear shaft by prying it off with a flat screwdriver
Using a flat screwdriver, remove the crank from the gear shaft
- We unscrew the three bolts securing the wiper gear with the electric motor
- Unscrew the two screws securing the windshield wiper motor wires
- Disconnect the wires from the bimetallic thermal fuse
- Remove the windshield wiper motor from the bracket
- Then remove the retaining ring from the wiper gearbox shaft
- Remove the adjusting washers from the gearbox shaft
Tip: Be sure to mark all the adjusting washers so that when assembling the windshield wiper mechanism, install them in the same quantity and in their original places
- Unscrew the three screws securing the wiper gearbox cover
- Removing the gearbox cover
We unscrew the screws (there are three of them), they are indicated by arrows, to remove the gearbox cover
Warning: When disassembling the windshield wiper gearbox, do not unscrew (do not touch at all) the adjusting screw (in the photo above it is marked in red) otherwise you will violate the axial clearance (it is adjusted at the factory) of the armature shaft.
- Remove the panel from the wiper gearbox
- We take out the gear of the wiper gear
- Unscrew two screws (the second is located behind the wiper gear housing) and remove two cage nuts
Unscrew the screws and remove the cage nuts
- Remove the wiper gear housing from the electric motor housing along with the brush holder
- We remove the armature from the wiper motor housing
- After disassembling the electric motor, we blow through the housing with compressed air in order to remove coal dust from it.
- Remove the retaining rings from both rollers of the wiper mechanism
- Then remove the adjusting washers from the two rollers of the windshield wiper mechanism.
- We remove the rods from the bracket and remove the adjusting washers from both rollers
- We remove the O-rings from the special grooves on both sides of the bracket.
It is impossible to further disassemble the trapezoid system; its rods have a completely non-demountable design (photo below):
- 1 – crank designated
- 2 - short wiper rod
- 3 — linkage joint
- 4 is the wiper mechanism roller
- 5 - long pull
Non-removable design of wiper rods
- We check the brush springs; if the electric motor brush springs are damaged or have lost their elasticity, replace the brushes with new ones
- Checking the ease of movement of brushes in the brush holder
- We replace worn or chipped brushes; they should move freely and without jamming
- Solder the leads of the new brushes (when replacing) to the brush holder
We check the elasticity of the springs and the smooth movement of the brushes themselves
- We clean the collector with fine sandpaper if it is dirty or if there are marks, scratches, etc.
- If the collector is badly worn or burnt, replace the armature or gearbox assembly with the electric motor
- Having found traces of jamming on the anchor journals themselves, we clean them with fine sandpaper
The armature journals are indicated by arrows, check the condition of the journals and commutator
- We replace an electric motor gearbox with broken or heavily worn teeth
- We straighten the bent wiper arms. If it is impossible to straighten them, replace the entire windshield wiper trapezoid
- If damage to the splines or roller threads is detected, replace the entire wiper trapezoid
- We clean burnt or oxidized contacts of the self-stopping mechanism using fine sandpaper.
- We replace torn, lost elasticity or cracked rubber cushions and other rubber parts
Complete disassembly of the windshield wiper trapezoid and its repair:
Note! When repairing the windshield wiper trapezoid, do not, under any circumstances, if you do not have the appropriate experience, remove the armature shaft adjustment screw. When it is turned out, the axial clearance at the shaft is violated!
Removal: 1) First, use a wrench to unscrew the nut that secures the trapezoid crank.
2) And then remove the crank by prying it up with a screwdriver.
3) Now, picking up the wrench again, unscrew the three bolts that secure the motor-gearbox to the bracket.
4) When the three bolts are unscrewed, use a screwdriver to unscrew the two screws that secure the wires to the fuse, and then disconnect them.
5) Next, grab the motor-gearbox with your hand and carefully remove it from the bracket.
6) Next, using a screwdriver, remove the retaining ring from the gearbox shaft.
Note! Behind the locking ring there are adjusting washers, which also need to be removed. By the way, for more accurate reassembly, the adjusting washers must be marked, for example, using a felt-tip pen, and when reassembling, install each one in its place!