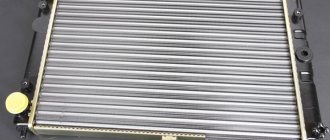
The radiator is a vulnerable car part
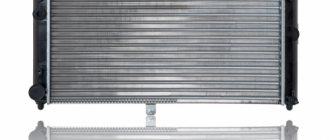
Replacing the cooling radiator of a VAZ 21093
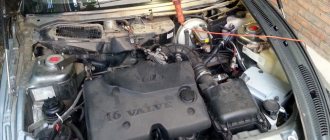
The radiator itself is a rather vulnerable part of the car, because it has a brass body that is subject to numerous loads. And this part is thin in design, and if you take into account the huge number of solder joints in it, then the quick failure of the cooling radiator becomes understandable. The radiator is located in front of the car and a pebble from the road or a tree branch that accidentally hits it can become a fatal bullet. Even the smallest foreign objects that get into the radiator can destroy soldering and resistance welding points.
VAZ 21099 replacement of cooling radiator
In addition, the mutual influence of the elements of the car in this case plays a cruel joke. Long-term use of chemicals, whether you like it or not, weakens the contact zone, disrupts the operating mode of the pump, increases the temperature of the coolant, etc. In addition, if the radiator cap valve gets stuck, it will not allow the pressure to be relieved in time, which will ultimately lead to set of flow points.
Note. There are many reasons why a radiator can fail or function unfairly. We will not dwell on them in this article. The purpose of this instruction is to familiarize the reader with how to easily remove the radiator and replace it with a new one.
Replacement
Replacing the cooling radiator in a VAZ 2109
This part must be replaced if a leak is detected. But still, first it’s better to check it to make sure where the leak is coming from.
Examination
To check the radiator, you need to remove it (how to do this will be described below), plug all the pipes and lower it into a bath of water. Work must be carried out in a specially designated place (workshop, garage, etc.). We supply air under pressure to the bath. If bubbles appear within 30 seconds of air entering, then there is a hole in the radiator and you can even find it if you watch carefully.
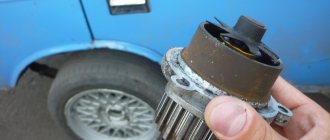
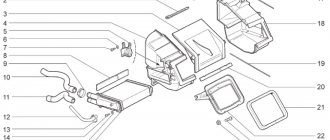
Interior heating device
VAZ 2109 radiator mount
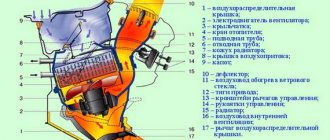
Designers of manufacturing plants have provided for the installation of a radiator for the heating system of the VAZ-2109 car interior. Under the panel of auxiliary devices, which is located between the two front seats, the design provides for the location of the interior heating stove. It contains a frame for installing a radiator. Plastic protective panels are installed on this panel on both sides (passenger and driver). They are attached to four self-tapping screws:
- Unscrew the screws.
- Take them off.
- This frees up access to the interior heating radiator.
- It is secured with four self-tapping screws.
- They are installed in holes located on the upper and lower surfaces of the radiator.
- Tighten the screws.
- After this, connect the hoses of the interior heating system.
Note: before tightening the pipes, it is necessary to put fastening clamps on them.
Tip: Before installing, clean the clamps along the inner edges with sandpaper. This is necessary to remove sharp edges. Since sharp edges can damage the rubber surfaces of the pipes.
Radiator mounting for VAZ 2109
This is the structural procedure for attaching radiators to the VAZ-2109:
Advice: it should be taken into account that before fixing the upper part of the cooling radiator, it is necessary to install the upper pipes on it.
- Secure them with clamps.
- Only then attach the top bar to the vehicle body.
- The following procedure for bringing the cooling system into working condition.
- Install the lower pipe and tighten the clamp.
Note. The lower pipe can be easily installed from the inspection hole. First you need to remove the engine crankcase protection.
Removing the radiator
VAZ 2109 cooling radiator
Let's get started:
- first of all, you should de-energize the battery or even remove it;
- Drain the coolant completely by opening the tap;
- If the car is equipped with a fuel injection system, then you need to remove the air filter.
Note. To quickly remove the air filter, press the latch with your finger or a screwdriver, disconnect the block with wires, loosen the clamp and remove the filter, first lifting its front part.
- now you need to cut the clamp securing the wire harnesses;
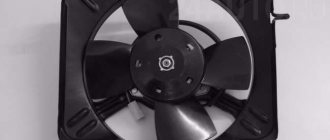
- disconnect the fan wire block;
- remove the throttle linkage clamp located on the fan casing;
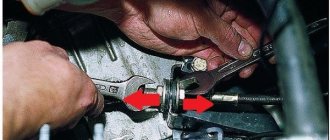
- Now you need to disconnect the radiator outlet hose, which is connected to the thermostat;
Disconnect the hose
- We also disconnect the supply hose connected to the cooling jacket pipe;
- remove the steam exhaust hose;
- It's time to unscrew the nut securing the radiator to the body from above.
Note. It is worth noting that the same bolt secures the fan casing.
- tilt the radiator towards the engine;
- remove it by moving it up together with the fan;
- now you need to loosen the clamps;
- disconnect all hoses from the radiator;
VAZ 2109 radiator cooling system diagram
- we unscrew the bolts and nuts that secure the casing with the fan and the radiator;
- disconnect the casing with the fan;
- You need to remove the two lower mounting cushions from the radiator.
Note. It is necessary to visually inspect the pillows and if they are torn or have lost their elasticity, replace them with new ones.
VAZ 21099 cooling radiator
Installation of a new radiator takes place in the reverse order. Don't forget to put on only the lower mounting cushions.
We fill in new antifreeze and that’s it, the radiator is ready for use.
It is definitely recommended to watch the corresponding video or photo materials while working with your own hands. The step-by-step instructions given above were written by specialists who know everything first-hand. Therefore, you need to comply with all its points. By learning how to change the radiator and other parts of your car yourself, you can save a lot on periodic repairs, the price of which is constantly growing.
Radiator frame
Replacing the radiator frame on a VAZ 2109
The radiator frame has two parts:
- external,
- internal.
Note: When purchasing frames, you must inspect them. They do not have packaging, and loading and unloading is done manually. Therefore, they may have concavities and damage to the metal.
Main design features
So:
- At the bottom of the radiator there are pins into which rubber inserts are installed. These inserts are responsible for shock absorption of the radiator while the vehicle is moving.
Radiator mounting in VAZ 21093
- There is a threaded pipe in the lower part; a plug is screwed into it to drain the brake fluid.
- If you look at the front surface of the radiator, in the right middle part there is a place for installing a fan switch sensor.
- In the upper part there are two cylindrical protrusions for connecting rubber pipes.
- There is one protrusion at the bottom.
Elements of the VAZ-2109 cooling system
1 - radiator; 2 — radiator drain plug; 3 - expansion tank; 4 — radiator supply hose; 5 — outlet hose; 6 — steam removal hose (to the expansion tank); 7 — casing with fan
Warnings! Before starting work, disconnect the wire from the “–” terminal of the battery.
Removal and installation of the radiator is performed on a cold engine.
Location of the coolant drain plug on the cylinder block.
If you remove the fan together with the radiator, then operations 6 and 9 do not need to be performed.
One possible reason for engine overheating may be a clogged radiator. In this case, flush the radiator with water.
How to replace the engine cooling radiator on a VAZ 2108-VAZ 21099?
1) First drain all coolant from the radiator. (How to drain it, see the article: “Replacing the coolant”)
2) Next, if you have an injection engine, then remove the air filter housing from it. (For how to remove the housing, see the article: “Replacing the air filter housing”)
3) Then remove the fan from the engine cooling radiator. (For how to remove the fan, see the article “Replacing the Radiator Fan”)
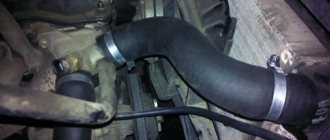
4) Next, using a screwdriver, loosen the supply hose clamp, also known as the thick hose (Indicated by the blue arrow), and after loosening the clamp, proceed to removing the steam hose, also known as the thin hose (Indicated by the red arrow), to do this: “Continue immediately under the picture"
Instructions for removing and installing a radiator on a VAZ 2109-2108
Before proceeding with dismantling, you must first remove the fan along with the housing. Then be sure to drain the coolant from the system. Once that's done, all that's really left to do is remove the cooling system pipes. So, two pipes are at the top, and they are clearly shown in the photo below. First, unscrew the clamp bolts:
Then we remove the pipe and hose, the result of which is shown in the picture below:
Then we proceed to the lower pipe, having also first unscrewed the bolt securing the clamp, and remove it:
All that remains is to disconnect the two wires from the temperature sensor, which is located on the right side of the radiator. This is shown more clearly below:
After this you can start withdrawing. Carefully move the radiator slightly forward towards the engine:
And also, no less carefully, we take it up, making sure that it does not cling anywhere during dismantling, so as not to damage it:
If replacement is necessary, you must buy a new one and install in the reverse order. The price of a new radiator for a VAZ 2109-2108 is about 1100-1500 rubles and differs depending on the manufacturer and material of manufacture.
The radiator of the VAZ 2108, 2109, 21099 engine cooling system leaked
Malfunction: a leaking radiator of the engine cooling system is often found on VAZ 2108, 21081, 21083, 2109, 21091, 21093, 21099 cars with high mileage.
Let's look at its signs, causes, places of leakage, and ways to eliminate it yourself.
Signs of a malfunction “the radiator of the VAZ 2108, 2109, 21099 engine cooling system is leaking”
— At a minimum: a sweetish smell of antifreeze (antifreeze) and barely noticeable steam under the hood of the car after the engine warms up (the radiator “soars”). Most likely, coolant is leaking slightly through the radiator seals, or through a crack somewhere in its aluminum tubes. In most cases, the area where the coolant oozes out sweats and is a different color from the entire surface of the radiator. When heated, antifreeze evaporates and emits a sweetish odor. The level in the expansion tank practically does not drop.
— At the maximum: a real coolant leak (radiator leak) is added to the smell and steam. The leak can be small (drops on the asphalt where the car is parked) or large (a puddle of antifreeze under the car). In this case, the radiator can leak both cold and hot. The fluid level in the expansion tank periodically or constantly drops.
Possible places for coolant leaks
— Connections between radiator pipes and cooling system hoses
— Aluminum radiator tubes
— Radiator tank seals
— Coolant drain plug
Causes of radiator leaks
- Mechanical damage
— Loose connection of pipes and hoses
— Destruction of rubber gaskets of radiator tanks
Fault diagnosis
A visual inspection of the radiator and its hoses helps diagnose the malfunction. Leak areas usually have drips and fogging that are quite easy to detect. The inspection should be carried out on a cold engine and on a warm one (start it and watch where the leak will be as it warms up).
Troubleshooting methods
In many cases, if a serious radiator leak occurs, self-repair does not bring the expected positive effect, or only brings a temporary one. But it’s still worth trying to repair a leaking radiator.
Firstly, if the connections of the radiator pipes and cooling system hoses are leaking, you should first tighten their clamps. If this does not help, replace the clamps with better ones. If this does not help, replace the cooling system hoses. In such a situation, when the coolant leak does not affect the radiator itself, this should help.
If a small crack is found in the aluminum tube of the radiator frame, it can be repaired by cold welding. If you approach such repairs with all responsibility: remove the radiator from the car, thoroughly clean the leak site, dry it, blow off dust and dirt, purchase high-quality cold welding, seal everything according to the instructions for it, then success in the fight against leaks is guaranteed. High-quality cold welding and thorough cleaning of the leak site will enable the radiator to operate for several more years.
A large hole or multiple holes and damage in aluminum radiator tubes must be welded using argon welding. If there is such an opportunity, you can remove the radiator, clean the damaged areas and weld it. The only negative is that the price of repairs using argon welding can be quite high.
If coolant flows through the rubber seals of the radiator tanks, it is easier to replace the radiator with a new one or a working used one than to bother with such repairs.
If you detect a leak from under the radiator drain plug, you can try replacing it with a new one.
If cracks are detected in the plastic radiator tanks, it must be replaced.
Notes and additions
— In addition to mechanical damage, coolant leaking through the radiator seals can cause excessive overheating and increased pressure in the cooling system. This situation is caused by clogging of the cooling system in general and the radiator in particular, a malfunction of the expansion tank cap, a malfunction of the thermostat, or a malfunction of the electric fan on the radiator. You should sequentially check all of the listed elements, and also, if necessary, flush the cooling system.
— The use of special additives in the coolant to eliminate radiator leaks is not recommended due to negative consequences: blockage of its tubes, as well as blockage of the heater tubes and clogging of the engine cooling system as a whole.
Twokarburators VK - More information on the topic in our VKontakte group, on Facebook Twokarburators FS and on Odnoklassniki - Twokarburators OK
More articles on the engine cooling system of VAZ 2108, 2109, 21099 cars
— The thermostat is jammed, signs and causes of the malfunction
— Why does antifreeze boil in the expansion tank?
— White coating on the oil filler cap, causes
— The coolant temperature indicator of VAZ 2108, 2109, 21099 does not work
— Replacing coolant on VAZ 2108, 2109, 21099
— The fan on the radiator is constantly running, the causes of the malfunction
Replacing a radiator in a VAZ 2109 video
Sources
- https://MasteraVaza.ru/sistema-ohlazhdeniya-dvigatelya/radiator-sistemy-ohlazhdeniya/vaz-2109-zamena-radiatora-ohlazhdeniya-671
- https://MasteraVaza.ru/sistema-ohlazhdeniya-dvigatelya/radiator-sistemy-ohlazhdeniya/kreplenie-radiatora-na-vaz-2109-674
- https://MasteraVaza.ru/sistema-otopleniya/u-zubily-sistema-otopleniya/vaz-2109-zamena-ramki-radiatora-675
- https://ovaze.ru/221-radiator-i-ventilyator.html
- https://remont-vaz2109.ru/zamena-radiatora-oxlazhdeniya-svoimi-rukami/