The VAZ 2109 camshaft is one of the main parts of the engine assembly, so it is very important to maintain its performance. The camshaft's job is to ensure the correct sequence of valve actuation during the combustion cycle. This part extremely rarely causes breakdowns in the nine, but still occasionally you have to check its condition. Let's look at how to properly disassemble the assembly and get to the camshaft, as well as what should be done if problems arise with this part.
Return to contents
Engine assembly design
Replacing the camshaft on a VAZ 2109 is extremely rarely required due to the fact that it is one of the strongest parts in the design. The camshaft itself is a solid metal product with a set of cams, so it is not afraid of most loads.
However, under certain conditions the shaft may suffer mechanical damage or deformation. Most often these are collisions and accidents, less often - overloads. In such cases, it will simply need to be replaced with a new one along with other damaged parts.
Along with the camshaft, two more parts are often checked: the oil seal and the gear. The oil seal is a rubber-metal cuff that protects the shaft from foreign liquids, moisture and dirt. If it is damaged or deformed, this will lead to incorrect operation of the camshaft.
The gear is connected via a chain transmission to the crankshaft, which ensures the mutual operation of the 2 mechanisms. It may also become damaged, causing the engine to malfunction.
Sometimes the bed in which the part is placed becomes a problem. If liquid, dirt, dust, or oil gets there, this can affect the performance of the camshaft.
Return to contents
Design and malfunctions of valve stem seals
Modern valve seals are rubber caps with a powerful steel sleeve inside and expander springs. The task of the latter is to effectively fix the edge of the cap and the valve stem.
As a rule, rubber is used as a gasket material, which hardens over time, wears out and ceases to perform its functions normally. The result is engine oil entering the combustion chamber.
This problem can be recognized by one simple sign - thick bluish smoke begins to come out of the exhaust pipe, and oil consumption increases. In such a situation, it may be necessary to replace the valve stem seals on the VAZ 2109.
First signs of trouble
During a technical inspection, we check the above parts if the engine begins to malfunction.
On a VAZ 2109, the injector and on models with a carburetor will have similar problems: the camshaft knocks. The knocking may occur when the engine is started cold, and then stop, or not stop at all. Here's what can cause this phenomenon:
- Axial play of the camshaft has arisen, causing it to beat inside the mechanism.
- Worn cams or bearings.
- Camshaft bed defects.
- Malfunction of the fuel supply system, which leads to detonation and knocking. Because of this, the speed will fluctuate while the car is moving.
- The part is damaged: the neck is bent, the support has burst, the oil seal is worn out. If the problem is in the oil seal, an oil leak may occur. The oil level sensor will show a constant decrease in fluid.
- Using low-quality technical fluid. Usually changing the oil will solve the problem.
Based on the nature of the knock, it is quite difficult to determine where it comes from. If the knocking does not stop after the engine warms up, this is the last opportunity to detect a breakdown and fix it in time. If you don’t dare disassemble the unit yourself, take the car to a workshop, where they can replace all the faulty parts of the unit in a few hours.
Return to contents
In parallel with the repair of the camshaft bed
Do you remember what causes the camshaft bed to fail? Therefore, bed boring is just a step in a complex of repair and diagnostic work. Along the way, you will have to find out and eliminate the cause of the camshaft bed malfunction.
And for this you need:
- diagnose the lubrication system, incl. and oil pump;
- clean and flush the oil passages of the block and cylinder head;
- checking the engine cooling system;
- checking the fuel system.
How to get to the camshaft?
To get to the VAZ 2109 camshaft, you will need to dismantle several parts. Arm yourself with the following tools:
- hexagon;
- wrench 13 or similar with a socket head;
- replaceable head for 10;
- ratchet handle.
To start work, turn off the power to your “nine” by disconnecting the battery. Then you need to set the piston of the first cylinder to the top dead center position.
Now we dismantle the devices that will interfere with the work in the following order:
- Air filter.
- Gasoline pump.
- Distributor.
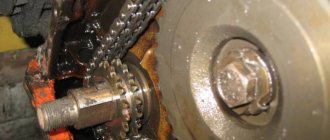
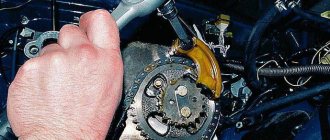
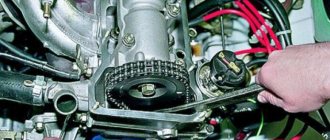
- Let's take care of the gear. Remove the timing belt from it and assess its condition. Installation of a split gear will only be necessary if the old one has visual defects: chips, damage, deformation. If everything is in order, simply remove it by unscrewing the fastener. Don't forget to pick up the key so you don't lose it.
- Remove the drive housing on which the distributor is located.
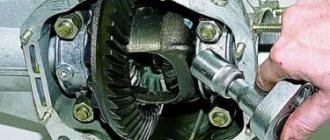
- Now the path to the camshaft housing is clear.
- Remove all body fasteners, there are 10 of them in total.
- Next, pull out the fastening studs. Once all the pins have been removed, the housing can be removed.
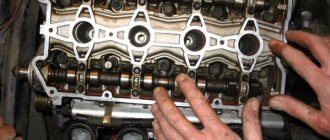
- And here is the camshaft. Now he can be taken out of bed and examined.
The VAZ 2109 camshaft will need to be replaced if it is bent or the cams are damaged. A new one will cost about 1000 rubles. The camshaft is installed in the reverse order. Follow the order of tightening the bolts on the body so that part of the assembly is assembled normally and all parts take their position. More specific information on how to tighten can be found in your vehicle's owner's manual.
Return to contents
Tightening the cylinder head and running-in config
The time has come to assemble the engine and the question arose about completing the attachment. Since the engine is new, I had to run it gently for 2000 km at a speed of no more than 3000. I could install all the tuning parts at once (Stingger trapezoid receiver, 56mm throttle, Volga injectors, DBP/DTV and possibly the camshaft) but then I would have to immediately make adjustments to firmware, but there was no desire to do it (as well as the opportunity). And the engine would have lost in the low end, but there would be no way to break it in without them.
Therefore, I decided to assemble it from stock for testing, although of course it is clear that the factory receiver and the sawn head are not a good combination? Well, what should I do?
Like a seasoned motor mechanic on the table, I immediately screw the 4-2-1 spider, receiver, thermostat and rear cover of the RV to the cylinder head). I also first washed the cylinder head bolts, they turned out to be suitable, and then, according to technology, I soaked them in oil and left them to drain for several hours (I read somewhere that they should drain for at least 8 hours?)
After waiting for a friend, we started assembling. Having degreased the planes just in case, laid down a thick gasket, together we put on the cylinder head - there is a certain inconvenience when installing with a long spider screwed on, so we need to do it together.
Using a wrench, I tighten all the bolts until they touch the head, then tighten according to the manual:
1. Tightening 2 kgs 2. Tightening 7.5-8.5 kgs (I tightened 3. Turn 90°. Smoke break 15-20 minutes 4. Turn another 90°
It’s also more convenient to turn it with two people - one indicates where to pull and the other puffs with the key? I used the standard tightening sequence (yes, there were others))
The procedure for tightening the cylinder head bolts of the VAZ 2108/21083/11183
I also modified the cylinder head cover. Having tried it on without a gasket, it became clear that it does not fit tightly on the long sides but wobbles on the camshaft covers. Since I decided to screw the lid without sealant onto the CS-20 silicone gasket, it was necessary to ensure a tight fit on all sides. The solution is simple - I use a cleaning disk to remove excess from the cover at the points of contact, since the depth of the groove there allows it.
After finishing on both sides, the lid fit perfectly, without cracks or wobble. Now you can try it without sealant. In general, I wouldn’t want to ruin the beautiful engine compartment because of a snotty lid gasket, but the manufacturer convinces me that it can be used without sealant and it will be reliable. Well, let's try. I screwed the pan on without sealant, using a silicone gasket.
Next about the timing case and the self-tensioning pulley from Granta.
Replacing the oil seal
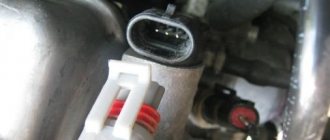
Replacing the VAZ 2109 camshaft oil seal is carried out after access to the gear is gained. Having removed the gear, you will see that a little further on the shaft there is a cuff, this is the oil seal. The oil seal can be pulled out by prying it with a slotted screwdriver.
Lubricate the new camshaft oil seal on the VAZ to make it easier to install it in its seat. We put the cuff on the installed camshaft and hammer it into place using a mandrel.
Take a test drive and look at the instruments. If the oil sensor shows that the fluid level is normal, then all the work has been done correctly.
The described tips can help guide owners of “nines” and their modifications (for example, VAZ 21093) in cases where knocking occurs from the engine. Some points are also described in the car manual. If you have no experience at all in disassembling car components, it is better to visit a car repair shop.
Material from the Encyclopedia of the magazine “Behind the Wheel” Jump to: navigation, search
When is it time to change the camshaft
Emergency intervention in the operation of the VAZ 2114 8 cl camshaft is necessary in the event of any obvious malfunctions. Signs may be different, for example, a knocking sound is heard when the engine is running or problems with the seals. You need to check what’s wrong in such a situation immediately, either yourself or at a service station.
If you determine that the problem is in the seals, then 10 minutes will be enough for you to make a replacement. The oil seals are located in easily accessible places and installing a new one does not require dismantling large systems and components. If you don’t know which one you need to replace, you can check this simply by looking at which one is already installed.
A more complex malfunction may occur if you hear a knocking sound in the engine. This malfunction may not progress, that is, the knocking does not increase, while the readings of all sensors are normal
Some drivers take this calmly; they are not bothered by this state of affairs and continue to use the vehicle without paying attention to it. But the solution is simple, if your engine knocks, it means that the camshaft end play has increased
In this case, you can put a washer between the camshaft and the cover and there is a high probability that the knocking will stop. A fairly simple way out of this situation.
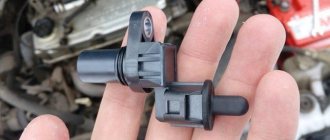
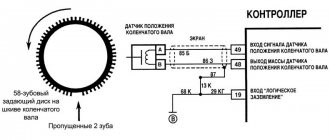
Some cars are equipped with camshaft position sensors, whose task is to signal in case of malfunction or malfunction of the system. But sometimes sensors fail and may need to be replaced. It is inexpensive and the price of such a sensor on the market does not exceed $10, and you can find out which one to buy from the car’s instructions. Installing such a sensor is simple, so there is no point in stopping there.
EXECUTION ORDER
Remove the valve cover of the cylinder head (see Adjusting thermal clearances in the gas distribution mechanism drive).
On the VAZ-2111 engine, using a “10” wrench, unscrew the two nuts securing the “mass” wires to the studs of the cylinder head plug and remove the wires from the studs. Using a 10mm wrench, unscrew the bolt... ...and the two nuts securing the plug. Remove the plug and its O-ring.
On the VAZ-21083 engine, remove the housing of the auxiliary units (see Removing the housing of the auxiliary units of the VAZ-21083 engine). Remove the camshaft gear pulley (see Replacing the camshaft oil seal). Unscrew the top nut securing the rear timing belt cover (see Removing the coolant pump).
Using the “13” head, evenly in several steps (until the pressure of the valve springs is removed), unscrew the ten nuts securing the camshaft bearing housings. Remove the front and rear camshaft bearing housings from the studs. Moving the rear timing belt cover slightly away from the cylinder head, remove the camshaft.
Remove the camshaft oil seal. Install the camshaft in the sequence shown below. We clean the mating surfaces of the cylinder head and bearing housings from old sealant and oil. Lubricate the bearing journals and camshaft cams with engine oil. We place the shaft in the cylinder head supports so that the cams of the first cylinder are directed upward (see Fig. 1). On the surfaces of the cylinder head that interface with the bearing housings in the area of the outer supports, we apply a thin layer of silicone sealant (see Fig. 2). We install the bearing housings and tighten the nuts securing them in two steps. Pre-tighten the nuts in the sequence shown in Fig. 3, until the surfaces of the bearing housings touch the cylinder head. In this case, it is necessary to ensure that the installed housing bushings fit freely into their sockets. We finally tighten the nuts to a torque of 21.6 N.m (2.2 kgf.m) in the same sequence. After tightening the nuts, carefully remove any remaining sealant squeezed out of the gaps. Check the clearances in the valve mechanism. We press in a new camshaft oil seal (see Replacing the camshaft oil seal). Further assembly is carried out in the reverse order of disassembly.
Tightening diagram
First of all, it is important to remember that you need to pre-tighten the bolts in this order:
- the first two are installed above and below in the central holes;
- the third and fourth below, respectively, to the right and left of the middle one;
- the fifth and sixth at the top are also on both sides of the central one;
- the seventh and eighth go into the leftmost holes;
- the ninth and tenth to the right.
Next, you will need to tighten all the bolts in this order:
- the first stage - twisting is carried out to 2 kgf*m;
- on the second round, tightening is carried out according to the above algorithm, with the only difference being that the force is brought to 8 kgf*m;
- on the third pass, all bolts are turned exactly 90 degrees;
- The fourth stage fully corresponds to the previous one and is the final one.
2.7. Removing and installing the camshaft
| GENERAL INFORMATION |
Camshaft and valve drive of a 4-cylinder petrol engine
4-CYLINDER PETROL ENGINE
Removal
| EXECUTION ORDER |
| 1. Remove the upper timing belt guard. |
| 2. Remove the cylinder head cover. |
| 3. Set the crankshaft in the TDC position for cylinder 1 (see subsection 2.5.2 ). |
| Warning Do not change the position of the engine crankshaft again. |
| 4. Loosen the toothed belt and remove it from the top of the camshaft gear (see subsection 2.5.1 ). |
| 6. Mark all main bearing caps. Four covers, from right to left, looking in the direction of travel, mark them with numbers from 1 to 4. |
| 7. Remove covers 1 and 3. Then unscrew covers 2 and 4 alternately crosswise. |
| 8. Remove the camshaft. |
| Warning If the disc pushers are removed, they must be marked so that they can be installed again in their original places. Place the disc tappets with the sliding surface (moving towards the camshaft) down. |
| EXECUTION ORDER |
| 1. Before installation, if necessary, you can check the camshaft runout at the factory. Wear limit: 0.01 mm. |
| 3. Install a new camshaft seal ring. Pre-oil the lips and the outer edge of the O-ring. |
| 4. Make a trial installation of the bearing caps, paying attention to the position of the centers. The covers must be installed so that the holes in the covers and the cylinder head are aligned. When doing this, pay attention to the labels. |
| 5. If the disc pushers were removed, install them in their original places. Lubricate the disc pushers with a thin layer of oil and do not distort them during installation. |
| Warning Disc pushers cannot be swapped! |
| 6. Lubricate with oil and install the camshaft. |
| Warning In this case, the cams of cylinder 1 must be directed upwards. Install the bearing caps according to the marks. Pay attention to the position of the centers. |
| 7. Tighten covers 2 and 4 crosswise to a torque of 20 Nm. |
| 8. Install covers 1 and 3 and tighten to 20 Nm. |
| 9. Install the camshaft key. Install the drive gear and tighten to a torque of 80 Nm, while holding the gear with a spike. |
| 10. Place the toothed belt on the camshaft gear, paying attention to the correct position of the intermediate shaft and vibration damper (see subsection 2.5.2 ). |
| 11. Tension the toothed belt (see subsection 2.5.1 ). |
| 12. Install a new cylinder head cover gasket, carefully tightening the cover bolts to a torque of 10 Nm. |
| 13. Install the timing belt guard. |
| Warning If new disc tappets are installed, the engine must not be started for approximately 30 minutes, otherwise the valves will hit the pistons! |
Instructions with photos and video materials for anyone who is faced with the need to replace the camshaft on VAZ 2114, 13, 15 cars
Withdrawal procedure
- Removing the timing belt
- Unscrew the nut and bolt of the upper fastening of the rear timing belt cover
- Removing the cylinder head cover
- On engines with phased fuel injection, disconnect the wiring harness connector from the camshaft position sensor
- Disconnect the wiring harness from the coolant temperature sensor
Using a 10 mm socket wrench, unscrew the bolt and two nuts securing the plug. A rubber sealing ring is installed under the plug mounting bolt. Replace the damaged o-ring.- We remove the plug. On an engine with a camshaft position sensor, the plug can only be removed if the pin (1) is located opposite the slot (2).
- Remove the sealing ring of the plug. The O-ring must be replaced if it is damaged or if oil is leaking from under the plug.
- Using a 13 mm socket wrench, evenly (in several steps) unscrew the ten nuts securing the two bearing housings.
- Remove the front bearing housing.
- Remove the rear bearing housing.
- Remove the camshaft from the cylinder head by slightly pulling the rear timing belt cover.
- Remove the oil seal from the camshaft.
Camshaft installation:
- Lubricate the camshaft journals with clean engine oil.
- Place the camshaft in the cylinder head with the pin facing up.
- Before installing the bearing housings, apply a thin layer of sealant to the mating surface of the block head in the areas of the front oil seal and plug.
- Evenly, in several steps, tighten the nuts of the bearing housings until the housings come into contact with the cylinder head (following the sequence indicated in the photo). Then tighten the nuts to a torque of 18.4–22.6 N m (1.9–2.3 kgf m).
- Pressing in a new camshaft oil seal
- Before installing the plug, put an O-ring on it.
- Further assembly is carried out in the reverse order of removal.
When is it necessary to puff?
On most injection and carburetor cars with engines of 8 and 16 valves, there is no need to tighten the cylinder head bolts during operation of the car.
But in the case of the domestic “Nine”, it is necessary to correctly stretch the cylinder head and tighten the screws at least when carrying out maintenance of the machine. For what reasons may a tightening be necessary:
- The device has been damaged due to engine overheating. Operating the motor in conditions of excessive temperature is fraught with serious malfunctions. The cylinder head of the power unit will need to be repaired, polished and then installed with tightening.
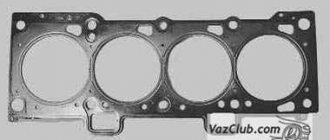
- The cylinder head gasket is damaged or has lost its tightness. If this problem is not resolved in a timely manner, engine fluid will enter the cooling system. A damaged gasket must be replaced. After changing the part, the head bolts must be tightened correctly.
- The engine has run for a certain time.
Read more: How to install Bluetooth into any car radio yourself
Video on the topic:
Replacing the camshaft of a VAZ 2110, 2109 is not particularly difficult, even for an inexperienced mechanic. And the replacement of the VAZ 2110, 2109 camshaft is required in very rare cases, only when the camshaft is worn out or mechanically damaged. Camshaft wear primarily occurs due to untimely oil changes, incorrect type of oil or insufficient oil level. If something like this happens to you, fix the problem before replacing the camshaft.
There is also a reason to replace the camshaft of VAZ 2110, 2109. This operation is often performed by tuners to improve engine performance.
This article will describe the procedure for replacing the camshaft of a VAZ 2110, 2109 with photographs.
Sports camshaft - how to install it on a VAZ 2108 with your own hands?
The most important characteristic of any engine is its power. This concept refers to the efficiency of the engine at low speeds. Most VAZ engines are distinguished by their low throttle response at low speeds, which prompts their owners to carry out certain engine tuning. This activity also includes the installation of a modified camshaft. In this article you will learn why and how a sports camshaft is installed on a VAZ.
Advantages of a sports camshaft over a standard camshaft
Valve timing plays a decisive role in the power of a car. Phases are the periods of time during which the intake or exhaust valves are opened and the duration of the intake or exhaust of exhaust gases. The supply of the mixture directly depends on the length of the phase, which means that the longer the phase length, the higher the thrust characteristic of a given engine.
A standard camshaft is not able to provide the required phase length, since it has insufficient cam sizes, however, these disadvantages are absent in the sports camshaft, which has the required cam length, and therefore the required phase duration.
As a result, the engine has higher thrust at low speeds, which means acceleration and movement will be more productive and save on consumables such as the clutch.
Installation of the camshaft.
1. Clean the mating surfaces of the bearing housings and cylinder heads from the remains of old sealant and oil.
2. Lubricate the camshaft with engine oil. We place the camshaft in the cylinder head supports so that the convexities of the cams of the first cylinder are directed upward.
3. At the camshaft exit points, on the surface of the cylinder head, apply a thin layer of silicone sealant.
4. Install the beds and tighten the nuts evenly in two steps.
5. First, tighten the nuts in the sequence indicated in the diagram until the bed surfaces touch the cylinder head. The installed bed bushings must fit freely into their sockets.
6. Then tighten the nuts to a torque of 21.6 N•m (2.2 kgf.m) in the same sequence.
7. After the final tightening of the beds, carefully remove the squeezed out sealant. We check the thermal clearances of the valves and, if necessary, adjust them. Then install a new camshaft oil seal.
8. We will assemble in the reverse order of disassembly.
Engine tuning is carried out to increase the parameters and characteristics of the power and dynamics of the power unit. In this case, one important factor should be taken into account: it is necessary to replace all elements with sports ones, and not just one. First, let's replace the camshaft from standard to sports.
To remove the camshaft, you must remove the plastic alternator belt cover. After removing the casing, open the cylinder head cover. In this case, you should pay attention to the position of the crankshaft - TDC for the first cylinder.
When removing the camshaft, it is not recommended to touch the large crankshaft, as this may reset the factory settings, which will be impossible to restore yourself.
Next, remove the timing belt. At this time, the camshaft must be jammed using a mounting tool. In this case, the camshaft should be with a spike in front. When removing the timing belt, you should act carefully so as not to damage the cylinder head; it is recommended to place a wooden plate or something similar under the mount to prevent damage to the cylinder head.
After the timing belt has been removed, unscrew the camshaft mounting bolt and remove its toothed wheel and key.
It is best to mark the main bearing caps; this will help avoid confusion during installation. It is also necessary to mark the disc pushers if they are replaced. This completes the stage of removing the old camshaft. Installation of a new, sports camshaft is carried out in the reverse order. Thanks to the replacement of the standard camshaft with a sports one, the knocking of “fingers” will not be heard when the engine is running. This is achieved due to an increase in the detonation limit.
Adjusting the bolt torque
In order to do everything correctly and avoid mistakes, you must strictly adhere to certain rules and follow the order of execution.
Tightening should only be done with a special torque wrench, which allows you to control the tightening torque.
Torque wrench
First, using a torque wrench, set the holder to the zero position. This means that the device data is equal to the moment of the original position. Then, you need to look at the indicator of the device when starting the fastener. Rotating the holder, we monitor the indicators. If the moment has not changed, this means that the fastener can be stretched and this is normal, as it should be. If the torque increases rapidly, bolt movement must be achieved. This indicates low stretch of the holder. This means stabilization is needed.
While the vehicle is running, the bolts that secure the cylinder head are constantly experiencing various impacts. They constantly heat and cool, which over time leads to the destruction of the structure of the fasteners.
For all power units there are specific rules that must be followed during operation:
- Strictly follow the data specified in the practical manual for the VAZ 2109.
- Adjustment is carried out only with a torque wrench. The use of another device will not allow this work to be performed correctly.
- Use only good bolts.
Replacement bolt kit - When starting to work, be sure to check the condition of the holders.
- Strictly adhere to the tightening torque values recommended by the manufacturer.
The most important data regarding adjustments is in the annotation for each specific car. As a result, you must carefully study and adhere to what is written in it. During operation of the vehicle, you must strictly comply with all manufacturer's requirements and systematically diagnose the car. Correct and smooth operation of the VAZ 2109 power unit prevents the need to adjust the cylinder head holders.
Since the cylinder head of the VAZ 2109 is a complex unit, it is necessary to carry out repair work only with absolute confidence in your actions. Strictly observing the order of work. If a deviation in the operation of the motor is detected, immediately carry out diagnostics. This will avoid more expensive repair work.
Required Tools
- torque wrench;
- caliper or ruler.
Tightening diagram
The cylinder head tightening pattern is the same as on traditional models and you need to start from the center. It takes place in four steps.
The diagram according to which the VAZ 2109 should be pulled
- tightening torque 2.0 kgf/m
- tightening torque 7.5 - 8.5 kgf/m
- turn it 90 degrees.
- turn it again by 90 degrees.
To make it clearer, let’s describe this process in more detail:
- Using a torque wrench, tighten the bolts in the sequence shown in the figure to 2.0 kg/cm.
- Then we go around the second circle and reach 8 kgf*m.
- Next, twist it 90 degrees.
- We go around the second circle, twisting another 90 degrees.
Proper lift
Attention! On 16-cl power units, bolts can be reused, but if their length is no more than 95 millimeters.
Otherwise it changes. The length is measured along with the washer. Do not try to replace the torque wrench with another device, otherwise the consequences may be unpredictable.
Loading …