Why do you need hydraulic compensators and how to install them on a VAZ 2107
Rockers, or valve rockers, are part of the timing mechanism parts of some automobile engines, most often of the so-called classic design.
In modern engines, after the final transition to overhead camshafts, rockers are rare. Typically, their use may be caused by a deviation from the standard design of the valve mechanism, for example, to reduce the size of the engine. In other words, the engine bay can be so small that engineers have to change the layout of engine parts to make the resulting unit fit into the given space. Forged sports engine parts are stronger than conventional ones, since during forging the metal structure is strengthened from mechanical stress
What is a gas distribution mechanism (GRM)?
The gas distribution mechanism (GRM) is a mechanism designed to inject fresh charge into the engine cylinders (fuel mixture in classic gasoline engines or air in diesel engines) and release exhaust gases in accordance with the operating cycle, as well as to ensure reliable isolation of the combustion chamber from the environment during time of compression strokes and power stroke.
Depending on the type of devices that inject charge and exhaust exhaust gases, there are two types of gas distribution mechanisms:
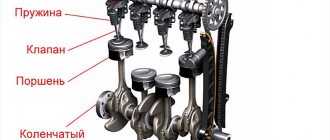
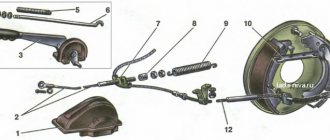
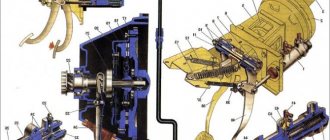
The valve train is the most widely used and is used in all four-stroke engines. Upper and lower valve locations are possible. The upper location is currently used more often, since in this case the gas exchange process is more efficient. Typical designs of gas distribution mechanisms with overhead valves are shown in the figure.
We recommend: How to check the spark on an injection engine
Preparing the car for adjustment work
Although adjusting the valves on a VAZ 2106 requires certain skills, it can easily be done by a car enthusiast with his own hands. To complete the work you need to stock up on:
- standard operating and maintenance manual for the vehicle;
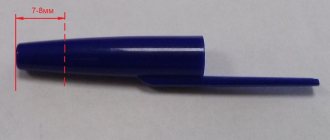
- branded probe with a thickness of 0.15 mm;
- two open-end wrenches for 17 and 13;
- standard VAZ screwdriver;
- 8x10 socket wrench.
Before starting work, it is advisable to wash the engine, including the engine compartment. This must be done to prevent dirt and dust from entering the timing mechanism. If adjustment work is carried out in winter, then it should be carried out in a closed, warm room and at an engine temperature of about 20°C. This is due not only to comfortable working conditions, but also to the dependence of the thermal gap on the temperature of the engine or timing belt.
If you imagine the change in the gap from temperature in the form of a graph, it becomes clear that the manufacturer’s recommended thermal gap value of 0.15 mm is set at 20 degrees, i.e., on a cold engine, and 0.20 mm at an operating engine temperature of 80 degrees. Celsius. The exhaust valve clearance will be approximately 30% greater than the intake valve clearance.
Dependence of the thermal clearance of the intake valve on the engine temperature
Newer movements of rock
. It is played by quite serious musicians, expanding and enriching rock with classical arrangements, borrowings and improvisations. Progressive came to replace psychedelic rock, completely displacing it in the 70-80s of the twentieth century. Despite the fact that this style is in the shadow of commercial trends, it continues to develop and improve, enriching the world music fund along with other genres.
Psychedelic rock, or psychedelic
. Characterized by depressive vocals, detached lyrics, experiments with sound, and the use of unconventional instruments and transitions. Historically, the perception of psychedelics was and remains closely associated with the use of narcotic drugs of varying strengths.
. The most enduring and popular genre, which has spawned many other trends, is the same metal. This is very dynamic, strong and powerful music. The lead is guitar or keyboards, complemented by a loud rhythm section. All this makes the work holistic and monolithic. What is most important here is the skill of each performer, as well as the ability to work with other similar masters in a team.
Purpose and principle of operation of the timing belt
The gas distribution mechanism in an internal combustion engine is designed to timely supply the air-fuel mixture or air into the cylinders and release exhaust gases from there. The mechanism operates through the timely opening and closing of the intake and exhaust valves.
The timing work process is based on the synchronous movement of the camshaft and crankshaft, which causes the valves to open and close at the right time in the engine cycle. During the rotational movement of the camshaft, the cams press on the levers, and those on the valve stems, opening them. The next turn of the camshaft turns the cam, which takes its original position and closes the valve.
Camshaft VAZ 2106
The camshaft is an integral part in the design of the gas distribution mechanism (GRM) of any engine. It is made in the form of a cylinder on which necks and cams are located.
Description
On the sixth model Zhiguli, the timing mechanism shaft is installed in the cylinder head (cylinder head) of the engine. This arrangement allows you to repair and change the part, as well as adjust the valve clearances without any difficulties. The shaft is accessible after removing the valve cover. The camshaft (CV) is assigned the role of controlling the opening and closing of valves in the engine cylinders - at the right moment it admits the fuel-air mixture into the cylinder and releases exhaust gases. A gear is installed on the camshaft, which is connected to the crankshaft sprocket through a chain. This design ensures simultaneous rotation of both shafts.
Since the crankshaft and camshaft have gears of different sizes, the rotation speed of the latter is halved. A complete operating cycle in a power unit occurs in one revolution of the camshaft and two revolutions of the crankshaft . The valves in the cylinder head open in a certain order under the influence of the corresponding cams on the pushers, i.e., when the camshaft rotates, the cam presses on the pusher and transmits force to the valve, pressed by the springs. In this case, the valve opens and admits the fuel-air mixture or releases exhaust gases. As the cam rotates further, the valve closes.
Options
The “six” camshaft has the following characteristics:
On the sixth model Zhiguli, the timing mechanism has eight valves, i.e. two for each cylinder, the number of cams is equal to the number of valves.
Which camshaft is better to install
Only one gas distribution shaft is suitable for the VAZ 2106 - from the Niva. The part is installed in order to increase the power and dynamic performance of the car. It is possible to achieve the desired results, albeit small ones, by increasing the width of the phases and the lift height of the intake valves. After installing the RV from Niva, these parameters will have values of 283˚ and 10.7 mm. Thus, the intake valve will be open for a longer time and raised to a greater height relative to the seat, which will ensure that more fuel enters the cylinders.
When replacing the standard camshaft with a part from a VAZ 21213, the engine parameters will not change dramatically. You can install a “sports” shaft intended for tuning, but it is not cheap - 4-10 thousand rubles.
Table: main parameters of “sports” camshafts for “classics”
| Name | Phase width, o | Valve lift height, mm |
| "Estonian" | 256 | 10,5 |
| "Estonian +" | 289 | 11,2 |
| "Estonian-M" | 256 | 11,33 |
| Shrik-1 | 296 | 11,8 |
| "Shrik-3" | 304 | 12,1 |
Who are rockers? We'll tell you!
→ Subcultures
The word rockers , initially, served to define British youth in Britain in the sixties of the last century, who allowed themselves to very irreverently ride along the roads on motorcycles. Rockers have become a concept opposed to mods - their peers who only use scooters as transport.
Rockers appeared as a subculture in the fifties and early sixties during the era of rock and roll, representatives of the music and style of which were Chuck Barry, early Elvis Presley, Gene Vincent and others. However, the first rockers were united by only one principle - the manner of riding a motorcycle, and only then the concept of style appeared. These guys could drive at speeds of up to 160 kilometers per hour on London's ring roads.
The rocker style was born out of necessity and practicality. Rockers wear leather motorcycle jackets, abundantly decorated with buttons, patches, stripes and pins. They often wear quite fashionable leather caps on their heads. They usually ride a motorcycle wearing an open-face helmet, aviator goggles, and a white silk scarf to protect their mouths from hypothermia. Every rocker's wardrobe includes Levi's jeans, leather trousers, high-top motorcycle boots from Lewis Leathers or military boots and T-shirts. Also popular are symbols that indicate a person’s involvement in the 59 Club of England, a youth church organization that later transformed into a club for motorcycle enthusiasts around the world. The rocker's hairstyle can, in principle, depend on personal preference, but it is often described as a smoothed or, on the contrary, enhanced pompadour hairstyle that characterizes the representatives of rock and roll of the fifties.
Timing device
The gas distribution mechanism has the following main elements:
1. Camshaft. Opens valves in a specific sequence depending on the order of operation of the cylinders. It is made of cast iron or steel, and the rubbing surfaces are hardened by high-frequency currents. It can be mounted in the cylinder head or in the crankcase. Multi-valve engines have two camshafts, one of which controls the intake valves and the other the exhaust valves. The shaft rotates on cylindrical bearing journals. Direct or indirect action on the valve is carried out by cams located on the shaft. Each cam corresponds to one valve.
2. Valve drive. The valves are driven in various ways: when the camshaft is located in the crankcase, the force from the cams is transmitted to the pushers, rods and rocker arms.
The rocker arm (rocker or roller lever) is made of steel and is mounted on a hollow axle fixed in the cylinder head struts. One side of it rests on the shaft cam, and the other presses on the end of the valve stem. When the engine is running, the valves heat up and elongate, which threatens them with incomplete seating in the seat. Therefore, a thermal gap must be maintained between the valve and the rocker arm.
We recommend: Installation and replacement of the fuel pump relay
The cam can also act on the valve through a lever or directly on its pusher. Pushers can be made in a mechanical (rigid), roller version or in the form of a hydraulic compensator. The first type is almost never used due to noise, while the latter is soft and does not require adjustments. Roller tappets are used in high-performance and sports engines.
3. Camshaft drive mechanism. It is carried out by chain, belt or gear transmission. The chain one is reliable, complicated to design and expensive, the belt one is cheaper, but less reliable, and if the belt breaks, it can cause engine damage due to the impact of the valves on the pistons.
4. Valves. Designed to open and close the inlet and outlet channels. They consist of a rod and a head, on which there is a narrow chamfer beveled at an angle, tightly adjacent to the chamfer of the seat, for which they are ground together. The intake valve heads are made larger than the exhaust valve heads. But the outlets heat up more, so they are made of heat-resistant steel and filled with sodium inside for better cooling.
The cylindrical valve stem is machined on top to attach a spring that prevents it from coming off the rocker arm, which rests on the washer on the head and is fixed with a thrust plate. The rod is placed in a guide sleeve pressed into the cylinder head to prevent oil from entering the combustion chamber; an oil-reflecting cap is placed on it.
Adjusting valves VAZ 2106, 2107
The gas distribution mechanism ensures the synchronous opening and closing of the valves at specified intervals. At the same time, complete tightness of the combustion chamber must be ensured. This is why you adjust the valves of the VAZ 2106 and 2107 yourself. This article will provide detailed setup instructions.
When adjustment is needed
To diagnose a malfunction, it is enough to evaluate the behavior of the car during acceleration. As you already understand, an incorrectly set valve clearance does not provide the required sealing of the combustion chamber. Thus, the cylinder loses compression, which means that the combustion efficiency of the mixture will be low, which leads to power loss.
In addition, the prerequisites for adjusting engine valves on a VAZ are also high fuel consumption and instability of speed. For many, the engine takes too long to warm up, and when the air damper is closed, it begins to stall. All this indicates a disturbed adjustment of the valve mechanism.
The procedure for adjusting valves on VAZ 2106 and 2107
Since the “six” and “seven” are generally identical cars, the algorithm of actions will be performed in the same way for them. First of all, you need to stock up on the necessary tools.
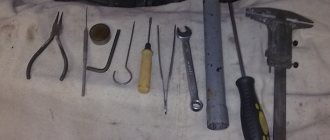
- You will need two keys for 13 and 17. The desirable condition is that they be open-end.
- A feeler gauge that has an exact thickness of 0.15 mm. These probes are sold in all auto parts stores. Its width should be such that it fits completely under the cam.
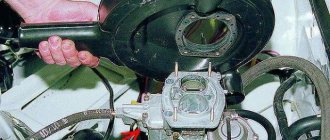
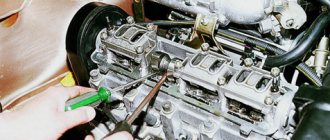
Now remove the carburetor, as it will interfere with removing the valve cover. By the way, some carburetor models are designed in such a way that they will not interfere with valve adjustment, but the choke drive cable will still have to be removed.
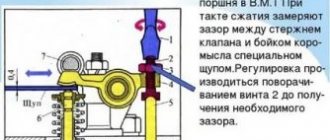
- After removing the valve cover, you can begin adjusting. First you need to install the first piston so that it is at top dead center. In simple terms, the piston must rise up and the valves must be completely closed. To do this, put the car in neutral and, using a recoil starter or any similar key, rotate the crankshaft until the mark on its pulley aligns with the mark on the cylinder block cover body. In addition, you need to make sure that the piston is exactly in the compression stroke; for this there are two more marks on the gas distribution mechanism, which must also match. One of these marks is located on the camshaft sprocket, and the second in the form of a pin is located near the sprocket. If the last marks do not match, you need to make another turn.
- After setting the marks, it is necessary to adjust valves 6 and 8. To avoid confusion, the countdown must be carried out from the timing chain. Now insert the dipstick between the valve lever (or, as it is also called, the rocker) and the camshaft cam. The dipstick should fit with a slight pinching; if this does not happen (it fits in too easily or does not fit in), then the valves need to be adjusted. Loosen the locking nut by 17, and turn the bolt by 13 in the direction you need (loosen or tighten, depending on how much clearance needs to be made). Once the gap is set, tighten the locknut.
- Rotate the crankshaft 180 degrees and adjust valves 4 and 7. The next pair (1 and 3, 2 and 5) are also adjusted by turning the crankshaft 180 degrees. In this case, there is no need to control the camshaft marks. Surely you understand why.
That's all. This is how the thermal clearance of valves on VAZ 2106 and 2107 cars is adjusted. As you can see, absolutely any Zhiguli owner can handle this.
A little theory
The main difference between rockers for the field “Made in USSR” and “Made in Russia” is the material. According to Soviet metal classification and state standards, cast iron was divided into two large categories. Cast iron of the highest quality, KCH - malleable cast iron. And the rest, the warhead, is white cast iron. These materials differed not only in specific gravity, but also in crystal structure. Frames for machine tools, engine blocks, and gearbox housings were made from CP. From warheads - weights, counterweights, manhole covers.....and other important details))) As you might guess, the old rockers are made from warheads, the new ones from warheads))) Well, since nothing can be done in this case, let's move on to specifics at the moment .
Typical breakdowns
In addition to the lever itself, the rocker design includes bushings that reduce friction and increase service life.
When carrying out repairs, it is necessary to thoroughly clean the rockers and check all parts of the part, including the striker and bearings for damage and signs of wear. If no damage is observed, the rockers can be reinstalled into the engine after cleaning.
A rocker fracture results in failure of the corresponding valve. When the rocker breaks, a knock appears in the cylinder head and engine power drops.
Step-by-step guide to adjusting valve clearances on a VAZ 2106
Before starting this work, it is worth considering that the car engine must be cold, that is, its temperature should be as close to room temperature as possible. It is also worth noting that the timing chain tension should be normal.
The first step is to remove the valve cover. After this, align the crankshaft and camshaft pulley according to the marks. If the chain was put on correctly, then the marks should match, but it’s still better to check it again. So, the mark on the crankshaft pulley should match the long mark on the front engine cover. This is how everything looks visually:
I specially made it closer so that it could be seen better:
Now we look at the camshaft sprocket and there, too, the mark on the gear should coincide with the protrusion on the cover. The photo below shows everything:
With this position of the crankshaft and camshaft, the piston of the fourth cylinder is at top dead center (TDC). It is at this moment that it is necessary to adjust the clearance of the 6th and 8th valves. If this is your first time, keep in mind that the valve numbers are counted from the left side, that is, from the front of the engine. To understand which valves need to be adjusted in this position, I will show you everything, literally:
Now we take a feeler gauge 0.15 mm thick and insert it between the rocker and the camshaft; the photo below shows all this more clearly using the example of the 8th valve:
If the feeler gauge passes without effort, then the gap is too large and needs to be made smaller. If, on the contrary, the dipstick does not pass between the rocker and the camshaft of the VAZ 2106, then the gap must be reduced to 0.15 mm. The gaps are adjusted using an adjusting bolt and a control nut as follows. First, slightly loosen the locking nut with a 17 wrench, and with a 13 wrench we set the required gap by unscrewing it or, on the contrary, tightening it.
Once you have achieved the required clearance with the adjusting bolt, you can tighten the locknut. But it is worth considering that during tightening the clearance may decrease, so check the clearance after tightening the nut and adjust again if necessary.
The remaining valves are adjusted in exactly the same way, but in a strictly defined sequence, which I will write about in detail below.
Replacement instructions
To install a new chain drive, you need to purchase a set of spare parts and consumables:
If, when diagnosing problems, you find oil leaks under the crankshaft pulley, it is worth purchasing a new oil seal built into the front cover. The part is easy to change during the disassembly of the timing drive.
Why is it recommended to change all drive parts, including gears:
Tools and working conditions
As for the special tools, you will need a 36 mm socket wrench to unscrew the nut (ratchet) holding the crankshaft pulley. Because the ratchet is located in a recess, it is much more difficult to grab it with an open-end wrench.
The rest of the toolset looks like this:
It is most convenient to replace the timing chain in an inspection ditch in a garage. As a last resort, an open area will do, but then to disassemble the unit you will have to lie down on the ground under the car.
Preliminary disassembly
The purpose of the preparatory stage is to provide convenient access to the front cover of the power unit and the timing drive. What to do:
In addition to the listed parts, you can remove other elements, such as the battery and the main radiator. These steps are optional, but will help increase access to the chain mechanism.
At this stage, it is recommended to clean the front part of the engine as much as possible from dirt and oil deposits. When you remove the timing cover, a small opening will open in the oil sump where foreign particles can enter.
Replacing rocker arms on a VAZ 2107
Rockers (rocker arms) are one of the elements of the valve timing mechanism of the VAZ 2107 engine. The purpose of the part is to transmit energy from the camshaft cam to the valve stem. Since the rocker is constantly exposed to mechanical and thermal stress, it wears out over time.
Determining the suitability of rocker arms
If during operation of the “Seven” there is a decrease in engine power or a characteristic knocking sound is heard in the cylinder head, then the likely cause is a broken rocker arm. During repair work, it is necessary to clean the rockers from dirt and carbon deposits and check them for wear and damage. If any defects in parts are found, they are replaced with new ones. If the rocker arms are in normal condition, install the products on the cylinder head.
Is it possible to level the rocker arm?
When adjusting valves or repairing the cylinder head, you may notice that the rocker arms are slightly at odds with respect to the camshaft, i.e., the distance between the rocker plane and the camshaft journal is not the same. To eliminate this nuance, some owners of “classics” align or change the springs that press the rocker arms, or replace the rocker itself, but the problem may still remain. In fact, on all classic Zhiguli models, including the VAZ 2107, misalignment is not as bad as incorrect valve clearance. Therefore, it is the gap that deserves attention. The main thing is that the parameter is adjusted properly and is 0.15 mm when cold.
Source
Dismantling the camshaft VAZ 2106
To carry out repair work or replace the camshaft on the “six”, you need to prepare the following tools:
We dismantle the unit in the following sequence:
When I carry out repair work on the camshaft after it has been removed from the cylinder head, I cover the head with a clean rag and press it, for example, with a tool. This prevents various debris from entering both the lubrication channels and the surface of the rockers. It is especially important to protect the exposed part of the engine during repairs outdoors, since the wind can cause a lot of dust and debris, which I have encountered many times. Before installing it into the housing, I also wipe the new shaft with a clean cloth.
Hydraulic compensators VAZ 2107
Hydraulic compensators are devices that independently adjust the valve clearance. The part is a more advanced product compared to the mechanical type regulator that was used on older cars. On the VAZ 2107 and other “classics” hydraulic compensators (GKK) were not installed. As a result, every 10 thousand km. mileage it was necessary to adjust the thermal clearance of the valves. The adjustment procedure was carried out manually, i.e. it was necessary to dismantle the valve cover and set the gaps using a special feeler gauge.
Camshaft installation
The shaft installation process occurs in the reverse order using the same tools as for its removal. Additionally, you will need a torque wrench that can be used to control the tightening force. The work is carried out as follows:
To ensure that the camshaft is evenly pressed against the cylinder head, tightening should be performed in several stages.
Video: installing the camshaft on classic Zhiguli cars
Installation by marks
Upon completion of the replacement, it is necessary to align the camshaft and crankshaft to the marks. Only after such a procedure will the ignition timing be correct and engine operation stable. An additional tool you will need is a wrench to rotate the crankshaft, and the work itself consists of the following steps:
When reinstalling the valve cover, I always pay attention to the condition of the gasket, even if it has recently been changed. There should be no tears, strong pressing or other damage. In addition, the seal should not be “oak”, but elastic. If the condition of the gasket leaves much to be desired, I always replace it with a new one, thereby eliminating possible oil leakage in the future.
Adjustment of valves
It is recommended to adjust the valves on the “classic” every 30 thousand km. mileage or after engine repair. Tools you need to prepare:
The work is carried out on a cooled engine after removing the valve covers and tensioning the chain:
Table: procedure for adjusting cylinder head valves on a “classic”
| Crankshaft rotation angle, o | Camshaft rotation angle, o | Cylinder numbers | Adjustable valve numbers |
| 4 and 3 | 8 and 6 | ||
| 180 | 90 | 2 and 4 | 4 and 7 |
| 360 | 180 | 1 and 2 | 1 and 3 |
| 540 | 270 | 3 and 1 | 5 and 2 |
Video: adjusting valves on a VAZ 2101–07
Some car enthusiasts use a narrow feeler gauge from the kit to set valve clearances. I would not recommend using it for the procedure in question, since if the valve lever is skewed, and the rockers can be skewed even with normal springs and good condition of the valve, a narrow feeler gauge will not allow for precise adjustment. And it’s more convenient to set the gap with a wide feeler gauge.
Replacing the camshaft on a VAZ 2106 does not require the owner to have high qualifications or special tools. Repairs can be carried out in a garage with a regular car set of keys and screwdrivers. If you follow the step-by-step instructions, the procedure will take about 2-3 hours, after which the gas distribution mechanism of your car will work clearly and smoothly.
Source
Installation of hydraulic compensators on a VAZ 2107
Before you begin installing hydraulic compensators on a VAZ 2107, you will need to prepare the necessary parts, materials and tools. List of elements that will be needed for work:
If the old rockers are in good condition, there is no need to replace them. Tools and materials you will need:
The process of installing hydraulic compensators on the seventh model Zhiguli comes down to the following step-by-step actions:
Replacing rocker arms on a VAZ 2107
Rockers (rocker arms) are one of the elements of the valve timing mechanism of the VAZ 2107 engine. The purpose of the part is to transmit energy from the camshaft cam to the valve stem. Since the rocker is constantly exposed to mechanical and thermal stress, it wears out over time.
Determining the suitability of rocker arms
If during operation of the “Seven” there is a decrease in engine power or a characteristic knocking sound is heard in the cylinder head, then the likely cause is a broken rocker arm. During repair work, it is necessary to clean the rockers from dirt and carbon deposits and check them for wear and damage. If any defects in parts are found, they are replaced with new ones. If the rocker arms are in normal condition, install the products on the cylinder head.
Is it possible to level the rocker arm?
When adjusting valves or repairing the cylinder head, you may notice that the rocker arms are slightly at odds with respect to the camshaft, i.e., the distance between the rocker plane and the camshaft journal is not the same. To eliminate this nuance, some owners of “classics” align or change the springs that press the rocker arms, or replace the rocker itself, but the problem may still remain. In fact, on all classic Zhiguli models, including the VAZ 2107, misalignment is not as bad as incorrect valve clearance. Therefore, it is the gap that deserves attention. The main thing is that the parameter is adjusted properly and is 0.15 mm when cold.
How to replace a rocker arm
If there is a need to replace the rocker arms on the “seven”, for example, 1 part in case of its breakdown, then it is not necessary to dismantle the camshaft. To do this, it will be enough to pry the spring with a screwdriver, remove it, and then remove the rocker itself. The new part is installed in the reverse order. If all the rocker arms are being replaced, then it is wiser to dismantle the camshaft.
We check and change the timing chain on a VAZ 2106
Although the timing chain of the VAZ 2106 has a long service life, it wears out over time. If there is significant wear, it must be replaced urgently. The replacement procedure is labor-intensive, but if you know the structure of the unit and follow the step-by-step instructions, you can do it yourself at home.
Why do you need a timing chain and its characteristics?
Old VAZ 2106 models were equipped with a mechanical plunger tensioner, in which the rod is pushed out by a spring. In new modifications, hydraulic plungers are installed; they operate due to oil pressure. The chain must always be tensioned for correct engine operation.
Tension is carried out using a semicircular shoe, which supports the element on the left. The damper plate is also adjacent to the chain. A metal stop located on the cylinder block prevents the chain from jumping off the lower sprocket in the event of significant stretching. When the drive elements rotate, the shoe and damper press on the chain from different sides.
The timing chain drive in the VAZ 2106 power unit performs the following functions:
The number of links depends on the type of engine installed. The sixth models were equipped with power units of 1.3, 1.4 and 1.6. The piston stroke length for motors of the 1st type is 66 mm, for the other two – 80 mm. Depending on the volume of the power unit, a chain of a certain size is taken:
When purchasing a chain, it is easy to check the number of links without having to count them. Straighten the product lengthwise so that the halves fit snugly against each other. If the ends lie the same way, then the number of links is 116; in a short chain, the outermost link will be rotated at a certain angle.
Determining the need to replace the chain
The service life of the timing chain is quite long and is about 100 thousand kilometers. Over time, as the machine is used, the chain gradually stretches. In this case, the metal links are not deformed, their hinges are erased, play appears, and gaps are formed. For a small area, this development is invisible, but if you take the chain drive as a whole, the length of the part will increase significantly.
The degree of wear of the chain drive is determined by the following symptoms:
If there is a displacement of at least 1 cm, this indicates chain stretching.
A chain that has stretched more than 10 mm may jump over several links along the gears. Jumping over one section is fraught with a violation of the valve timing. In this case, the engine vibrates in any operating mode, often stalls, and its power drops significantly. Signs appear in the form of shots in the exhaust pipe or carburetor. Adjusting the ignition and fuel supply does not help eliminate vibration.
When jumping 2-4 teeth, the motor stalls and does not start again. The most unpleasant situation is when the pistons meet the valves due to a violation of the valve timing. This threatens a major engine overhaul.
Preparing for replacement: materials, tools and disassembly
During long-term operation of the power unit, not only the chain drive wears out, but also some associated elements:
The disassembly process is simple, but very labor-intensive: you have to unscrew a large number of nuts and bolts, dismantle several components and parts. Therefore, it is advisable to replace all worn-out elements, including gears. Experts recommend replacing the timing kit with a “six” and several additional elements; the set consists of the following parts:
You will need a high temperature sealant. The pulley key is often lost during repairs, and without it assembly is impossible. Therefore, it makes sense to buy a spare one, its cost is low.
Tools you need to prepare:
It is more convenient to carry out the work on a lifting device, but you can do without it by removing the hood of the car or lying on the ground.
At the preparatory stage, we provide access to the timing drive and the front wall of the cylinder block. To do this, wait for the engine to cool down, set the car to the handbrake, and perform the following steps:
Removing and installing a new chain drive
When replacing the timing chain drive, you must strictly follow the step-by-step instructions:
We install the chain and spare parts according to the following algorithm: