Installation of front speakers
A distinctive feature of installing acoustics on the Lada Granta is that the designers of this model made this process a little easier by providing standard places for placing the speakers. All wires are routed, only minor modifications will be required if the speaker diameter is slightly off. In addition, another problem may arise during operation.
Due to the discrepancy between the dimensions of the installed speaker and the expected dimensions included in the design, after installation the process of lowering the front side window may be disrupted. In this case, modification will be needed. Let's return to the front speakers. In short, the installation process will look something like this:
We make a podium. It is a ring, the thickness of which is 1 cm, and the outer diameter coincides with the diameter of the column, for which we first draw it on paper. Then you need to cut the blanks from plywood
Important! If the thickness of the plywood is less than 11 mm, each podium will require two identical parts, which will then need to be glued together. If the problem described above occurs with opening the front side windows, it becomes necessary to increase the thickness of the podium
The desired result can be achieved by increasing the number of glued parts. To install the podiums, you need to make markings on the door. In this case, there is no need to remove the casing. After marking, you can remove the trim, use a drill to prepare holes in the metal for attaching the podiums, and securely fasten them to the door. Then you should lay the wires, return the casing to its place and secure the mesh.
Before you begin installation, watch the video carefully.
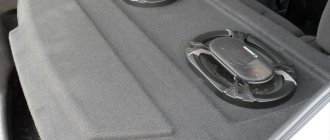
Now let's move directly to the acoustic shelf. Currently, manufacturers offer ready-made models, designed taking into account the dimensions of the car and the sizes of the speakers of popular manufacturers. But experienced auto mechanics advise using a rear shelf made of wood. They improve sound quality due to the fact that the trunk acquires the properties of a closed box. Of course, you can select the required model in a store and buy it, but can you be sure that this shelf meets your requirements?
You can make an acoustic shelf from plywood yourself
Materials and tools for making a shelf:
- plywood;
- glue;
- fabric for covering;
- sound insulation material;
- wires;
- self-tapping screws;
- screwdriver;
- jigsaw
The production of the rear shelf begins with an accurate paper mock-up of the future design. To do this, it is necessary to take accurate measurements of the existing rear shelf. After the pattern is made on paper, it must be attached to the original and checked for size and shape.
The next step is to cut out the plywood blank. The most important thing here is accuracy! After making the shelf blank, you can make holes for the speakers. Some car owners at this stage of work give free rein to their imagination and make various additions to the design of the acoustic shelf; such an element could be, for example, a pocket located in it for various small items.
Next comes noise insulation work. To do this, it is best to use materials that dampen, among other things, vibration. Since the Standard package does not provide sound insulation, you may have to do this operation with all doors. At best, the insulating material should cover the entire area. The next layer is direct sound insulation.
This layer should cover 100% of the area, but do not make it thick, otherwise installation problems may occur. We cover the entire structure with prepared fabric, not forgetting the holes for the speakers. You can learn more about making an acoustic shelf from the video.
Now you need to install the speakers. For this, in addition to the devices themselves, you will need wires, insulating tape, glue and a set of screwdrivers. We install the speakers in the prepared sockets. Protective nets must be installed on top. Manufacturers strongly recommend using them, but such meshes are not available on all models. Using a screwdriver, connect the speakers and wires. The acoustic shelf is ready. Now you need to install it in the car interior.
How to install an audio system on a Lada: features
The standard equipment of the Lada Granta consists of elementary speakers with average sound quality. Accordingly, there is a desire to install something more serious in your car. In fact, this car brand has good preparation for a really high-quality audio system. The car has the necessary wiring for the car radio and beepers.
Before making the connection, disconnect the power from the vehicle.
In order to do the installation yourself, you should have:
- screwdriver;
- nozzles;
- edges;
- knife;
- insulating tape.
So, the work is carried out in several stages. Since the audio system is connected to wires, you should first turn off the power to the car. Otherwise, there is a risk of getting burned and receiving a strong electric shock. De-energizing occurs by removing the terminals with the “-” sign from the power supply. You should not forget about the antenna, which is most often installed in the right corner at the top of the windshield. Therefore, you should make room for it in advance.
Correctly the electrical wiring is laid under the car's dashboard and all the way to the glove compartment. You should also remove the plastic trim located on the glass on the right side. It is recommended to use modern antennas, as they have a self-adhesive base, which means the installation process will be much easier. But it should be remembered that any glue does not like dirty surfaces. Therefore, the future location of the antenna must be thoroughly cleaned and degreased.
Sequence of actions when installing rear speakers in a Lada Granta liftback
Granta has factory openings in the rear door fragments, only the shape is cut out oval, so if round speakers are purchased, then a problem arises. Using the standard set of equipment described above, you can get to work:
- The inside of the door is disassembled: handle, trim, power window control unit.
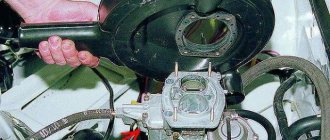
- A hole is cut in the facing sheet. Using a jigsaw, the elongated metal pancake is dismantled. A round niche is created for the column.
- If a set of size 13 speakers is selected, then there is no need to dismantle the metal structure. Using a knife, only the top part of the panel is cut off.
- A stand is cut out of wood. It is lined from the inside and fastened with screws or self-tapping screws to the speaker.
- Cable laying and electrical wiring are being connected. It is recommended to install the ISO connector immediately.
After this, the structure is assembled. Drivers can additionally insulate or soundproof the door. If you choose the right material, you can achieve excellent vibration insulation and acoustic performance.
How to install 16 cm speakers with spacers
For size 16 speakers, the algorithm is slightly different. It will be necessary to create an additional podium made of wood or plywood. In addition to the standard set of auxiliary devices, you need a star key. Along with the acoustics kit, a diagram is provided according to which you can cut out the spacer. Further instructions:
- After dismantling the casing and handle using a jigsaw, the standard oval hole in the door for musical equipment is enlarged.
- A wooden podium is installed at the back, and a column is screwed in front with self-tapping screws.
- The edge of the musical structure is ground down so that it does not touch the clips on the casing.
- The cable is brought out, the wires are connected.
- The structure is installed in the reverse order.
Video — Lada Granta — Installing an acoustic shelf
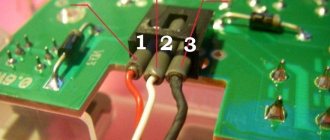
With the advent of a subwoofer in the trunk, a problem appeared in the form of a rattling rear parcel shelf. To eliminate this drawback, 5 sheets of 3mm vibration insulation and 1 sheet of splen were purchased. You will also need a stitching roller, scissors/knife and degreaser. The shelf upholstery is dismantled in the following way: Remove the pistons (3 pcs.):
Then remove the two side plastic covers. Unscrew the screw:
And pull off the cover from the 4 pistons:
We remove the upholstery of the rear parcel shelf and place it on the reclined back of the rear sofa.
Action plan
Summarizing all of the above, we organize the sequence of actions as follows:
- We choose the method of setting up the lighting fixtures (by ourselves, by a service station);
- We prepare the car, check the tire pressure (2.0 / 2.2 MPa), place the Lada Granta at a distance of three meters from the wall (notional obstacle), remove the plug from the back of the headlight;
- We draw the diagram according to GOST, parallel and perpendicular lines;
- We compare the light beam with actual points on the wall;
- We carry out adjustments using hydraulic correctors.
New Lada: Do-it-yourself anti-corrosion treatment of Lada Grants
Nuances and advantages of the new shelf
A useful activity for beginners who dare to independently install such a device as an acoustic shelf would be to watch videos of other owners on this topic. This allows us to avoid banal mistakes made during the dismantling procedure or installation of a shelf in the LADA Granta model. Also, familiarization with other people’s experience allows you to find the optimal solution to complete the process in full.
It should be remembered that installing new loudspeakers in the “native” shelf of the Lada Grant is impractical. The new acoustic shelves, which have appropriate quality indicators, have high strength, which eliminates unpleasant rattling when driving.
The factory product is not designed to withstand the weight of acoustic heads and their vibration impact during operation. Therefore, by cutting holes in the shelf for mounting speakers, you can end up with a deflection and, as a result, unsuitability for further protection from the noise factor.
We recommend that you carefully study these aspects, which will allow you to be on the safe side when purchasing an acoustic shelf. Now the buyer can independently decide on the right choice of shelf, which, after installation and connection of the acoustic system, will delight him with excellent sound and the absence of extraneous noise.
What elements can be amenable to the modernization process?
Bright Lada Granta after tuning
When purchasing a new Lada Granta equipped with an automatic transmission, you are interested in the intricacies of warranty service. Car manufacturers are often too distrustful of their own tuning. For this reason, after the warranty period expires, the transformation will have to wait.
What components and parts can a specialist immediately tune? For example, you will be asked to install Fedoro DS 2500 brake pads together with discs. They are intended for those drivers who like active traffic on the roadway. Spare parts serve well in all weather conditions and do not damage brake discs too quickly.
The Kit Autoturbo seal allows the power of the Lada Grant to increase by BO. The Prosport muffler with its extraordinary appearance will also make your car stand out from the traffic.
If you are a competition enthusiast, then the OMR set will allow you to feel high-quality active turns using ARS seats equipped with four-point belts, which are installed with high quality using special brackets. You can also install an original sports steering wheel. The suspension will give your car a luxurious look.
Thanks to tuning the Lada Granta, engine performance will improve due to the power of torque. Currently, the installation of a gas turbine, as well as the improvement of the suspension, have become very popular. Tuning makes it possible to achieve maximum comfort with the original equipment of the Lada using a new spoiler, tires, body kit and optics. Car owners replace the car sound, increase the size of the trunk, tint the windows, and also increase the percentage of sound insulation. These transformations do not require a lot of cost and time, so it will not be difficult for you to complete this work yourself.
Lada Granta: updated panel
Even the most sophisticated car enthusiasts will appreciate the perfection resulting from tuning the Lada Granta
Taking into account wishes and preferences, as well as focusing on innovations in the field of car improvement, it will not be difficult for you to find a photo that will make your dreams come true
Major breakdowns and inconsistencies in the Priora trunk
Technically, these faults only appear due to three main reasons:
- Mechanical damage to the trunk lid (door).
- Body corrosion.
- Wear of the Priora trunk lid seal.
We need to make a reservation right away. The first two reasons are not worth considering closely in this topic. These jobs are the responsibility of bodywork specialists and require not only special skills, but also many special tools and equipment, not to mention materials. Therefore, you should only contact them if corrosion or damage is detected.
A separate issue is the problematic opening of the trunk. There are two possibilities here:
- Poor adjustment or worn hinges.
- The lock is broken or the trunk lock is misaligned.
This malfunction (loops) can already be eliminated independently. Therefore, the issue will be briefly considered.
Trunk device "Priors"
The compartment at the back of the car is called the trunk. The Priora has a sedan body and is isolated from the passenger compartment. At the same time, on station wagon and hatchback bodies, the trunk is combined with the interior space.
However, this part, in the mentioned body models, is called not a lid, but a “door”. This is due to the fact that both the station wagon and the hatchback have a glazed window in this “door”. Otherwise, all these cars have a similar device. This system includes:
- Directly the “door” (trunk lid).
- Locking device.
- Fastening loops.
- Recliner springs (shock absorbers for station wagon and hatchback)
- Wiring.
- Electric lock activator.
- Seal.
How to humanize Granta
Not a single Tolyatti car can boast of excellent build quality and materials, as well as the freshness of engineering solutions. Granta is no exception. It went on sale almost 15 years later than planned and its original mission to replace the VAZ 2107 in the minds of the buyer failed miserably.
A huge audience that wanted to see Tolyatti cars in their garages preferred more practical and modern Koreans and inexpensive European models, so a certain part of the buyer for VAZ was lost forever. A naked Granta, with a virtually empty interior, is record-breakingly cheap. No more than 450 thousand. However, there are no queues for it, and all because the outdated design and design can no longer provide sane competition.
Do-it-yourself soundproofing of car arches
Wheel arches are the main and strongest source of sound while driving. While driving, stones, sand, and crushed stones fly off from under the wheels and hit the wheel arches, causing a rumble. With a high-quality approach to work, noise can be reduced by 30% - 50%.
The noise level depends on the body type. In sedans, the arches are at the same height as the hood, and the rear arches are at the same height as the trunk. If the factory for such a car provided noise absorption in the luggage compartment and for the rear wall of the engine compartment, then in this case the extraneous sound from the arches is muffled.
External and internal insulation of wheel arches
The situation with the hatchback is a little more complicated. Regardless of how well the front of the car is processed, the rear arches are installed at the level of the cabin. This is why the noise inside the cabin becomes higher. There are two ways to solve the situation - turn to professionals or install sound insulation yourself.
Required tools:
- Roulette;
- Construction knife;
- Scissors;
- Textile;
- Construction hair dryer;
- Roller.
Before purchasing raw materials, you should decide on the area where the sound absorber will be installed. The level of insulation depends on the thickness of the material. If you use too thick sound insulation, it may be difficult to mount attachments; the distance between the wheel and the arch will decrease, which will lead to friction and, accordingly, additional noise. To do everything correctly, choose a material with a thickness of 3 mm to 5 mm.
Sound insulation of wheel arches from the inside
First, we remove all parts of the car that may interfere with work. For example, the internal sound insulation of the front arches allows for work from the engine compartment. There is no need to remove the engine or other complex parts, but it is worthwhile to “clear the way” a little.
Wheel arches can be soundproofed from the inside
We clean the arch from dirt, wash it and dry it with a hairdryer. Afterwards, we cut out the required area (it is advisable to achieve 100% coverage) from vibration-proofing material. We apply self-adhesive insulation to the arches. When using materials based on bitumen, after gluing it is necessary to warm it up with a hairdryer.
There is no need to rush, sticking vibration insulation to all places. It is worth starting from one corner, gradually smoothing the material with a roller. At the end of the work, you need to smooth everything out again.
During the process, it is important to ensure that there is no free space left under the sheets. Subsequently, due to incomplete coverage, rust may occur.
Applying self-adhesive vibration insulation to the wheel arches from the inside
After installing the vibration insulation, add a second layer of noise insulation (for example, Accent). The process is similar to that described above.
Applying sound insulation to the wheel arches from the inside
Sound insulation of wheel arches from outside
Before starting, remove the wheel and fender liners and clean the surface from dirt. If metal corrosion is detected, we clean it. We glue vibration insulation, which contains bitumen, onto the clean surface of the arch. After this, sound insulation can be applied on top of the first layer. For better results, we apply mastic material on a rubber-bitumen base to the joint areas, and at the end we treat the entire area with mastic (or anti-gravel).
1. Remove the wheel and protection 2. Clean the surface from dirt 3. Remove corrosion 4. Apply vibration insulation throughout the entire arch 5. Apply sound insulation 6. Apply mastic material on the rubber-bitumen base to the joints 7. Treat the entire arch with anti-gravel
After the entire operation, we return the wheel to its place and cover it.
The arch's noise protection is complete.
Technical nuances of tuning Grants
However, there is a certain audience that will choose the Lada Granta. Do-it-yourself modifications will not stand in the way of those who have been fans of the brand for many years or for those who simply do not yet have the money for a more advanced car. We are not inclined to think that instant technical tuning of a new car can bring any positive results. The car must be run in and get used to both the owner and the conditions, and after that it can be modified as necessary.
If we talk about the Granta engine, then there is no need to isolate it. Absolutely the entire AvtoVAZ model range uses engines of a similar design, originally from the twentieth century, and they, naturally, require modifications. It is useless to want enormous power from the imperfect engines of Tolyatti small cars. All we can do is make life easier for the engine, and it, in turn, will give us several horsepower, noticeable, however, only on bench measurements.
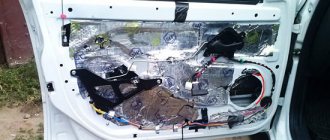
Do-it-yourself soundproofing of car doors
Usually the first step is to soundproof the doors. Drivers who have installed insulation note a noticeable dampening of environmental sounds and high-quality music sound. The work should be carried out in rooms where the temperature is more than +15°. In cold weather, at the beginning of work, it is worth opening all the doors and letting the car warm up warmly.
Attention! Do not disassemble cold plastic - this will lead to its breakage.
Before isolation, you need to prepare the following tools:
- Screwdrivers;
- Stitching roller;
- Shovels for engaging clips and trim;
- Knife for cutting metal;
- Clean rags;
- Degreaser;
- Construction hairdryer.
First, we remove the door trim from the door and remove the film from moisture (often this is standard polyethylene). Afterwards we clean and degrease the door.
Before carrying out soundproofing work on car doors, it is necessary to remove all trim.
It's better to start working with the door panel
It is important to pay attention to the old vibration insulation - if there is damage or deformation, it should be thrown away. We also remove the factory anti-corrosion coating.
Methods for installing sound insulation on car doors
Now let's move on to vibration insulation of the doors. It is not necessary to stick sound insulation on the entire door, the main thing is to paste over a large number of areas.
To achieve maximum sound insulation quality, it is enough to cover 70-80% of the surface
There is no need to glue the door stiffeners. It won't get any worse, and the material will be wasted.
2 mm of vibration isolation is enough for the door, since the thickness of the door metal is small. To ensure that the material lasts a long time, if possible, smooth it with a roller. If the room temperature is low, the vibration insulation should first be heated with a hair dryer to +17°.
We install sound insulation on the vibration insulation. The insulation is self-adhesive, but it still needs to be ironed after installation.
There is no need to pay attention to the fact that it will not be possible to glue a single sheet of sound insulation; it is almost impossible to install it there whole. The main task is to do everything carefully and cover all open surfaces
Applying sound insulation to the inside of the door
Then we work with vibration isolation again. In order to have a good effect, the technological holes should be closed. The final surface of the door should look like closed areas.
Step three - anti-squeak treatment. Wrap the wires and rods with 5 mm anti-squeak. We treat the areas of the trim boundaries, removable plastic parts and clips with material.
An example of anti-creaking door treatment
For an additional effect, you can partially install vibration insulation on the door trim, and completely glue a sound absorber on top of it. The difference between them is that the vibration isolator has the ability to retain heat in the cabin, and the sound absorber dissipates sounds. This action will improve music playback and significantly reduce driving noise.
This completes the soundproofing of the doors and installs them in their original state.
You can also watch a video on this topic:
Chip tuning Lada Granta
An undoubted advantage to engine performance will be competent chip tuning of the Lada Grant. Reflashing the electronic engine control unit will also give the car an additional increase in power, but what is more important in this case is, perhaps, the elasticity of operation, engine life and efficiency. An excellent solution could also be to install an electronic gas pedal on the Grant.
This will not only increase the sensitivity of the engine and reduce the reaction time to movement of the accelerator pedal, but will also make driving more comfortable. Precise fuel dosage will ensure both efficiency and improved vehicle dynamics as a whole. In addition, electronic gas pedal kits will allow you to regulate and switch engine operating modes based on the driver’s personal preferences.
How to choose an acoustic shelf for the Lada Granta?
The purchased component should not only look stylish, but also be of high quality. An acoustic shelf with plywood reinforcement for the Lada Granta has an affordable price. You can find the product in any auto store.
Models require the installation of speakers with standard sizes of 6X9 inches; in some versions there is a separate place for an amplifier. Additionally, the motorist will need to purchase a set of wires to connect the installed elements.
It is also important that the Lada Granta acoustic shelf has a practical top covering. An attractive option is leatherette or carpet. Both materials are easy to clean, so your car's interior will always be clean. The accumulation of dust on the speakers and the shelf itself is unacceptable, so it is recommended to constantly remove dust using a mini vacuum cleaner and a damp rag.
There are various models of shelves that differ in design. Pedestals for speakers can be represented by protrusions or holes. When choosing, it is recommended to give preference to a modification that will look good in the cabin.
It is also worth paying attention to the accuracy of the assembly: it is unacceptable that the new element is uneven or not strong enough.
A few touches to increase power
If you decide to take tuning seriously and take on the engine, don’t rush. Having bought a new car, it is stupid to immediately start rebuilding the engine. First you need to break in the car, drive at least five thousand kilometers. Perhaps, after grinding in the parts and mechanisms, the sensations while driving will be wonderful and you will not want to change anything.
However, there is a small list of measures that need to be taken. A zero-resistance air filter will make it easier for your vehicle to “breathe.” After installing the filter, the amount of oxygen in the combustion chambers will increase by 6%. The value may be smaller depending on the number of engine revolutions. This will lead to an increase in power output. An updated exhaust kit will help increase the percentage of Granta's power. If the pipes are larger, the cylinders will be better ventilated, which will lead to a decrease in the resistance to the circulation of exhaust gases.
For daring racers, a sparkling muffler with tailpipes is a must-have option. This will make the car look more modern and stylish.
It is important not to neglect the chip tuning of the Lada Granta. If you reflash your car computer, you will be able to optimize your interaction with the car. Chip tuning will adjust your car to your usual driving style, this will help reduce fuel consumption and increase engine power
Chip tuning will adjust your car to your usual driving style, this will help reduce fuel consumption and increase engine power.
Another useful detail is the electronic gas pedal. It must be installed before performing chip tuning. An electronic pedal will help the control unit respond more accurately and quickly to any driver actions. This will also have a beneficial effect on fuel consumption. Advanced electronic pedals have a personal control unit on which you can switch modes.
Deep tuning of a Granta engine is usually not complete without installing forged metal piston parts, boring the cylinders, as well as installing a nitrogen accelerator and turbine on the engine. If you are interested in such changes, experts advise making them in a comprehensive manner, otherwise turbocharging the engine from the basic configuration will significantly increase the risk of pistons failure in the event of extreme loads. Forged parts are not cheap, so their installation must be justified by concerns about increasing the performance of the fuel supply system.
Recommended article: Comparing the new Hyundai Solaris versus Lada Vesta
It is important to understand that if you have increased engine power, to consolidate the result you need to strengthen the brake system, it is also advisable to redo the transmission and pay attention to the suspension. If this is not done, the car will not surprise you for long, but will soon return to its original state.
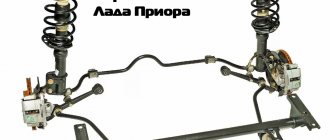
Multi-lever
A car's multi-link suspension consists of several levers (usually at least four) connected to the body, beam or frame through rotary supports (silent blocks). The second end of the lever is connected to the steering knuckles using ball joints. The presence of ball joints and silent blocks increases the car's handling and smoothness, as they absorb impacts well when hitting an obstacle, and also increases sound insulation.
In the recent past, such a system was used only for the production of expensive cars, since its design was more complex and expensive. Currently, it is successfully used in cars of lower cost.
Among the promising developments of optimal suspension options, active suspension equipped with electric motors should be noted. Depending on the driving situation, the sensors transmit a signal to the engine, which changes the current parameters and operating mode of the entire system.
Alternator belt overtightened
One of the most common problems with the Lada Grant is an overtightened alternator belt. As a rule, it does not last long, and car owners quickly run into trouble. To avoid problems, it is recommended to slightly modify the mount. You can do this in several ways:
- install a bracket from Lada Kalina instead of the original one;
- replace the oversized original generator bolt with smaller fasteners;
- install another bearing;
- install a Bosch generator instead of the native KATEK.
All methods are quite effective, although each of them has its own advantages and disadvantages. Therefore, you can choose the one that you find most convenient for yourself.
The process of removing and installing a shelf
- We place the car on a flat platform, open the rear row of doors to provide full access to the shelf;
- lower the backrest of the rear row of seats;
- unfasten the seat belt fastenings, having first unscrewed the fastening bolts;
- unscrew the fasteners for the child seat;
- use a screwdriver to pry up three plastic latches;
- pull it towards you and remove the plastic shelf.
Installing front speakers
Acoustics for Lada Granta
Before moving on to the actual algorithm for installing the front speakers (see How to choose speakers for a car radio on your own), let us remind you that this car has already been equipped with standard seats and there is no need to do anything new. But a serious problem arises when installing two-component acoustics. And yet, modernization will have to be carried out, since the diameter of the standard seats is quite limited, however, as on other car models.
Note. If, for example, we want to install high-quality 16 cm acoustics on a Lada Granta, then another intractable problem will arise. The front windows may not open all the way and will hit the speaker. You will have to make special spacers from plywood or chipboard.
Making podiums
The first thing to do is to make podiums.
DIY acoustic podium
Cut out a paper stencil to fit the diameter of the speaker. Don't forget to cut out the inner circle too.
Note. For 16 cm acoustics, you should get a ring with the same diameter and a 15 cm circle cut inside it.
- We glue together 2 pieces of plywood, cut according to a stencil. We use PVA glue and self-tapping screws.
- We should get rings 11 mm thick. This is quite enough for most speakers, although the thickness can be increased, if necessary, later by adding additional rings.
- Now we need to install these same acoustic podiums in the door of the Lada Grant. Without removing the trim, we make markings by attaching a homemade ring to the door.
- We remove the casing.
- We take a drill and start drilling holes in the metal of the door.
- We put up podiums and fasten them well.
Note. During this work, it is recommended to at the same time make high-quality sound insulation of the door. It will make the sound from the speakers much fuller, and music lovers will be satisfied.
- We lay wiring in the door.
- We put the trim back in place.
- We install the decorative speaker grille. You can attach it in various ways.
Isolation procedure
Now specifically about the process of soundproofing the cargo compartment.
Let's assume we have a sedan
It doesn't matter what model or brand. There is a trunk lid, as well as the compartment floor itself
They have to be silenced.
All work is divided into 4 stages.
First stage
First you need to remove the trunk. That is, remove everything unnecessary from there.
The carpet and upholstery will need to be removed. At the same time, the spare wheel, etc. is removed.
When removing the side panels of the luggage compartment, measure the distance from them to the body. This will make it clear whether the sound absorber will fit there or not.
If everything is removed, start cleaning up the dirt. Here you will need a brush, vacuum cleaner, rags and degreaser.
Second phase
Here you need to install a layer of vibration-absorbing material.
Let's take vibroplast as an example. Popular choice. With its help you need to cover:
- side walls of the cargo compartment;
- rear arches;
- shelf;
- wings;
- cover.
The advantage of vibroplast is that it is quite thin and light, but has high insulation efficiency.
Make patterns from cardboard, and cut out blanks from the insulator using them. Apply them to grease-free surfaces and roll them out with a roller.
If it is cold outside and the material does not have the required plasticity, then warm it up with a hair dryer.
By the way, the list of vibroplast coating did not include flooring. This is done on purpose. For flooring, as well as for arches, it is better to take dense and hard material such as bimast. Rigidity will prevent the material from being pressed under the weight of the cargo being transported.
The floors in the cars are uneven. Has a relief surface. Bimast is more difficult to lay on it than vibroplast. But arm yourself with a hair dryer. Warm up all areas and roll thoroughly with force. It's better to work with 4 hands. One person heats it, and the second rolls it with a roller.
Air bubbles are not allowed. Otherwise, the effectiveness of the insulator will decrease.
Third stage
This is a soundproofing process. Soundproofing material is laid on top of vibration insulators.
Accent and bitoplast perform well. Just take products with a thickness of 10 mm or more.
The emphasis needs to be mounted joint to joint. The excess is cut out with a sharp knife.
The spare tire niche should be covered with splen. Cover all other floor surfaces with a sheet of bitoplast or accent. Splen will protect against the possible formation of corrosion, as well as the appearance of rust spots. The accent absorbs water. But there is no splen
This is its important advantage
Fourth stage
The luggage compartment lid is insulated, as well as plastic elements.
If it is a liftback, hatchback or station wagon, then the Shumka is performed on the principle of insulating the side doors of the car.
In a sedan everything is somewhat simpler.
It is necessary to remove the casing, degrease and clean the metal from dirt. Then apply a layer of vibration absorber, followed by a noise absorber.
The reverse side of plastic products should be covered with bitoplast. This will get rid of extraneous squeaks.
And at the end of all work, reassembly is performed.
Video - Egaz. Electronic gas pedal. EPG. Granta Lada Auto VAZ
Reinforced "Hedgehog" pistons for interior door trims of VAZ 2108-21099, 2110-2112, 2113-2115
Flip ignition key Audi style for Lada Priora, Kalina, Granta, Chevrolet Niva, Datsun
Dirt plugs for the steering rod opening for Lada Granta, Kalina, Kalina 2
USB charger 2 slots for Lada Priora, Granta, Kalina 2
Luxury air duct nozzle with silver ring for Lada Granta, Kalina 2, Granta 2
Reinforced upholstery clamps Raymond for Lada Priora, Kalina 2, Granta, datsun
Glasses holder
Working blank key with chip for Lada Priora, Kalina, Kalina 2, Granta, Chevrolet Niva
Floor tunnel from Granta assembled for Lada Kalina
Door sill trim for Lada Granta, Kalina 2
Immobilizer chip key (transponder) working for Lada Kalina, Priora, Grant
Threshold seal RGI 135 for Lada Granta, Kalina, Kalina 2, datsun
Vertical seal RKI 19 for Lada Granta, Kalina, Kalina 2, Largus
Rubber mat for driver's door handle for Lada Granta, Kalina, Kalina 2, Datsun
Training key blank with chip for Lada Priora, Kalina, Kalina 2, Granta, Chevrolet Niva
Chrome door lock buttons for Lada Kalina 2, Granta
Colored handbrake handle for VAZ cars
Original audio preparation kit (plastic speaker grilles in the doors) for Lada Granta, Kalina 2
One of the popular types of tuning is interior tuning. And it is here that we offer you a large selection of all kinds of small and large spare parts and parts for a variety of purposes, ranging from replacing a broken spare part to a real cool change in the entire appearance of the interior. So let’s talk about all sorts of “pumping up the interior” of the Lada Grant and its modifications.
This type of car modernization is one of the most enjoyable, since you can replace the old and add a new one, in which you are surrounded by space while driving. In other words, while driving you will feel the innovations you are purchasing, which ultimately will allow you to truly choose “your plate” due to a wide range of replaceable elements, their style, color, shape and design.
Features and nuances of installing the Lada Granta acoustic shelf
Very useful for beginners who decide to install an acoustic shelf will be a preliminary study of video recordings of other Lada owners.
Correct installation of the acoustic shelf on the Grant video will help to avoid mistakes when removing the standard one and installing a new element. It is especially important to study the conditions for connecting wires and hiding them carefully. This will greatly simplify the search for the optimal solution to the problem.
It is worth remembering that you cannot install speakers in a standard shelf. High-quality acoustic shelves on Granta are highly durable, which eliminates rattling during driving.
The factory stock element is simply not designed to support the weight of the speakers. Therefore, after cutting holes in it and installing acoustic elements, the shelf will sag and become completely unsuitable for noise protection.
It is recommended that you carefully study these tips and follow them when purchasing a new shelf and installing it. The new acoustic shelf on Grant's photo, which is presented in full assembly, will also be useful.
The buyer will be able to evaluate the implementation and choose the most stylish and practical option. And the purchased element will look good with the interior decoration and will allow you to travel with excellent music and a great mood.
Bumper tuning
The discreet bumper from the creators of the Lada Granta attracts few people, but since this model was published quite a long time ago, you can already find a lot of parts for it, namely bumpers for decoration. The first thing that comes to mind is the common “I am a Robot” bumper, which fits perfectly with the fasteners of this model, but the price of the front and rear bumpers is high, as well as delivery.
It will be much more profitable to pay attention to tuning using the STM bumper. It immediately catches the eye not only because of its uniqueness, but also because it solves many driver problems
This also applies to the cooling of the brake system, which is improved due to the protrusion that captures more air flow. Additional thresholds create a large volume for the front bumper, protecting it from dirt and chips falling into the radiator grille. The connectors for the foglights and air collector also look original.
The bumper, called “Sniper”, is valued for its unique configuration and compatibility with both sharpness and power. Trapezoidal cutouts for the air collector make the car lively and unpredictable, but they also play the additional role of cooling the engine and front brake systems.
The GTS kit has a large air intake that is distinguished by sharp lines. The connector for the fog lights adds even more sharpness, which looks great in a complete package. Like other kits, GTS tuning allows not only to qualitatively increase the cooling of the front brake system, but also to improve aerodynamics.
The rear bumpers, in almost all sets, have the same features, namely aerodynamics, and even, smooth cutouts for the cable and state. car numbers.
What else could be knocking in the back of the car?
If you are faced with the fact that diagnostics do not give any effect, and the knocking continues, you should contact specialists and get a complete professional diagnosis of the rear suspension of your car. Of course, hidden parts that are not visible to the eye of the car owner can knock. But it is impossible to hide the knock from experts. The technician will definitely find the cause of the problem
Before you go to a service station and pay money for diagnostic and repair work, you should once again carefully inspect everything and pay attention to the most popular causes of knocking in the rear suspension
Consider additional knocking possibilities:
- loose wheel – even a small problem with wheel play will affect the quality of the car’s movement; the knocking noise can be associated with one loose bolt or loose fastener;
- foreign objects entering the rotation area - you need to carefully inspect the location of the hubs behind the wheel on a pit or lift; you can also jack up the car and unscrew the wheel for examination;
- body problems - rotten welding points may fail, and the metal in this place will clatter, making specific sounds, often this becomes the cause of serious problems;
- metal part in the tread - in this case the knocking will be rhythmic, you just need to examine the rubber and get the part that creates an unpleasant knock when in contact with asphalt;
- bent beam - in this case, the wheels will not be level, and the beam itself may make unpleasant sounds, squeaks, knocks and other problems; these features must be taken into account.
As you can see, there are quite a lot of different nuances. You need to carefully diagnose one reason after another, and you will definitely be able to find the reason for the knocking
If the suspension in your car is not constantly knocking, but periodically, you will have to pay attention to exactly when the knocking occurs. At sub-zero temperatures, rubber dampers change their properties and shrink slightly
This is especially true for low-quality automobile parts, which are especially often installed on inexpensive cars.
We suggest watching a video about a knock in the rear suspension:
Do-it-yourself soundproofing of a car floor
Floor insulation will bring good results in reducing noise, because most of the sounds are transmitted into the car interior through it.
The following tools are required for work:
- Metal scissors;
- Construction roller;
- Hairdryer;
- Clean cloth;
- Screwdrivers;
- Degreaser.
Before work, we remove all seats, mats and upholstery - the interior should remain completely empty
It is important to look at the factory felt sound insulation. It should not smell unpleasant, peel off or crumble, but must be completely dry
Otherwise it should be removed. Next, we vacuum the entire floor, degrease it and cover it with anticorrosive.
The first is vibration isolation. Gluing from the motor partition, we lay the material across the entire floor in whole sheets. We finish at the lift under the rear seats. Heat the surface with a hairdryer and roll it with a roller. We glue the vibration insulation under the rear seats in the same way.
Pasting the car floor with vibration insulation
Wiring and technical holes must not be covered with tape.
Attention! Overlapping gluing risks introducing air between the material and the floor, which can result in corrosion.
You need to try to cover as best as possible the areas of the front arches under the factory sound insulation and at the same time not touch the gas tank flaps. Afterwards we roll everything thoroughly with a roller.
We glue the sound insulation with the second layer. We tape it from the engine bulkhead to the raised rear seats. Using a roller, squeeze out the air from under the material. Then, in the same way, we treat the area under the rear seats and the gas tank flaps and again iron everything with a roller.
Pasting the car floor with sound insulation
After all the work, we return all interior parts to their place. The soundproofing of the car floor is complete.
Video on the topic: