Lambda probe on VAZ 2107 causes of malfunction and replacement features
A lambda probe is an oxygen sensor that began to be installed on the VAZ 2107 after the seven acquired injection engines. Not many owners of fuel-injected cars know what a lambda probe is. The sensor in question is a device by which the oxygen content in the exhaust system is monitored. It is part of a system that is responsible for reducing the content of harmful substances in vehicle exhaust gases - the catalytic converter.
Why does the lambda probe break on a VAZ 2107?
The oxygen sensor on the VAZ 2107 compares the oxygen content in the atmosphere and car exhaust. The principle of operation of the device is based on the supply of signals in the form of increased or decreased voltage supplied to the ECU. Depending on the signal received by the computer, the composition of the mixture entering the cylinders is adjusted.
Until 2004, injection sevens were equipped with oxygen sensors without heaters, and after that with heating elements. The exhaust system design may use one or two devices. If there is one, then it is installed immediately at the outlet of the exhaust manifold in front of the converter, which complies with the Euro-2 standard. The presence of a second sensor indicates that the car complies with the Euro-3 environmental standard. If the first sensor reacts to excess gas toxicity, the second is used to monitor the quality of the catalyst.
The only lambda probe is located on the seven under the bottom of the car immediately after the exhaust manifold, and is part of the exhaust system. Oxygen sensors often fail, which occurs due to the use of low-quality fuel. Low-quality fuel is gasoline, which contains a large amount of lead. Lead is added to gasoline to increase the octane number.
In addition to the high lead content in the fuel, the reasons for the rapid failure of the oxygen sensor are:
- Liquid entering the intake manifold. These liquids include water, brake fluid, antifreeze, oil, gasoline. Any type of liquid that settles on the device leads to the formation of microcracks.
- Clogged fuel filters. In this case, the blockages reach the exhaust system and settle on the body of the lambda probe, thereby reducing the efficiency of the device.
- Overheating of the housing in case of incorrectly set ignition.
- Popping noises in the muffler, which lead to a violation of the integrity of the ceramic base.
- Service life - like any part, the oxygen sensor on the VAZ 2107 has a certain service life. It ranges from 3 to 5 years or from 40 to 70 thousand kilometers. After the specified period, the device in question must be replaced.
It is also worth understanding that the lambda probe can be damaged from the outside through mechanical impact. Causes of external damage include stones and other types of obstacles that come into contact with the device. The integrity of the wires and insulation that are connected to the device may also be compromised. All these breakdowns will definitely manifest themselves immediately.
Symptoms of a malfunctioning lambda probe
The oxygen sensor on the VAZ 2107 injector sooner or later fails, which entails various unpleasant consequences. The main symptom of a faulty oxygen sensor on a VAZ 2107 is an increase in fuel consumption. This happens because the lambda probe sends false signals to the ECU, resulting in increased consumption.
In addition to increased fuel consumption, a malfunction of the sensor can also be detected for a number of the following reasons - the engine is shaking and there are jerks when driving. The idle speed may also change spontaneously, as a result of which the engine may stall. If the lambda probe is faulty, the toxicity of the exhaust increases, which can be detected using a special device. A symptom of a malfunction is also the Check Engine indicator on the instrument panel, but it lights up only when the lambda probe completely fails.
How to check the oxygen sensor on a VAZ 2107
How to check the lambda probe on a VAZ 2107? To do this, connect the red probe of the multimeter to the white wire of the device. The black probe is connected to the engine ground. The voltage on the device should be 0.45V. This is the nominal voltage, and if the meter shows a higher value, the device should be replaced. Replacement will also be needed in other cases when, during artificial enrichment or depletion of the mixture, the voltage readings on the sensor do not change, and the device shows 0.45V. The pinout of the oxygen sensor on the VAZ 2107 is shown in the diagram below.
The VAZ 2107 is equipped with four-wire sensors, which can be checked using the resistor resistance:
- Switch the device to resistance measurement mode.
- Ring the device terminals.
- The resistance should not be less than 10 ohms.
If the resistance exceeds 10 ohms, this indicates a malfunction of the heating element. You can identify a sensor malfunction using error codes. Error number PO131 indicates that the lambda probe has a low signal level. The cause of this error may be a faulty lambda probe or a lean mixture. To verify that the device is faulty, you need to spray a little gasoline into the intake manifold with the engine running. If the sensor shows that the mixture is too rich, then it is working, and if the error does not disappear, then you can verify that the device is faulty in another way. It is necessary to ensure air leaks into the manifold, which is accomplished by dropping the vacuum brake booster hose. If the sensor responds, there is no need to change it.
Replacing the oxygen sensor
Replacing the lambda on a VAZ 2107 begins with the need to dismantle the engine protection. The device is located directly in the exhaust manifold, so before replacing, you need to let the engine cool down, otherwise you risk serious body burns.
How to troubleshoot an oxygen sensor
If a subsequent check shows that the reason is in the wiring, then the problem will be solved by replacing the wiring harness or connection chip, but if there is no signal from the sensor itself, it often indicates the need to replace the oxygen concentration sensor with a new one, but before buying a new lambda, you can use one of the ones below ways.
Method one
Involves cleaning the heating element from carbon deposits (used when a malfunction of the oxygen sensor heater occurs). To implement this method, it is necessary to provide access to the sensitive ceramic part of the device, which is hidden behind a protective cap. You can remove this cap using a thin file, with which you need to make cuts in the area of the base of the sensor. If it is not possible to completely dismantle the cap, then it is possible to make small windows about 5 mm in size. For further work, about 100 ml of orthophosphoric acid or rust converter is needed.
The recovery procedure is performed according to the following algorithm:
Sometimes it takes up to eight hours to clean the sensor using this method, because if you don’t succeed in cleaning the soot the first time, then it makes sense to repeat the procedure two or more times, and you can use a brush to mechanically treat the surface. Instead of a brush, you can use a toothbrush.
Method two
It assumes carbon deposits have burned out on the sensor. To clean the oxygen sensor using the second method, in addition to the same orthophosphoric acid, you will also need a gas burner (as an option, use a home gas stove). The cleaning algorithm is as follows:
The described procedure must be repeated several times until the sensitive element becomes clean and shiny.
Source
Oxygen sensor for VAZ 2107
Today, the oxygen sensor is one of the most expensive. Its cost can reach several thousand rubles. On VAZ 2107 equipped with an injection engine, a lambda probe is installed - replacing it is required relatively infrequently.
Most modern cars have 2 oxygen sensors - next to the catalyst and directly on the muffler. The VAZ 2107 is equipped with only 1 sensor - it is located under the bottom of the car.
This greatly simplifies the replacement procedure - just lift the car on a special lift or place it on a pit.
The main reasons for sensor failure
Most often, these types of parts fail for the following reasons:
- the service life of the part has been exhausted;
- constant use of fuel with high lead content;
- liquid entering the sensor (it enters it through the exhaust manifold).
There is no point in repairing the lambda probe - its price is relatively low. It is important to take the procedure for selecting a new part responsibly. It is recommended to carry out the replacement process every 75-80 thousand km or every 3-5 years.
Signs of sensor failure
There is a whole range of different signs of malfunctions, when they appear it is advisable to immediately replace them. The standard list includes:
- increase in fuel consumption – 1.5 and even 2 times;
- “choking” engine;
- interruptions in idling;
- check engine light on;
- extraneous sounds in the catalyst.
If jerks occur during movement, this may also be a sign of a sensor malfunction. It is advisable to carry out a diagnosis. By connecting a special diagnostic device via the CAN bus, you can get a complete list of error codes.
It is important to remember: this sensor reacts to the amount of oxygen in the mixture. If there is air leakage, the sensor will definitely give the command to enrich the mixture. As a result, consumption will increase significantly.
Buying an oxygen sensor: original and analogue
There are a large number of different types of sensors on the market. First of all, all products are divided into two categories - original and analogues. Both options have their advantages and disadvantages.
Today it is relatively difficult to find original components. Since the VAZ 2107 car has not been produced for quite a long time.
- Analogs
The market offers a relatively large selection of various analogues of the original sensor. Moreover, both domestic and foreign production. The VAZ 2107 car is relatively simple; parts from many other vehicles fit into it. That is why purchasing an analogue will not be difficult.
But before purchasing a suitable part, it is advisable to carefully study the packaging and the sensor itself. There are many fakes on the market today. Main signs: poor quality packaging, lack of hologram, poorly printed print. Today the following manufacturers have proven themselves to be good:
How to replace an oxygen sensor
The replacement process usually does not cause serious difficulties. You only need to prepare the necessary documents and a car in advance. Some work is easier to do through the bottom, so it is advisable to place the car on a special pit or on a lift. This will significantly simplify the procedure and reduce the time spent.
It is also necessary to remove the metal crankcase protection, if installed. All work must be carried out cold. Because metal expands when heated. Which will lead to problems when unscrewing the thread. It is also advisable to pre-spray the joint with a special compound - WD-40. It will significantly simplify the procedure for unscrewing the sensor.
The process of installing a new sensor includes the following main steps:
- cut off the clamps - if they are present and interfere with work;
- remove all existing electrical connectors;
- we clean the connector with special cleaning agents and a wire brush - it will be reused in the future;
- Using a 22mm wrench, unscrew the oxygen sensor;
- then screw the new sensor onto the old seat;
- put the connector in place.
After installation is complete, it is advisable to check the functionality of the sensor. This is very simple to do - just remove the sensor, check for voltage on the signal wire coming from the electronic control unit. It should be within 0.45 V. A more accurate diagnosis is easiest to do in a specialized service center.
If the diagnostic device displays error PO131, then the signal level coming from the sensor is too low. To determine whether the mixture is really lean or the sensor is faulty is very simple.
It is enough to spray gasoline from a syringe onto the intake manifold while simultaneously squeezing the return line. If the diagnostics, on the contrary, show too high a fuel content in the mixture, you need to increase the air flow into the manifold. If the sensor readings change, it is working properly.
Methods for diagnosing an oxygen sensor
Experts advise checking the correct operation of the lambda probe every 10,000 km, even if there are no problems with the operation of the device.
Diagnostics begins with checking the reliability of the connection between the terminal and the sensor and for the presence of mechanical damage. Next, unscrew the lambda probe from the manifold and inspect the protective casing. Small deposits are cleaned.
If, during a visual inspection, traces of soot, strong white, gray or shiny deposits were detected on the protective tube of the oxygen sensor, the lambda probe should be replaced
How to check a lambda probe with a multimeter (tester)
The sensor is checked for functionality using the following parameters:
- Heating circuit voltage;
- "Reference" voltage;
- Heater condition;
- Sensor signal.
Connection diagram to the lambda probe depending on its type
The presence of voltage in the heating circuit is determined with a multimeter or voltmeter in the following sequence:
- Without removing the connector from the sensor, turn on the ignition.
- The probes are connected to the heating circuit.
- The readings on the device must match the voltage on the battery - 12V.
“+” goes to the sensor from the battery through the fuse. In its absence, this circuit is called.
“—” comes from the control unit. If it is not detected, check the terminals of the lambda probe - ECU circuit.
The reference voltage measurements are carried out using the same devices. Sequencing:
- Turn on the ignition.
- Measure the voltage between the signal wire and ground.
- The device should show 0.45 V.
To check the heater, set the multimeter to ohmmeter mode. Diagnostic stages:
- Remove the connector from the device.
- Measure the resistance between the heater contacts.
- The readings on different oxygen pumps are different, but should not go beyond 2-10 ohms.
Important! The absence of resistance indicates a break in the heater circuit.
A voltmeter or multimeter is used to check the sensor signal. For this:
- They start the engine.
- Warm it up to operating temperature.
- The probes of the device are connected to the signal wire and the ground wire.
- Engine speed is increased to 3000 rpm.
- Monitor voltage measurements. Jumps should be observed in the range from 0.1 V to 0.9 V.
If during at least one of the checks the indicators differ from the norm, the sensor is faulty and needs to be replaced.
Video: checking the lambda probe with a tester
Checking with an oscilloscope
The main advantage of this lambda probe diagnostic over checking with a voltmeter and multimeter is the recording of the time between similar changes in the output voltage. It should not exceed 120 ms.
- The probe of the device is connected to the signal wire.
- The engine is warmed up to operating temperature.
- Engine speed is increased to 2000-2600 rpm.
- Based on the oscilloscope readings, the performance of the oxygen sensor is determined.
Diagnostics with an oscilloscope gives the most complete picture of the operation of the lambda probe
Exceeding the time indicator or crossing the voltage limits of the lower 0.1 V and upper 0.9 V indicates a faulty oxygen sensor.
Video: diagnosing an oxygen sensor with an oscilloscope
Other verification methods
If the car has an on-board system, then the “CHECK ENGINE” signal, which generates a certain error, can be used to diagnose the condition of the lambda probe.
List of lambda probe errors
In order for the lambda probe to work for a long time and efficiently, it is necessary to fill the car only with high-quality fuel. Scheduled and timely diagnostics of the oxygen sensor will help to detect its malfunction in time. This measure can extend the life of not only the sensor itself, but also the catalyst.
What is a lambda probe?
The Greek letter "lambda" in physics represents the oxygen content.
Therefore, the oxygen sensor on injection engines is also called a lambda probe. These sensors began to be used on VAZ classics recently, when the VAZ 2107 model with an injection engine appeared on the assembly line. In the engine injection system, the VAZ 2107 oxygen sensor (injector ) monitors the oxygen content in the exhaust gas mixture. This was done to reduce the content of harmful carbon monoxide in the vehicle exhaust and ensure the optimal composition of the mixture supplied to the cylinders.
The sensor compares the oxygen content in the atmosphere and car exhaust. When the oxygen content is lower, the sensor produces a higher voltage and vice versa. The engine ECU operating algorithm is based on sensor readings and automatically changes the composition of the mixture entering the cylinders.
Lambda probe: why an oxygen sensor is so important for a car
Doubtful refueling, bad gasoline, a “check” on the panel - a standard and quick way to replace the oxygen sensor. Many motorists have heard about the lambda probe, but few understood what exactly it is responsible for and why it fails so easily. Let's talk about the oxygen sensor - the "smell" of the engine.
Lambda and engine stoichiometry
The name of the sensor comes from the Greek letter λ (lambda), which denotes the coefficient of excess air in the fuel-air mixture. For complete combustion of the mixture, the ratio of air to fuel must be 14.7:1 (λ=1). This composition of the fuel-air mixture is called stoichiometric - ideal from the point of view of the chemical reaction: the fuel and oxygen in the air will be completely consumed during the combustion process. At the same time, the engine will produce a minimum of toxic emissions, and the ratio of power and fuel consumption will be optimal.
If lambda is 1 (excess air), the mixture is called lean. A mixture that is too rich results in increased fuel consumption and more toxic emissions, while a mixture that is too lean results in loss of power and unstable engine operation.
It is clear from the graph that at λ = 1 the engine power is not peak, and fuel consumption is not minimal - this is only the optimal balance between them. The engine develops the greatest power with a slightly rich mixture, but fuel consumption increases. And maximum fuel efficiency is achieved with a slightly lean mixture, but at the cost of a drop in power. Therefore, the task of the engine ECU (electronic control unit) is to adjust the fuel-air mixture based on the situation: enrich it during a cold start or sharp acceleration, and lean it during uniform movement, achieving optimal engine operation in all modes. To do this, the control unit is guided by the readings of the oxygen sensor.
Why do you need an oxygen sensor?
There are a great many sensors in a modern engine. Using various sensors, the ECU measures the temperature of the outside air and its flow, “sees” the position of the throttle valve, monitors detonation and crankshaft position - in a word, it closely monitors the air “inlet” and engine performance, adjusting the fuel supply to create the optimal mixture in the cylinders .
Reasons for failure of the lambda probe on the VAZ 2107
The main reason for oxygen sensor failure is the use of low-quality fuel. If gasoline contains a lot of lead (compounds containing it are used by unscrupulous manufacturers to increase the octane number of the fuel). Another reason is liquids entering the exhaust manifold (and therefore the sensor). Water, brake fluid, gasoline, and antifreeze lead to microcracks and sensor failure. The third reason is clogged car fuel filters. In this case, the fuel does not undergo proper cleaning and contaminants settle on the parts of the VAZ 2107 oxygen sensor, causing breakdown. Therefore, replacing the oxygen sensor requires installing new fuel filters.
We must not forget about the limited resource of the node. After 3-5 years of sensor service (time depends on annual mileage), it must be replaced.
A rarer case is mechanical damage to the oxygen sensor. This can happen due to unqualified repairs, the impact of a stone that bounces off the wheel, or during an accident.
The main symptoms of a malfunctioning lambda probe
The main sign of a faulty lambda probe is a change in engine operation, since after its breakdown the quality of the fuel mixture supplied to the combustion chamber significantly deteriorates. The fuel mixture essentially remains uncontrolled, which is unacceptable.
The reason for the lambda probe to fail to operate may be the following:
In all of the above cases, except the last one, failure occurs gradually. Therefore, those car owners who do not know how to check the lambda probe and where it is located will most likely not immediately notice the malfunction. However, for experienced drivers it will not be difficult to determine the reason for changes in engine performance.
The gradual failure of the lambda probe can be divided into several stages. At the initial stage, the sensor stops functioning normally, that is, at certain operating moments of the motor, the device stops generating a signal, subsequently destabilizing the idle speed.
In other words, they begin to fluctuate over a fairly wide range, which ultimately leads to a loss of quality of the fuel mixture. At the same time, the car begins to jerk for no reason, you can also hear popping noises that are uncharacteristic of the engine, and a warning light always lights up on the instrument panel. All these anomalous phenomena signal to the car owner that the lambda probe is not working properly.
At the second stage, the sensor stops working completely when the engine is not warmed up, while the car will signal the driver about the problem in every possible way. In particular, there will be a noticeable loss of power, a slow response when pressing the accelerator pedal and the same popping noises from under the hood, as well as unjustified jerking of the car. However, the most significant and extremely dangerous signal of a lambda probe failure is engine overheating.
If you completely ignore all previous signals indicating a deterioration in the condition of the lambda probe, its breakdown is inevitable, which will cause a large number of problems. First of all, the possibility of natural movement will suffer, fuel consumption will also increase significantly and an unpleasant, pungent odor with a pronounced hint of toxicity will appear from the exhaust pipe. In modern automated cars, in the event of a breakdown of the oxygen sensor, an emergency lock can simply be activated, as a result of which subsequent movement of the car becomes impossible. In such cases, only an emergency call to a tow truck can help.
However, the worst case scenario is depressurization of the sensor, since in this case the movement of the car becomes impossible due to the high probability of engine failure and subsequent expensive repairs. During depressurization, exhaust gases, instead of exiting through the exhaust pipe, enter the atmospheric reference air intake channel. During engine braking, the lambda probe begins to detect an excess of oxygen molecules and urgently sends a large number of negative signals, which completely disables the injection control system.
The main sign of sensor depressurization is a loss of power, this is especially felt during high-speed driving, a characteristic knocking sound from under the hood while driving, which is accompanied by unpleasant jerking, and an unpleasant odor that is emitted from the exhaust. Depressurization is also indicated by visible deposits of soot formations on the exhaust valve body and in the area of the spark plugs.
How to determine a faulty lambda probe is described in the video:
How to check the oxygen sensor on a VAZ 2107?
Malfunctions of the oxygen sensor may be “undetected” by the engine ECU, so the “Check Engine” lamp may not light up. It lights up only when the sensor is completely inoperable. If it simply produces incorrect information, the system will not notice the malfunction.
When manually diagnosing a lambda probe, you need to remove the terminal from it and check the voltage on the signal wire coming from the computer. The normal value is 0.45V. A common problem is voltage higher than rated. This can be corrected by connecting an additional resistor to the circuit. Its value is calculated using a variable resistor. It must be connected to the sensor's power circuit, connect the sensor and a voltmeter. Then, with the ignition on, change the resistance of the resistor, observing the voltmeter readings. The required voltage is 0.45-0.46 volts. Then it remains to measure the resistance of the variable resistor and replace it with the corresponding constant resistance.
Now let's look at the error codes associated with lambda.
Error “PO131” indicates a low sensor signal level. It’s easy to understand whether the mixture is really lean or the lambda probe is faulty. With the engine running, you need to spray a little gasoline from a syringe into the intake manifold while the “return” is pinched. If the sensor shows the mixture is too rich, it is working. If the error code indicates a rich mixture, you need to check the sensor differently. You will need to suck air into the manifold. You can organize it by dropping the vacuum brake booster hose. If the sensor responds, it does not need to be replaced.
If, during artificial enrichment and depletion of the mixture, the sensor produces the “native” 0.45 V, it should be replaced.
How to check a lambda probe with a multimeter
When there are jerks when driving, increased fuel consumption, and a lighted “check”, then it is worth carrying out diagnostics. These signs may indicate other malfunctions, but if you have a multimeter, you can check the oxygen sensor yourself. Experts recommend checking the lambda by measuring voltages.
But before any measurements, you need to warm up the internal combustion engine. If the lambda is cold, it will not work. It is also recommended to remove the sensor, if possible, and inspect it and the wiring for dirt or damage. If the sensor is deformed, the electrode is scratched or covered with soot or carbon deposits, then it is better to replace it.
Heating circuit voltage measurements
Turn on the ignition, pierce the wires that go to the heater with probes. You can also plug multimeter probes into the connector. The voltage will be approximately equal to the voltage in the on-board network. If the engine is not running, then there may be no voltage.
Usually the plus comes directly to the heater. The minus is supplied by the control unit. If there is no positive, you should check the circuits from the battery to the sensor. If there is no minus, then you need to check the circuit from the ECU to the sensor.
Heater check
You can check the functionality of the oxygen sensor using an ohmmeter. Very often the breakdown is associated with the heating coil or the wiring to it.
Replacing the lambda probe
If necessary, remove the engine protection.
The VAZ 2107 lambda probe is located in the exhaust manifold - the most running part of the car. This must be taken into account in your work. Before starting work, you must allow the parts to cool down to avoid burns. The next steps look like this:
- cut the clamps;
- remove the connectors;
- clean the connector left in the car (it will be reused);
- unscrew the oxygen sensor using a 22 mm wrench;
- screw in the new sensor;
- connect the sensor connector.
- After installing a new sensor, you need to check its performance as described in the previous part of the article.
What is a VAZ 2107 lambda probe: an injector and its components
In this article you will learn about perhaps the most interesting element of the car control system - the VAZ 2107 lambda probe (injector). This is one of the elements that began to be used in the control system of an internal combustion engine relatively recently. But what is it? Lambda is the Greek letter used by physicists to denote oxygen content.
Therefore, a lambda probe is nothing more than a device that allows you to see how much pure oxygen is contained in a mixture of gases (in this case we are talking about exhaust gases). The need for these metering devices arose at a time when Euro standards began to be applied, which regulated the amount of harmful substances in exhaust gases. Europeans have reduced the CO content in exhaust gas so much that now, roughly speaking, you can breathe directly from the exhaust pipe of a car.
Types of devices and principle of operation
This sensor is installed in the exhaust system. They come in two types:
And now about each of them in more detail in order to understand the difference and feel the advantages of one over the other. Two-point ones are made from a special type of ceramic. The sensor elements are coated with zirconium dioxide. The installation can be done either before the catalyst, or after it, or before and after. Depends on what type of control system is used. The higher the Euro standard, the more oxygen sensors are installed on the car.
The operating principle is based on the process of measuring the quantitative level of pure oxygen in the air (atmosphere) and in the exhaust gas. It is this difference in oxygen content that is important for engine operation. And now the standard situation is that the content levels are different. Consequently, the VAZ 2107 oxygen sensor (injector) begins to generate some voltage. Moreover, at a low oxygen content, the voltage will be the highest. And vice versa. A signal is sent from the sensor to the electronic control unit. The ECU operating algorithm specifies how much oxygen is contained in the exhaust gas if a certain current is supplied.
Wideband oxygen sensors have a more modern filling; they consist of ceramics. The design includes two main elements, one of which activates the process of pumping air out of the exhaust system. And the second ceramic element of the oxygen sensor is more similar to the previously discussed two-point one. The principle of operation is that air is exchanged between two elements of the broadband sensor. Of course, with such a lambda probe, the VAZ 2107 injection engine will work perfectly. But the price can scare him away - about 3500-4000 rubles.
Purpose and principle of operation of the lambda probe
Lambda probe mounted on the exhaust pipe
Strict environmental requirements for cars force manufacturers to use catalytic converters that reduce exhaust toxicity. But its efficient operation cannot be achieved without controlling the composition of the air-fuel mixture. Such control is carried out by an oxygen sensor, also known as a λ-probe, the operation of which is based on the use of feedback from the device and the fuel system with a discrete or electronic injection system.
The amount of excess air is measured by determining the residual oxygen in the exhaust gas. To do this, the lambda probe is placed in front of the exhaust manifold catalyst. The sensor signal is processed by the control unit and optimizes the air-fuel mixture, more accurately dosing the fuel supply to the injectors. On some car models, a second device is installed after the catalyst, which makes the preparation of the mixture even more accurate.
The lambda probe works as a galvanic cell with a solid electrode made in the form of ceramics made of zirconium dioxide doped with yttria, on which platinum is deposited, which acts as electrodes. One of them records readings of atmospheric air, and the second - exhaust gas.
Oxygen sensor device (lambda probe)
There are two types of λ-probe - broadband and two-point. The first type has higher information content, which allows you to more accurately tune the operation of the engine. The device is made of materials that can withstand elevated temperatures. The operating principle of all types of sensor is the same, and is as follows:
"Native" oxygen sensors
For VAZ cars equipped with an injection system, the following oxygen sensors are ideal:
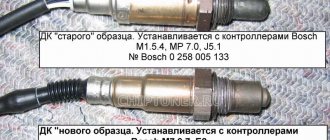
- For engines with a volume of 1.5 liters, complying with Euro-2 standards, they were equipped with a lambda probe manufactured by Bosch, number 0258005133. It was also used on cars that were compliant with the Euro-3 standard, directly in front of the catalytic converter.
- The second oxygen sensor is manufactured by Bosch with model number 0258006537. It has been actively installed on cars since 2004. The difference from the first lambda is that it has a special heater. This oxygen sensor can be installed on a car that was equipped with a lambda without a heater. But under no circumstances should you carry out a reverse replacement.
Why does the lambda probe on a VAZ 2107 break?
There are quite a few reasons why the VAZ 2107 oxygen sensor fails. In this case, the injector does not work correctly and does not behave as expected. Often, lambda probe failure occurs when low-quality fuel is used. If you fill up with gasoline that contains a large amount of lead, this will lead to rapid failure of the oxygen concentration sensor.
Often liquids get on the device itself - brake fluid, antifreeze, gasoline, water. This leads to microcracks appearing on it, which disrupt the entire operation of the device. Also, driving a car in which the fuel filters are clogged leads to rapid breakdown of the lambda probe, not only on the VAZ 2107, but on all others. When replacing the oxygen concentration sensor, you will have to install new fuel filters.
Of course, like any other device, the oxygen concentration sensor has a certain resource. And if it has served for a long time, and for it this is 3-5 years, depending on the mileage, then this device must be replaced. Mechanical damage occurs somewhat less frequently. This can happen both when the car is moving (for example, a stone bouncing off the wheel), and during unqualified car repairs.
Lambda probe sensor pinout table
Purpose
Color combinations for zirconium sensors.
How to check the lambda probe and signs of malfunction? Will a Bosch universal fit?
First of all, when the lambda fails and malfunctions, several tangible consequences appear in the car’s behavior:
Then, to check the lambda probe, you can first unscrew it and carry out a visual check (just as a visual check of the spark plugs can tell you a lot).
Several types of lambdas are installed on cars; the sensors can have one, 2, 3, 4, even five wires, but it is worth remembering that in any of the options, one of them is a signal (often black), and the rest are intended for heater (usually they are white).
What problems can you expect in the event of a breakdown?
Of course, certain symptoms begin to appear immediately. For the oxygen sensor on the VAZ 2107, as well as on other cars in which an injector is installed, this is expressed very specifically. The saddest thing for the driver is an increase (and a significant one) in fuel consumption. The car begins to “eat” gasoline with a very good appetite. The movement also occurs with jerks, as if the engine is “troubling” or sometimes it does not have enough air.
Consequently, engine performance deteriorates and the crankshaft speed may even fluctuate. In this case, the catalytic converter stops working in normal mode, therefore, in this case, you cannot even mention that your VAZ 2107 car meets any Euro standards. Because when testing exhaust toxicity, you will get very high CO levels.
Symptoms of malfunction
The main signs indicating a breakdown of the oxygen sensor are:
- Increased toxicity of exhaust gases;
- Unstable, intermittent acceleration dynamics;
- Short-term activation of the “CHECK ENGINE” lamp with a sharp increase in speed;
- Unstable, constantly changing idle speed;
- Increased fuel consumption;
- Overheating of the catalyst, accompanied by crackling sounds in its area when the engine is turned off;
- Constantly lit “CHECK ENGINE” indicator;
- Unreasonable alarm from the on-board computer about an over-enriched fuel assembly.
Replacing the oxygen sensor
This small guide will be useful not only to owners of VAZ 2107 cars, but also to more modern tens and fourteeners. Please note that all repair work is best carried out on a lift or inspection pit. Do not forget that the catalytic collector is located in the exhaust gas system. If necessary, dismantle the engine protection of the VAZ 2107. Next, look for all the wires that relate to the oxygen sensor.
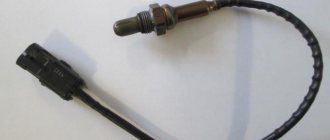
All clamps should be cut using wire cutters and the connectors should be disconnected. Moreover, it is advisable to thoroughly clean the one that remains on the machine from accumulated dust and dirt, since it will be used in the future. If the exhaust tract is hot, allow it to cool. Then, using a key with size “22”, unscrew the lambda probe. Screw the new device into place of the old one, tighten the nuts and connect the connection connector. The pinout of the oxygen concentration sensor is shown in the photo.
Do not lay wires too close to the exhaust pipe. They need to be secured with clamps to the elements of the cooling system. Finally, install engine protection on the VAZ 2107 and make a test drive to make sure the sensor is working. One of the problems that may arise during replacement is the sensor housing sticking to the exhaust pipe. In this case, penetrating lubricant can help (its price is about 70 rubles for a 200 ml container). If it does not help, then start the engine and warm it up. Try unscrewing the sensor while it is hot.
If this does not help, then let the system cool down, after which you heat only the sensor housing. You can even deliver several sharp but weak blows. And the very last method is to heat the body of the VAZ 2107 lambda probe to a high temperature and pour cold water over it. One of these methods should help to unscrew the oxygen sensor on the VAZ 2107. The price of a new device ranges from one to three thousand rubles.
How to determine a faulty oxygen sensor
There are a number of methods for checking the condition of the lambda sensor and its power/signal circuits.
What should be done first when diagnosing?
How to check a lambda probe video
Please note that normal operation of the oxygen sensor is only possible at its normal operating temperature of +300°C...+400°C. This is due to the fact that only under such conditions does the zirconium electrolyte deposited on the sensitive element of the sensor become a conductor of electric current. Also, at this temperature, the difference between atmospheric oxygen and oxygen in the exhaust pipe will cause an electric current to appear on the sensor electrodes, which will be transmitted to the electronic engine control unit.
Since checking the oxygen sensor in many cases involves removal/installation, it is worth considering the following nuances:
Accurate testing of the lambda probe
The most accurate way to determine the malfunction of the oxygen concentration sensor is to use an oscilloscope. Moreover, it is not necessary to use a professional device; you can take an oscillogram using a simulator program on a laptop or other gadget.
Diagram of correct operation of the oxygen sensor
The first figure in this section shows a graph of the correct operation of the oxygen sensor. In this case, a signal similar to a smooth sine wave is received on the signal wire. A sinusoid in this case means that the parameter monitored by the sensor (the amount of oxygen in the exhaust gases) is within the maximum permissible limits, and it is simply constantly and periodically checked.
Operating graph of a heavily contaminated oxygen sensor
Graph of operation of the oxygen sensor on a lean fuel mixture
Graph of operation of the oxygen sensor on a rich fuel mixture
Graph of operation of the oxygen sensor on a lean fuel mixture
The following are graphs corresponding to a heavily contaminated sensor, the vehicle engine using a lean fuel mixture, a rich mixture, and also a lean mixture. Straight lines on the graphs mean that the monitored parameter has gone beyond the permissible limits in one direction or another.
Replacing a lambda probe on a VAZ 2104, VAZ 2105, VAZ 2107
Welcome! Today we will be replacing the con sensor on injection vehicles VAZ 2104, VAZ 2105, VAZ 2107.
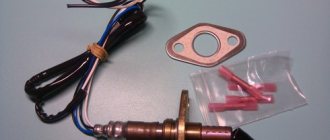
How much will it cost to replace a lambda probe on a VAZ 2104, VAZ 2105, VAZ 2107? 1) A new con sensor will cost you about 1300-2100 rubles.
When do you need to change the lambda probe on a VAZ 2104, VAZ 2105, VAZ 2107? The con sensor must be replaced if: 1) The engine's fuel consumption has increased. 2) And also if the engine has become less responsive.
What is needed to replace the lambda probe on a VAZ 2104, VAZ 2105, VAZ 2107? 1) Gloves. 2) Wrenches.