Determining faults
We identify a radiator malfunction. The first signal that there is a malfunction is the frequent pouring of antifreeze into the tank. In this situation, it is impossible to say for sure that the problem lies precisely in the radiator. The culprits may be the pipes or tap of the heating system. To isolate the option with a tap, it is enough to check the interior of the car for an unpleasant odor and drops of antifreeze on the floor covering. If there are none, the problem is definitely not in the faucet. To determine the condition of the pipes, gain access to them to visually inspect them. This way you will understand whether they are leaking or not.
If there are no problems as such, the problem lies in the radiator. The problem must be solved quickly enough, since antifreeze can get into the interior and ruin the carpeting.
Replacing the stove VAZ 2109 high panel replacement
Heater device VAZ 2109
The VAZ 2109 heater is made according to the classical design, without additional recirculation hoses and electronics. It consists of a radiator, heater motor, air blower, intake air duct and cabin air ducts with deflectors. The operation of the engine is regulated by a handle on the panel, where it is also possible to adjust the amount of external air supplied and the ability to distribute the flow of warm air along the contours of the air ducts.
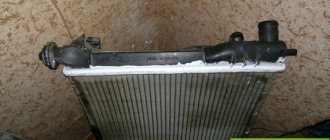
Most often, the heater radiator pipes and the radiator itself fail. A signal to replace it may be an antifreeze leak in the cabin, but this is not a definite verdict. It is quite possible that the pipes were to blame. they have the unpleasant property of leaking at the most inopportune moment, when it is 25 degrees below zero outside the window. But not only leaks can cause poor stove performance. Before removing the radiator of the VAZ 2109 heater, it is worth checking the intake air duct and making sure there is no debris and dust. The car does not have a cabin filter as such, so anything can get into the air duct. In this case, there will be insufficient air pressure and the heating will not work efficiently.
About the reasons for the malfunction of the VAZ 2109 heater
Air locks also became a fairly common occurrence during the first winter starts of the stove. Antifreeze simply does not circulate through the heating circuit, since it is blocked by an air lock. In this case, you need to take measures to remove the plug, and at the same time change the antifreeze and flush the cooling system for the company. It may happen that after 60-80 thousand, the amount of scale in the heater radiator simply does not allow coolant to circulate normally, in this case, if obvious symptoms of a malfunction are not visible, you need to make a decision depending on the mileage of the nine.
If the antifreeze still begins to leak, then first of all it is worth checking the heating system pipes. It's not as easy as it seems, but it's still better than removing the heater completely. In principle, even when replacing the stove radiator, it is recommended to change the hoses for preventive maintenance, so it’s worth buying them too. Since we are already in the store, then we will choose a suitable heater radiator.
How to choose a heater radiator 2109
All commercially available heater radiators are divided into three groups:
- Copper stove radiators. An excellent opportunity to tune the stove, because copper has good thermal conductivity, but the most valuable thing about copper radiators is that they can be restored. If you approach the process of repairing and cleaning a copper radiator correctly, it will last almost forever. I don’t dare call it expensive, because with a difference in price from the standard one of 500-800 rubles, the effect and subsequent operation will confirm its unconditional superiority over aluminum models. A copper radiator is a little heavier than an aluminum one, but compared to the junk that we constantly carry in the trunk, this is not weight.
- Aluminum heater radiators 2109. A good replacement for a copper-brass radiator if the replacement budget is no more than a thousand. This money will also include a lightweight aluminum radiator and pipes with clamps. The bad thing about aluminum models is that they are prone to corrosion, heat up quickly, but cool down just as quickly. Okay - price. For 800 rubles you can buy an average quality radiator, the only caveat is Luzar radiators. In terms of price, they are in the middle range, and the quality of the enterprise floats, as does the equipment. In addition, judging by the reviews, they tend to develop microcracks that are invisible to the eye, but the antifreeze, which will invariably evaporate from their surface all winter, will give the interior a unique aroma and the eternal mystery of “where does the antifreeze go.”
Replacing the heater radiator 2109 without removing the panel
The instructions say that it is necessary to remove the entire front panel, regardless of whether the panel is installed high or low. Of course, we won’t do anything like that. If the car has a high panel, it is enough to simply unscrew all the screws that secure it to the engine shield and the power elements of the body.
You can’t do it yourself, so you need either an assistant or a log of a suitable size. It (he) holds the panel at such a distance from the engine shield that the radiator, previously disconnected from the pipes, just passes.
The radiator passes between the glove compartment and the glove compartment, and the entire operation takes no more than an hour.
Therefore, just in case, keep a couple of logs of suitable size and a good stove radiator in the garage. Don't freeze in the cabin, have a successful and warm winter trip!
Progress
- Remove the lower console, which goes from the interior heating control levers to the gearbox housing.
- Move both front seats as far back as possible. If, in addition to the heater radiator, you also want to replace the faucet, then you will need to remove the plastic trim from the thresholds and lift up the carpet.
- File the magazine shelf under the glove compartment on one side; you can screw it back using self-tapping screws.
- After which you will see that you can easily remove the part into the resulting gap without any problems.
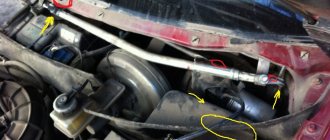
- Turn off the heater tap and prepare plugs that you will use as plugs and a container for the remaining coolant to prevent the remaining antifreeze that has accumulated in the radiator itself from spilling.
- Unscrew three bolts on each side of the radiator.
- Loosen only those clamps that fit directly to the radiator, but do not tighten them.
- Now the hardest part is that you need to drain the remaining antifreeze from the radiator. To prevent coolant from spilling on the floor, place waterproof mats or an old cloth under the faucet, at the front passenger's feet, and under the radiator.
- Pull off the pipes from the radiator, the first one to remove is the bottom one, which is located below on the tap; it is closed. Place a container and drain the coolant from the radiator. Keep the cork ready. About a liter of liquid may leak out. You may need to drain the liquid several times, so you will most likely have to plug the pipe with a plug.
- Remove the outlet pipe from the radiator, but do not lower it down, as coolant may pour out of it, keep it at the level of the attachment to the radiator. There is no need to drain the liquid, just plug the pipe with a plug.
- Now you can pull out the radiator itself.
- Replace it with a new one.
- Plug in the top outlet pipe.
- Then the bottom one.
- Tighten the clamps.
- If necessary, remove the air lock.
We recommend: How to unlock a VAZ seat belt?
High Panel Radiator Replacement with Dashboard Removal
Replacing the radiator on a VAZ-2109 with removing the dashboard will take a little longer than without, but the shelf for magazines will remain intact.
Progress
- Move the front passenger seat as far back as possible.
- Find the dashboard fasteners on the right and unscrew them.
- Pull the instrument console towards you and insert a spacer into the resulting gap; you can use a block of wood for these purposes.
- Close the heater valve and place rubber mats or old rags where coolant may leak.
- Open the hood and unscrew the expansion tank cap. To reduce pressure, close the lid.
- The radiator is located between the glove compartment and the lower shelf. To avoid spilling the coolant, perform all actions very quickly. In addition, you will need 2 rubber plugs or champagne corks to plug the holes in the hoses.
- Place your hands through the gap in the retracted instrument panel towards the part that needs replacing.
- Remove the lower pipe and immediately plug its hole with the thumb of your left hand, then insert the plug into the hose with your right hand.
- Drain the coolant from the pipe into a prepared container.
- Disconnect the heater element and replace it with a new one. Remove the part carefully: first lift it up, then move it a little and pull it down. This will make it easier for you to remove it.
About the reasons for the malfunction of the VAZ 2109 heater
Air locks also became a fairly common occurrence during the first winter starts of the stove. Antifreeze simply does not circulate through the heating circuit, since it is blocked by an air lock. In this case, you need to take measures to remove the plug, and at the same time change the antifreeze and flush the cooling system for the company. It may happen that after 60-80 thousand, the amount of scale in the heater radiator simply does not allow coolant to circulate normally, in this case, if obvious symptoms of a malfunction are not visible, you need to make a decision depending on the mileage of the nine.
If the antifreeze still begins to leak, then first of all it is worth checking the heating system pipes. It's not as easy as it seems, but it's still better than removing the heater completely. In principle, even when replacing the stove radiator, it is recommended to change the hoses for preventive maintenance, so it’s worth buying them too. Since we are already in the store, then we will choose a suitable heater radiator.
Replacement
Before you begin replacing the device, be sure to evaluate the condition of the new unit.
A mistake many people make is buying painted radiators. They may look more presentable, but in practice they have poor thermal conductivity. Moreover, the difference with an unpainted radiator is significant. Don't buy such devices.
Replacing the heater core can be done using two methods:
- With removal of the instrument panel;
- Without removing the dashboard.
Removing the panel makes the job easy and quite convenient. But you will have to spend at least 6-8 hours on this, depending on your level of preparation.
The second method does not require removing the panel, which makes the procedure more complicated. But it literally takes 2 hours to work.
Most car owners want to do everything quickly, but efficiently. The process of dismantling the panel takes a lot of time and requires careful fiddling with each fastener. Therefore, the best option for most is without removing the dashboard.
That’s why we’ll tell you about it in detail.
To work you will need:
- Ratchet;
- Set of heads;
- Set of screwdrivers (flat and Phillips);
- Container for draining antifreeze with a volume of 8-10 liters;
- Rubber gloves for protection;
- Spanners;
- Garage with a pit.
When everything is ready and you are ready to work, you can begin.
- Get into the hole under the car, having previously turned on the handbrake, placing supports under the wheels and removing the negative terminal from the battery. All in the name of safety.
- Drain the coolant from the radiator by unscrewing the drain plug.
- Next, after draining the antifreeze from the radiator, you will fill the container with approximately 2 liters. Let's move on to the drain plug on the engine. Antifreeze is drained in the same way as from a radiator. A hose with a diameter of 1 cm and a length of about 1 meter can help. All work on draining the coolant must be performed with the engine cooled down and wearing gloves.
- The plug for draining coolant from the engine is unscrewed with a 17 key.
- Loosen the pipe clamps and drain the remaining antifreeze from the stove system. Here you will have to lie down in the cabin with your head towards the engine, since the pipes can only be reached from the passenger side.
Dismantling process
- After draining the antifreeze, you can begin replacing the radiator itself.
- Remove the screws that hold the front panel in place.
- Unscrew the fasteners located on the rear wall of the glove compartment.
- You also need to remove the screw, which you will find near the side mirror on the passenger side.
- Once these fasteners are removed, the front panel will move freely up and down on the passenger side.
- To make your work easier, lift the panel as high as possible and insert something like a wooden block into the resulting gap. Usually you need a stopper about 7 centimeters thick.
- Lie on your back on the floor on the passenger side, unscrew the three fasteners that hold the heater in place. Get her out. The radiator has been removed.
- Apply a rubber seal to the new unit and insert the device in place of the old radiator. Don’t forget to clean the unit’s landing site first.
- Reassemble the unit.
- Fill the system with old or new coolant. This is an excellent reason to change the antifreeze if the old one has been in use for a long time.
Removed device
Antifreeze should be added sequentially. First add fluid to the reservoir up to the MAX mark. After this, you need to start the engine so that it runs for about 15 minutes. The antifreeze level will drop, and you can add the missing amount.
The work is completed. The old radiator is recycled, the interior is tidied up and you can enjoy the result.
Choice
When choosing a new radiator for the stove of your VAZ 2109, you should understand what exactly you want to achieve and what budget you have.
Today, consumers are offered two types of units to choose from.
| Radiator type | Peculiarities |
| Aluminum | A relatively inexpensive radiator option, which is characterized by high thermal conductivity. However, such a device cannot be repaired, which is its main drawback. But in practice, repairs are not carried out so often, so few people pay attention to this disadvantage |
| Copper | If necessary and a leak is detected, the copper radiator can be repaired - soldered. Thermal conductivity indicators are slightly higher when compared with aluminum analogues. But at the same time, the price is quite high - both for repairs and for the radiator itself |
Aluminum unit
Due to unprofitability and high cost, most VAZ 2109 owners choose aluminum radiators. But it all depends on your personal decisions and preferences. When actively using a car in harsh winter conditions, a copper radiator is fully justified.
Copper unit
We recommend: Everything about replacing the cylinder head gasket on a VAZ 2112 car
Which heater radiator for the VAZ 2109 is better
The VAZ 2109 comes from the factory with an aluminum radiator from DZA LLC (DAAZ). Catalog number - 2108-8101060-00. The average price of the original is 870 rubles. Analogues of other brands are also mostly aluminum and at the same level in quality. They can differ from the factory one only in whether there is a sealing foam tape or not. It must be glued around the perimeter before installation. Without sealing tape in winter, cold air will flow through the gaps around the radiator and as a result the heater will blow cold air.
Copper is offered only by the Orenburg Radiators company, its quality and heat transfer are slightly better, but it is more expensive. Therefore, focus on your budget. The list of the most popular analogue brands with their article numbers includes those listed in the table.
| Name | vendor code | Estimated price for 2021 |
| Orenburg radiators | 1102-8101.100 | 1700 RUR |
| PRAMO | LR2108.1301012 | 480 RUR |
| Baker | 2108-8101060 | 850 RUR |
| LUZAR | LRh 010 | 820 RUR |
| OberKRAFT | KT-104005 | 680 RUR |
Products of the brands “Orenburg radiators”, “DAAZ” and “PRAMO” do not have sealing foam in the set.
Of the options considered, self-adhesive tapes are available in the following sets: “Pekar”, “LUZAR” and “OberKRAFT”. Also, before buying a new radiator for nine, pay attention to the distance between the plates.
The smaller it is, the better the stove will heat. For example, in DAAZ products the plates are installed much closer to each other than in PRAMO brand radiators.
Step-by-step process for replacing a stove radiator
So, how to replace a radiator using the example of a VAZ-2109? The work can be carried out using two methods – with removal of the dashboard and without dismantling the device.
The first option involves an easier process that will take about 6 hours. In the second, everything will be somewhat more complicated, but the time spent will not exceed two hours. It's quick or easy - it's up to you. We will tell you how to replace it without disassembling the car dashboard.
To get started, prepare the following tools:
- two screwdrivers - cross and flat;
- ratchet with a set of heads;
- any container with a volume of up to 8 liters so that the coolant can be drained;
- rubber gloves to avoid chemical burns;
- spanners.
It is recommended to carry out work in a garage with an inspection pit.
After everything is prepared, you can begin replacing the heater radiator on a VAZ-2109 car. Following our recommendations, the process will not seem so difficult.
Let's start:
- Put on gloves and climb into the inspection hole. Unscrew the radiator cap and drain the liquid into a container. To simplify the process, take a hose 1 m long and 1 cm in diameter.
- After all the liquid has been drained, it should be about two liters by eye, it is necessary to drain the coolant from the engine cooling system. To do this, just find the appropriate plug on the engine and do everything in the same way as with the radiator. The button is unscrewed using a key with a diameter of 17 mm.
- At the next step, the pipes of the clamps are lowered and the remaining antifreeze is drained from the heating system. To do this, you need to get to these nodes from the salon and carry out this procedure. It's easier to do this from the front passenger seat.
- After draining all the antifreeze, proceed to dismantling the radiator. First, remove the screws that hold the front panel in place.
- The next step is to remove the screw on the back wall of the glove compartment and the screw located next to the passenger side rear view mirror.
- Once all the screws are removed, the front panel should move up/down freely. To simplify the work, lift it up to the maximum and place a 7 cm block under it.
- Place your back on the passenger seat mat and unscrew the 3 screws that hold the heater in place and remove it.
- At this stage, cover the new radiator with rubber band and put it in place. Be sure to clean this area before installation.
- Final step: Reassemble the entire system in reverse order. This should no longer cause additional difficulties.
We recommend: Oil leakage from under the crankshaft oil seal: causes and troubleshooting
Replacing the radiator on the low panel
The progress of work on replacing the heating system of cars with a low dashboard is similar to models with a high one. However, replacing the radiator does not require moving or removing the front seats.
Also, before starting work, be sure to remove the cover from the steering wheel so as not to damage it when bending the instrument console. The most reliable replacement option is a copper stove radiator; it is the most expensive of all existing ones, but it is the most reliable and in case of damage or leakage, it can be repaired by soldering the resulting hole.
When removing the heater radiator on a VAZ-2109, do not forget about safety, the coolant is hazardous to health, try to protect your hands with at least gloves, and wash them thoroughly after work. If you have doubts that you will not be able to cope, it is better to seek help from a car service center. But it’s much more pleasant to figure it out yourself and save a couple of thousand rubles.
Basic faults
As a rule, a heater failure occurs due to the fact that its electric motor stops functioning. There are several reasons for this:
- combustion of the fuse link;
- breakage of the electrical circuit wires responsible for its operation;
- switch failure.
In the first case, the faulty protective device must be replaced.
If the new fuse burns out, you need to find out why this is happening. Most often this happens if there is damage to the insulation of the wires or their separation from the connecting terminals. The electrical circuit is tested with a multimeter, and if a defect is detected, it is eliminated. The regulator, in turn, usually does not work properly when its contacts burn out. A broken pusher also causes a similar result. The serviceability of this element is determined by measuring the voltage at its side contacts. Its presence when switching the toggle switch indicates operability. Otherwise, this unit will need to be replaced.
In addition, the motor itself may fail. The most common reasons are:
- breakage of armature winding wires;
- brushes sticking;
- collector oxidation.
If eliminating these causes does not correct the problem, then the engine is completely changed.
Sometimes a malfunction occurs due to a break in the wires supplying the mounting block or due to a burnout of the current-carrying track in it.
And finally, destruction of the resistor circuit may also occur - it is checked and the element that has become unusable is replaced with a serviceable one.
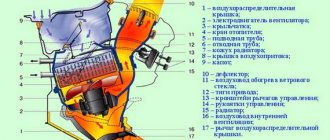
Principle of design and operation
- The stove includes a pair of plastic casings (left, right). They will be connected to each other with brackets around the perimeter. For sealing, a harness is placed in the grooves of the casings.
- An electric heater fan forces air inside the cabin. It is held in place by a pair of screws on top of the stove. The heater is designed in such a way that the fan can be easily removed through the engine compartment.
- An electric motor is attached to the fan casings. On its shaft there is a fan impeller with three speeds. This is possible due to the two coils of the resistor. To obtain the required wheel speed, there is an additional resistor. It is attached to the hole in the heater casing on the left.
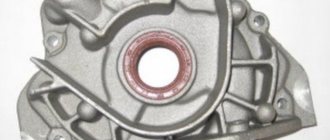
- The radiator is located in the heater casings. Mounted to the right one using 3 fasteners and sealed with a polyurethane gasket. The radiator consists of two rows of tubes, cooling plates and plastic tanks. Also two.
- The heater valve consists of a housing, two pairs of pipes and is connected to the cooling system using rubber hoses.
- The liquid circulates through the radiator due to the operation of the cooling system pump.
- On the supply line in the heater faucet body, there is a faucet valve on the axis (it is plate-type), which has a hole for the passage of cooling liquid.
- The valve lever of the faucet is connected to the handle lever by a rod. The handle is responsible for controlling air heating. When the lever is turned, the valve hole opens the line and liquid begins to flow into the radiator.
- The stove is controlled using three handles. Their levers are located on the axes of a plastic bracket secured to the instrument panel with 4 screws.
- The heating control handle acts on the faucet lever by means of traction and on the damper drive lever. By moving the handle completely to the right, the valve and damper will fully open, and air will begin to flow with the help of a fan through the radiator, where the heated coolant is circulated.
- In the middle position of the handle, the valve and tap move to an intermediate position. Some of the air goes through the radiator, and the other part goes past it. This effectively ensures the degree of air heating required by the user at a given moment.
- If the handle is in the extreme left position, the valve and tap are completely closed. As a result, the air flowing into the cabin is not heated.
- The upper left handle is responsible for adjusting the air supply to the legs of passengers and the driver. It is connected to the damper lever by means of traction.
- By moving the handle to the left, the footwell heating flap opens and air flows through the casings into the corresponding windows.
- On the left and right, air is supplied to the feet of the front passenger and driver. Interior ventilation ducts allow air to be delivered to the rear passengers' feet.
- The handle that regulates the air supply to the windshield is connected to the drive lever for the heated windshield flap using a rod. It can close or open the path for air to pass through the ducts to the glass.
- To provide air supply to passengers and blow off the side windows of the car, the design of the stove provides 4 nozzles - a pair of central ones, left and right. The body of each of them is equipped with a damper with a seal. By closing or opening the damper, you regulate the intensity of air supply. Plus another lever allows you to control the direction of the air coming from the nozzle.
- The VAZ 2109 is equipped with an exhaust or exhaust ventilation system. With its help, air is sucked out of the cabin. In the case of the nine, the hood is located behind the body openings for the side windows. The exhaust also occurs through the vacuum that occurs at the deflectors while the car is moving.
If problems arise with the operation of the stove, you can visit a car service center. Either there is another option - remove the stove yourself and try to repair it, or entrust the work to specialists. In any case, by dismantling the device yourself, you will save a lot of money and gain important experience.
To remove the stove, follow the following algorithm.
- Loosen the tension on the clamps and disconnect the pair of hoses from the faucet connections. To do this, you will first need to remove the dashboard from inside the cabin.
- Loosen the clamps and disconnect the hoses from the stove tap pipes. Here the work is already done through the engine compartment.
- Unscrew the heater tap mounting nuts.
- Remove the tap from the front panel.
- Remove the heater tap rod holder.
- Disconnect the rod and valve lever.
- Remove the boot that protects the gear lever.
- Remove the floor trim.
- Unscrew the floor covering fastener at the rear.
- Remove the tunnel lining on the floor by sliding it backwards.
- Remove the internal ventilation air duct and disconnect it from the heater body.
- Disconnect the wires coming from the heater motor.
- Disconnect the wiring from the resistor.
- Unscrew the fastening nuts to the right of the stove.
- Remove the remaining fasteners and remove the stove, taking the control panel with you.
Dismantling work
Further actions directly depend on the level of your training. For beginners, it is better to take the dismantled stove to specialists. If you have a good understanding of your VAZ 2109, you can try to carry out repair work yourself.
The stove is a complex but very important component in a car. Therefore, it is always necessary to monitor its functionality and detect malfunctions in time. It is unlikely that you will want to be left without heat in the cabin in winter.
Tap selection
Before you begin replacement, it is important to select a new, high-quality faucet that can reliably serve the heating system of your VAZ 2109.
Factory
Crane type
Peculiarities
This is a standard type of faucet that the VAZ 2109 is equipped with from the factory. Its main advantage is its affordable price. As for the reliability and frequency of jamming, here we are talking about obvious shortcomings. It is worth taking such a faucet as a replacement only if you could not find others
It is more expensive than the factory device, has high strength, but its throughput is lower compared to the third option. Low throughput rates can lead to the fact that the efficiency of the stove in winter will leave much to be desired
Excellent throughput, high reliability and durability. Alas, even such faucets turn sour, although their prices are higher than their analogues
Ball
Troubleshooting
To find the source of a leak in the heater radiator, pay attention to the following points:
- The primary sign of a leak in the interior heating system is an increased frequency of adding antifreeze to the expansion tank. At the same time, it is impossible to guarantee that the problem is in the radiator itself;
- Examine the condition of the heater valve and pipes;
- If the culprit is a faucet, it is not difficult to determine . If there are no unpleasant sweetish odors inside the cabin and the floor is not covered with traces of coolant, then this is definitely not it. The presence of such signs indicates that the stove tap needs to be replaced;
- The presence of deformations and cracks in the pipes can only be determined by visual inspection. Therefore, dismantling work will have to be carried out;
- Having discarded the options with pipes and tap , there is only one option left - damage to the heater radiator itself.
You should not delay repairing the radiator, since this will first lead to the need to spend extra money on antifreeze (moreover, you yourself will breathe in the antifreeze vapors, which can lead to poisoning). A liter of coolant costs about 100 rubles. And over time, the problem will worsen, antifreeze will fill the interior, begin to corrode the floor covering, and cause a lot of other troubles.
Design of the VAZ-21099 heater
And then everything is simple: the created flow passes through the radiator honeycombs, where heat exchange occurs, as a result, heat is transferred to the air, which then blows into the required zones through the air ducts.
The design of the VAZ-21099 stove includes several main components:
- stove body made of plastic;
- heating system radiator (connected to the cooling system);
- electric fan;
- air ducts;
- heater control mechanism.
This car used heaters of two modifications (old and new), which were slightly different in design, but their components were completely identical.
Housing, radiator, dampers
Thanks to the housing, the required redirection of heating is ensured, since the movement created by the fan motor is immediately fed into it, rather than being dissipated. The body of the VAZ 2109 stove itself consists of two halves, connected to each other with special brackets. To reduce flow losses, a seal is placed between its halves. Partitions are made inside both halves, which provide the correct direction.
There is also a niche inside this case into which the radiator is installed. Initially, the radiator was made of brass, but now it is almost always made of aluminum. The design of the stove radiator 2109 is identical to the main one (consists of two tanks, tubes through which coolant circulates, and plates that form honeycombs), but is significantly smaller in size.
Video: The stove in the VAZ 2108, 2109, 21099, 2110, 2111, 2112, 2113, 2114, 2115 HEATS poorly
Air is blown through the stove dampers, also installed inside the housing. These elements are movable, and thanks to them it is possible to close some and open other air ducts. There are three of them in total - the main one (heater control), an air duct that redirects between the foot area and the supply to the cabin, and a damper for supplying flow to the windshield.
Additional flaps are installed on the side and central deflectors. It turns out that by default, air from the housing constantly blows onto the deflectors and this is done so that the flow always has an exit. Thanks to the existing dampers, it is possible to provide simultaneous supply of hot air to several zones at once (the interior and the windshield or the windshield and the footwell area).
The main heater damper provides air flow to the radiator or bypasses it. This is all done because the heater also plays the role of a forced ventilation system for the interior. This allows for a supply of cool air in the summer. And to do this, you just need to redirect the movement bypassing the heat exchanger, and the supply of heated coolant to the radiator itself will stop. To disconnect the heat exchanger from the cooling system, a heater tap is used, which is located on the supply pipe in front of the radiator.
Fan
The air flow is created by a squirrel wheel fan driven by an electric motor. These two elements are enclosed in their own separate housing, installed on top of the heater housing. Moreover, it is structurally designed to provide the easiest possible access to the electric motor, since it is considered one of the weakest components of the system.
The design provides three modes of fan operation. This allows you to select optimal air supply conditions (cold or hot).
Control mechanism
Video: Useful tips for cars. Why does the VAZ stove not work?
To control the stove and redirect air movement and open and close the coolant supply valve, a control mechanism located on the center console is used. It consists of a three slider mechanism and a fan operating mode switch.
The lower slider is the main one, since it changes the system mode (heating or ventilation). It controls two elements at once - the main damper and the tap. When this slider is switched to the “ventilation” mode, the tap and damper are simultaneously closed, which ensures air movement bypassing the heat exchanger. And everything is exactly the opposite - when you switch it to the “heating” mode.
The remaining two sliders control two other flaps - supply to the windshield and to the foot area. For example, when moving them to the center (the left slider goes all the way to the right, and the right slider goes all the way to the left), the air duct for the footwell area will be closed, and the one leading to the windshield will be open. When these sliders are moved to the edges, hot air blows into the legs (and the supply to the central deflectors is also cut off).
The connection between the slider and the valves and the tap is carried out using cables. Moreover, two cables connect to the main slider at once, since it simultaneously opens and closes the valve and tap.