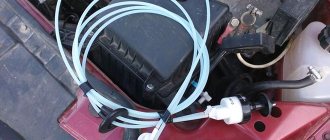
I had a little trouble. The pump is leaking. This creates several troubles - antifreeze runs out, the engine makes noise. And, the most dangerous thing, if the pump bearing becomes skewed or jams, the timing belt will be affected. And then, you yourself understand what the consequences are. I read a lot before the replacement: that, they say, there will be a lot of removal there. It was decided to disassemble and navigate the work independently. For convenience, I removed the adsorber without disconnecting the wires and hoses and pulled it to the side. Then I removed the plastic cover from the engine and the timing belt cover.
Next, let's jack up... We hang up the right front wheel. This is necessary in order to put everything on the marks. By the way, for convenience, I made one mark... with white paint, which is very helpful in the future. Photo below. In the end, you will have to remove the wheel, because only from below you can get to the lower bolt securing the inside of the plastic casing. And now ATTENTION))) The condition of the timing belt was excellent... Therefore, it was decided not to remove either the timing belt, or the generator drive belt, or the generator drive pulley. Which saved us a lot of time. But you still need to remove the plastic casing, which means you need to remove the camshaft pulleys and rollers. Actually, this is not difficult, we loosen the tension rollers and remove them and the timing belt. Then we use something flat to place a spacer between the camshaft gears... and unscrew them. Be careful, the teeth themselves are very soft, so only push into the teeth, not lateral pressure.
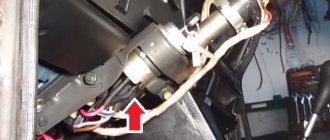
We removed the pulleys... now we unscrew the plastic casing itself (one fastening bolt will have to be unscrewed from below, from the cavity of the wheel) and finally we get to the pump.
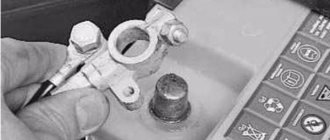
The pump itself is screwed on with three hexagons. We unscrew them... and gently tapping on it, we begin to pull it out... antifreeze will begin to flow... we substitute the vessel along the way so as not to make dirt. As it turned out, I got home by miracle))) The pump bearing was so damaged... there was both axial and lateral play... about 4 - 5 mm. In short, it was hanging unrealistically))) Now we take a new pump (check for the presence of lubricant in it), if the gasket is paper, then lubricate it with sealant, a thin layer... and let it dry for 5 - 10 minutes. Yes yes... the sealant should always dry out a little.
Now we put everything back together in reverse order. We install the pump... We install the plastic casing... We install the camshaft pulleys... And now we need to put on the timing belt. In the photo you can see the mark that I made on the crankshaft pulley (circled in red)... there are marks on the camshafts. We combine everything and put on a belt, nothing complicated.
We turn the engine by the wheel a couple of times, adjust the position and tension of the belt if necessary, and assemble further. At this stage, you can check the operation of the engine.
Then we put on the cover, the adsorber... we put the wheel in place... that's all)) This work took about 3 hours.
Many people write on the Internet that you can remove the pump without removing the plastic casing - this is not true! Be sure to remove it... here's the pump mount in the photo... you can unscrew it, but you won't be able to pull it out.
I'm happy with the work!
https://www.drive2.ru/l/444340/
VAZ cars of the tenth family (VAZ 2110, VAZ 2111, VAZ 2112, as well as all their modifications) are considered classic vehicles for the majority of Russian residents. At the same time, both the cost and ease of maintenance of the machines allow them to be used both for private use and for commercial purposes. But in the VAZ 2110/2112 there is one unit, the importance of which most car enthusiasts may not even be aware of. We are talking about the cooling system pump.
DIY diagnostics and replacement of the pump on a BAZ 2110
The water pump plays an important role in the “life” of the engine. Thanks to the pump, coolant can circulate freely throughout the cooling system, thus removing temperature from heating engine parts. A faulty water pump can cause the engine to overheat and completely damage it. In order to prevent this from happening, it is necessary to monitor the condition of the pump and its performance. A faulty water pump makes itself felt by the following symptoms:
- Leaks in the oil seal area.
- Humming noise during operation.
- Poor coolant circulation.
- Increased engine temperature.
- Coolant level drop.
To make sure that the pump is faulty, perform a few simple tests:
- Warm up the engine to operating temperature, then compress the upper radiator hose. If at the same time you feel that liquid continues to circulate in the system, you can conclude that the water pump is working.
- Listen to the pump for a hum; if you feel a hum, the bearing is most likely “dying.” It’s better not to wait for this to happen and replace the pump to avoid big troubles.
I recently replaced the pump because it was out of order, which I realized from the howling sounds. Today I want to tell you about how to replace the water pump of a VAZ 2110 with your own hands without removing the generator drive.
Do-it-yourself replacement of the VAZ 2110 pump - step-by-step instructions
1. First of all, I decided to remove the adsorber for the convenience of doing the work without disconnecting the wires and hoses.
2. Next, you need to remove the plastic casing from the engine, as well as the timing belt casing.
3. Now take a jack and jack up the right side of the car, your task is to hang the front right wheel. This is done in order to put everything on the tags. For convenience, I decided to make one mark using white paint; later, believe me, this was very useful.
4. No matter how much I wanted to, I still had to remove the wheel, because I needed access to the bottom bolt securing the plastic casing.
5. The timing belt is in excellent condition, so there is no point in changing it. In addition, I decided to try replacing the pump without removing the alternator drive belt. As it turned out later, this was a good idea that saved a lot of time.
6. However, the plastic casing, and with it the pulleys with the camshaft rollers, still had to be removed. To do this, you need to loosen the tension rollers, then remove the timing belt from them.
7. Next, you need to stop the camshaft gears with something flat in order to unscrew them. Be careful, the teeth are quite soft.
8. When the pulleys are dismantled, you need to unscrew the plastic casing itself. The unpleasant thing is that one fastening bolt will need to be unscrewed from below, through the space near the wheel. Now we can say that we have reached the pump.
9. The VAZ 2110 water pump is secured with three hexagon mounting bolts. Unscrew them, then lightly tap on its body and try to pull it out.
10. Place a container for coolant and be careful not to get wet.
11. Take a new VAZ 2110 pump and make sure that it has a sufficient amount of lubricant. Also, I recommend applying a thin layer of sealant if you have a paper gasket. Let it dry.
Replacing the VAZ 2110 pump - assembly
Assembly is traditionally done in reverse order.
- Reinstall the water pump.
- Install the plastic casing.
- Secure the camshaft pulleys in their places.
- Put on the timing belt.
- Using the previously marked marks on the camshaft, align and put on the timing belt.
- Turn the engine with the wheel, adjust the correct tension and position of the belt. When everything is installed, add antifreeze (or any other coolant) and you can check the operation.
Replacing the water pump took me 3 hours, everything works fine, the problem is fixed
Thank you for your attention, those who wish to add can do so using the comments
Major liquid pump failures
Signs of a pump malfunction are as follows:
- The appearance of a hum or rustling sound in the area of the gas distribution mechanism drive.
- Presence of coolant leakage in the area of the pump seat.
- Mechanical damage to the timing belt (eating of teeth, delamination or cracking).
The most common failure is bearing failure. Occurs due to excessive wear. But often the bearing fails due to the fact that the timing belt is tensioned with excessive force.
If you find a bearing failure, immediately replace the entire pump; it will not last long. The total resource of the liquid pump is 50-60 thousand km. The timing belt serves the same amount of time. But sometimes replacement is required even at lower mileage - if the first signs of breakdown begin to appear.
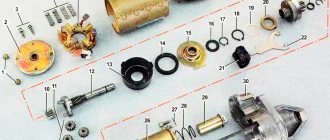
Necessary materials
Replacing the timing belt VAZ 2110 8 valves
Before you begin installing an additional pump on a vase, you must purchase all the necessary materials. The list of required materials includes:
- electric pump from a Gazelle car. This part will act as a pump;
- a relay with slightly open contacts (an ideal option would be a relay from a VAZ 2108);
- reinforced hose, at least 1 meter long;
- hose clamps (at least 5 pieces);
Pump installation
To install an additional pump on a VAZ 2110, you need to crimp the pipe coming out of the stove. This will help prevent antifreeze from leaking. However, experts believe that it is best to completely drain the antifreeze from the system. When the work space is cleared, you need to take the pipe and cut out a part from it that will correspond in length to the length of the pump. At the same time, the length of the fittings themselves should not be taken into account, since they will fit into the pipes.
If, for certain reasons, the outer diameter of the fittings does not coincide with the inner diameter of the nozzles, you will have to use adapters or select a pump of the appropriate diameter for installation. The second option is often more practical, since each adapter represents a potential leak point.
In order to increase the level of efficiency of the device, it is necessary to remove four screws from the part and remove the upper housing. The internal gasket of the pump must be carefully treated with sealant and the entire part must be reassembled. But re-fastening the housing is best done using long bolts and nuts. This way you can provide the future pump with greater tightness.
Installation location
The driver of a VAZ 2110 car can choose where exactly to install the pump independently.
But when choosing a location, one basic requirement must be met - the pump must be connected to exactly the hose that leads to the stove radiator. If you connect the pump to the wrong hose, it can be seriously damaged. There are enough studs under the hood of the VAZ 2110 to install a pump and therefore there will be no problems with its placement. Next, you need to turn on the additional pump. Power will be supplied from the recirculation valve. The connection diagram consists of several stages:
- The white and white-yellow wires must be disconnected from the recirculation valve. The first wire is connected to the relay contact number 85, and the second is number 30. Contacts 30 and 86 are connected using a jumper;
- pin 87 is connected to the pump wire. To check the operation of the pump, you need to connect the ground. If the ground rotates, then all connections are made correctly.
Connecting the pump
When connecting the pump, be sure to set the switch. If the device operates in forced mode without the ability to turn off, in the summer it will be unbearably hot inside the car. An O-ring must be installed around the perimeter of the switch, which will hide the place of its contact with the body. The negative wire will be connected directly to the pump, past the switch, and the positive wire will go through it. Thanks to this device, an additional pump for the VAZ 2110 can be connected only as needed.
What will happen if you don't replace your pump in a timely manner?
But if you do not replace the VAZ-2110 pump (8-valve injector) in a timely manner, you can get the following consequences:
- Broken or damaged timing belt. More serious repairs will have to be carried out, since very often the integrity of the valves or even the cylinder head is compromised. Sometimes even the pistons become unusable.
- The engine heats up excessively, the integrity of the rubber elements - pipes, gaskets - is damaged, the cylinder head gasket, valve cover, and piston group components are destroyed.
The price for replacing a pump on a VAZ-2110 (8 valves) in workshops is about 1500-2000 rubles. The more complex the repair, the more expensive it is. If the timing roller and belt need to be replaced, the cost increases.
It is worth noting that you can replace the pump on the “ten” yourself, this will not cause any difficulties.
Why do you need an additional pump on the VAZ-2110?
Replacing the VAZ 2110 thermostat yourself
Very often, owners of domestic cars wonder about installing an additional coolant pump. As a result of the operation of two pumps, the efficiency of the heater at idle speed of the internal combustion engine can be significantly increased. And if before this the stove blew only warm air at 1000 rpm, then after the upgrade a hot stream will flow into the cabin. In addition, when moving in the coolant system, the pump will provide good circulation, which could not be achieved with a single pump.
The installation of an additional coolant pump is especially important for car owners living in northern latitudes, where there is a significant lack of heater power at an outside temperature of minus 20-25 degrees Celsius.
And since our cars are not able to properly heat the interior in such a winter, installing a second pump is the only effective way to improve the situation. By the way, this technology has long been practiced on BMW and Mercedes cars. So with an additional pump, your iron friend will be one step closer to a foreign car.
So, we found out how the pump is dismantled. The VAZ-2110 and its “brothers” models 2111 and 2112 have a similar design of the coolant system, so this instruction is relevant for all cars of this family.
15 Signs Your Current Job Isn't Right for You Has your job stopped bringing you joy for a long time and leaves you feeling like you're stuck in a vast plateau? In fact, there is a way out of any situation.
13 signs that you have the best husband Husbands are truly great people. What a pity that good spouses don't grow on trees. If your significant other does these 13 things, then you can s.
What is it like to be a virgin at 30? I wonder what it’s like for women who didn’t have sex until almost middle age.
7 Body Parts You Shouldn't Touch with Your Hands Think of your body as a temple: you can use it, but there are some sacred places that you shouldn't touch with your hands. Research showing.
These 10 little things a man always notices in a woman Do you think your man doesn’t understand anything about female psychology? This is wrong. Not a single little thing can be hidden from the gaze of a partner who loves you. And here are 10 things.
20 photos of cats taken at the right moment Cats are amazing creatures, and perhaps everyone knows this. They are also incredibly photogenic and always know how to be in the right place at the right time.
Which pump to choose
There is no need to save money on purchasing the main coolant unit. Today the market is saturated with various types of pumps, with any pricing policy. For VAZ 2110 car owners who decide to replace the pump with their own hands for the first time, auto repair shop experts recommend paying attention to branded manufacturers such as: KolbenShmidt, SKF, GRAF, HEPU, Valeo, Quinton Hazell. It is not recommended to install: FEBI, Dolz, RUVILLE, Airtex, Pex.
How to check the pump on a VAZ-2112 16 valves photo and video
Replacing the timing belt and pump on a Priora
The pump is a special device equipped with centrifugal blades on one side and a toothed pulley on the other side. It is driven by a timing belt through a crankshaft pulley, causing the blades to rotate and drive coolant through the system.
The video describes the detailed process of diagnosing and checking the pump:
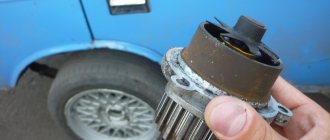
Pump design
Let's look at the water pump up close!
- This device is located in a housing made of aluminum, inside which a roller rotates in a double-row bearing, the lubricant of which is sufficient for the entire period of operation of the pump. The outer ring of the bearing is locked with a screw.
- The toothed pulley is pressed into the front of the roller, and the impeller is pressed onto the reverse side. The impeller is also secured with a retaining ring made of graphite-containing materials.
- Such a one-piece design of the device will not allow repairs. And when a pump malfunction is detected (play, etc.) - only replacement.
Car behavior with a faulty pump
When the pump is faulty or its operation occurs with some difficulties in the operation of the engine, changes may also be observed:
- Poor circulation of coolant, as a result of which the car heats up faster and cools slower.
- The coolant level drops.
- Bearing noise in the engine compartment.
Signs of a fake pump. This is clearly not the famous Gates
Pump performance test
In order to make sure that the pump is fully operational, you can perform one very simple test. To do this, you need to warm up the engine to operating temperature, and then touch the upper radiator pipe. So, if the liquid circulates properly in the system, you will feel it with fairly intense movements inside.
Reasons for pump failure on a VAZ-2112
The main signs of a pump malfunction are as follows:
The main reason for pump failure is play on the drive pulley of the entire structure, because of this the pulley begins to simply dangle. This directly indicates wear of the internal bearings and rapid failure of the entire pump as a whole. Such a defect is very easy to detect by touch, and with the timing belt removed, turn the pump pulley by hand and swing it in one direction or the other. If there is play on the pump, you will feel it immediately.
The presence of play is the reason for replacement.
A characteristic hum or crackling noise during pump operation will certainly indicate bearing malfunctions.
What can happen due to pump play?
Such behavior of the bearings can negatively affect the condition of the timing belt, since during such unstable operation it can rub against the tension roller.
The timing belt rubs against the pump body, soon it will become unusable and there will be a break. And here it depends
And in the end result, it may simply tear or fly off the pulleys, which can end very unpleasantly due to the impact of the valves on the pistons. So choose your pump wisely!
Please note that if you do not observe any play on the pump, and there are obvious signs of wear on the belt, then do not skimp and replace the pump
What do coolant leaks mean?
Also, when the pump wears out, there may be traces of coolant near the drain hole located at the bottom of the pump. Operating a vehicle with such malfunctions is also not recommended, as it can lead to engine overheating and further failure.
conclusions
In order to verify for yourself that the old pump is worn out and how it differs from the new one, simply take the old and new element and rotate the impeller on them in turn.
Comparison of the operation of the old and new pump. Check for play and ease of rotation.
You can clearly see from your example that on the old element its rotation will occur with interference, while on the new element it will not be necessary to exert excessive effort.
Pump location
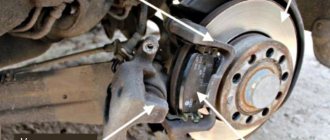
On the VAZ 2110/11/12 the water pump is located on the cylinder block on the right side. This is due to the design features of the gas distribution mechanism, since the impeller begins to rotate only after the engine and timing belt are started. That is, the design of the gas distribution mechanism initially involves the use of a pump.
The water pump is part of the timing mechanism and is installed on the right side of the cylinder block
Replacement
Having purchased a new coolant pump, you can begin the replacement procedure.
The VAZ 2110 works in conjunction with 8 valve and 16 valve power units. Despite there being a certain difference between them, the pump replacement procedure is identical.
Dismantling works
The instructions below are relevant for dozens with two types of motors.
- Place the car on a level area above a hole or on an overpass.
- Lift the hood, remove the negative terminal from the battery, which will turn off the power to the car.
- Unscrew the cap of the coolant expansion tank. This will relieve excess pressure in the system.
- Now get down under the car.
- Place a clean container with a volume of at least 5 liters under the cylinder block.
- Unscrew the coolant drain plug using a 13mm wrench, which will allow you to drain the coolant. Be careful, unlike oil, you need to drain the coolant when the engine is cool.
- When all the coolant is out, screw the plug back into place.
- Using a 10mm wrench, unscrew the three mounting bolts that hold the timing case in place.
- Remove the casing.
- Place the crankshaft at TDC of the first cylinder - top dead center. To do this, you need to turn off the gear and turn the special bolt that holds the generator pulley to 19 with a key. Turn until the marks on the camshaft gear align with the mark on the rear timing case.
- Make sure that the marks on the flywheel and clutch housing match. To do this, you will have to remove the plug on the crankcase. It is made of rubber and is located to the right of the cylinder block.
- Lock the crankshaft in this position. You can use a simple slotted screwdriver that fits into the teeth of the flywheel.
- Slightly loosen the tension roller locking nut using a 17mm wrench.
- Turn the roller using a special wrench in a counterclockwise direction. This way you can loosen the tension level of the timing belt.
- Now you can quite easily dismantle the tension roller and belt.
- The next step is to remove the five mounting bolts that hold the lower timing case in place. These include 3 bolts that hold the pump. You will need a socket wrench or a 10mm socket.
- The casing can then be removed.
- The VAZ 2110 provides for installation of a pump using three hexagon bolts. Once you unscrew them, you can simply carefully remove the pump by tapping on the body.
- If that doesn't work, then use a flathead screwdriver to pry up the coolant pump housing, which will allow you to remove the pump.
- Remove traces of the old gasket that should remain on the surfaces of the seats.
Changing the gasket
- The gasket is lubricated on both sides using a special automotive sealant. The prepared and processed new gasket is placed on the body of the new pump.
- The new pump is installed in its rightful place, taking the baton from the old coolant supercharger.
Before installing a new coolant pump, make sure that it rotates normally and does not jam anywhere.
Reassembly nuances
- Reinstall the new coolant pump;
- Replace the casing;
- Fix the camshaft pulleys;
- Return the timing belt to its rightful place;
- The belt must be put on, focusing on the marks on the camshaft and crankshaft;
- Pull the belt using the tension roller and eccentric to the desired level;
- Turn the engine over several times to check that the marks match;
- Adjust the position and tension of the belt in accordance with the standards;
- Install the outer casing of the device;
- Replace the terminal from the adsorber;
- Add coolant to the required level.
Replacing the pump is an excellent reason to change the coolant at the same time. If you plan to do this in advance, you don’t have to pay special attention to the cleanliness of the container for draining the coolant.
If the pump fails some time after the coolant was changed, it is better to fill it back after the repair is completed. Still, buying a new coolant is not the cheapest thing. Learn to save wisely on repairs.
By properly organizing the replacement of the pump on your VAZ 2110, you can save a decent amount of money, plus improve your skills. On average, the work takes about 3 hours. If you follow the instructions, no pitfalls should arise during the repair process.
Installing a new pump
Assembly is an equally responsible matter; a certain sequence must be followed in the process:
- first you need to install the new water pump in its place;
- Next, a plastic casing is installed;
- the camshaft pulleys are fixed in place;
- the timing belt is put on;
- The VAZ 2110 belt is put on according to the previously applied marks on the camshaft;
- The wheel rotates the engine, adjusting the correct tension and position of the belt.
Note! After installation, you need to add antifreeze or other coolant.
After these steps, you can check the operation. Usually, the process of replacing a pump with your own hands takes about three hours. If everything was done as required by the instructions, there should be no problems. Thus, you can save a lot of money, because the price for services of this type in car services is quite high.
Replacing the cylinder head gasket on VAZ 2110 2112 8 and 16 valves. Business as usual
- Gaskets made on a non-asbestos basis are characterized as products that are easily restored and have minimal shrinkage;
- Products made on the basis of asbestos. Their high heat resistance, elasticity and elasticity are noted. They are recommended for use as repair kits;
- Metal gaskets. Today they are considered products that have high efficiency and quality, allowing the created pressure to be evenly distributed over the entire sealed surface.
- Noticed the appearance of drops of engine oil or coolant at the sealing area of the head and block;
- The presence of whitish exhaust from the exhaust pipe is evidence of the penetration of coolant due to burnout of the gasket;
- When checking the oil level, a white emulsion appeared on the dipstick, this is a sign of coolant entering the lubrication system;
- The presence of oil stains in the coolant, which can be seen in the expansion tank or radiator;
- Bubbling of the coolant is evidence of exhaust gases breaking through the burnt gasket into the engine cooling system.
- First of all, you need to disconnect the battery and drain the coolant; to do this, simply disconnect the negative terminal on the battery and drain the antifreeze into a container;
- The next step will be to disconnect the exhaust system from the cylinder head;
- Now it’s time to dismantle the VAZ 2110 carburetor;
- After this, you can start removing the wiring from the spark plugs, temperature and oil pressure sensors;
- Next, disconnect the vacuum booster that is connected to the intake manifold;
- Now you can remove the ignition distributor;
- The time has come to remove the housing on which the auxiliary units and the fuel pump are mounted;
- To begin removing the pulley and timing belt, you need to loosen the tension roller and remove everything;
- After this, it’s time to remove the timing pulley; after unscrewing the mounting bolt, it is removed from the camshaft;
- A Phillips screwdriver will help loosen all the clamps and remove all the hoses going to the cylinder head;
- Now it’s time to remove the cylinder head mounting bolts; for this you need a hexagon. The bolts must be removed with washers (see the article “Tightening torque of the cylinder head bolts”);
- After this, you can remove the cylinder head along with the gasket from the cylinder block.
AutoFlit.ru
DIY pump repair VAZ 2110/2112
The driver does not always have the opportunity to replace a faulty pump. In some cases, it is possible to repair the device by restoring the operating functions of the pump. If the pump has not yet exhausted its service life (50 thousand kilometers), then you can repair it. However, the pump cannot be repaired without using a special repair kit. This is a set of rubber gaskets and parts that most often fail and need to be replaced.
Repair kits for pumps may vary in composition, depending on which spare parts need to be replaced
In addition, you will have to thoroughly prepare for repairs: the place for disassembling and repairing the pump must be clean and level.
How to disassemble a water pump
Once the pump is removed from the machine, it will need to be disassembled. Only after disassembly and thorough cleaning will it be possible to replace the leaked parts of the pump.
To disassemble the pump, it is recommended to follow the following diagram:
- Wipe the product with a dry cloth.
- Unscrew the pump pulley.
- Pull out the thrust ring.
- Use a hammer to knock out the bearings from the shaft.
- Pull the shaft itself out of the housing.
- Unfasten the impeller.
- If something remains from the oil seal, then remove the remaining rubber from the housing.
The procedure for disassembling the water pump is intuitive: until you remove the pulley, it is impossible to get to the shaft and impeller
After this, the cavity of the pump itself must be thoroughly cleaned of dirt and old deposits - you can wash the pump with the same gasoline that is usually filled into the VAZ 2110/2112 tank.
A visual inspection of the pump parts will show which element needs to be replaced. Typically, a pump leak is caused by rotting of the oil seal, and a whistle when the engine is running or a grinding noise at high speeds is caused by wear of the shaft.
Video: disassembling the pump
Replacing the oil seal
An oil seal is a gasket made of rubber and metal inserts. During normal pump repairs, changing the oil seal is included in the list of mandatory procedures, since the gasket is a rubber product in its structure, and therefore wears out quickly.
Replacing the oil seal is not difficult:
- The old gasket is removed from the shaft.
- The landing site is cleared of dirt.
- A new oil seal is installed.
The rubber-metal product that ensures the tightness of the pump is called an oil seal.
Before installing the rubber seal, you can lubricate it with antifreeze so that the oil seal quickly “grinds” to the shaft.
Changing the shaft with bearings
Most often, it is the bearings that have become loose that need to be replaced. But knocking them out of the shaft is a very tedious task. In addition, a hydraulic vice is required, which not every driver has. Therefore, it is easier to replace the bearings along with the shaft.
Again, the procedure for replacing the shaft is not associated with difficulties: a new one is driven in in place of the old shaft.
It is not possible to knock out the old bearings from the pump, so it is easier to replace the shaft along with them
How to replace a pipe on a pump
Sometimes, due to unstable pressure in the cooling system, the antifreeze supply or discharge hoses may become deformed. New pipes cost pennies, and new metal mounting clamps are not difficult to buy.
If the pipe is swollen, this is a clear sign that the rubber will soon burst. Cracks and dents in the tube also indicate the need for prompt replacement.
To make a replacement, you must:
- Use a screwdriver to loosen the clamp.
- Remove the clamp.
- Disconnect the pipe from the pump.
- Loosen the clamp on the back of the pipe and remove the fastener.
- Remove the pipe from under the hood.
The clamp, when compressing the pipe, can severely damage the rubber, which can cause antifreeze leaks
Element characteristics
In total, in the automotive world there are two types of coolant pumps - mechanical or electrically driven. In the first case, the drive is carried out from the camshaft or crankshaft of the internal combustion engine using a belt drive. In the case of an electric one, all this is done by one electric motor, which has its own control system. Regardless of the type and dimensions of the machine, this pump is installed only in the front part of the engine. VAZ-2110 is no exception.
The design of this part assumes the presence of a centrifugal type pump. In addition, the design of this element includes an impeller and a housing. The first part is most often installed on a shaft with a pulley. The body can be either cast iron or aluminum. It has special channels for draining and discharging antifreeze to the impeller. A sealing gasket is placed between the pump body and the internal combustion engine cylinder block. It prevents coolant from leaking out of the pump.
Why do you need a pump in a car?
If we talk about the operation of a car engine, then we immediately touch upon the topic of its cooling. Indeed, without high-quality cooling, the engine will not be able to work for a long time and will definitely “boil”. Thanks to the circulation of coolant, it becomes possible to operate the engine at any time of the year under any external conditions.
The power component on the VAZ of the tenth family has a rather complex structure. During the working cycle, the pistons rub strongly against each other, which invariably leads to strong heating of the surfaces. The only way to prevent engine overheating is to constantly maintain the desired temperature in the friction zone through the circulation of coolant and. It is for this purpose that the VAZ design includes a cooling system.
The design and operating features of the VAZ 2110 engine cooling system are described in detail in this material:
Coolant (antifreeze or antifreeze) is poured by the driver into the expansion tank of the car. From it, the liquid is transferred through pipes to the water pump, and from there it goes to the radiator and cylinder block. The water pump (or pump) is designed to pump antifreeze through the system while the engine is running. That is, the pump starts together with the engine and turns off after the driver turns off the car. Without a pump, the entire cooling system can be considered ineffective, since only the pump can create rapid circulation of liquid throughout all parts of the system.
The pump is designed to create the necessary pressure in the cooling system to move the liquid.
The device in a metal case ensures continuous circulation of antifreeze through the cooling system
Signs of a pump malfunction
Thanks to the rotation of the pump driven by the timing belt, the impeller circulates a special fluid (antifreeze, antifreeze) through the small and large circuits of the cooling system. A damaged pump can cause the engine to overheat or cause the timing belt to break. To avoid an emergency on the road, you should do preventive repairs on time. On a VAZ 2110 with an 8-valve engine, the omen of replacing the pump can be recognized by the symptoms described below.
Noise from the timing belt cover
Timing belt cover
When the engine is running, a shuffling rotating sound is produced from the side of the timing belt protective cover. This is an indication that the pump bearings are sufficiently worn. According to the maintenance regulations, the pump should be changed every second timing belt replacement. The recommendation should not be neglected, since the rolling shaft bearings operate under load and wear out relatively quickly. Sometimes antifreeze or antifreeze gets into the bearing race due to a leaky seal. As a result, the lubricant is washed out and wear of rubbing parts accelerates.
Coolant leak from under the pump
Hermetic seals: the oil seal and rubber cuffs, as well as the bearings, have a limited service life. Typically, seals leak after bearings wear out, as there is play in the shaft. In addition to this, the constant cycle of heating and cooling of the engine gradually destroys the material of rubber products. As a result, small puddles of coolant appear under the engine compartment of the VAZ 2110 on the pump side.
Misalignment of drive shaft pulleys
Pulley VAZ 2110
A defective pump can result in noisy engine operation and frequent timing belt breaks. According to the performance characteristics, skewed rotation of the pulleys does not provide the vehicle with a long service life. The belt cannot withstand additional loads and breaks after a mileage of up to 1000 km. As a result, you will have to replace the defective pump, otherwise on such a VAZ 2110, an unscheduled replacement of the timing belt will become a regular procedure.
Motor overheating
The pump impeller may be partially destroyed. The lack of blades leads to a decrease in coolant circulation. As a result, the engine does not receive proper cooling from the small circuit and the temperature rises, even to the point of boiling. Overheating, in turn, has a detrimental effect on the engine.
Among the most common consequences, the most difficult to eliminate should be listed:
- can “drive” the cylinder head;
- the cylinder head gasket burns out;
- piston rings are destroyed;
- the motor risks jamming;
- The crankshaft bearings fail.
For reference! Frequent use of a special sealant to eliminate coolant leaks reduces the service life of the water pump. The foreign mixture tends to stick to the impeller, forming a solid clot and clogging the channels of the cooling jacket.
Cost and prices of work
Luzar pump.
The price of a water pump for an 8-valve VAZ-2110 engine ranges from 700 to 1000 rubles.
For repair work to install it at the service, you will have to pay at least 1000 rubles . However, there is no need to overpay for the installation of the pump, since you can install it yourself.
Pump device
Pump device.
The purpose of the pump is to pump coolant into the system, thereby circulating it and cooling the engine..
In the VAZ-2110 (with an 8-valve engine), this pump is located to the right of the engine cylinder block, directly under the timing belt cover. It is the latter mechanism that powers the pump, rotating it.
Location of the pump on the engine.
Possible causes of malfunction
There are different types of pumps and water pumps.
But they all have similarities, representing: a fixed shaft, on one side of which there is an impeller, and on the other side there is a drive roller driven by a timing belt.
- But also, an oil seal is installed between the housing and the impeller . Damage to it can cause coolant to leak out, washing away the lubricant from the bearings. After this, they may jam or become quite noisy.
- Despite the fact that the bearings do not wear out so quickly , you should not hesitate to correct this malfunction, as this can lead to more serious consequences, including a major overhaul of the motor.
Checking the operation of the pump on a VAZ-2110
You can diagnose a water pump using various methods.
The simplest involves warming up the engine and squeezing the upper hose that comes from the radiator. Feeling clear pulsations of the coolant will indicate that the pump is working properly.
If you squeeze this pipe, your hand will feel the pressure of the antifreeze when the pump is running.
When checking this, be extremely careful not to touch the pump blades with your hands, since the motor is at operating temperature.
The second way to check the water pump is to inspect the oil seal . Its failure leads to leakage of coolant. To do this, you need to remove the timing belt cover and examine the special ventilation hole. If it is contaminated with brown deposits, the oil seal must be replaced, preferably together with the pump.
Leakage from the oil seal is visible from streaks on the engine housing.
It is not difficult to replace the oil seal with your own hands. This part plays a vital role in the operation of the engine cooling system, therefore, it needs to be monitored.
Bearings
Also, the cause of malfunctions in the cooling system can be damaged pump shaft bearings.
This breakdown is accompanied by a howling sound from the front of the car. In order to determine the degree of bearing wear, you should check for shaft play by loosening the pump drive sprocket.
In a situation where external malfunctions in the operation of the water pump cannot be determined, it should be dismantled and inspected in detail. This is how you can identify rusted blades, which jeopardizes the operation of the entire engine cooling system.