The car dashboard is becoming more complex every year, and more and more different icons appear on it, signaling the driver about a particular malfunction. At the same time, the coolant icon is not one of the new ones, and car manufacturers have been offering drivers control of the cooling parameter for a long time. There are reasons for this - maintaining the correct temperature in the engine is necessary so that its traction characteristics do not deteriorate. In addition, an excessively cooled or overheated engine poses a danger to individual units, which may fail, and their repair will cost a considerable amount.
How to check the coolant level sensor on a VAZ 2114
4 / 5 ( 53 voices)
Such a simple component of the cooling system as the VAZ 2114 expansion tank can cause a lot of trouble for the motorist. Let's look at which ones exactly to be in the know. There are not very many major problems, but the price of repairs may differ, and significantly. The most common breakdown is rubbing of the tank body. A small hole appears through which liquid seeps out. But there are more serious problems.
What you need to know about device malfunction
First, you need to understand when you should pay attention to this particular detail. The main sign of a breakdown is a discrepancy between the sensor readings and the actual level of air heating outside the car
This is not so easy to notice if the difference is small. But, as a rule, if the temperature readings do not coincide by less than seven degrees, this is not even considered a breakdown. But a difference of about 10 is easier to recognize. It is also common for the sensor to loop at minus forty even in the warm season.
As for owners of modern cars, in particular foreign cars (Ford, Chevrolet, BMW, etc.), the on-board computer itself will indicate the malfunction by providing an error code on the screen.
Secondly, before changing the thermistor itself, it is worth checking the contacts and wiring - if the fault lies in them, then replacing the thermal detector will not save the situation.
Reasons why the VAZ 2114 air temperature sensor may fail:
- mechanical damage that compromised the integrity of the device (being hit by a heavy object during a trip - crushed stone or something similar);
- the influence of harsh climates - in particular, very low temperatures outside can lead to malfunction of the device;
- oxidation of contacts and disruption of wiring can be both independent breakdowns and the cause of failure of the DTVV.
The light on the panel of the VAZ 2114 came on - who knows?
Who knows what kind of light came on on the central panel of the VAZ 2114, not where the odometer is, there is an oil light there of course, but on the central panel?
Here it is next to these:
What does this mean, how scary is it and is it possible to drive like this?
Urgent car purchase and car pawnshop
Help in choosing a car
Who knows what kind of light came on on the central panel of the VAZ 2114, not where the odometer is, there is an oil light there of course, but on the central panel?
What does this mean, how scary is it and is it possible to drive like this?
Low oil level light. Check the level on the dipstick - if it’s normal, then most likely the sensor is just messing around. If it doesn't bother you, drive like this.
Probably every experienced owner of the fourteenth model has encountered a yellow icon in the form of a cup with a scale burning in the signal lamp block. This is the coolant light on the VAZ 2114. This article is dedicated to those who encountered this problem for the first time and those who have already solved it.
The on-board control system warning lamp unit is located to the driver's right above the central ventilation system nozzles.
It is a narrow plastic panel with seven indicators:
- - little oil;
- -insufficient level of windshield washer fluid;
- -low coolant level;
- -one of the doors is unlocked;
- - there is a malfunction of the brake lights and dimensions;
- - pad wear;
- -belts are not fastened.
You saw the light on and, first of all, checked the fluid level in the expansion tank (usually it can be seen through it). On a cold engine, the antifreeze is located exactly between the minimum and maximum marks, and the light is still on. This indicates that the VAZ 2114 coolant level sensor is not working.
BUTTONS ON THE INSTRUMENT PANEL
In the center of the dashboard there is a row of five buttons:
Buttons
The description of the VAZ 2114 instrument panel buttons is as follows:
- Turning on/off side lights. When the lights are on, the light turns green;
- Button to turn the headlights on and off;
- Turn on/off the front fog lights. In order to turn on the fog lights, you must first turn on the side lights;
- Turn on/off rear fog lights;
- Turning on/off the heated glass on the tailgate fourteenth.
Generator check
You can't do this without the help of another person. We ask a friend to get behind the wheel, start the engine and use the gas pedal to raise the speed to 3000-3500. In this case, the high beam headlights, rear window defroster + heater must be turned on. We use a tester to check the battery and the supplied voltage, which should be around 13.2-13.6 volts. If the readings are lower, then the reason is a break or short circuit in the generator windings or their oxidation. If in this case you turn off the lights and other consumers, the voltage charge level should return to the values specified above. Also, the alternator belt may be loose, the diode bridge has oxidized, or the alternator brushes may be worn out. When replacing brushes, do not forget about their holders.
If oxidized wires or slip rings are to blame, then we clean or wipe with ordinary gasoline. We tighten a stretched belt, and replace a torn belt. Instead of faulty rectifier units and voltage regulator, we install new spare parts of the same brands and parameters. Increased noise during operation indicates wear of the generator bearing. It is cheaper to simply replace such a bearing. A faulty diode bridge is indicated by its melted components.
From this article it is clear that there are a lot of reasons why the battery icon on a VAZ 2114 may be dim, blinking or constantly on, but they are mainly located in the generator. You can try to detect the problem yourself. If funds allow, then, without hesitation, simply change the generator assembly. Its cost fluctuates around 3,000 rubles. If you are not sure of the exact diagnosis, then to determine the breakdown, I advise you to go to a good auto repair and diagnostic center.
You can go to specialists in garages or car markets, but only after real reviews and recommendations about the competence of such workers. In this case, you will lose money on the analysis, but will save by the fact that you will have to change only individual spare parts, and not the unit as a whole.
And remember that a lit battery icon on the instrument panel requires your utmost attention and prompt diagnosis.
Replacing the coolant level sensor
Unfortunately, plastic sensors often break, and it even happens that newly installed new elements fail. This is a sore spot of the VAZ 2114, so in subsequent models (such as Granta, Priora) they were completely removed. You can do the same.
To no longer deal with broken sensors, buy a new expansion tank with only a cap and install it in place of yours. And you either remove the wires from the mounting block chip, or simply insulate them and leave them as is.
- Go to the store and buy a VAZ 2114 coolant level sensor (90 rubles).
- Disconnect the terminal from the battery.
- Remove the block from the old sensor.
- Unscrew it from the tank.
- Screw in a new one.
- Connect the block and place the terminal on the battery.
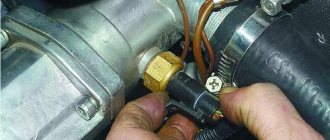
How to replace the temperature sensor?
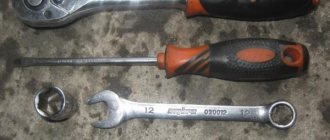
You can replace the part yourself without resorting to the help of specialists. For ease of dismantling, it is better to choose a socket wrench or a deep socket with a knob.
Replacement is carried out on a cold engine in the following sequence:
- Remove the air filter from the car. It blocks access to the sensor. After replacement, you will need to install the filter in its seat.
- Disconnect the negative cable from the battery. Necessary to avoid errors in the electronic control unit.
- Remove the protection located under the power unit.
- Drain the coolant from the radiator.
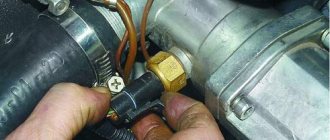
- Disconnect the wires from the sensor. When disconnecting the connector, it is important not to damage the plastic latch. It is necessary to fix the plug and prevent it from spontaneously disconnecting.
- Unscrew and replace the sensor. A 19 mm socket wrench is used. To speed up the work process, you can use a head with a ratchet.
- Reinstall the electrical wiring plug and protection.
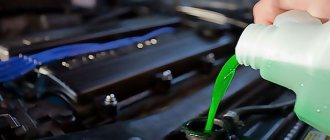
- Fill with coolant and warm up the power unit to operating temperature.
Some car owners replace the sensor without draining the coolant. To do this, carefully unscrew the part and quickly replace it with a new one. Thus, during the replacement process, a minimum amount of coolant leaks.
The oil light on the VAZ 2114 came on
Only after establishing the exact cause can the driver take the necessary actions to eliminate the malfunction. There are several reasons for a light bulb to light up:
— the engine is idling:
The indicator may light up when the car warms up or simply blink. If you add gas, the light bulb will go out immediately. In this case, there are also several sources:
- The wear of the crankshaft liners increases the gap between the liners and the connecting rod of the car;
- Too much clogging of the oil receiver mesh is the most common reason why the required amount does not flow into the pump;
- Sensor malfunction - the level is normal, but you have a simple breakdown;
- Short circuit in the electrical wiring - worn out electrical wiring can be a source of failure in the flow of oil to the engine. - the car is in motion: In this case, you should stop immediately, if the malfunction of the light bulb does not disappear, then you have one of the following problems:
- It's time to change the oil - sometimes car owners forget about routine maintenance and it loses its working properties;
- The engine oil level is at about - you should top up the lubricating fluid level in the engine;
- A clogged cleaning filter leads to a very rapid decrease in pressure in the engine.
Signs of DTOZH malfunction
The owner can independently determine the need to replace the part. Part failure is accompanied by the following symptoms:
- Increased fuel consumption. Based on incorrect data, the ECU incorrectly selects the ratio of fuel and air mass in the working mixture. A rich mixture with a warm engine leads to increased consumption.
- Engine overheating. Turning on the cooling fan late leads to an increase in the temperature of the liquid in the jacket. When the power unit overheats, metal parts expand, which increases friction between the rotating parts and reduces their service life.
- The engine takes a long time to warm up. The cooling fan operates in advance. The liquid passing through the radiator is constantly cooled. This leads to a decrease in temperature and an increase in the warm-up time of the power unit.
Where to find a temperature sensor in a VAZ-2115
The entire cooling system in cars is divided into several types:
- air;
- liquid;
- combined - combining 2 types at once.
The VAZ-2115 has a built-in liquid cooling system, which involves filling with antifreeze or higher quality antifreeze. In general, the mechanism consists of the following functional elements:
- a radiator that allows the engine to cool;
- radiator fan;
- heater radiator;
- cooling device jacket;
- pump pumping coolant;
- expansion tank;
- connecting pipes;
- antifreeze temperature sensor.
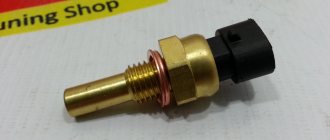
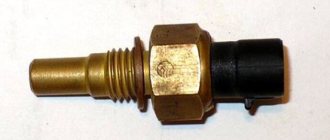
Beginners are wondering where the coolant temperature sensor is located on the VAZ-2115? The unit located between the thermostat and the head of the cylinder combination, directly on top of the cooling system pipe, connects the part to the system using 2 wires.
There is another meter installed nearby, but note that this additional unit is connected on one side to the instrument panel.
A careful study of the design allows you to see a resistor in the sensor, where the resistance is determined depending on the heating of the VAZ-2115 engine.
VAZ 2115 sensors, their purposes and malfunctions. List and tips
- the calculation of the duration of permissible fuel injection is based on them;
- TPS data is the basis for setting the ignition timing;
- They are used to determine the operating mode of the motor, acceleration and many other related parameters.
- On VAZs, the TPD is made in the form of a polymer film, onto which graphite tracks are sprayed, and a slider runs along them. The tracks have a clearly calculated resistance, and the stability of the sensor depends on the coherence of the system. However, the designers did something wrong - either in the material or in the technology. As a result, TPS is the sensor that most often fails. Most often, the path gets worn out, and when the slider hits a “bald” area, trouble begins;
- When the gas pedal is held steadily, the car jerks;
- The operating power drops noticeably;
- There are dips and sharp jerks during acceleration;
- There is virtually no engine braking.
Purpose of VAZ 2114 devices and interpretation of the symbols on them
Located on the left side of the dashboard, directly in front of the driver's seat, the VAZ 2114 instrument cluster plays an important role in driving. It contains pointer instruments, VAZ 2114 indicators with electronic digital windows and signal lights for various purposes.
- An induction speedometer, which receives speed readings from a sensor located directly in the gearbox, shows the actual speed of the car from zero to two hundred kilometers per hour. The division price is 10 km/h. It must be borne in mind that such devices have a permissible error of at least 5 km/h. In the lower, central part of the device there is a window with an electronic display, in which two lines reflect the total mileage for the entire period of operation of the car and the current mileage.
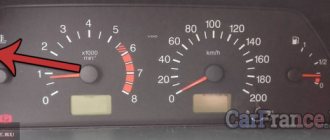
- To the left of the speedometer is the tachometer. This is an electronic device that, receiving a signal from the on-board computer, shows the current crankshaft speed at that particular moment. The scale has divisions of 5 units, digitization is done after 10 units, the maximum value is 80. When multiplied by 100, the real number of revolutions is obtained, for example, 30 multiplied by 100, the result is 3000 rpm. The range of 55 - 60 is shaded in red - this signals that the critical speed is approaching. The critical range 60 - 80 is shaded in red. If the speed increases to these values, the engine may fail. In the lower middle part of the device, an electronic display displays the time and real ambient temperature.
- To the left of the tachometer there is a dial gauge for the coolant temperature. It receives a signal about the actual condition from the coolant temperature sensor, which is located between the cylinder head and the thermostat. The division value is 20 degrees. Digitization of the device begins at 50, after two divisions it is 90 and the divisions end at 130 degrees. The red, danger zone starts at 105 degrees. If the arrow falls into this zone, then the engine must be turned off immediately, no matter what mode it is operating in. Due to overheating of the engine, failure of the main blocks of the power unit is possible. At the top, near the number 130, there is a graphic temperature icon. To the right of the speedometer is a device indicating the presence and level of fuel in the car’s fuel tank.
Identification of buttons
It is also important to know the designation of the buttons on the VAZ 2114 panel. On the instrument cluster on the right side there is a button (11), with which the time and temperature on the digital indicator are switched, and when pressed for 5 seconds or more, the current mileage is reset, if pressed this button on a stationary car.
In the central part of the dashboard are located in a row:
Buttons VAZ 2114
Double headlight switch. Button 1 turns on the dimensions, button 2 turns on the low beam;
Buttons on VAZ 2114
Key switch block. The first 1 turns on the front fog lights, the second 2 turns on the rear fog lights and the third 3 turns on the heated rear window.
This shit lights up. But the antifreeze level is normal. The sensor is new!
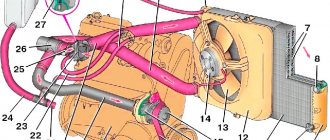
DIAGRAM AND DEVICE OF THE COOLING SYSTEM
The cooling system of the VAZ 2114 is liquid, with forced circulation. Antifreeze or antifreeze is poured into the system as a coolant. In the most extreme case, you can fill it with water, but you can’t drive it for a long time - in winter you can defrost the engine, and during the rest of the season, when the engine is used for a long time on water, the cooling jacket in the block and cylinder head is corroded, and rust accumulates in the radiator.
The VAZ 2114 engine cooling system (SOD) consists of the following elements:
- Radiator. It is the main cooling part in the system and performs the function of transferring heat to the liquid into the surrounding airspace;
- Water pump (pump). The pump creates forced movement of antifreeze in the system, thereby cooling the entire SOD, including the internal combustion engine (ICE). The pump rotates from the timing belt;
- Branch pipes (hoses). Antifreeze circulates through them;
- Thermostat. It regulates the passage of coolant through all pipes or only in a small circle and maintains the required operating temperature of the internal combustion engine;
- Electric fan. The fan is located on the plane of the radiator and, due to the air flow created, cools its surface when turned on. The electric motor turns on only when the temperature set by the sensor is reached (103°C);
- Expansion tank. Liquid is poured into the tank, and when the fan is activated, antifreeze flows into it through the return hose, thereby releasing excess pressure into the SOD;
- Expansion tank plugs. There are valves in the plug that relieve excess air pressure created in the system when antifreeze circulates.
Source
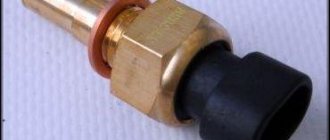
Causes of failure of the coolant temperature sensor
Structurally, the coolant sensor is quite simple, and accordingly, it rarely fails. Usually this happens simply due to its old age or mechanical damage. For example, corrosion of contacts and metal parts of the case may occur due to the fact that instead of antifreeze or antifreeze, ordinary water was poured into the cooling system (and even more so if this water is “hard”, that is, with a high content of metal salts). Also, the reasons for the failure of this device may be:
- Damage to the body. This can be expressed in various aspects. Often, leaks of coolant are visible, which flows from the threads of the sensor or its housing. Also, the electrical contacts and/or the thermistor itself may be damaged, which will produce an incorrect signal.
- Oxidation of contacts. Sometimes situations arise when, under the influence of fumes or simply from old age, the contacts on the sensor oxidize, so the electrical signal does not pass through them.
- Damage to the chip. In some cases, due to mechanical damage, the so-called “chip” may fail, that is, a group of contacts that is connected to the coolant temperature sensor. Simply put, the wires at the base of the connector fray. According to statistics from reviews found on the Internet, this is one of the most common malfunctions that occurs with the sensor and the corresponding system.
- Lost electrical contact inside the sensor. In this case, unfortunately, repair is hardly possible, since usually its body is sealed and does not allow access to the insides of the DTOZH. Accordingly, in this case the sensor only needs to be replaced with a new one.
- Violation of wire insulation. In particular, we are talking about the power and signal wires that go to the sensor from the electronic control unit and back. The insulation can be damaged due to mechanical stress, abrasion, or even simply from old age, when it “peeles” in pieces. This is especially true for those machines that are operated in conditions of high humidity and sudden changes in ambient temperature.
Coolant level sensor for VAZ 2114: device, check and replacement
Probably every experienced owner of the fourteenth model has encountered a yellow icon in the form of a cup with a scale burning in the signal lamp block. This is the coolant light on the VAZ 2114. This article is dedicated to those who encountered this problem for the first time and those who have already solved it.
The on-board control system warning lamp unit is located to the driver's right above the central ventilation system nozzles.
It is a narrow plastic panel with seven indicators:
- - little oil;
- -insufficient level of windshield washer fluid;
- -low coolant level;
- -one of the doors is unlocked;
- - there is a malfunction of the brake lights and dimensions;
- - pad wear;
- -belts are not fastened.
You saw the light on and, first of all, checked the fluid level in the expansion tank (usually it can be seen through it). On a cold engine, the antifreeze is located exactly between the minimum and maximum marks, and the light is still on. This indicates that the VAZ 2114 coolant level sensor is not working.
Why is the coolant temperature light on?
It was already mentioned earlier that the cooling system indicator lights up if there is any deviation from the optimal temperature. This can happen both when the engine temperature increases and when it decreases. Often the light comes on when there is not enough coolant in the tank and it needs to be refilled as quickly as possible. Mixing antifreeze is not allowed in all cases, and in general you should choose the coolant for your car very carefully.
It is especially worth noting that when the coolant indicator lights up when the engine is hot, you should absolutely not add antifreeze. You must wait until the engine cools down. Otherwise, due to the temperature difference between the hot parts of the engine and the coolant, cracks will occur in the cylinder head.
It is also important to remember that the coolant light does not always light up only if there are any problems with the antifreeze. It is possible that there is a malfunction in one of the elements of the cooling system. In this situation, it is worth contacting a service workshop, where, using special diagnostics, the technician will determine what exactly the problem is.
Replacing the coolant level sensor
Unfortunately, plastic sensors often break, and it even happens that newly installed new elements fail. This is a sore spot of the VAZ 2114, so in subsequent models (such as Granta, Priora) they were completely removed. You can do the same.
To no longer deal with broken sensors, buy a new expansion tank with only a cap and install it in place of yours. And you either remove the wires from the mounting block chip, or simply insulate them and leave them as is.
- Go to the store and buy a VAZ 2114 coolant level sensor (90 rubles).
- Disconnect the terminal from the battery.
- Remove the block from the old sensor.
- Unscrew it from the tank.
- Screw in a new one.
- Connect the block and place the terminal on the battery.
Outside air temperature sensor VAZ 2114
The model of the temperature sensor that is installed on this VAZ car is 2115-3828210 and its modifications 02 and 03. Some of them are marked VDO - there is an opinion that devices with such markings are more accurate, faster and more modern.
In the most modern car models, the system for measuring the external air temperature allows the owner to start auto-warming of the engine in case of frost.
It is worth noting that early Lada models were not equipped with such devices. Over time, the situation began to improve for the better. For example, VAZ 2110, VAZ 2112 have so-called trip computers, which may not be as informative as the devices of more modern cars such as Samara-2, but could also show the level of air heating outside the car.
What's good about the VAZ 2110? You can install the DTVV on it yourself. It must be taken into account that it should be located so that water and direct sunlight do not fall on it. It is also worth mounting it away from hot parts of the car in order to avoid heating, which may cause incorrect readings.
The best choice would be the space allocated by the manufacturer for the detector. Or - a place near the towing area under the bumper
It is important to install the device under the front bumper, since under the rear bumper, due to warm air from the engine, the readings may be distorted. Not much, but it won’t have the required accuracy
It is located in the front of the vehicle - between the bumper and radiator.
Like any other sensor in domestic cars, this one can be changed on your own, the main thing is to read the instructions and safety instructions and strictly follow them. You can, of course, take the car to a service station and entrust it to professionals, but if you have some skills, it will be easier and cheaper to change the device yourself.
It is worth noting that the DTVV cannot be repaired - only replaced, but this is not so scary, since the cost of the spare part is very low.
Coolant level sensor repair
If the sensor contacts are intact, but the sensor itself does not function as it should, then it can be repaired.
- Remove the sensor from the car.
- Remove the amendments.
- Using sealant, glue it well to the body.
- Then solder the joint (isolate it from antifreeze).
This way you can repair the plastic float. The porous float must be replaced, however, you can find a similar part and install it in its place.
Source
How to check DTOZH?
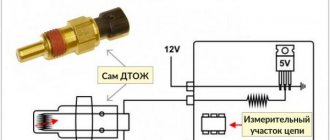
If signs of failure of the DTOZ appear, its performance should be checked. In some cases, incorrect operation of the cooling system may be due to damage to the wiring. You can check the DTOZH yourself at home. To do this you will need a multimeter and a water thermometer. For diagnostics, set the multimeter switch to resistance measurement mode. After this, place the working surface of the part in a container with water.
During the testing process, it is important to ensure that liquid does not get on the terminals of the product. Failure to comply with this rule will result in incorrect data. Using a multimeter, measure the resistance between the contact pads. As the temperature of the liquid in the container increases, the resistance indicators should change. The photo below shows the dependence table. Please note that indicators may vary slightly individually for each case. If during the diagnostic process it was possible to determine that the sensor is working, it is necessary to check the integrity of the wiring. In some cases, the contacts close together. This leads to malfunctions in the cooling system. A failed sensor must be replaced. Repairing the part at home is not possible.