How to remove the rear wheel hub - we work on our own
In principle, there is nothing difficult in how to remove the rear wheel hub, the main thing is to remember that the bearings are quite fragile, so it is worth adjusting your force so as not to damage them
. The hub is replaced as follows. First you need to lift the car onto supports and disconnect the decorative cap. Next, unscrew the nuts that secure the wheels. Now you need to remove the brake drums from the hub, of course, if there are any.
Now you need to unscrew the bolts that secure the hub to the bracket. They can only be accessed through a special hole in the hub itself. To do this, you need to rotate the flange and align the hole with each of the bolts. These nuts are usually tightened with a large torque, so for safety reasons it is necessary to fix the car and engage the gear with the parking brake; it would not hurt to install wheel chocks under the wheels.
Now the caliper mounting bolts, steering knuckle mounting bolts and brake pad guides can be safely unscrewed. Next, you need to remove the hub by pulling it through the brake mechanism. If not installed, then the rear wheel hubs are removed from the bearing, intended for its replacement. But this requires a special tool, and if one is not available, you need to contact a service station, where they will replace this part.
The service life of wheel bearings should have a fairly long mileage (at least 100,000 km). But the condition of our roads can lead to a fairly early replacement of the wheel bearing on the VAZ 2109, 2110.
Diagnostics of serviceability of VAZ 2112 wheel bearings
When operating a car, regular maintenance of all parts is necessary. An important role in extending the service life of the machine is replacing the grease in the bearings and periodically adjusting the clearances. The average service life of bearings is up to 60 thousand km. Poor quality of roads, jumps and jumps on pits also reduce the service life of the part.
To check the serviceability of the play, you need to hang the problem wheel and spin it well. The bearings should move freely along the axis, without jamming or noticeable friction. If the play cannot be eliminated by adjusting, and a distinct noise is heard when driving, the hub bearing has probably failed. We turn the wheel in all directions. Please note that two elements may fail at once.
Rings and rollers should not have scuffs or the slightest signs of wear. If any are found, replacing the wheel bearings cannot be avoided.
Replacement procedure
Please note that the hub nut is tightened very tightly and is difficult to budge. To make this task easier, you can use a metal pipe as a lever. A chisel and pry bar may also come in handy - it's best to keep them nearby. It is very good if an experienced motorist can help you replace this element yourself for the first time.
This procedure is performed in the following order. First of all, the car should be placed in a garage equipped with an inspection hole. If this is not possible, then you need to find a flat area for repair work. Then use the gearshift lever to engage first gear, and place wheel chocks under the front wheels (ordinary bricks will also do). Having done this, use a balloon wrench to slightly loosen the wheel bolts and lift the side on which the wheel bearing will be changed using a jack.
Then the mounting bolts are unscrewed completely and the wheel is removed from the axle. The guide pins are unscrewed and the brake drum is removed.
If you can’t do this right away, you should take a hammer and, applying a small plank to the drum, tap it around the circumference.
If tapping does not produce results, you can try screwing the pins into place - sometimes the drum comes off after this. If all methods are ineffective, the part must be dismantled using a puller, but there is a serious risk of damage. If this happens, the brake drum will also need to be replaced with a new one.
The hub nut is unscrewed using a socket wrench and (if necessary) a metal pipe.
The hub nut is removed from the axle using a puller
You can try to remove the hub without a puller. To do this, you need to put the removed wheel back in place, and then pull it sharply (but you don’t need to be too zealous, otherwise the car will fall off the jack)
If successful, the bearing is removed along with the inner ring. If it remains in place, then in order to dismantle it you need to use a small puller.
If the ring is stuck, you need to move it with a chisel and a pry bar, and then use a tension puller.
The retaining ring is removed using special pliers or pliers, after which the boot is knocked off (it can not be removed if the bearing is dismantled by knocking it out).
Then the bearing is pressed out (or simply knocked out).
The old lubricant should be removed and replaced with a new one. Then the new bearing is pressed in (according to the rules, this should be done using a puller, but if it is not available, the outer race of the element being replaced will also work).
Pressing can also be done using a vice, but under no circumstances should you try to make the work easier by hammering the bearing, otherwise it will simply be broken.
The bearing must be pressed in until the groove for the retaining ring is visible.
When pressing, you must be careful not to accidentally damage the boot. The retaining ring is installed in place using pliers or a puller.
The hub and inner ring are put in place.
After this the nut is tightened...
... and tightened with a torque wrench to 20-22 kgf/m. The shoulder of the nut should be kneaded to prevent it from unscrewing spontaneously.
The brake drum and wheel are placed in their original places.
The wheel bearing replacement procedure is complete. If all stages are followed accurately and the necessary tools are available, this work takes no more than an hour and a half.
Replacing the front wheel bearing
The front part of the car is heavier and more often experiences loads when driving, so the chassis requires more attention. If you do not replace the front hub bearing in time, it may crumble, the inner rim of the wheel will break, and the wheel disc will cut off the bolts with which it is attached to the hub. All this will lead to the loss of a wheel, which at speed can end tragically.
The front wheel bearing replacement procedure consists of several steps:
- the car is placed on a lift and the wheel is removed;
- unscrew the hub nuts and remove the brake caliper;
- the ABS system hose mount, the car steering gear rotary arm and the brake disc are dismantled;
- the strut fasteners are removed, and the hubs are freed from the lower and upper ball joints and the drive mechanism;
- the hub is dismantled;
- the faulty bearing is removed and a new one is installed in its place;
- all dismantled parts are put in their place.
Detailed instructions for replacing the rear wheel bearing
- The car stops at the front.
- Wheel bolts break off.
- The nut in the center of the hub breaks off, and you must first remove the cap.
- The required side is jacked up and the trestles are positioned.
- The wheel is removed.
- The area for installing the disc brake is filled with WD-40 or other special liquids.
Note! In this situation, you can use diesel fuel or any brake fluid.
The guide bolts are unscrewed, which it is recommended to first tap with a hammer.
Carefully remove the brake drum. If removal is difficult, you need to screw special bolts into the threads on this drum, tighten it and lightly tap it with a hammer. Usually such measures produce positive results.
Note! You can buy specialized drum pullers, but this is the last option when you can’t do anything on your own.
The central nut is completely unscrewed. Of course, you can unscrew it immediately and remove the hub, wheel and drum together, but in this case there will be a high risk of damaging the brake pads.
- The hub tightens. If one of the bearing races remains on the axis, you need to move it out of place using a puller or sharpened chisels.
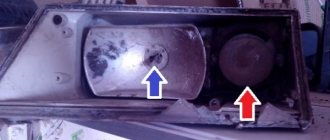
- The axle is inspected for the presence of marks from bearing rotation; if such marks are present, the assembled hub will need to be replaced.
- The brake cylinder is assessed for leakage, and the pads are assessed for wear.
- The retaining ring is removed from the hub using pliers or screwdrivers.
- The edge must be cleaned of rust, after which it must be moistened with WD-40 or a similar liquid that is at hand.
- There are three ways to press out a bearing: using a special press, a puller or a heavy hammer (sledgehammer). The third method may seem aggressive, but it is preferred by most service station technicians, so let’s look at it in more detail.
- The hub is securely installed on a hard surface, and the bearing is dislodged from its place through the mandrel with several blows of a hammer or sledgehammer. After this, the hub is installed on a vice.
Note! There must be a stop for the part and a place for the bearing to bounce off.
A couple more blows are made, after which the bearing comes out.
- The bearing seating surface must be carefully inspected, any existing rust should be sanded off and lubricated with plain motor oil.
- The purchased bearing must be screwed using a selected bolt through a washer, which must be selected in accordance with the internal races. Since the bearings are double row, they will have to be disassembled during installation.
- The hub is installed on a hard surface.
- A twisted bearing is installed on top, but first you need to lubricate its installed plane with oil.
- Use a one-kilogram hammer to slightly level the element in a plane.
- Take a suitable mandrel, for example, a pry bar, which is used to hit the part to press the bearing.
Note! The main thing is not to apply strong blows, since the pressing will be uneven.
- When the bearing is about halfway through, you can hit harder.
- When reaching the cut part of the hub, you need to use the old clip as a mandrel.
Note! Do not apply strong blows, as this is a high-carbon metal that can burst.
You need to push it all the way, after which the stopper is installed; if it is not possible to install the last element normally, then most likely the bearing was not finished completely.
Note! The stopper should spring back into the groove without difficulty.
Bearing assembly procedure
Now it's time for assembly, the hub is put on the axle, and you need to remove the bolt used to tighten the cage.
- The central nut is tightened and tightened as much as possible. In this case, it means installing a new nut. We also install a thrust washer.
- The previously removed brake drum and wheel are put on and screwed on.
- The rotation is evaluated, if there is no noise, then all actions were performed correctly. The car is removed from the jack.
- The wheel with the central nut is tightened.
- The hub nuts are closed and the wheels are tightened securely.
For a better explanation of the process, it is recommended to watch the video. A photo will also help as a visual aid. Using step-by-step instructions, you can quickly and easily replace the rear wheel bearing with your own hands, without spending money on repairs at a service station. By doing everything as required by the instructions, you can even save a lot of money, because the price of repairs in this case will be much lower. You can also find out about replacing the front wheel bearing on our website.
Replacing the rear wheel bearing using the example of Daewoo Lanos
On Lanos this operation is performed slightly differently, and fewer tools are needed:
- Jack;
- Car supports;
- Balloon wrench;
- Open-end wrench set to “24-27”;
- Pliers;
- Screwdriver;
- Bearing puller;
- Hammer;
- Chisel;
- Mount;
The initial stage of work is almost the same as described above - the car is jacked up and the wheel is removed.
Video: Lanos, changing rear wheel bearings and rear pads
Next, use a hammer and screwdriver to knock off the protective cap of the hub. To unscrew the nut, first remove the locking pin using pliers.
Then the hub nut is unscrewed with a wrench and the support washer is removed. After this, it will be possible to remove the brake drum along with the bearings. Often the inner race of the inner bearing remains on the axle. To remove it you will have to use a puller or a hammer and chisel.
Next, you need to press the outer race of the inner bearing and the outer bearing out of the drum. For ease of work, special recesses are made inside the drum, making it easy to knock out the outer races of the bearings with a hammer and chisel.
Then you need to press the outer races of the new bearings into the drum seats. It is better to do this using a vice and old clips as guides.
Then the inner race of the inner bearing is put on the axle and carefully hammered with a hammer and a pipe equal in diameter to this race. The main thing is that it sits on the axle all the way.
The next step is to install the drum in place, and after that the inner race of the outer bearing is installed. All that remains is to replace the thrust washer and tighten the hub nut. It must be tightened all the way, and then unscrewed a third of a turn to ensure the wheel rotates. Before installing the protective cap, the nut must be secured with a cotter pin.
After complete assembly, you should drive the car a little, and then make sure that the bearing does not heat up. If it gets hot, you need to remove the cap again, pull out the cotter pin and loosen the nut a little more.
Symptoms of a problem
The wheel bearing has a large margin of safety, but since the loads it constantly experiences during movement are very large, sooner or later it wears out to such an extent that it becomes ineffective. You should not delay replacing a faulty wheel bearing, as this risks causing it to fall apart while driving. This will inevitably lead to instant blocking of the wheel, which, when driving at a sufficiently high speed, very often becomes the cause of a serious accident.
Even if you are lucky enough not to get into an accident, operating a car with a non-working wheel bearing will gradually lead to failure of the entire strut, and replacing it is a much more complex and expensive process.
The faulty condition of the wheel bearing can be judged by the appearance of extraneous sounds during movement - knocking or buzzing from the side where the faulty part is located, which after some time, if no measures are taken, turn into vibration that radiates to both the steering wheel and the body part . This sign already poses a serious threat - if it comes to vibration, in the near future you can expect the collapse of the “dead” bearing with all the problems associated with it.
Causes of breakdowns
Below are the 2 most common reasons for element failure:
- Loss of bearing tightness. The fact is that the product body contains a certain amount of lubricant to reduce friction between the internal elements. The lubricant is retained by special protective covers made of rubber or plastic. Accordingly, these materials deteriorate over time, which leads to a gradual loss of lubrication and failure of the hub element.
- Large production resource. No matter how carefully you operate your car, over time most components and elements become unusable. Each part has its own service life. The bearing, whose service life is about 60 thousand kilometers, is no exception. In some cases (regular or periodic driving through potholes, under conditions of increased wear), the element fails much earlier than the above indicators.
How to change the rear wheel bearing of a Lada Granta
Work related to the removal and installation of the element will require special tools, namely: - a special hub puller; - chisel; — retaining ring remover (or pliers with round ends); — a “30” head, or a key of the same size; - vice; — a puller for pressing and pressing out bearings; - a flat-tipped screwdriver.
So, let's get started, below are 14 detailed stages of the work:
- Remove the plastic protective cap from the rear wheel.
- We move the gearbox lever to the “1st gear” position. To prevent the car from rolling away under the front wheels, we place supports.
- We loosen the tightening torque for the hub nut (it is most convenient to use a long lever). Unscrew it a little and loosen the bolts holding the wheel.
- Using a reliable jack, we lift the rear side of the car, where the bearing is actually changed.
- Unscrew the nuts and remove the rear wheel from the studs. We dismantle the brake drum.
- Unscrew and remove the hub nut, take out the thrust washer.
- We take the previously prepared puller in our hands and carefully press the hub from the axle.
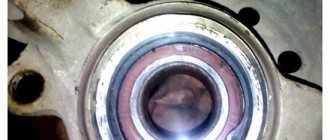
- Now we take the hub, install it and clamp it with a vice. Remove the retaining ring (use a puller).
- Press the bearing out of the rear hub. Then, using a brush with metal bristles, we clean the inside of the hub from dirt. We press the new product back in. Don't forget to install the special retaining ring correctly.
- Taking advantage of this opportunity, we clean the brake system elements from rust and contaminants.
- We put the hub back on the axle element. We return the brake drum to its place and put the wheel back on.
- Tighten the wheel bolts. Let go of the raised part of the car until the wheel is firmly in contact with the ground.
- Tighten the hub nut securely using a long-lever wrench (or a special hub wrench). We return the protective plastic cap to its place.
- In order to check the results of the work performed, we start the car engine and start driving.
This completes the replacement of the rear wheel bearing (Lada Granta). As you can see, the process is not too complicated. All you need is a good specialized tool and some free time.
VAZ 2112: replacing the rear wheel bearing with your own hands, MasteraVAZa
Useful for car enthusiasts - everything about cars
Replacing a bearing installed on the rear hub of a VAZ-2110 is a job that ordinary car owners should not often encounter. This is due to the long service life of the part (hundreds of thousands of kilometers or more). But this is only in theory. In reality, the condition of the roads makes adjustments to the life of the rear wheel bearing, which wears out faster and, sooner or later, requires replacement. What are the features of this work? In what order should it be performed? Let's consider these points in more detail.
How to check a bearing?
To avoid problems in the future, it is important to promptly identify the faulty part and replace it. The main signs of a malfunction include the appearance of a “howl”, hum or other extraneous sounds that intensify when turning. All these symptoms indicate the need to check the rear wheel bearing and, if a malfunction is detected, then replace the part.
Checking the part for integrity is done as follows:
- Fix the wheel, which is located diagonally, on the opposite side from the jack installation point. Now hang each of the rear wheels separately. Thanks to this approach, it is possible to accurately determine the source of the noise and not have to change two bearings at once.
- After lifting the car, spin the wheel as much as possible. The presence of noise similar to a hum is the main sign indicating the failure of the rear wheel bearing and the need to replace it.
- If the check does not give 100% confidence that there is a breakdown, check the wheel for lateral play. Grab the edges and roll the wheel in different directions (away from you and towards you). A failed bearing is indicated by the presence of movement of the wheel around the axis.
Video: How to check a wheel bearing
If the video does not show, please refresh the page or » style=»color:#CC3333″>click here
The modern market is saturated with spare parts, which simplifies the choice for car owners. If desired, you can buy a bearing or hub assembly. On the other hand, there is often no need to spend money on an assembled unit. And replacing the rear wheel bearing itself is a task that even a beginner can handle.
Rear wheel bearing replacement process
When the fault is found and the decision about the need for replacement has been made, get to work (see video “Replacing the rear wheel bearing of a VAZ 2110-2112” below). To begin, stop the car from the front, and then remove the fixing bolts on the wheels. Next, remove the center cap and turn the hub nut.
Now place the jack on the desired side and lift the car, followed by installing the trestles. Once the wheel is off the ground, tighten the retaining bolts completely.
FIRST STAGE - dismantling the drum and hub:
- Treat the area for mounting disc brakes with WD-40 or a similar compound. Alternatively, brake fluid or diesel fuel will do.
- Tap the guide bolts with a hammer, then tighten them with a wrench.
- Remove the brake drum. If problems arise at this stage, screw the bolts into the threads, achieve a slight tension, and then repeat the tapping. Often such actions produce results, and the drum can be removed. As a last resort, when the methods discussed above do not produce results, use a special puller.
- Tighten the center nut completely. Theoretically, it can be unscrewed at the beginning of the repair, after which the hub, drum and wheel as a whole can be dismantled. But it is not recommended to act in this way, due to the risk of damaging the pads.
After completing the work, pull the hub off the axle. If one of the bearing parts remains in the same place, displace it using a chisel or a special puller. Carefully inspect the axle for signs indicating that the bearing has rotated. If so, replace the bearing mounted on the rear hub.
Make sure that the brake cylinder is not leaking and assess the degree of wear on the brake pads.
SECOND STAGE - pressing out the bearing:
- Remove the retaining ring mounted on the hub. To do the job, use a screwdriver or duckbill.
- Clean the edges from traces of corrosion, and then treat the assembly with WD-40 or another similar compound.
- Press out the bearing. There are three options to choose from - use a heavy hammer, a special puller or a press.
The pressing process deserves special attention. First, find a flat, hard surface and then install the hub on it. Next, place the mandrel and apply several blows (use a sledgehammer or hammer). The main task is to displace the bearing from its original position, and then place the hub on a vice. When performing work, consider two points - ensure a high-quality stop for the unit being processed, and also free up additional space where the bearing is planned to be “dumped out”.
Make several blows and knock out the rear wheel bearing completely.
Video: Replacing the rear wheel bearing of a VAZ 2110-2112
If the video does not show, please refresh the page or » style=»color:#CC3333″>click here
THIRD STAGE - installation of a new bearing:
- Direct replacement with a new bearing begins with surface treatment of the seat. Clean it with sandpaper, remove even the slightest traces of corrosion and wipe it with engine oil.
- Unscrew the purchased bearing using a bolt through a washer of a suitable size. Choose the latter taking into account the parameters of the internal volume. Please note that the design of the bearing is double-row, so it will have to be disassembled.
- Clear the previously used surface and place the hub on it.
- Mount the twisted bearing on top, having previously lubricated the contact surface with engine oil.
- Using a small hammer, weighing 500 grams, trim the part flat.
- Select a mandrel of the appropriate size (you can use a pry bar), and then hit it on the pressed assembly. At this stage, proceed carefully - do not overdo it. Inflicting strong blows can cause the knot to become skewed.
- Watch the bearing move. When the part is halfway in, start hitting harder. As soon as you reach the cut part of the part, install the old mandrel and use it for further work. Please note that hitting hard is not allowed. This is explained by the fragility of the part made of high-carbon metal.
- Punch the knot until it stops. If there are problems with the installation of the last element (stopper), most likely the bearing has not taken its place. When everything is done correctly, the stopper fits into the groove intended for it without any problems.
FOURTH STAGE - assembly.
The last step in replacing the rear wheel bearing is to reassemble it. First, place the hub on the axle. First remove the bolt used to tighten the cage. Next, tighten and tighten the nut in the central part. Please note that it is not advisable to install the old nut - install a new one. Now install the thrust washer, put on and screw the previously removed brake system drum.
Reinstall the wheel and make sure it turns easily. There should be no extraneous noise or other strange sounds. If there are no comments, lower the car and remove the jack. Finally, tighten the hub nut and wheel bolts.
If any aspects of replacing the bearing installed on the rear hub remain unclear, watch the instructional video or photo. Thanks to the step-by-step instructions, there should be no problems with dismantling the old part and installing the new part. At the same time, it is possible to save money on visiting a service station.
Materials: https://autoinfa.com/post.php?id=417
Signs of a faulty rear wheel bearing on a Grant
In order to replace an element in a timely manner, you need to know the symptoms that indicate its inoperability. Below are some of the most common:
- Vibration during vehicle driving conditions. Vibration can be felt both in the car body and in the steering wheel when driving. If such signs appear, a thorough diagnosis and (or) replacement of the unit is immediately carried out.
- The appearance of a specific hum, crunching noise when moving. Such sounds indicate mechanical damage and destruction of the hub mechanism (spherical elements).
How to change the wheel bearing on a VAZ 2110
You need to familiarize yourself with the design of the hub (figure below). Disassembly of the unit is carried out strictly on a flat surface, a lift. It is necessary to engage first gear and put the wheels on the “shoes”. You will need a standard set of tools:
- needle file;
- socket head at “30”;
- narrow chisel;
- hammer;
- spanners for 17 and 19;
- mandrel for knocking out clips;
- torque wrench for tightening the hub nut.
Node device:
1 — steering fist; 2 — internal anti-splash ring; 3 — steering knuckle ring; 4 — lock bearing ring; 5 — hub bearing; 6 — front hub; 7 — anti-splash ring; 8 or 10 — hub cap; 9 — cap seal; 11 - nut; 12 — hub washer
Necessary tool
Before you start work, you need to prepare all the tools and assemble them in one place:
- Special puller for bearing removal.
- Collar.
- Head at "30".
- Keys or sockets for “17” and “19”.
- Mandrel for knocking out the hub.
- New wheel bearings.
The tool is assembled and ready to use
Preparatory work
Make sure that the workplace is well lit, and it is best if it is on a viewing hole or a lift. Because this is the only way to talk about high convenience when carrying out such work. It would also be a good idea to familiarize yourself with the detailed diagram of the location of the bearing on the front hub of the VAZ-2112.
Thanks to this illustration, the diagram becomes very clear.
Step-by-step work order
First of all, we place the car in a stationary state, put on the handbrake, and, if desired, install wheel chocks. And while the car is on the surface, we tear off all the bolts on the front wheels.
We unscrew the torn bolts and put them aside. We remove the wheel.
Next, we need to use a “30” wrench to unscrew the hub nut
Please note that during its dismantling, you will have to press the brake pedal, and for this we will need an assistant.
Then, using a screwdriver, press out the calipers. When this operation is completed, having the key at hand at “17”, unscrew the calipers from the steering knuckles.
- Carefully unscrew the brake disc from the hub.
- Then, making gentle blows, we release the hub.
- And then the CV joint from the bearing.
Replacing the wheel bearing
Then, when access to the hub bearing is completely open, there are several ways to replace it.
First way
In this case, it is necessary to have a special puller to remove the bearing.
- First you need to take care of removing the stopper.
- Using this device, you simply remove the old bearing and install a new one in its place.
- After this, we carry out the entire assembly process in the same order as removal.
- The advantages of this method include the fact that during this work there is no need to touch the wheel alignment bolt, therefore, you will not have to add additional work.
- The disadvantages of this method include inconvenience during the process. Because you have to contrive and take an extremely uncomfortable position.
Second way
To carry out this work, it is necessary to carefully dismantle the steering knuckle and completely remove the hub.
- Moving to the workbench, we replace the wheel bearing.
- To do this, dismantle the retaining ring and knock the bearing out of its seat, or press it out.
- Next, we perform the installation in reverse order, having previously cleaned the surface of the hub.
Advice! Before you begin removing the alignment bolts, mark their position with a marker or chalk. In this case, the marks should indicate the current position of the bolt on the rack and the previous location of the knuckles. Thanks to such marks, during assembly it will be much easier to navigate the position of these bolts. Although it will not be possible to return to the previous state, it will still be possible to minimize it.
Putting marks
- We put marks.
- We knock out all the bolts from the fist.
- Remove the mounting bolts on the lower ball joint.
- This will knock the bearing out of the hub.
- Remove the retaining rings.
- Press out the bearing.
- We mount a new bearing, having previously cleaned the space of the hub and generously coated its surface.
This repair method will be very effective when not only the wheel bearing is subject to repair, but also most of the VAZ-2112 chassis. Such elements include the replacement of steering tips, silent blocks of levers and ball joints.
Third way
To perform work using this method, it is necessary to remove the entire rack completely.
The stand has been dismantled.
- Next, using a vice, we replace the wheel bearing.
- Because this is how the replacement will happen quickly and efficiently.
After dismantling the bearings, we install everything in the reverse order, assemble the rack and mount it on the car.
Do we make the puller ourselves or buy it?
If you do not want to knock out the bearing, you can purchase a special puller in stores, since the entire process of working with such a device becomes easier and the time required for work is reduced. This also applies to bearing installation work.
Hand-made hub puller
How to determine the need for replacement?
Strong noise, humming of the rear hub bearing of VAZ 2109, 2110, “howling” from the rear, which intensifies when turning, clearly indicates the need to check the condition of the rear hubs. The verification methods are quite simple:
- Be sure to stop the wheel diagonally opposite from the jacking side, and then jack up each rear wheel one by one. (Why each? The fact is that very often there are errors in determining the side of the hum, and even more often there is a need to replace both bearings).
- When the wheel is raised, you need to try to spin it as much as possible. If at the same time you hear extraneous sounds similar to a hum, you don’t have to check further - replacement is necessary.
- If in doubt, you can also check the lateral play of the bearing by grasping the edges of the wheel and rocking it towards you - away from you. If you feel the wheel moving on the axle, the bearing needs to be replaced.
Automotive stores can offer you both a separate bearing and a hub assembly. We see no point in purchasing an assembled unit (except for the cases described below), where replacing the bearing is not at all a difficult matter.
When to change the rear bearing
To know for sure that the part needs to be replaced, you need to lift the rear wheels one by one and do the following experiments with them. The wheel is spun by hand as much as possible, then it is allowed to rotate freely. If you hear any sounds in the form of crunches and noises, then the wheel bearing needs to be replaced. In addition, in addition to this feature, one can mention that during the rotation process, the wheel stops very quickly.
Many drivers make the mistake of hanging the wheels not one by one, but two at once. In this case, the load on the suspension changes and then you can get a rather inaccurate diagnostic result.
To dispel all doubts, you can grab the edges of the wheel and try to rock it. If you feel noticeable play in the wheel relative to the other axis, then the bearing definitely needs urgent replacement.
VAZ 2110 wheel bearing dimensions, number and marking
Before buying a new spare part, make sure its exact dimensions. The dimensions of the VAZ 2110 front wheel bearing are usually standard, as are the markings. Keep in mind that this bearing is also used in VAZ 2108, 2109, 2111, 2112 models.
- Inner diameter (d): 34mm;
- Outer Diameter (D): 64mm;
- Width (H): 37 mm.
Front bearing number for VAZ 2110: 6-256907 (marking)
How to choose a ball bearing for a VAZ 2110 hub
When purchasing a front wheel hub bearing for a VAZ 2110, focus on three options:
- JSC Saratov Bearing Plant - professionals claim that the company produces the best wheel bearings. The plant's products are additionally marked "SPZ".
- The Samara Bearing Plant produces inexpensive products that are not of good quality. Suitable if you want to save money. The front wheel bearing will need to be replaced after 20,000 kilometers. The price of a VAZ 2110 wheel bearing from this brand is two times cheaper: 150-320 rubles.
- 23 GPP (VBF, Vologda) – this manufacturer is considered the best among its competitors. These products are rarely counterfeited, are of high quality, are inexpensive and are now in demand among domestic car owners.
The price of a part for a hub from these manufacturers: from 800 rubles.
Recommended bearing manufacturers
| No. | Manufacturer, country | Catalog number | Dimensions, mm | Price, rubles |
| 1 | VBF, Vologda | 2108-3103020-01 | 34*64*37 | 900 |
| 2 | LGR | LGR-4703 | 600 | |
| 3 | LGR | LGR-4721 | 850 | |
| 4 | SACHS | 34640037 | 800 | |
| 5 | SKF | 309726DA | 1250 |
It is important to know:
During the pressing process, the p/w will be completely destroyed. Therefore, pressing should be done if replacement is actually required.
Replacing the rear wheel bearing of VAZ 2113, 2114, 2115
Replacing the rear wheel bearing of VAZ 2113, 2114, 2115
The other day a very nasty squeak appeared in the rear left wheel. I decided that the cylinder was a working brake cylinder, which might be causing the pads to move poorly, but it turned out that the bearing itself was jammed. It was already unbearable to drive with a creak. A faulty rear wheel bearing of a car makes itself felt by the appearance of play in the wheel, which is easily determined by the presence of noise in the rear of the car when driving, or by the appearance of a knock if the play in the bearing has become too large. You can finally be convinced of the malfunction if you jack up the car and swing the hanging wheel - if there is play, you will certainly feel it. As a rule, the rear hub bearing cannot be adjusted and if it fails, it must be replaced. If the play is not too large, then you can try to tighten the hub nut a little; as a rule, this step helps to get rid of it, but not for long and, in the near future, replacement will still have to be done.
I bought this one
I agreed on the box and the lift and immediately changed everything. Let's first “go through” the tools and devices that will be necessary to replace the rear wheel bearing on VAZ-2108, VAZ-2109, VAZ-21099, VAZ-2110, VAZ-2112, VAZ-2114, VAZ-2115, VAZ- 1119
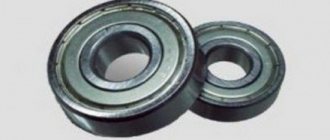
Its main area of application is the rear wheel bearing of VAZ 2108, 2109, 2110, 2111, 2112 cars. It has the following design characteristics - ball, angular contact, double-row, closed type (seals on both sides). Since it has two rows of rolling elements, it is capable of fixing the shaft under axial load in both directions. There is a roller analogue of this bearing - 537906, it has an increased load capacity, but also a lower rotation speed.
Since VAZ cars are widely used not only in our country, but also abroad, the demand for rear hub bearings is very high - they are produced at four factories in our country: JSC Saratov Bearing Plant (labeled SPZ) - produces according to According to experts, these are the best rear wheel bearings in our country, and they are not very expensive. 23 GPZ (or VBF, Vologda) - among motorists it is considered the best plant, but Saratov bearings are in no way inferior to them in durability, are less likely to be counterfeited and are a little cheaper. SPZ-4 (Samara) - produces products for those who are used to saving. But if you need a high-quality rear wheel bearing, it is best to pay attention to the manufacturers presented above. 20 GPP (Kursk) - currently not produced.
Domestic bearings are produced in accordance with GOST 520-2002, imported in accordance with ISO 15:1998. According to the international designation system, the number of this bearing is BA2B33313C. Technical parameters and dimensions of rear hub bearing 256706:
Inner diameter (d): 30mm;
Outer diameter (D): 60mm;
Ball diameter: 9.525 mm;
Number of balls: 28 pcs.;
Dynamic load capacity: 30.1 kN;
Static load capacity: 25.9 kN;
Rated speed: 6500 rpm. In addition to the jack and the wheel wrench, we will need: a socket wrench set to “30”, plus a long pipe for it; pliers for removing retaining rings; simple pliers or a 12" spanner (for unscrewing the guide pins of the rear brake drum), a wooden block and a hammer; You may need a chisel and a pry bar. And most importantly, to remove and install the bearing, you will need a universal puller for pressing out the wheel bearings. It is advisable to purchase it. With its help you can change not only the rear wheel bearing, but also the front one. Of course, you can carry out the replacement without it (as will be written below), but with it it’s still more convenient and faster.
Diagnostic procedure
Self-checking of the wheel bearing is carried out in the following order. You should alternately jack up the left and right sides of the vehicle and spin the wheels.
Having found a wheel that makes a hum when rotating, you should rock it in different directions. As a rule, backlash is quickly detected. In some cases, this is caused by a loose hub nut. To eliminate this possibility, it should be tightened using a torque wrench and locked. If the play and extraneous noise have not disappeared, the wheel bearing should be replaced.
Since the VAZ-2110 has been out of production for quite some time, it cannot be under warranty. This car is not equipped with overly complex electronics, unlike many foreign cars. Therefore, if you have the necessary tools and some skills, you can replace the wheel bearing on the “ten” yourself.
Replacing the rear wheel bearing on a VAZ-2110
The wheel bearing is one of the important components of the vehicle's chassis. Sooner or later, every car owner is faced with the question of the need to replace this element due to its failure or the end of its service life. You need to figure out how to diagnose a faulty rear wheel bearing on a VAZ-2110 and replace it correctly.
The manufacturer recommends replacing these parts every 100 thousand kilometers traveled by the car, but only in rare cases do they completely use up their resource. Much more often they become faulty approximately 1.5-2 times faster. In many ways, the rate of wear depends on the road conditions in which the car is operated, as well as on the driving style of its owner. Naturally, a lot depends on the quality of the bearing itself.
What to prepare for dismantling?
If you are sure that the part needs to be removed, then stock up on the following tools:
- a set of socket wrenches, and it is advisable that it be supplemented with a long pipe;
- passages, they are necessary in order to remove the locking rings;
- a spanner wrench, with its help the guide pins are unscrewed;
- a wooden block to soften the blow;
- hammer;
- pry bar and chisel.
It is worth considering that by contacting a service station you will not always receive guaranteed quality work. And an incorrectly replaced bearing will fail quite quickly, so it’s quite possible to dismantle this part yourself, and no one will worry about your “iron horse” better than you yourself. So that you don't feel shy, we offer detailed instructions.