Lada Priora is an improved prototype of the well-known “ten”. Modern design and new equipment components have made this budget domestic car quite popular among car enthusiasts. But despite this, every Priora owner strives to improve his car to his own taste, to make it more comfortable and stylish. Often lovers of clean and high-quality acoustics replace their standard audio player with a more modern version. Installing a radio on a Lada Priora has some features, which you can familiarize yourself with in this article.
Modern car players are quite functional and varied not only in external design, but also in configuration, installation and connection methods. When choosing a car player in a Priora, you should take into account all the features of its size, the possibility of connecting connectors and the quality of parts.
Features of installing a radio on a Lada Priora
As a rule, installing a radio on a Priora involves several types of audio players:
- 1 DIN;
- 2 DIN.
2 DIN media player for LADA Priora
These designations indicate the dimensions of the hole for installing the radio, which correspond to the dimensions 180x50x160 mm for 1 DIN and 180x100x160 mm for 2 DIN. If you want to install a more modern version of a 2 DIN radio, the car owner will have to carry out the procedure of sawing the partitions of the front console of the car in order to widen the hole for the player. In some cases, to adjust the dimensions, it becomes necessary to cut out or purchase an appropriate transition frame for the console, which is much more difficult than installing 1 DIN.
If you nevertheless decide to install a 2 DIN system, then it is best to entrust the installation work to an experienced specialist, otherwise there is a risk of damaging both the console itself and the car interior trim.
It should also be noted that 2 DIN standard radios have an extensive range of functions:
- long service life thanks to shock-resistant housing;
- paired amplifiers increase signal reception several times;
- the ability to switch the frequency of the radio signal by all passengers in the car thanks to the Music Zone system;
- function of built-in radio navigator;
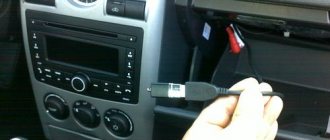
- built-in USB connector allows you to connect external devices to view and play files;
- the presence of a bass amplifier for music for higher quality sound.
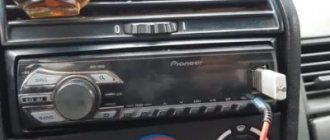
Built-in USB port and amplifier outputs
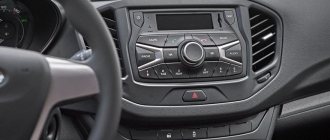
How to Install a Radio on Priora 2
install radio
priority in Lada
Introduction
Lada Prior . The location of the famous "tens" has been improved. Modern design and new configuration details have made this economical Russian car quite popular among car owners. But, despite this, every Priora owner strives to modify his car to his own taste, to make it more comfortable and elegant. How to install fog lights on a Lada Grant. Often lovers of clean and high-quality acoustics change their standard audio player to a more modern version. Installing a radio on Lada Priora has some features that can be found in this article.
Do-it-yourself installation of a radio in a Lada Priora
In the first case, we consider the installation of a 1 DIN type audio player, which does not involve changing the shape and parameters of the plastic base of the console. Before installation, turn off the power to the vehicle by disconnecting the negative terminal of the battery.
It is recommended to divide the installation process of a standard audio player into several stages in the following sequence:
- 1. Preparing the hole for installation. To do this, remove the plastic cover covering the niche provided by the manufacturer for installing the audio player;
- 2. Determination of connectors for connection. In the hole for installing the audio player there are several sockets: for power connections in gray and for speakers in brown;
- 3. Connecting the player to car connectors. If the connectors of the audio player and the machine comply with the ISO standard, it is necessary to make the connection according to the diagram or through an adapter;
- 4. Installing the radio in the standard hole. Remove the magnetic frame and install the housing into the standard hole in the car console. When locked correctly, there will be a slight click;
- 5. Activate the player by pressing the “Reset” button.
Installing an audio player of type 2 DIN is more labor-intensive due to the formation of the appropriate hole size in the Priora console. The installation process is similar to the 1 DIN installation system, the connection is made according to the same principle.
Firmware for Lada Priora radio
Modern technologies are rapidly moving forward, also improving car gadgets. Firmware for the standard Lada Priora radio allows car enthusiasts to expand the capabilities of the player by adding additional functions that the standard software does not have. The updated radio interface can be supplemented with a convenient touch keyboard, fresh programs and new versions of players with the ability to play all audio and video formats.
Radio set from Priora 2
The firmware of the VAZ 2170 audio player system is carried out using an SD card with a capacity of at least 4 GB, formatted in the FAT system.
Firmware for the Lada 2170 radio is quite simple:
- 1. You need to find a suitable program on the Internet and save it to your PC. As a rule, such programs are shared by car enthusiasts on thematic forums;
- 2. Write downloaded files to a memory card;
- 3. Insert the SD card with the necessary information into the provided slot on the radio;
- 4. Restart the player by pressing the “Reset” button, after which the update program will automatically start. Thus, the firmware goes through to completion, as evidenced by the scale on the radio monitor;
- 5. When the firmware is completed, you should remove the memory card and reboot the player, after which you can use the updated interface.
When choosing a program that will be used to flash the Lada Priora head unit, you should pay special attention to its description. Various options for updating may include redundant and unnecessary functions, which will subsequently overload the device's memory and lead to its slowdown.
You should also select a program to expand the device display, otherwise the firmware will require constant screen calibration. The best solution to updating the radio software is to contact experienced specialists who provide this service. This will help avoid some unexpected difficulties when installing the wrong firmware.
Tips for installing a radio in Lada Priora
In order to avoid unforeseen difficulties during the installation of the radio in the Lada Priora, it is recommended to use the advice of experienced car enthusiasts:
- 1. Before installing the radio, you need to thoroughly study the connection diagram for media devices. If the player's connectors are connected incorrectly, there is a high probability of failure of some vehicle systems;
- 2. There are many models of radios from different manufacturers. Some of them have individual connectors with an additional adapter included for the ISO standard. This fact should be taken into account when choosing an audio device for the Lada Priora, since one of the connection options in this situation would be cutting the wires and directly soldering them to the car’s wiring;
- 3. When directly connecting the standard radio, you can use special terminals;
- 4. The connection diagram for the audio player via ISO will remain the same when replacing the radio with a new one.
Do not twist or wrap electrical tape to connect wires directly. This type of insulation is dangerous when operating a car in winter, since at low temperatures the adhesive-based tape is deformed and destroyed, which will lead to a short-circuit in the car's wires.
Reading time: 4 minutes. k.
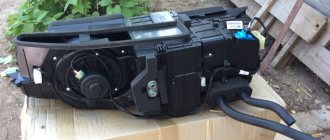
The VAZ plant equipped some of the Priora cars produced with a standard head unit; the basic modifications were only prepared for independent installation of equipment. The mounting sockets are designed for standard products; it is possible to install a 2-din radio in a first-generation Priora, but this requires modification of the internal elements of the instrument panel.
How to install the device itself
The radio is installed in the Priora in a standard socket designed for mounting a 1 Din standard holder. The metal shaft is inserted into a rectangular hole, and then secured using metal antennae, which are bent with a screwdriver. Then the owner connects the cables and antenna, and then installs the head unit housing into the shaft until the side spring clamps are activated. Installation work is completed with the installation of a decorative plastic frame and front panel, then the equipment is tested.
To integrate a 2-Din radio into the Lada Priora, you will need to modify the car's design:
- Remove the battery from the car, and then carefully separate the plastic cover with air channels located in the center of the dashboard. The part is held in place by plastic clips; a mounting spatula is used for removal. Together with the cover, the connecting cables are removed and attached to the back of the cover.
- Disconnect the plugs from the retaining pads (located on the back of the small items drawer), and then connect the media player adapter.
- Connect the adapter to the radio and output an additional power cord (for the red wire).
- Restore power to the vehicle's on-board network and check the correct operation of additional equipment at different positions of the key in the lock.
- Cut a window in the plastic cover that matches the dimensions of the multimedia center body. A hacksaw is used for cutting; the edges are finished using a file.
- Insert a metal clip, which is fixed by bending the triangular antennae.
- Install the trim in its original place, passing the wiring harness through the mounting shaft into the car interior. If the machine does not have an antenna, then it is necessary to mount the device and lay a separate coaxial cable. The cord is routed through the upper part of the cabin under the pillar trims and the headliner. It is not recommended to lay the cable along the floor of the cabin, since passengers will touch the wiring with their feet.
- If the head unit design uses a rear USB connector, the plug can be installed in the glove box or on the surface of the center console.
- Reinstall all the removed parts, and then check the operation of the radio.
If you plan to replace the standard radio in a Priora 2 car (manufactured after 2003), then remove the gearshift lever cover, which will allow you to unscrew the screws securing the trim (additional screws are located in the niche of the cup holder). The central cover is secured with screws located under the radio socket plug, the switch block and the cup holder niche. After removing the standard plastic pocket, it is necessary to secure the player's mounting shaft to the panel frame; the antenna cable is pulled out from the niche under the glove compartment.
Installation on the first generation Priora
To install the car radio in its original location, you need:
- Disconnect the battery from the vehicle's on-board network.
- Remove the 1DIN decorative frame with a box for small items from the center console of the instrument panel. The assembly is held in place by plastic latches located in pairs at the top and bottom of the drawer. Removal is carried out by pulling the part towards you; it is possible to bend the edges with a plastic mounting spatula.
- The rear has mounting points for the factory patch harness equipped with ISO connectors. It is necessary to disconnect the plugs from the box, which is then set aside.
- Connect the pads to the radio and check the operation of the device. Priora cars are supplied from the factory with a constant supply of positive power, independent of the position of the key in the ignition switch. It is necessary to change the wire connection, following the operating instructions for the head unit. The positive signal sent when the ignition is turned on is taken from the rear window heating button.
- Lay the wire leading to the external antenna. The cable runs under the plastic trim of the A-pillars and the roof panel. To reduce the likelihood of noise, the wire is wrapped in fabric insulating tape or foam rubber.
- Reinstall the removed trim elements.
- Connect the antenna power from the ISO connector and check the functionality of the acoustic device in radio receiver mode.
- Place the standard mounting shaft into the hole in the center console. The part is attached using tabs that are pressed out with a screwdriver. During installation, it is necessary to ensure maximum fit density, which will reduce vibrations of the radio when moving.
- Connect the power, speaker and antenna plugs to the connectors on the back of the head unit. Place the radio in the guide shaft until the locking latches engage. Check the tightness of the installation, and then place the decorative frame in place.
installation of 2 DIN radios in prio
It's about how to put
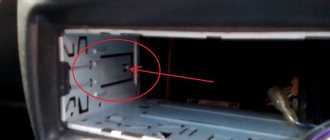
Clarion tape recorder in a double height version instead of two pockets in the car's center console. This 1 DIN hole (there is a pocket or glove box scientifically) in the car is already there, and there is no problem installing a radio of the same size. This standard has been around for a long time and most automakers follow it. Device with two devices for assembly. task for the Master. Remove the glove box using a flathead screwdriver by pressing on the top and bottom edges of it and pulling it towards you. The latches holding it in place can be seen in the picture to the right. At the back of the pockets are the radio connectors, from which the wires go to the speakers and come from the battery. Disconnect them. The lower part of the compartment is usually covered with a decorative cover. Take it off, it won't be useful. The mounting screws are visible on the back wall of this recess. They must be unscrewed. The center console contains six screws. Two of them. in the hole under the upper glove box, screwed at an angle of 45 degrees. Two more. under the convertible top is an ashtray that folds back.
It is also deleted. Did you unscrew? Remove the console. Carefully disconnect all connectors from the switches and fuser unit. In this car one wire did not have a connector within reach. alarm LED wire. But he is not regular. It was cut off and later restored after all the work was completed. This is what the Priora center console looks like from the rear. We remove it from the car. Then unscrew the internal spacer to support one head unit. This is also an optional part in this car.