Improved connection of trunk lighting for Lada Granta, Kalina and Priora
When the trunk is opened, the light comes on only when the lights are on - this is a drawback of the standard connection of the trunk light of many AvtoVAZ cars (including Lada Granta, Priora, Kalina).
We offer you a method that will make the lighting in the luggage compartment independent. You will need : several meters of wire, a multimeter or test lamp, electrical tape.
In order for the backlight to turn on when the trunk lid is opened, regardless of the dimensions, it is necessary to lay a wire from the ceiling (navigator) lamp on the ceiling (where there is a constant + 12V) to the trunk light. It is not at all necessary to remove the roof trim, just bend it a little from the edge or move it out a little from the door seal.
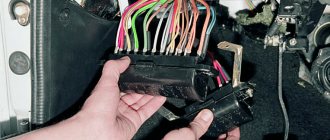
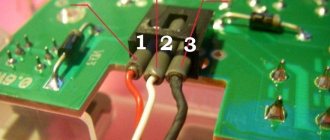
one end of the wiring to the central wire of the interior lamp connector (for Lada Priora) or to the outer wire for Lada Kalina/Granta (white or white-red). The color of the wires may vary depending on the car model or its configuration, so first check it with a multimeter or test lamp. We hide the wire under the door seal and run it down to the lamp in the trunk.
The other end of the wiring goes to the light in the trunk. Two wires come to it, one of them is ground, and the other is + 12V from the dimensions (usually yellow-red or yellow). It is also recommended to check with the device first. Disconnect the second wire and isolate it. In its place we connect the wire from the navigation lamp. Ready!
Lada Priora front lamp diagram:
- far left (red) – “mass”
- central (white) – +12V
- far right (black) – ground (door switches)
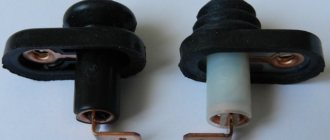
Diagram of the front lamp of Lada Granta (pre-style) and Lada Kalina:
- far left (black) – “mass”
- central (green) – “ground” (door switches)
- far right (red) – +12V
Diagram of the front lamp with ERA-GLONASS for Lada Granta FL:
- 11 and 14 – +12V appears after turning on the main relay (turning on the ignition, opening the doors). The power goes out 2-5 minutes after removing the ignition key.
- 15 – “mass”.
- 17 – “ground” (door limit switches), which appears for a while when the doors are opened.
By the way, in the “Lux” configurations, the middle wire of the ceiling lamp has an auto-shut-off function after 10 minutes of inactivity, which is very convenient.
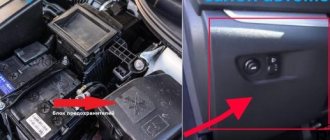
Let us remind you that constant +12V can be taken from other sources, for example:
- From the ignition switch (pin 50)
- ISO connector of the radio (A4 contact)
- Cigarette lighter (middle wire white-red or red-blue)
Have you made the trunk lighting independent of the dimensions? Perhaps you have thought about installing additional lighting in your doors?
Source: xn--80aal0a.xn--80asehdb
Car alarm connection points for Lada Priora
Block to the right of the brake pedal: hood switch (-) - white/black in the middle connector ignition (+) - orange in the middle connector trunk opening (-) - blue/red in the small connector door switch (-) - white/black in the small connector trunk limit switch (-) - yellow/red in the small connector
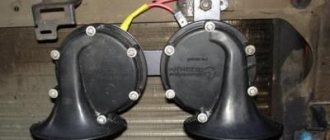
original siren - gray/black on the fuse box
To control the central locking , cut the brown wire in the driver's door and connect it according to the diagram:
Priora trunk light
Slowly I realized my old dream - trunk lighting from constant +12V, i.e. without included dimensions. Once upon a time I did this on the previous 21093i. There will also be an option to manually turn off the backlight when the rear door is open for a long time. The “VAZ 2101 interior lamp (OSVAR) PK140B” lamp was selected as a lamp with a switch (on 9, the “VAZ 2110 trunk lamp, VAZ 2102 interior lamp with lamp. (OSVAR) PK142” was used). I placed it on the right side under the speaker shelf, symmetrically to the left standard lamp.
I made an additional bracket for the new lamp from 2mm fiberglass.
On the right shelf, I cut out the missing window for the lampshade and screwed the bracket there with two M4 screws. It turned out to be quite reliable.
I cut out a window in the felt upholstery and installed a lampshade. It turned out just like from the factory.
I decided not to touch the standard left lamp, let it remain with the factory operating logic (depending on the dimensions). I laid the wiring for the new right lamp in a corrugation under the right shelf, raised it to the ceiling along the right rear pillar, securing it with nylon ties to the standard wiring. At the top, I brought the corrugation under the ceiling trim to the middle and pulled only one wire (in the corrugation) to the rear ceiling light. There I connected to the white-red wire (constant +12V). The lamp in the new flashlight is connected via a diode from constant +12V. The wire to the lock switch (yellow-red wire) will go along the ceiling to the left to the rear left pillar and go down along it under the left shelf, where it will be connected.
Everything works, including the standard alarm. Now the entire inside of the luggage compartment is clearly visible in the dark without running around and turning on the lights. I wish I had done this much earlier. +You can always turn off the light when the rear door is open for a long time.
The photo shows strong light from the lamp.
The lamps arrived and were installed (glove compartment, standard left trunk light, new right trunk light). Photos will come a little later.
Illumination with a new flashlight in the dark using an LED lamp.
We carry out the work when replacing a lamp or trunk light. The lamp is installed in the trunk of the car in a special bracket under the rear parcel shelf. Disconnect the wire terminal from the negative terminal of the battery. Raise the trunk lid.
On the left side, use your finger to press the plastic lock of the lampshade... ...and remove the lampshade from the hole in the rear parcel shelf of the car.
We remove the lamp from the lampshade... ...and replace it with a new C5W lamp. To remove the lampshade, use a screwdriver to press the lock of the wire block and disconnect the wire block from the lampshade. Install the trunk light in the reverse order.
When the trunk is opened, the light comes on only when the lights are on - this is a drawback of the standard connection of the trunk light of many AvtoVAZ cars (including Lada Granta, Priora, Kalina). We offer you a method that will make the lighting in the luggage compartment independent.
You will need : several meters of wire, a multimeter or test lamp, electrical tape.
In order for the backlight to turn on when the trunk lid is opened, regardless of the dimensions, it is necessary to lay a wire from the ceiling (navigator) lamp on the ceiling (where there is a constant + 12V) to the trunk light. It is not at all necessary to remove the roof trim, just bend it a little from the edge or move it out a little from the door seal.
one end of the wiring to the central wire of the interior lamp connector (for Lada Priora) or to the outer wire for Lada Kalina/Granta (white or white-red). The color of the wires may vary depending on the car model or its configuration, so first check it with a multimeter or test lamp. We hide the wire under the door seal and run it down to the lamp in the trunk.
The other end of the wiring goes to the light in the trunk. Two wires come to it, one of them is ground, and the other is + 12V from the dimensions (usually yellow-red or yellow). It is also recommended to check with the device first. Disconnect the second wire and isolate it. In its place we connect the wire from the navigation lamp. Ready!
Car alarm connection points for Lada Priora 2011
Ignition switch: + 12V - brown Starter - red IGN - blue/black
Tidy: Tacho signal - brown/red Handbrake - brown/blue (For more details, see Diagram 1)
Connector X3 (See Fig. 1) BCM: Driver's door switch - blue/black Right front door switch - brown Rear door switches - gray/red Trunk switch - yellow/red Opening the trunk (low-current input, possible without a relay, additional channel directly to alarm) - blue/red
Connector X1 (See Figure 1) BCM: Turns - blue, blue/black
Ts.Z. - brown; The wire is located inside the driver's door, in the harness from the button block. (See Diagram 3 for details)
Hood tip - white/black; Connector X2-17 (If an engine temperature sensor is used, then according to scheme 2)
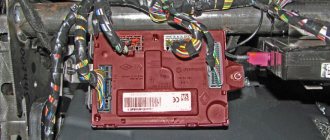
The block is located behind the panel, near the gas pedal. To remove the block, remove the left and right panels, unscrew the two 10mm nuts, left and right, securing the block.
3.1. Connection to central locking
When connecting the central locking (see diagram 3), if you connect only to the brown wire in the driver's door, then all doors will close and only the driver's door will open. To open the remaining doors, you need to use a wire in the alarm for two-step opening of the central locking system, and connect according to the diagram below.
The remaining doors are opened by the second impulse, relay K1. Relays K2 and K3 are also activated; they are needed to block the right power windows. If this is not done, then when you open the remaining doors, the right windows will open slightly for 0.8 seconds, i.e. from the impulse to open the central locking, the second step. It is necessary to block the power windows due to the peculiarities of the electrical circuit of the Priora doors.
If the configuration does not include power windows on the rear doors, then relay K3 does not need to be installed, and accordingly, cell X1-11 in connector X1 is not used. (The color of wire X1-11 is not known.) If the configuration does not include power windows at all, then there is no need to use relay K2.
3.2. Electrical package controller circuit
The interior lighting of the Priora does not light up
Sooner or later, most car owners are faced with the fact that the interior lighting stops working. Let's look at the reasons for this malfunction and figure out what to do in this or that case.
To understand where to look for the cause of a breakdown, you need to understand how the interior lighting system generally works. Here is a typical simplified diagram. It may include many more different devices, but the cars are different and it is impossible to draw a diagram for each specific instance. In most cases, the interior light is connected like this:
Now let’s go over the reasons that can cause interior lighting to fail.
Reason #1: Burnt out light bulb
It’s very simple and elementary, but some car owners start looking for a “fault” in the depths of the electrical system. No need - just check the lamp. You can just look at the thread, or you can ring it with a tester. The latter option will help you identify a burnt-out light bulb much more accurately - sometimes it is not the spiral that burns out, but the contact inside the base, and everything looks quite good in appearance.
Reason #2: Blown fuse
The second reason why the interior light may not work is a blown fuse . Almost always, interior lighting “shares” a fuse with other devices. Therefore, if, along with the light, a clock or radio tape recorder, for example, stopped working, then the likelihood of a blown fuse is extremely high.
Find the correct fuse in the appropriate block and make sure it is intact. If the fuse does blow, there is probably a reason for this - a short circuit. Therefore, it is not a fact that after inserting a new fuse everything will work. It is quite possible that it will burn out immediately. If this happens, there is definitely a short circuit. Need to know how to find a short circuit in a car
.
At the same time, a fuse does not always blow due to a short circuit. Its jumper may simply be old (tired) or made of poor quality material.
Reason #3: Oxidized contact
There are plenty of contacts in the interior lighting circuits. But the contacts inside the lampshade and door limit switches are most susceptible to oxidation. Limit switches very often oxidize in many Russian cars, since they do not have a rubber casing.
It is very easy to identify an oxidized contact - just look at it. Remove the lampshade, disassemble it and make sure the contacts are clean. If there is oxide, clean it with a small flathead screwdriver or fine sandpaper. Do the same with the limit switches - each such switch must be removed and inspected. Before removing the limit switches, it is better to disconnect the battery, because very often during removal the positive wire of the switch shorts to the body.
Reason #4: Broken wire
The reason why the light in the cabin does not work may be a broken wire. Wires that are forced to bend due to their location are especially susceptible to damage. So, the wires running into the trunk lid or doors often break. This occurs due to frequent twisting or bending of the wire when opening these body elements. In theory, the interior lighting wiring does not go into the doors or trunk, but the general meaning is the same - the wire can be broken, crushed or broken.
To find the location of the wire break, you will need a tester. With its help, you need to check every section of the electrical circuit, starting from the ceiling light to the fuse box.
Here are common reasons why your interior lights may not be working. However, as mentioned at the very beginning of the article, various devices can be included in the interior lighting scheme. For example, interior light control unit, alarm system, on-board control system unit, etc. The presence of such devices complicates troubleshooting, because the cause may be inside the unit and even represent an electronic “glitch”.
You can “calculate” a certain electronic unit that prevents the light from working using the same tester. Roughly speaking, if the voltage through the interior lighting wire enters this unit, but does not come out, then there is an electrical break inside. It is better to entrust the diagnosis of complex electronic devices to specialists.
Salam to everyone. Lada Priora 1.6 16kl 2007. The interior lamp does not light up. I changed the light bulb and the lampshade itself - it didn’t help. What else could be the problem? The light in the Prior's cabin does not come on.
Similar articles
10 comments on “The light in the Priora's interior does not come on. The interior lamp does not light up"
Look for the plus comes! If there is no safety fuse, and the minus comes from the limit switches
Maybe there is no battery, it could also be from it
The reason is the prior.
The interior light works with one front and rear brake lights
Check the front or see if the brake lights are on
Maxim, the feet are on, the rear foglights are on, everything is on. The headlights are also ok
Guys, help me out. The lights in the interior and on the doors do not light up. Only the driver's door light is on. And the tidy doesn't work. The arrows are down. What could it be?
Have a great Friday everyone!
by Adminrive · Published 02/20/2015
Who rides TRW brake discs?
by Adminrive · Published 07/17/2015
The light in the trunk does not come on
Has anyone encountered such nonsense? Recently I was driving along an icy, bone-crushing road like a washboard. It didn’t seem to shake much, but then the light in the trunk stopped working. installed a new one. still doesn't light up. where to look next? Is there a fuse or a cover switch? I didn’t see anything. I climb into luggage often, so I need lighting. car on avatar. what the hell is this?
check if there is power, if not, check the circuit.
colt1980
I think so too
colt1980
hks-ss
are there any other options?
guys, no offense, but I didn’t ask whether to score or not. I will repeat. I use the trunk often
and don’t want to fumble around in the dark in the cold. Well, I take care of cars in general. and with your approach you can race without oil in the engine - it doesn’t affect the speed
VIKTOR33
Diagnostics with a tester, check the power supply!
hks-ss
Yes, that's understandable. Is there a button in the luggage, similar to the cabin door, which, when opened, provides power to the flashlight? Or is the light always on? If so, where is it hidden? There is no point in installing a fuse on such a lamp, but is it still there or not? the rest of the lighting is fine.
Well, there has to be a limit switch, it can’t be on there all the time! Location, to be honest, I don’t know
VIKTOR33
On the back of the trunk lock, there is a limit switch “jerk” it and everything will work! frequent x..
Pole WRX
Is the counter part located on the lid or on the shelf?
VIKTOR33
On the rear panel, shorter at the bottom, there is a loop, on the side of it there is a limit switch, I often get it stuck)))))))
Pole WRX
Thank you. I'll fuck him up tomorrow
VIKTOR33
come on, come on, otherwise he doesn’t want to work))))
Pole WRX
You need to rub some kind of Vaseline on it so that it doesn’t get stuck there.
I'll raise an existing topic guys. Help) I keep my car in perfect condition. Then I decided to remove the LED lighting in the trunk and install a stock lamp and a stock lamp. I bought a new original lampshade. I started removing the diodes, shorted one of them, and the trunk went out. and it doesn’t light up anymore (((checked all the previous ones! everything! everyone is alive. And there’s nothing on the list for the trunk. Everything else in the car continued to work. I checked everything: interior lighting, glove compartment, lighting the fir tree., in general, everything is working. trunk is silent(((2005 horse restated America.
The trunk is hanging from the interior light. ring the wire that is now hanging on it plus minus or nothing at all?
(((I can only get to the machine tomorrow with a tester. What are the options? If there’s nothing there?
Look for what's missing, walk along the wire
I don’t know how it is on the gd, but on my Hz on the interior light there is always a plus on one of the wires and a minus comes to the other wire when the door is opened (or when the light is turned on manually).
measured it, silence. by zeros. nothing comes to the chip at all. What could have happened due to the short circuit of the diode? why didn’t the fuse blow out?((options: just open the seat shelf and look at all the wiring. (
In short, there are 2 wires. Blue with a red stripe is a permanent plus, from the same fuse that is responsible for the interior light. Yellow with a red stripe is a minus that appears when you open the trunk (if a sedan, the diagram on a carriage is more complicated).
Trunk lighting Prior sedan
Good day, dear Drayvovites! Everyone knows FAT
minus the trunk light of the Priora car - it lights up only when the dimensions are on. That is, if I need to put something in or take it out of the trunk at night, I have to go open the door, turn on the lights, open the trunk... a hassle, in short! It’s not thought out, and there’s just one dim light bulb - as they told Masha Dobkin “... this is lean crap!” Using figures of speech, let’s move directly to the topic of installing the trunk lighting in the same light theme with the lighting of the legs www.drive2.ru/cars/lada/p…shenkoeo/journal/3052497/, so that everything was complementary.
The constant + was pulling from the + foot lighting, but it just so happened that it was coming from the lampshade. Fortunately, the node of this contact is located next to the fuse block, in which case, I can power it from the cigarette lighter. The on/off button is located on the plastic lining of the trunk lid.
I used 70 cm of green diode tape (tape parameters: 60 diodes per meter, diode dimensions 50x50, moisture resistant). Attached the tape to a plastic construction corner
But very soon I stopped liking it, for the reason - the diodes are visible, the diodes are blinding, and it’s somehow collective farm...
An aluminum profile for an RGB strip was purchased at a hardware store.
Sold by 1m. The length of the required profile is 75 cm. The kit includes a profile, a diffuser lens, and 2 plugs. The color of the aluminum is silver, which matches the color of my car. I didn't paint anything. I drilled a hole at the ends of the profile for attaching screws. I drilled one hole in the bottom of the profile to exit the wires of the tape. RGB tape was used. But I didn’t install a controller (I simply saved money). I connected the Red+Green+Blue contacts into one and got a white color. I brought out 4 wires (and this is Red + Green + Blue = 1 is minus and +). I brought out 4 wires for the purpose of further supplying an RGB controller. I glued the tape to the bottom of the aluminum profile. I marked holes for fastening in the beam, drilled and screwed in the profile screws. I didn’t change the location of the button; I didn’t think it was necessary. This is what I got.
We carry out the work when replacing a lamp or trunk light. The lamp is installed in the trunk of the car in a special bracket under the rear parcel shelf. Disconnect the wire terminal from the negative terminal of the battery. Raise the trunk lid.
On the left side, use your finger to press the plastic lock of the lampshade... ...and remove the lampshade from the hole in the rear parcel shelf of the car.
We remove the lamp from the lampshade... ...and replace it with a new C5W lamp. To remove the lampshade, use a screwdriver to press the lock of the wire block and disconnect the wire block from the lampshade. Install the trunk light in the reverse order.
The content of the article:
Installation of additional trunk lighting of Lada Priora
Immediately after buying the car, I was depressed by the flashlight in the trunk. There was absolutely no sense in him. Replaced it with 6 powerful LEDs. There was much more light, but it was still not enough, because the entire luggage compartment is lined with black light-absorbing material and there is nothing there to reflect light. Some time ago I got hold of an LED strip at work. I carried it for a very long time and could not find a use for it. And so it came in handy for me. I bought male and female connectors like this
I cut a piece of tape of the required length and soldered one of the connectors to it
Then I decided that I would power this tape through a separate fuse, because I didn’t even know approximately how much it consumes. The second connector was also soldered.
Next, I tested the tape and it turned out that it consumes only 250 mA.
Without further ado, I attached the tape with four plastic clamps to the top crossbar of the Tekhnomaster body reinforcement. The tape went from the bottom of the crossbar.
Several times I had to remove this crossbar to transport large items. It is easy to remove - it takes about 10 minutes. Therefore, if in the future I need to remove it again, I will simply disconnect the connectors of the tape and remove the crossbar along with the tape.
I pulled out the connectors for clarity. In fact, they are hiding under the skin.
Well, the result of the work done. I took this photo specially without flash. Oh, yes, I powered the tape from the trunk light.
There is so much light that I can even give half of it to someone
Luggage shelf lighting for Lada Priora
Someone the other day was interested in how the trunk rack illumination would be implemented. Here is the report. It's simple. I bought a semi-luxury Priora lamp, installed bright LEDs in it instead of the standard incandescent lamp, and embedded this lamp into the plastic trim of the trunk door. I laid the wires inside the rear door through the standard rubber corrugation. That is, I simply added a couple of wires to those already there. I used fiberglass cable traction for these purposes.
The plastic is very soft and can be cut easily with a knife. By the way, it scratches just as well