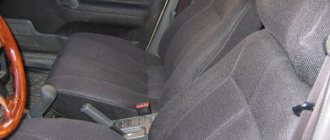
Good day, dear readers! In the eighth issue of the BZ I will tell you about the selection and installation of seat covers for the new Lada Granta.
Since the car was originally purchased for use in a taxi, it was decided to immediately install seat covers to protect them from all sorts of “surprises”, otherwise, you know, anything can happen... Without thinking twice, my wife and I went to the nearest store, where car covers were sold.
Advertising
Mounting features
To fasten eco-leather car covers, cord, Velcro, hooks, elastic, various latches, etc. are usually used. When attaching a cover, you need to know the following:
- In the process of putting the product on the seat, fasteners made of elastic bands with hooks can be pushed under the plastic decorative parts located on the side, using a thin wooden strip like a ruler for further threading them below.
- It is important to know that the fastener must be made exactly at the location of the fastener, therefore, when putting on the product, it is necessary to apply force to tighten it. The main thing is not to overdo it, otherwise you can damage the car cover.
- When you put the cover on the back, squeeze the side supports.
- Be sure to tuck the machined holes on the car cover under the plastic.
- The headrest cover is pulled on and secured with a tie near the riser.
Shape Features
When purchasing car covers and putting them on, it is necessary to take into account the following features of seat shapes, which are determined by:
- Body type. For example, when sewing products for a sedan and a hatchback, different patterns are used. You can still somehow put covers from a “foreign” body on the front seats, but for the rear ones you will have to make cuts, otherwise the car covers won’t fit.
- The passenger and driver's seats are similar, but do not confuse the covers, the shapes of which are slightly different. They are distinguished by their tear seams; when putting them on, they must be on the door side, otherwise problems with the airbags may arise. That is why a special “AIRBAG” label is sewn into the seam side.
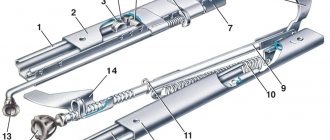
Removing the seats
Sometimes you can hear that changing the car covers of some car models is possible without removing them. This opinion is refuted by the following arguments:
- Before putting on the product, you will need to remove the plastic covers, which will be difficult to do in a salon.
- In order to put on the eco-leather cover, you will have to constantly turn the seat.
- At times there simply won’t be enough space to get the job done properly.
Therefore, in order to avoid the listed difficulties, it is recommended to put covers on previously removed seats, and it is advisable to have assistants.
Dismantling the seats can be divided into the following stages:
- you need to start from the front seats;
- move the chair all the way, unscrew the bolts on both sides;
- move the seat to the opposite side and repeat the steps;
- remove all the side trims from it, to do this, first pull out the plugs, then start unscrewing the bolts;
- start removing the cladding; to do this, press it out with a screwdriver.
How to dress correctly
The entire dressing process can be broken down as follows:
- You need to start with the front seats.
- Carry out dismantling.
- Remove the headrest from the chair and cover it.
- First, the seat is put on. It is necessary to carefully straighten the eco-leather, only then place the chair on the side and secure the fasteners. It is important to tighten this part of the chair very well, since this is where the bulk of the load falls. If the tension is weak, wrinkles and folds will form on the chair.
- If the fastening is made from below, the upper part of the chair is put on like a sweater, but it is necessary to apply force, since the cut of the car cover is made exactly to size. Fasteners on the product made on the back of the seat are less preferred by drivers, as they do not look so elegant.
- The bottom of the car cover is secured under the seat, and it must be pulled tight.
- After the covers are put on, you need to install the covers on the previous areas and return the chair to its place.
- Putting on the eco-leather car seat cover for the front and rear seats is identical.
Before installation, be sure to read the included instructions. This will help avoid mistakes and avoid over-tightening the product.
The factory upholstery of the seats inside the car is subject to wear and tear. Eco-leather car covers will help protect the seats externally and significantly transform the car.
A big role here belongs to the correctness of putting on the cover. If you approach this work thoughtfully, it will take a little time, but the result will please you and your loved ones.
Publication date: February 27, 2021. Category: Automotive equipment.
Even after a short period of use of a new car, the standard seat upholstery (especially light colors) loses its neat and attractive appearance. Dust, moisture, food and drinks will certainly leave their “traces” on it, which will then be quite difficult to remove even in specialized services that deal with professional dry cleaning of car interiors. Covers, which are best purchased immediately after purchasing a car, will not only reliably protect the seats from all these troubles, but will also give the vehicle interior an elegant look. How to put covers on car seats: videos, photos and recommendations for installing them are presented in this article.
How to tighten covers with your own hands
Before putting covers on car seats, check the contents. Hooks, Velcro, ties, loops and other fasteners must be in place.
Only certified covers are purchased for cars with side airbags. The seam along the back of the seat is designed so that the cushion releases in time. When installing car covers or capes, the seam under the airbag must be on the right side. Certified products have markings on the seat back cover.
Then check the dimensions. Take a tape measure or put covers on the chairs. Approximate estimate. Measure the dimensions of the car seat covers from seam to seam. If the covers are ten centimeters longer or wider, you can return them to the seller.
Important! Make sure that the covers are made from the exact material you paid for. Instead of eco-leather, there may be leatherette. Instead of car velor - furniture fabric. Expensive high-quality materials have many cheap analogues.
You may be interested in: Alcantara - what kind of material is it?
Design features and dimensions of universal cases
Almost all models of modern protective devices worn on car seats (both front and rear) are made using the so-called separate technology. A standard kit usually consists of 11 parts:
- 2 – for the lower parts of the front seats;
- 2 – for the backs of the front seats;
- 1 – for the lower part of the rear seat;
- 1 – for the back of the rear seat;
- 5 – for head restraints.
The best (but also the most expensive) option is to purchase covers made specifically for a specific car model. Then you can be sure that they will fit the seats exactly and there will be no problems with their installation.
Universal car covers (the most popular option) are produced mainly in two standard sizes: S - for small cars (for example, Opel Astra, Volkswagen Golf and the like); M is a standard size suitable for most car seats.
The responsible manufacturer indicates in the instructions an approximate list of car models for which the products it produces are suitable. And an experienced sales consultant will tell you which set of car covers is best for you to purchase.
Methods for installing car covers
Some automobile “gurus” claim that it is possible to properly put covers on car seats only after they have been dismantled (they believe that this achieves the effect of completely reupholstering the seat upholstery). Let's not say that this is not the case. Moreover, dismantling, for example, the front seats does not take much time: it is enough to unscrew only four bolts (for each seat). If you remove the seats from the car, the process of installing the covers is greatly simplified:
- There is no need to put your hands under the front seat and feel for something to hook the mounting hooks onto.
- The covers are tightened more efficiently (they fit more tightly to the surface of the seats).
- You can quite simply dismantle the side plastic covers (if they are present and interfere with the installation of the covers).
On a note! If your car is equipped with side airbags or electric front seat adjustment (forward/backward and backrest tilt), then remove the terminals from the battery before dismantling. Then disconnect all electrical wires. And only then remove the seats from the car.
However, as practice shows, most cars can be fitted with seat covers without having to dismantle them. The main thing is to follow the manufacturer’s instructions (if available), carefully read our recommendations and familiarize yourself with the materials: “how to put covers on car seats video,” a selection of which is presented at the end of the article.
Blog categories
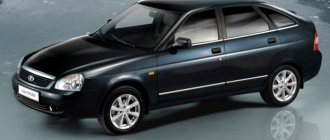
Installing covers on the Lada Granta Liftback or how to inexpensively protect the interior of a new car.
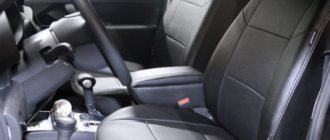
A Lada Granta Liftback car came to us to install the covers. The client chose Eco-leather for the installation of car seat covers, and the color was a combination of Black and Dark Brown. I was pleased with the car’s interior, everything is modern, of course it’s not a foreign car, but the price of this car implies economy class. Nevertheless, I think the car turned out to be decent, especially in the Liftback body, such cars are very practical, I myself have a car in such a body. A lot of things fit into the trunk of the Liftback, and if you fold down the backrest, you can generally load a full car.
Starts installing car covers………..
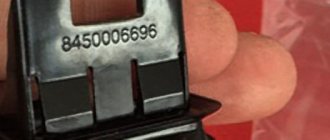
First of all, of course, we inspect the fasteners of the front seats in order to remove them. We see bolts with this key (Fig. 1). We find the one we need in the set, try it on and begin dismantling. Removing the seats on the Grant Liftback does not take much time, but the process of installing car covers simplifies it significantly. After we have unscrewed the bolts on the driver's seat, we tilt it back a little in order to disconnect the only piece, after which we remove the seats from the car to the outside. The passenger seat is removed in the same way, only there is no chip on it, so we just pull it out of the car. We begin the process of installing seat covers for the Lada Granta Liftback by trying on the covers. Trying on is necessary in order not to redo the work in the future if you mix up the sides. The seats on this car are the same, so let's proceed with the installation. Smoothing the cover on the seat, we run the hooks with elastic bands under the bottom of the seat to secure them. Be sure to insert the hooks into the holes on the sled, and not at the bottom of the sled itself. Since in the future your elastic band may interfere with the movement of the seat. Next, we fasten and tighten the perimeter with a special cord. We turn the front seat over to make sure that the cover sits evenly. Then we move on to installing the cover on the back of the front seat. The cover is easy to put on and just as easy to attach; do not forget to insert the headrest fastenings into the technological holes on the cover. We perform the same operation with the passenger seat; the Grant Liftback front seat covers are on.
Rear sofa……..
It is better to start installing covers on the back sofa from the backs. To make it easier to put on the covers, we remove the seats themselves. They can be easily removed by pulling the cord located on the seat, lifting it, and pulling it out of the fastening grooves located under the knees. Then we pull the covers over the backs. The process of stretching car covers onto the backrests of Granta Liftback is standard, since the covers are completely model-made, have original dimensions and all slots are needed. Be sure to tuck the covers under the headrests and the rear backrest reclining mechanism. Next, move on to our removed seats. Everything here is incredibly easy, we attach the cover, align it, attach the Velcro on the back side and tighten the perimeter. Then we install our seats in place. Next we have the process of stretching the covers on the headrests and installing the front seats. The installation is complete, our salon has been transformed beyond recognition.
Conclusion: the installation process took a little more than 2 hours, the installation machine is not complicated, so no special skills are required.
If you are unable to install the Lada Granta Liftback covers yourself, we can offer our services for professional installation. To do this, when placing an order through the website or operator, indicate that you need installation. We will be happy to quickly and efficiently install new eco-leather covers or Alcantara covers for you, with a guarantee for the covers themselves and our work. You can buy covers for the Lada Granta Liftback in our online store of car covers Autopilot.
Have a good shopping and worry-free use of our products.
Bottom of front seats
First we put on the lower part of the front seat cover. How to wear:
- Carefully lay out the element on the seat, straighten it into the gap between the seat and the back and forcefully pull it down.
- Next, we put fastening hooks on the elastic bands sewn around the perimeter of the lower part (they are included in the delivery kit). We put our hand under the seat (if we decided to install the covers without dismantling the seats). We find the technological elements of the car to securely hook all the hooks around the perimeter of the lower part.
Attention! Be careful and careful! Do not attach hook elements to electrical wires or other electrical wiring elements.
- After all the elastic bands are secured with hooks, we smooth out the installed part of the cover again and, if necessary, tighten it down in the necessary (or bristling) places. If in some places the cover is not secured tightly enough, put your hand under the seat again and rearrange the fastening hooks so as to increase the tension of the included rubber bands.
- Next, carefully cut a hole for the backrest tilt adjustment knob (if your car is not equipped with an electric drive) and place the edges of the fabric under the plastic plug.
After you put on the lower part, you can start arranging the back.
Front seat backs
Regardless of the design features of the front seats (and the make of the car), covers on the backs of the front row seats can be easily installed without removing the seats. How to wear it correctly:
- First, remove the headrest. Pull the cover over the back of the seat. Don't worry about the so-called "drum" on the front side. The fact is that the material of the cover does not follow the geometry of the seat back. Everything will be fixed later.
- We tighten the lower “tongue” so that the cover sits on the back “like a glove” (that is, the geometry of the seats and the elements of lateral support are fully outlined). Since the back of the backrest covers is made of a thinner, well-stretchable material, this will not be difficult to do.
On a note! Don’t be afraid to apply force when pulling - it’s almost impossible to tear the cover with your hands.
- Having achieved complete adherence of the cover to the back of the seat, we drag the “tongue” into the gap between the seat and the back.
- We fasten it with rubber bands and hooks to the bottom (again, by the technological holes or metal elements of the chair).
Types of car covers
Universal covers . These covers are made of elastic material that stretches well. Thus, one model of covers can be installed on a number of cars with similar seat parameters. Universal covers are the cheapest and may not “sit” on car seats tightly enough (they may slide out). You can buy universal covers at the car market, where their selection is huge.
Model cases . Such models are already sewn individually for each car brand. Thus, when sewing, all the nuances of the car interior are taken into account (the layout of the rear seat, the presence of headrests and an armrest in the rear seat). Model cases look beautiful and stylish, but their price is higher than that of universal ones. As a rule, such covers are ordered from auto repair shops or online stores; they are less often found in ordinary stores.
Bottom of rear seats
In some cars, the bottom of the rear seats can be put into covers without dismantling (for example, in the Renault Logan, it folds forward on mounting hinges), but for some cars it will still have to be dismantled. It's not that difficult to do.
The cover is put on similarly to the lower part of the front seat:
- First we stretch it over the entire lower part of the seat.
- Then we attach the cover using elastic bands and hooks.
- If there are no metal technological elements on the inside of the rear seat that could be hooked onto, then we tie the elastic bands opposite each other using a cord.
Attention! Do not hook the hooks onto the inner polypropylene filling. Such a mount will eventually fall off over time. And the cover will fit “like a saddle on a cow.”
Rear seat backs
The back of the rear seats in modern cars either folds forward or is attached quite simply (using special latches).
Typically, the back cover has three sewn-in vertical zippers. This is necessary in order to tilt forward only one part of the backrest (if this is provided for by the design). If the back is “monolithic”, then these fasteners are not used.
For seats consisting of two reclining parts:
- first we carry out preliminary fastening (with zippers fastened) on both parts folded forward using elastic bands and hooks (similar to the lower part);
- then unfasten the zipper opposite the line between the halves of the chair;
- Using additional elastic bands, we fix the edges at the junction of the parts of the backrest;
- Place both halves of the backrest in a vertical position and fasten the zipper.
Now, even with the cover on, both parts of the rear backrest can be folded forward independently of each other. To do this, you just need to unzip the zipper first.
Tuning Lada Priora seats with “drive” covers
Drive models are universal and fit the seats of many car brands. They will also fit the Lada Priora sedan. But for the hatchback and station wagon you will have to select other models due to differences in the structure of the rear seat backs.
The “drive” model is characterized by a one-piece backrest of the front seats; they are put on together with the headrest. Foam inserts in the side parts provide increased comfort and anatomical backrest.
The eco-leather material used for their manufacture will give the interior decoration of the Lada Priora an expensive look of a leather interior, and a variety of colors and combinations will help you choose covers to match the main color scheme of the “room”.
Covers for front seats
For those who do not want to spend a lot of time installing protective devices for car seats, seat covers can be a good alternative to full-size products.
The undoubted advantage of such products is their ease of installation, which usually takes only a few minutes and does not require explanations or recommendations. The downside (and a very significant one) is that numerous parts of the seats remain unprotected. As a result, they can not only get dirty, but also fade on sunny days.
December 18, 2016
This review with video instructions will tell you how to put seat covers on correctly and quickly.
In the video, an Avtoprofi expert will show and teach how to correctly and quickly put on seat covers with a separate fitting pattern on car seats.
For those in a hurry, here are brief step-by-step instructions for installing covers on the rear and front rows. But we recommend watching the video anyway – it’s interesting.
Covers are ordered according to the following parameters:
| Parameter | What does it affect? |
| Year of car manufacture | Generation – change of components, interior and exterior of the car. May change at different time intervals. Different seat shapes. |
| Generation | |
| Equipment | Set of options. Differences in seat design. |
| Size range | Standard M. Seat dimensions 52x48; back dimensions 64Х46Х56; without upper narrowing. Small-sized S. Seat dimensions 48X42; back dimensions: 60Х44Х52; |
Covers of some models are suitable for installation on cars of other brands. There are special tables for compatibility of car covers. They are found on the Internet or requested from the seller.
Knowing all the parameters, the manufacturer will select the appropriate covers. For cars of less common configuration, the covers will be sewn in a sewing workshop. The pattern of the seat and backrest will be made according to the measurements taken.
The service of putting car covers on seats is not expensive. You can't do a better job of installing seat covers than a professional installer. There are surprises in non-standard configurations. When installing a new covering, a specialist will find a solution.
You may be interested in: Eco-leather cases with diamonds
Installing covers on the front seats
It is better to remove the seats - this way the tension will be as tight as possible and without wrinkles.
If the covers have a separate putting on pattern, then first put the cover on the chair cushion.
- Put on the cover;
- Tuck the tongue between the pillow and the backrest;
- Spread the material around the entire perimeter.
- We first fix it with long thin elastic bands - we put them under the seat, stretch them and tie them together.
- We finally fix the lower part of the cover using installation rubber bands with hooks at the bottom of the seat.
car owners were advised to purchase a strong nylon cord from a fishing store and sew it to the covers instead of ribbons. With the Avtoprofi models, such efforts are not required: all models are pre-installed with wide stitched elastic bands with stainless steel hooks.
- The tongue of the upper half of the cover also fits between the pillow and the back.
- Then the fabric of the cover should be pulled down with a slight movement and smoothed so as to pull the material down as much as possible, towards the tongue.
- The cover is pulled over a tongue on the back of the chair, like leather on a drum.
- With maximum tightening, the front part of the cover is literally imprinted into the shape of the chair.
- The tongue is inserted under the back of the cover and secured with Velcro.
A little trick: holes for the headrest rods in the cover can be made using a screwdriver or... A regular cigarette!
Installing car covers on the rear row
Now you need to install the covers on the back row of the car. We remove the pillows and the backrest. Leave the back in place.
The donning pattern here is exactly the same as with the first row:
- On the back of the rear seat, you need to remove the seat belts, if present, and then fold the backrest.
- The cover consists of two halves and is positioned so that its zippers coincide with the fault lines of the back.
- Once put on, the zippers are closed and the two separate halves of the cover become one.
Removing the front seats
To evenly tighten the covers on the seats, first remove the backrests and take them out of the cabin. Sometimes it's easier to just pull out the chairs.
Study the seat mounting mechanism. If the covers consist of two parts, it is more convenient to dismantle the backs. When installing one-piece covers, the backrests are lowered. Particular attention is paid to dismantling the backrests of seats with airbags.
Car seats have plastic seat edging. It can be easily removed. Tight plastic is heated with a hairdryer.
You may be interested in: Perforated leather
Additional tips:
- The tighter the material adheres to the case, the longer they will last. Therefore, it is better to take the time to remove the seats before installation.
- If the seats have built-in side airbags, then choose the appropriate cover models.
- The unraveling seam must be placed on the side where the Airbag pillow is located.
- Remove the seats. At least the front row. The quality of planting will be higher, and it will take less time. Removing the seats is quite simple: turn off the electrics and unscrew the mounting bolts of the slide.
- Be sure to turn off the ignition before removing the seats and rear sofa!
- There is no need to remove the plastic on the sides of the seats. In principle, it is not suitable for removal and returning it to its place can be problematic. To better push the cover fabric between the seat and the plastic, it is good to use a smooth metal plate (about the same as what doctors use to examine the throat).
- Squeeze the seat upholstery while pulling the cover. This will make it easier to install the covers without damaging the fabric around the seams.
- It’s unlikely that anyone is going to install seat covers in the cold, but just in case, it’s worth pointing out that it’s best to install protective coverings at above-zero temperatures. Especially if the covers are made of natural or artificial leather (eco leather). These materials “tan” and lose elasticity at low temperatures, so if you don’t have a warm garage, then summer is the best season to install covers.
In what order should you put the covers on the interior seats?
To put the covers on the seats, the seats and backrests of the first row are pulled out of the cabin. It is difficult to work in the confined space of the machine.
Remove the seat belts. Wires are connected to the driver's seat. Power is required for the following options:
- For electric drive of the seat adjustment mechanism
- Seat heating (ventilation)
- Airbag mechanism in the backrest frame
The wires are disconnected so as not to be damaged when installing the covers.
When you search on the Internet for “How to remove headrests and backrests,” many instructions will appear. They describe the design of seats in different car models. Wrenches may be needed.
Advice. Lay out the covers for each car seat separately. When removing the backrests from the driver's and passenger's seats, mark them. Don't get confused during installation.
You may be interested in: Eco-leather covers – real reviews from owners