Characteristics of the Lada Granta cooling system
| Temperature at which the main thermostat valve begins to open, °C | 85-89 |
| Full opening temperature of the main thermostat valve, °C | 102 |
| Opening pressure of the outlet valve of the expansion tank plug, kPa (bar) | 110-150 (1,1-1,5) |
| Opening pressure of the inlet valve of the expansion tank plug, kPa (bar) | 3-13 (0,1) |
| Coolant temperature in a warm engine at an ambient temperature of 20–30 °C and a fully loaded vehicle moving at a constant speed of 80 km/h, no more, °C | 95 |
| Volume of liquid in the engine cooling system, l | 7,84 |
| Coolant (mixing liquids of different brands is not allowed) | Cool Stream Standard; Cool Steam Premium; Antifreeze-TS Felix, Felix Carbox-40 |
Cooling system Lada Granta engine 21116
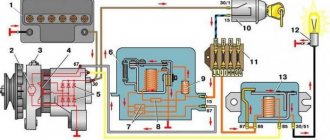
1
— coolant drain hose from the heater radiator;
2
— hose for supplying coolant to the heater radiator;
3
— hose for draining fluid from the engine radiator;
4
— expansion tank hose;
5
- expansion tank;
6
— steam exhaust hose of the engine radiator;
7
— thermostat;
8
— hose for supplying fluid to the engine radiator;
9
— electric radiator fan;
10
— engine radiator;
11
— radiator drain plug;
12
— coolant pump;
13
— supply pipe of the coolant pump.
Thermostat
. Device
The cooling system on the Lada Grant is the main link in the chain. Performs the function of a valve that redirects the flow of antifreeze from a small to a large circle. When the operating temperature is below 94°, the thermostat is in the closed position. The liquid circulates in a small circle without “entering” the radiator. According to this movement pattern, the heating of the liquid occurs many times faster. When the antifreeze heats up, the valve opens slightly, starting circulation in a large circle into the water jacket line. Most often, a thermostat malfunction is associated with its boiling or jamming due to overheating. The part cannot be repaired; it must be replaced with a new, serviceable one.
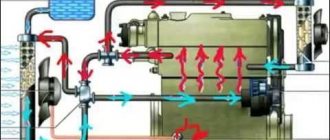
• Engines of cars of the Lada Granta (2190) and Kalina FL (2192, 2194) family have the same hydraulic cooling system design, see Figure 1. • The cooling system of engines of cars of the Lada Granta and Kalina FL family has features compared to previous car models: – single-pass heater radiator, with reduced hydraulic resistance, brazed aluminum, with increased thermal efficiency, built in series into the “small circuit” of the cooling system, in contrast to the previously adopted parallel installation of a two-pass heater radiator; – thermostat 2190-1306010 has one, not two valves and controls only the flow of coolant through the radiator of the cooling system; – single-pass radiator of the cooling system with reduced hydraulic resistance. See Figures 2 and 3 for coolant circulation at different temperatures.
When the coolant temperature is below the temperature at which the thermostat valve begins to open (the thermostat is closed), 100% of the coolant circulates through the heater radiator (small circuit), shown in color in Figure 2. The coolant circulation diagram at its temperature above the temperature at which the thermostat valve begins to open (the thermostat is open) is shown in color in Figure 3.
Opening the thermostat, without stopping coolant circulation through the heater radiator (small circuit), leads to coolant circulation through the cooling system radiator and its steam removal hose (large circuit). This is accompanied by an external manifestation in the form of heating of the inlet and outlet hoses of the radiator of the cooling system, the radiator itself, as well as in the form of coolant flowing out of the steam hose into the expansion tank.
Signs and causes of malfunctions of ODS Grants
There are not many elements involved in the cooling system, and therefore the list of faults is small. Signs of ODS problems:
- The engine gets very hot. Since the coolant temperature indicator on the Lada Grant was removed to reduce the cost, the driver will be able to track the temperature increase only after reaching a critical point. In this case, the warning indicator on the instrument panel will light up. Overheating is indicated by constant operation of the electric fan. Another reason is the failure of the temperature sensor, which transmits inflated readings to the ECU. Systematic overheating of the engine can also be determined by white carbon deposits on the spark plugs.
- The engine cannot warm up or takes a long time to warm up. In this case, the stove will blow cool air, the radiator pipe from below will be warm, but not as the engine warms up, but almost immediately after starting. A faulty thermostat is to blame. If the engine is in a constant state of insufficient heating, operation for a long time is prohibited, since it cannot be subjected to loads.
- Antifreeze leak. The problem can be determined by inspecting the elements of the ODS. On a hot engine, you can see fumes from antifreeze, and traces of coolant will also be visible under the engine. The most dangerous internal leak occurs when antifreeze enters the combustion chambers. Visually there are no leaks on the engine, but the coolant level in the tank is still decreasing.
Another characteristic sign of ODS problems is an increase in the oil level and white smoke from the exhaust pipe. This situation is dangerous due to the complete failure of the internal combustion engine, since the entry of antifreeze into the cylinders deprives the elements of the lubrication system.
Motor oil mixed with coolant completely loses its properties. Operating a vehicle with such a malfunction is prohibited.
Engine repair will be required, as the problem is related to a broken cylinder head gasket, a damaged water jacket, or a crack in the block.
The most common reasons are:
- natural wear and tear of parts;
- mechanical damage;
- violation by the owner of engine operation requirements.
The use of low-quality antifreeze, mixing different types of coolant, and installation of low-quality parts are also causes of malfunctions of the elements of the power plant cooling system. Repairs carried out without the appropriate knowledge, skills and experience lead to breakdowns. SOD problems require an early solution, as they affect the resource of the power plant.
No less dangerous are hidden problems, for example, engine detonation caused by overheating. Clogged radiator honeycombs prevent normal cooling, and the antifreeze temperature does not have time to decrease, causing the engine to overheat. Fuel detonates in the combustion chambers, the cylinder head gasket burns out, the plane of the cylinder head is disrupted, and the engine subsequently “jams”—there is a need for major repairs or replacement. The cooling system requires constant monitoring - you need to monitor the level of antifreeze in the expansion tank and periodically change the working fluid.
A pump malfunction is characterized by coolant leaks at the pump installation location, disruption or cessation of antifreeze circulation through the system. In this case, the engine overheats, but jamming of the pump bearing is even more dangerous, since on the Grant this leads to a broken timing belt and damage to the valves. Engine repair will be required. Malfunctions of the electric fan in most cases are associated with a violation in the electrical circuit, malfunctions of the thermal relay and the electric motor. Lack of forced cooling of the motor by a fan leads to overheating.
The most unpleasant malfunction for car owners is damage to the cylinder head gasket or a defect in the surface of the head at the point of contact with the cylinder block. Cracks in the cylinder head and cylinder head are less common. This causes coolant to leak into the oil sump. The tightness of the cooling system is also compromised if there are problems with the connecting pipes - cracks, blockages and loose connections.
Failures of the SOD can also include electronic malfunctions. In the case of Granta, this is a malfunction of the warning light warning of overheating and failure of the engine temperature sensor. As a result, the electric fan does not turn on at the right time, and the engine temperature exceeds critical values - overheating occurs.
Design of the engine cooling system on Grant
The cooling system on Grant is liquid, closed type. The design involves forced distribution of coolant to all engine elements that need it. The fluid flow diverges evenly.
Despite some differences in Granta engines of various configurations, the cooling system works the same on all.
Let's look at the main elements of ODS on Grant:
Liquid pump.
The regular and uniform supply of antifreeze or antifreeze (coolant) to the heated engine elements depends on it.
The pump is located on the front surface of the cylinder block. As soon as the gas distribution mechanism is activated, under the action of the toothed belt, the water pump begins pumping fluid. The pump does not require lubrication, as it is equipped with closed bearings.
If it breaks down, the liquid pump cannot be repaired. For the continued functioning of all parts of the cooling system, the old pump must be replaced with a new one.
Thermostat.
Equipped with a solid heat-sensitive filling, which helps maintain the required coolant temperature.
When operating a vehicle, this system significantly reduces the time spent warming up the engine.
The thermostat design implies the presence of a main and additional bypass valve. If the coolant temperature does not exceed 85 degrees, the thermostat is closed, preventing fluid from moving through the radiator. Due to this, the time for warming up the engine is reduced. The thermostat directs fluid to the radiator at temperatures above 85 degrees.
Radiator and expansion tank
The radiator device is equipped with plastic tanks and hoses leading to the engine water jacket and expansion tank.
The radiator on Grant is manufactured by a French manufacturer. The design and operating principle of the device is similar to the performance of radiators installed on Renault Logan.
The expansion tank has the function of compensating and smoothing the amount of liquid evaporating due to temperature changes.
Electric fan.
Made of plastic and has the function of cooling the radiator with air flow.
Usually, the radiator is cooled by a natural, oncoming flow of air when the car is moving, but sometimes it happens that this is not enough.
Problems caused by malfunctions in the Lada Granta engine cooling system
In a Lada Granta car, the cooling system in the operating scheme is quite typical. Accordingly, the problems associated with it are often typical.
Let's look at some known problems associated with the Lada Granta ODS, as well as their possible solutions:
The engine gets very hot.
This problem can be caused by several reasons:
– there is not enough coolant in the system (needs to be added);
– the thermostat does not open (you need to buy and install a new thermostat);
– the pump does not function (the liquid pump needs to be replaced);
– the valves in the expansion tank are faulty (check, replace).
The heater in the car blows a cold stream of air.
This problem is often accompanied by engine overheating. Most likely it's a bad cylinder head gasket. This leads to coolant leakage and the formation of vapor locks in the cooling system.
To resolve the problem, it is necessary to replace the cylinder head gasket.
The engine takes a very long time to warm up.
The problem is most likely a faulty thermostat. When broken, it hangs in a closed or open state (in this case, open).
A new thermostat needs to be installed.
Rapid decrease in coolant level in the tank.
The problem can be caused by several reasons:
– leaky connection between the radiator and expansion tank (check for integrity and tightness of the connection);
– hoses are damaged (check integrity, replace);
– leakage through the cylinder head gasket (check, replace).
Fogging of windows, oil stains on the windshield, decreased coolant level.
These problems together indicate a leaky stove heater. It is necessary to check all connections from the radiator for leaks.
You should regularly flush the elements of the engine cooling system, otherwise the accumulation of dirt and dust will cause clogging of the installation, which will also lead to engine overheating or other problems.
Malfunctions of the engine cooling system and how to eliminate them
| Cause of malfunction | Remedy |
| The engine gets very hot | |
| Reduced coolant level in the radiator | Add coolant |
| Thermostat valve stuck closed | Thermostat is faulty, replace. |
| Poor circulation of coolant in the system | Replacing the pump (coolant pump) |
| The radiator is clogged with insects and dirt | Cleaning the engine radiator from the outside |
| Radiator tubes, hoses and engine cooling jacket are clogged with scale and silty deposits | Flush the engine cooling system and add fresh coolant |
| The electric fan does not turn on due to a broken electrical circuit, failure of the temperature sensor, fuses, additional resistance, relay or fan motor | Check and restore electrical circuits. If necessary, replace the fuses, resistor, relay or electric fan assembly |
| Damage to the plug in the expansion tank cap (constantly open, causing the system to be under atmospheric pressure) | Replace the expansion tank cap |
| The engine overheats and cold air blows from the heater | |
| Excessively low coolant level due to a leak or damage to the cylinder head gasket, causing vapor locks to form in the engine water jacket | Repair coolant leak. Replace the damaged cylinder head gasket. |
| The engine does not warm up to operating temperature for a long time, the thermal regime is not stable while driving | |
| Thermostat valve stuck closed | Thermostat is faulty, replace. |
| Constant decrease in coolant level in the expansion tank | |
| Radiator leaking | Repair or replace radiator |
| Heater radiator leaking | Repair or replace heater core |
| Expansion tank leaking | Replace expansion tank |
| Coolant leakage through leaky connections of hoses and pipes | Replace the hose and pipe clamps |
| Damaged water pump seal | Replace the pump |
| The cylinder head bolts are not tightened sufficiently (on a cold engine during long-term parking, a coolant leak appears through the joint between the cylinder head and the cylinder block, in addition, traces of coolant may appear in the engine compartment) | Tighten the cylinder head bolts to the required torque. |
Thermostats used on VAZ cars
| Photo | Name | Popular name | Description | Application |
| 2108-1306010 | “Four-hole” | The basic thermostat with which the VAZ-2108 began production. The expansion tank is included in a large circle. Installed via coupling and outlet pipe. | Samara | |
| 2110-1306010 | “Three-hole” | Thermostat for VAZ-2110. The expansion tank is connected to the heater return hose, so the system is a complete analogue of the “six-hole” thermostat circuit. Installed via coupling and outlet pipe. | 110, Samara-2 | |
| 21082-1306010 | “Five-hole” | Modernized, collapsible thermostat. The expansion tank is included in the common part, and not in a large circle. | Samara, 110, Priora | |
| 21082-1306010 | “Six-hole” | Modernized, collapsible thermostat. Compared to the “five-hole” one, a pipe was added to the expansion tank. The bypass hole is smaller than in 2108. There is also an opinion that it is smaller than in the “five-hole” one. The expansion tank is included in the common part, and not in a large circle. | Samara, 110, Priora | |
| 1118-1306010 | For Kalina | Thermostat for LADA Kalina. Functionally, it is a complete analogue of the basic thermostat VAZ-2108. | Kalina | |
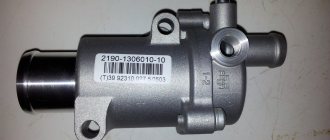
| 21900-1306010 | For Grants | Thermostat for LADA Granta. A fundamentally different thermostat closes the inlet to the radiator, not the outlet. When the thermostat is closed, all coolant flows through the heater core. | Priora, Granta, Kalina 2, Vesta |
There are only listed thermostats. There are no “carburetor”, “injection” or others. All of them are identical in terms of the seat on the cylinder block and the pipes (the 2190 has a slightly larger pipe for the cooling radiator).
Sequence of actions when replacing the thermostat on a Lada Grant with 8 valve
- We park the car within the perimeter of the repair area.
- Drain the antifreeze (antifreeze).
- Remove the clamps and disconnect the pipes in the cooling system.
- Unscrew the three screws securing the regulator to the cylinder block.
- We remove the thermostat.
- We carry out troubleshooting.
- We install new parts and assemble the mechanisms in reverse order.
Where is the thermostat located on the Lada Granta
In the Lada Granta family of cars, the “flow regulator” is fixed on the outer casing of the cylinder block on the rear side. Schematically, it is located on a section of the line between the cylinder block and the radiator of the cooling system.
Spare part location
When the temperature reaches 90°C, the regulator redirects the flow of antifreeze from the small circle to the large one. The small circuit structurally consists of:
- water jacket;
- pump (pump);
- stove heater.
Note to the driver! In modifications of the Lada Granta, the heater is looped into a small circuit, and not in parallel, as was the case in previous VAZ models.
When the temperature reaches 90°C, the regulator valve opens and the antifreeze begins to circulate in a large circle, passing through the cooling radiator.
The advantage of a small circle is that the antifreeze, leaving the block, immediately goes to the flow regulator, which allows you to more accurately determine the degree of antifreeze.
At the same time, the thermostat on the Lada Grant opens at 85°C, and not 90°C, as the manufacturer indicates in the instruction manual. The actual range varies from 78°C to 93°C.
Fortunately, underheating does not have critical consequences, but it is not desirable. Such systematic actions lead to deterioration of lubrication, underheating of the combustible mixture, as a result of which the fuel does not burn completely in the cylinders.
The role of the engine thermal control circuit
Overheating is the main enemy of the cylinder-piston group. The aluminum alloy from which the pistons are made begins to expand rapidly when overheated, and the working surfaces begin to sharply become denser. At the same time, the friction force increases, causing additional heating, the temperature becomes even higher, and the consequences are as follows.
- The piston begins to scratch the wall of the liner, making deep grooves on it. If the process is not stopped, the expansion of the piston material will lead to it jamming in the cylinder, breaking the connecting rod, and so on.
- Piston rings, made of heat-treated steel, are tempered when exposed to high temperatures and become soft, like wire. Even if the overheating stops, the ring material will not return to its previous state.
This is why the engine cooling system plays such a big role; without its normal operation, the operation of the car is impossible. The circuit used in the power unit of the Lada 2190 has been improved and works more efficiently than on previous models of the AvtoVAZ concern.
Functions of ODS
What is this system used for? Based on its name, it is not difficult to guess that SOD serves to cool the internal combustion engine. The Grant uses a liquid-type system. The SOD provides effective cooling and maintains the optimal temperature range of the motor in different operating modes.
In addition, the ODS ensures the operation of the cabin heater. It is enclosed in a small circle of the system and has a separate compact radiator. The latter works in tandem with a special stove motor. Thus, warm air enters the car interior.
The advantage of the Lada Granta engine cooling system
1.1
The main advantage of the engine cooling system of the Grant (2190) and Kalina FL (2192, 2194) cars compared to the previous Priora, Samara and Kalina models is to improve the heating of the car interior by removing more heat from the heater radiator.
An increase in the thermal efficiency of the interior heating system was achieved by:
a) An increase in coolant flow through the heater radiator as a result of directing 100% coolant into it with the thermostat closed (small circuit), which became possible by connecting the heater radiator in series, in contrast to the previously accepted parallel connection.
b) An increase in the thermal efficiency of the heater radiator as a result of changes in its design: – a single-pass circuit instead of a two-pass circuit reduced the hydraulic resistance and increased the coolant flow through the heater radiator; – flat aluminum tubes instead of cylindrical aluminum ones; – soldering of corrugated elements to flat tubes, increasing the heat transfer area, instead of pressing flat elements (plates) onto cylindrical tubes. c) Elimination of the possibility of airing the heater radiator due to the removal of air by the coolant flow even at a minimum engine idle speed due to a change in the coolant flow pattern through the heater radiator in combination with increased coolant flow and reduced hydraulic resistance, see above. d) Improving the aerodynamic and flow-pressure characteristics of the fan and elements of the vehicle interior heating system (pipes, deflectors, etc.). 1.2
The second advantage of the engine cooling system of the Grant (2190) and Kalina FL (2192, 2194) cars compared to the previous Priora, Samara and Kalina models is more precise regulation of the engine temperature.
On previous models of Priora, Samara and Kalina, mixing cold and hot coolant directly in the thermostat led to an uncontrollable increase in coolant temperature. On Grant (2190) and Kalina FL (2192, 2194) cars, the thermostat thermocouple 2190-1306010 is washed only with hot coolant from the engine, which minimized the inertia* of the thermostat and made it possible to more accurately regulate the coolant temperature. The dependence of the temperature regime of engine operation on external factors has decreased and began to be determined mainly by the opening temperature of the thermostat valve. *Thermostat inertia is the difference between the temperature at which the thermostat valve begins to open and the average coolant temperature maintained in the cooling system. 1.3
The third advantage of the engine cooling system of the Grant (2190) and Kalina FL (2192, 2194) cars compared to the previous Priora, Samara and Kalina models follows from the first two advantages and lies in the ability to increase the ignition timing and, accordingly, get some savings fuel and improving vehicle dynamics.
Since a significant part of the heat is removed from the coolant and transferred to heating the interior (see paragraph 1.1), the coolant itself retains less heat and its temperature decreases. This is also facilitated by the elimination of uncontrolled increase in coolant temperature (see paragraph 1.2). Additional reasons for lowering the coolant temperature:
a) improved thermal characteristics of a single-pass radiator of the cooling system; b) additional heat removal from the elements of the engine cooling system by improved blowing of the engine compartment with a counter flow of air. Lowering the coolant temperature improves engine cooling; in particular, the temperature of the cylinder head decreases due to the lower coolant temperature on a warm engine. This allows you to increase the ignition timing, and, accordingly, get some fuel savings and improve vehicle dynamics.
List and functions of elements
The diagram of the Lada Granta car, as in previous VAZ models, involves the following elements and components.
- The main radiator is a honeycomb heat exchanger operating on the coolant-air principle. Its main purpose is to release excess heat from the engine to the environment. Equipped with an electric fan installed in a special diffuser on the heat exchange surface of the radiator, and a temperature sensor. The latter signals an increase in temperature in the heat exchanger cells, as a result of which the control unit turns on the fan. Most often, this situation occurs when driving in traffic jams or increased loads at low speeds.
- The engine cooling jacket is a system of channels in the block and cylinder head that allows heat to be removed from the hot walls of the liners and combustion chambers.
- Cooling liquid transfer pump (pump). Its task is to create circulation in the network, overcoming the hydraulic resistance of the channels. Mounted on the cylinder block, the drive shaft rotates the timing belt. The higher the speed and the faster the fuel is burned in the cylinders, the more intensely the pump pumps coolant in the system.
- A thermostatic element whose task is to activate a large circulation circuit when the coolant temperature rises and cool it in the radiator. The VAZ 2190 thermostat is a single-valve thermostat that fully opens the flow to the radiator at a temperature of 102 °C.
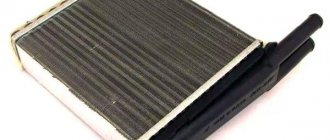
- The interior heating radiator is also a cellular water-air heat exchanger, for which the engine cooling liquid is the coolant, the energy of which is transferred into the interior space using a small electric fan.
- The expansion tank compensates or accepts the amount of liquid, which decreases or increases in volume depending on the temperature. Equipped with a sealed cover with air inlet and outlet valves. The valve response threshold when the pressure in the tank increases is 1.1 Bar, when a vacuum appears - 0.03 Bar. That is, the task of the tank cap is to regulate the pressure in the system.
- Connecting pipes with clamps.
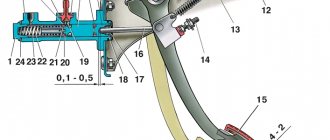
Cooling system: 1 — coolant drain hose from the heater radiator;
2 — hose for supplying coolant to the heater radiator; 3 — hose for draining fluid from the engine radiator; 4 — expansion tank hose; 5 - expansion tank; 6 — steam exhaust hose of the engine radiator; 7 — thermostat; 8 — hose for supplying fluid to the engine radiator; 9 — electric radiator fan; 10 — engine radiator; 11 — radiator drain plug; 12 — coolant pump; 13 — supply pipe of the coolant pump. General diagram of electrical equipment of Lada Granta
1 — block headlight; 2 — windshield wiper gear motor; 3 - generator; 4 - battery; 5 - starter; 6 — sound signal; 7 — fuse box in the engine compartment; 8 — power window switch for the right front door; 9 — motor-reducer for window lifter of the right front door; 10 — right front door connector; 11 — connecting blocks of wires for connecting the right front speaker of the audio system; 12 — electric drive for locking the lock of the right front door; 13 — electric windshield washer pump; 14 — connecting block of the wiring harness for connection to the computer; 15 — electric fan of the engine cooling system; 16 — sensor of insufficient brake fluid level; 17 — left front door connector; 18 — central locking switch; 19 — interior lamp switch; 20 — connecting blocks of wires for connecting the left front speaker of the audio system; 21 — right front door power window switch (installed on the driver’s door); 22 — power window switch for the left front door; 23 — window lift motor of the right front door: 24 — airbag control unit; 25 — electrical equipment control unit; 26 — instrument panel; 27 — mounting block; 28 — right side turn signal; 29 — brake signal switch; 30 — seat belt unfastened sensor: 31 — ignition switch (lock); 32 — lighting control unit; 33 — steering column switches; 34 — left side direction indicator; 35 — connecting blocks of wires for connecting the left rear speaker of the audio system; 36 — electric drive for locking the left rear door; 37 — electric heater fan; 38 — additional heater resistor: 39 — heater switch: 40 — airbag module; 41 — hazard warning switch: 42 — trunk lock switch; 43 — rear window heating switch: 44 — connecting blocks of wires for connecting the right rear speaker of the audio system; 45 — electric drive for locking the right rear door; 46 — reverse light switch; 47 — parking brake warning lamp switch; 48 — cigarette lighter; 49 — connecting blocks of wires for connecting the head unit of the audio system: 50 — backlight lamps on the trim of the center console of the instrument panel: 51 — control unit for electric power steering; 52 — interior lamp; 53 — rear light; 54 — trunk lid lock; 55 — license plate lights; 56 — additional brake light; 57 — rear window heating element; 58 — luggage compartment lamp
Instrument panel harness wiring diagram
1-block of the wiring harness of the wiring panel to the block of the front wiring harness; 2-block of the wiring harness of the wiring panel to the block of the front wiring harness; 3-block of the wiring harness of the wiring panel to the block of the rear wiring harness; 4-block of the wiring harness of the wiring panel to the block of the rear wiring harness; 5-lighting control module; 6-ignition switch; 7-on-board computer mode switch; 8-wiper switch; 9-instrument cluster; 10-light signaling switch; 11-switch for trunk lock drive; 12-block diagnostics; 13-block of the instrument panel wiring harness to the block of the wiring harness of the air supply box; 14-rear window heating switch; 15-hazard switch; 16-brake signal switch; 17-block of the instrument panel wiring harness to the radio; 18-block of the instrument panel wiring harness to the radio; 19-rotating device; 20-module driver airbag; 22-mounting block; 23-electric power steering; 24-cigarette lighter; 25-lamp illumination of the heater control panel; 26-illuminator; 27-block of the instrument panel wiring harness to the block of the ignition system wiring harness; 28-controller; 29-clutch pedal position signal switch; 30-electronic accelerator pedal; 31-additional resistor; 32-heater electric motor; 33-heater motor switch; 34-door lock system control unit.
Relay: K1-relay for the electric fan of the engine cooling system; K2-door lock activation relay; K3-additional starter relay; K4-additional relay; K5-relay-breaker for direction indicators and hazard warning lights; K6 wiper relay; K7-relay for turning on the high beam headlights; K8-horn relay; K9 relay for low beam headlights; K10-relay for turning on the heated rear window; K11-main relay; K12 fuel pump relay.
Electrical diagram of the rear of the car
1-rear wiring harness block to the instrument panel wiring harness block; 2-rear wiring harness block to the instrument panel wiring harness block; 3-side direction indicator right; 4-side direction indicator left; 5-handbrake sensor; 6-element for rear window heating; 7-interior lighting lamp; 8-switch in the driver's seat belt; 9-trunk light; 10-electric fuel pump module; 11-light right; 12-trunk lock electric motor; 13-switch for interior lighting; 14-additional brake signal; 15-left lamp; 16-rear wiring harness block to the rear left door wiring harness block; 17-rear wiring harness block to rear right door wiring harness block; 18-rear wiring harness block to the front right door wiring harness block; 19-rear wiring harness block to the front left door wiring harness block; 20-airbag control unit; 21-rear wiring harness block to license plate light wiring harness block.
Grants ignition system diagram
1-oil pressure warning lamp sensor; 2-generator; 3-throttle pipe with electric drive; 4-coolant temperature sensor; 5-block of the ignition system wiring harness to the instrument panel harness block; 6-solenoid valve for purge adsorber; 7-speed sensor; 8-mass air flow sensor; 9-crankshaft position sensor; 10-oxygen concentration sensor; 11-controller; 12-diagnostic oxygen concentration sensor; 13-ignition coil; 14-spark plugs; 15-injectors; 16-pads for the ignition system wiring harness and injector wiring harness; 17-knock sensor.
Reasons why air appears in the cooling system
Air appears in the system due to malfunctions, actions or inactions on the part of the driver. The following reasons are identified:
- The tightness of the system is broken. This could be a loose clamp, fitting, or cracks in the hoses.
- Work has been carried out to replace or top up the coolant. This is, as a rule, the most common reason for air getting in, because not everyone knows that it should be poured in a thin stream. If you pour in a thick stream, a funnel is formed that swirls the air.
- The air valve is out of working order. This valve is located in the coolant reservoir cap. During natural heating or by installing and starting an autonomous engine preheater, the volume of liquid increases, the pressure in the tank increases and excess air must be discharged through the valve in the lid. This is also a common reason. This is the first place to look for the reasons for airing in the cooling channels. This cover costs 100 rubles for modern VAZ cars. Whoever changes it, when he has already double-checked all the reasons, even after replacing the cylinder head, it turned out that the reason was precisely the non-working cover.
- Problems with the pump (pump). The seals and fibers in the pump may be faulty, causing air leaks.
- There is a leak through a bolt in the cooling radiator (not available on all models). If there is a leak of antifreeze, antifreeze or water, the lost volume is filled with air.
- Burnt cylinder head gasket. If the engine has already been overheated, then there is a possibility that the cylinder head gasket has burned out. When it burns, coolant is released either into the crankcase or into the exhaust system. Seething and boiling begins when the volume of coolant (coolant) has decreased and the entire void is filled with air. In this case, repairs and replacement of the head gasket will be required; for this you need to know what types of cylinder head gaskets there are.
Checking the radiator for leaks
The diagnostic process is not at all complicated; we carry it out ourselves, and if you don’t have free time, visit a service station to have the work performed by professionals.
Checking the radiator from the engine compartment side
- We place the car within the perimeter of the repair area, on the inspection hole, and open the hood.
- From the engine compartment side, we inspect the surface of the radiator for drips and traces of antifreeze (antifreeze) leakage.
- We carry out similar actions from under the bottom of the car;
- We inspect the antifreeze supply/return lines, upper and lower circuits.
The most common places for depressurization: corners around the perimeter, joints, ties with clamps.
How to drain antifreeze from the cooling system of a Lada Granta
- The hood is open, the car engine has cooled down to a safe temperature so as not to damage the skin.
- We unscrew 6 screws from under the bottom and remove the oil pan protection.
- Unscrew the drain plug in the lower circuit of the radiator.
- At the same time, unscrew the drain plug on the wall of the cylinder block. We substitute the container.
Unscrew the plastic drain plug of the radiator tank
Note to the driver!
The Lada Granta version has 8 valves. Place the container for testing below the ignition module, under the cylinder block (nut at “13”).
In the Lada Granta 16-valve, we first dismantle the starter, since it prevents free access to the plug. If you do not remove the starter, antifreeze will flood the part, temporarily rendering it unusable.
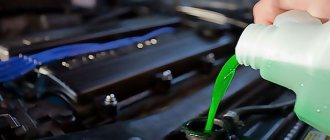
- After the liquid is completely drained from the water jacket, screw in the drain plugs. Fill in new antifreeze in a volume of 7.5 liters to about or 8.0 liters to the recommended average level.
Replacing coolant in the SOD
The antifreeze level in the tank is checked only after the engine has cooled down. You cannot add coolant to the maximum mark - during operation the liquid heats up and increases in volume, after topping up the valve cover is screwed on tightly.
It is necessary to constantly monitor the level of antifreeze; a sharp decrease in its volume can cause a malfunction of the cooling system, which should be eliminated immediately. Every motorist can add antifreeze to the expansion tank:
- The car must be on a flat surface, all work is carried out with the engine cooled down.
- Unscrew the cap of the expansion tank.
- Check the condition of the antifreeze; there should be no oil film or other contaminants on it. If the color of the coolant is dark or rusty, the ODS needs to be flushed.
- If the fluid level is below the minimum level, all connections should be inspected for leaks. If they are missing, add antifreeze between the two marks and tighten the valve cover tightly.
The procedure is simple and can be performed by anyone without seeking help from a car service center. The price of the work does not exceed 100-200 rubles, depending on the region.
Preparing for replacement
According to the regulations, the coolant is replaced after reaching 75 thousand km or after 5 years of operation. In other cases, the procedure is carried out when antifreeze is contaminated or leaks. Lada Granta engines use ethylene glycol-based coolant without the addition of borates, silicates and other synthetic additives. To change the entire coolant, you will need to purchase at least 8 liters of fluid. It is not necessary to use the antifreeze used at the factory for this. As an alternative, you can take products from the brands Sintek, Felix, G-ENERGY.
For work, a 13 mm wrench, screwdrivers, rags, a container for draining the coolant and new antifreeze are used.
How to drain coolant
First of all, the engine must cool down. Then, by unscrewing the cap of the expansion tank, relieve pressure in the system. The engine protection is removed. A suitable container is placed under the radiator drain plug, and the valve cover is screwed on - this way the antifreeze will drain more slowly and will not flood everything around. Then the drain plug is unscrewed and the coolant is drained into the container. This way, not all the liquid comes out - you also need to drain it from the water jacket.
On an engine with 8 valves, the container is placed below the ignition module under the front part of the BC. Using a 13 mm wrench, unscrew the drain nut on the block and wait until the antifreeze drains from the jacket. Then tighten the nut.
On an engine with 16 valves, due to design features, the starter prevents the fluid from draining from the jacket. For this reason, you must first remove it and only then unscrew the drain nut. If this is not done, the coolant will flood the starter, and this will lead to the failure of the starter. The drain nuts use tapered threads so no O-ring is required.
How to remove air from the cooling system of a Lada Granta
There are several effective ways to bleed air from the system.
Purge using a pump
Method No. 1
- We move the stove heater lever to the “Maximum” position (car interior). Be sure to follow basic safety measures and place wheel chocks under the rear wheels.
- Unscrew the valve cover, having first removed the decorative trim.
- Using a screwdriver, loosen the clamp on the throttle body fitting and remove the rubber pipe..
- Unscrew the cap on the expansion tank
- Through a gauze bandage, blow air through your mouth in the direction of the expansion tank.
It is important not to overdo it, as you can start a new portion of air again.
Method No. 2
- We warm up the car to 40 - 45°, turn off the engine.
- Unscrew the throttle clamp and remove the hose.
- If liquid leaks out of the hose, put it back on, otherwise wait until the air comes out.
- We assemble the structure in reverse order.
One time is not always enough to remove air. We repeat the procedure as necessary.
Method No. 3
- We drive the front wheels of the car onto a hill so that the highest point in the cooling system is the “plug”.
- We twist the cap on the expansion tank and the cap on the radiator.
- We start the engine, it runs at idle speed.
- We warm up the car to an operating temperature of 40 - 45°.
- As soon as the antifreeze level begins to decrease, we replenish the missing amount.
- We repeat the procedure until the maximum amount of plug comes out.
- Screw the lids on.
An air lock in the system can not only reduce the efficiency of the stove heater, but also negatively affect the operation of the engine as a whole. After the blockage is cleared, systematically inspect the equipment.
How to fix breakdowns
Repair of ODS elements is not considered as part of troubleshooting. In most cases, replacement of failed parts is necessary.
Replacing the thermostat
Lada Granta is available with two types of engines: one of them is 8-valve, the other is 16-valve. The location of the thermostat on these power plants is somewhat different, which means that replacement is carried out with certain differences.
To replace the thermostat on an eight-valve engine, you will need a small set of tools: socket wrenches, screwdrivers, a Torex wrench and a container for draining the coolant.
The replacement procedure is simple; to do this, you need to follow a number of steps:
- Place the car on a level surface and use a jack to raise the front end.
- After unscrewing the bolts securing the engine protection, remove it.
- Place a suitable container under the plug to drain the coolant from the radiator.
- Unscrew the cap from the expansion tank neck.
- Unscrew the drain plug and wait until the liquid drains.
- Loosen the thermostat pipe clamp from the rear and disconnect the hose.
- Loosen the clamp on the front thermostat pipe and disconnect it.
- The ground wire is secured with a nut on the thermostat stud - unscrew it and disconnect the wire.
- Unscrew both nuts that secure the thermostat to the studs and remove it.
- Remove the O-ring and, unscrewing the three nuts, remove the thermostat cover.
- Press and rotate the locking plate to remove the cover.
- Remove the spring with the valve mechanism.
Installing a new thermostat is carried out in the reverse order. If the hoses will not be changed, then to prevent possible leakage of antifreeze, it is recommended to lubricate them from the inside with a small amount of sealant before installation.
After installing the thermostat, all pipes are tightened with new clamps, and coolant is poured into the expansion tank.
Then you need to start the engine and check the operation of the cooling system, if necessary, remove the air lock. To replace the thermostat on a 16-valve engine, the same set of tools is used, steps for an 8-valve engine are repeated from 1 to 6, then the process is as follows:
- Disconnect all pipes through which coolant is supplied to the thermostat by loosening the clamps.
- Unscrew the fastening bolts and remove the thermostat cover from the seat.
- Remove the sealing ring, turn the fixing plate by pressing and remove the spring with the valve mechanism.
Installation of a new thermostat is carried out in the reverse order. All hoses are connected, antifreeze is poured into the system, the engine is started, and if necessary, the air lock is removed, after which antifreeze is added to the tank to the mark between the minimum and maximum. There are many fakes and low-quality parts on the car parts market, so it is advisable to check the thermostat before installation. To do this, you need to heat water in a container to a temperature close to boiling and place a thermostat there; if the valve begins to open slightly, it means the device is working.
Replacing the thermostat can be done with your own hands in a regular garage. There are no difficulties, but you will have to spend money on a new part, pipes, if changed, and coolant. To save time, you can contact any car service center, where within 20-30 minutes the technicians will change the thermostat for 200-300 rubles.
Replacing the coolant pump
To replace the pump on a Grant you will need a set of sockets, wrenches and screwdrivers. Many car owners combine pump replacement with timing belt replacement. At the initial stage, the process is identical for both procedures:
- Disconnect the negative terminal from the battery.
- Using a 17 mm wrench, rotate the camshaft pulley by the fastening nut until the mark on the pulley matches the mark on the rear casing cover. So the piston in the first cylinder will be at top dead center.
- The nut securing the timing belt tensioner roller is unscrewed and the tension is weakened.
- Drain the coolant through the drain hole on the radiator.
- Unscrew the bolts securing the pump to the cylinder block and remove it together with the sealing gasket.
- The new pump must be installed with the number facing up, and it is recommended to replace the sealing gasket.
Next, installation of the belt and pulleys (if the timing belt has been changed) is carried out in the reverse order. In this case, you need to ensure that the marks are not knocked down, otherwise the valve timing will be disrupted.
A car service center will charge from 800 to 1,500 rubles for such work, depending on the type of engine (8 or 16 valves).
How to repair an expansion tank
During engine operation, the expansion tank is constantly deformed from increasing and decreasing pressure in the system, as well as from temperature changes. Over time, the material wears out, and at peak pressure, microcracks form on the walls. In most cases, no one repairs this part - the tank is replaced. But there are also those who try to repair it with their own hands. The material from which the tank is made is incompatible with most adhesive bases, so it will not be possible to seal it. For repairs, you can use two available methods:
- soldering with a soldering iron using metal reinforcing mesh;
- repair cracks with epoxy resin or cold welding.
Compositions based on epoxy resins and similar substances act temporarily, so for high-quality repairs it is recommended to solder the tank. The crack site is thoroughly cleaned with fine sandpaper, degreased and dried. A thin metal mesh is placed over the hole and a continuous layer is sealed into plastic with a soldering iron.
The treated area is cleaned, puttied and, if necessary, primed and painted. The car service center does not do such things and offers to replace a cracked tank - the cost of the service is no more than 200 rubles.
Connecting hoses, electric fans and radiators should be replaced if they fail. The latter can be soldered, but no one is responsible for the quality, since the process is labor-intensive and requires equipment and experience. Considering that soldering costs about 800 rubles, then it is more logical to purchase a new radiator.
Elements of the Lada Granta cooling system
- stove heater radiators;
- electric pump;
- engine;
- throttle assembly;
- thermostat;
- antifreeze temperature sensor;
- overheat indicator;
- viscous fan drive coupling;
- fan;
- radiator cap;
- radiator;
- expansion tank cap;
- expansion tank;
- water pump;
- drain valve of the lower circuit.
And also, pipes of the Lada Granta cooling system, metal clamps - ties.
Thermostat
The cooling device on the Lada Grant is the main link in the chain. Performs the function of a valve that redirects the flow of antifreeze from a small to a large circle. When the operating temperature is below 94°, the thermostat is in the closed position. The liquid circulates in a small circle without “entering” the radiator.
( 1 rating, average 4 out of 5 )
Description of the cooling system
Grant engines are equipped with a standard liquid cooling system. It includes a number of parts - radiator, electric fan, thermostat, water pump, pipes, heater and expansion tank.
This system is necessary to maintain the operating temperature of the power unit. The fluid circulates in two circles - small and large. Let's consider the coolant circulation scheme: cylinder head water jacket - pipes - radiator - water pump - thermostat. A heater can be added to this system.
Is the absence of an engine temperature sensor a cost-saving measure?
An interesting point is the absence of an indicator on the instrument panel indicating the fluid temperature and engine condition. As the developers themselves say, this indicator does not correspond to the price category of the car and is too expensive for it.
The solution to the problem was to install a special light bulb on the panel, which lights up red in case of overheating. If the system is working properly, in this case, the fan automatically turns on, and the problem is resolved without driver intervention.
Despite everything, the Lada Granta, whose cooling system is very well thought out, works well and rarely causes breakdowns. This is a proven car, albeit of a budget class.
Author of all articles on the site! Own service “New Line Auto” All types of work. Specialization: Lada
water pump
It is also referred to as the liquid pump of the cooling system. On Grant, this element is located under the timing cover. Driven by a toothed belt from the crankshaft. Externally it looks like a kind of round impeller. The pump uses these blades to capture liquid, circulating it throughout the system. The pump runs continuously when the engine is turned on. The only difference is in the rotation speed of the impeller. The more gas the driver gives, the more often the crankshaft rotates, and, accordingly, the water pump.
The Granta cooling system uses a centrifugal pump with forced circulation. The pump has sealed bearings. To ensure they rotate freely, lubricant is provided inside. It is filled for the entire service life of the pump and does not need periodic replacement. The entire pump is replaced if the bearing begins to make a characteristic noise.
Typical malfunctions of the Lada Granta cooling system
| Malfunction | Diagnostics | Remedy |
| The fluid level is below the permissible norm in the radiator | Inspection of the highway for integrity | Topping up |
| The motor is overheating | Thermostat is stuck | Replacement with new one |
| No pressure in the cooling system of Lada Granta | Channel clogging, depressurization | Replacing the water pump |
| The electric fan does not turn on when the temperature limit is reached | Checking the integrity of the electrical circuit and fuse Checking the fan circuit of the Lada Granta | Prevention, replacement with new ones |
| Whistle from under the expansion tank cap | Inspection | Replacement |
| The motor takes a long time to reach operating temperature | Inspecting the antifreeze level | Adding fluid, replacing the thermostat with a new one |
| The temperature sensor systematically shows false data | Inspecting the electrical circuit, measuring the sensor resistance | Replacement with new one |
| No circulation in the main line | Inspection through the expansion tank with the engine running | Washing, removing air pockets |
An air lock forms in the engine cooling system.
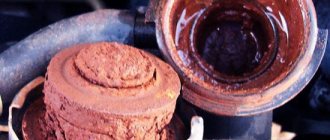
It would seem that the formation of an air lock in the cooling system of an internal combustion engine is such a simple problem, but its presence seriously affects the current and future operation of the engine. Many drivers have encountered such phenomena as boiling antifreeze, antifreeze and water, failure of various sensors, seething - all this indicates that there is air in the system channels, which is stopping circulation. It also happens that after starting the engine the car does not heat up. When the first signs of air appear in the engine cooling system, prompt elimination of the causes is required.
Expansion tank
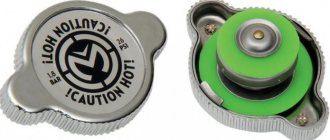
The Lada Granta expansion tank is designed to compensate for the volume of antifreeze in the system. When heated, this liquid changes its density and increases in volume. Along with this, the internal pressure in the system also increases. To prevent the liquid from rupturing the pipes and radiator, the system has a special tank that compensates for these loads. Part of the pressure is released through the lid. The latter contains a special valve - inlet and outlet. If we talk about the technical characteristics of the lid, it opens at a pressure of 150 kPa. This activates the exhaust valve, which prevents intense steam formation in the system. The inlet one is activated when there is a vacuum. It operates at a pressure of 3 kPa.
The tank itself is made of translucent temperature-resistant plastic. There are marks on its walls (maximum and minimum levels). To replace the fluid, the system has a filler neck. It is hermetically sealed with a lid.
Sequencing
- We place the car within the perimeter of the repair area.
- Loosen the clamp of the air supply pipe (Phillips screwdriver).
- Remove the mass air flow sensor (MAF).
- We unscrew the expansion tank cap and remove the vacuum.
- We unscrew the three clamps on the cooling system distributor and pour the waste into a plastic container (about 3 liters).
Preparatory processes before installation
Note to the driver! If the drained antifreeze is free of sediment, it can be reused later. Otherwise, replace the entire cooling system fluid.
- We press the block with wires from the engine control unit, disconnect the temperature sensor terminal.
- Using a key set to “13”, unscrew the negative terminal and remove it from the regulator body.
- Using the “8” head, we loosen the clamps of the supply pipe – the antifreeze return to the radiator.
Supply pipe clamps
- Remove the rubber pipes from the regulator.
Disconnect the rubber pipes
- Using the “13” socket, unscrew the two nuts that secure the thermostat to the wall of the cylinder block.
Two nuts - clamps to the block
- We remove the mechanism from its normal place and clamp it in a vice for preventive maintenance.
Clamp in a vice
- Using a Torx T-30 wrench, unscrew the three screws of the cover and remove it.
Removing the cover
- The connection between the cover and the body is sealed with a rubber gasket. We inspect it, if there is mechanical damage or deformation, we replace it with a new one.
- We grab the spring with pliers, press it, and release the metal plate.
Metal plate
- Release the regulator bottle.
Regulator bottle
- To check the functionality of the distributor, lower it into a container of water, gradually heat it up, bring it to a temperature of 85 - 90°C. We observe the movement of the rod. In good condition, it will move closer to the top.
Temperature adjustment
- We assemble the parts in the reverse order and install them in their original place.
Note to the driver!
At a water temperature of 96 – 98°C, the cylinder rod should fully extend to a distance of at least 8.0 mm. We replace the sealing ring with a new one. Before installation, clean the surface of the cylinder head from possible deposits.
Reviews
| № | Positive |
| 1. | Vasily: I’ve been driving a car for a year and a half, no comments. I carry out technical inspections in a timely manner, fill up with high-quality fuel and oils, and have a moderate driving style. |
| 2. | Gennady: at 50,000 km the standard thermostat jammed, replaced it with a new one under warranty. There were no more breakdowns, the machine works like a watch. |
| 3. | Kirill: the rubber pipe burst once where it was fixed with a clamp, I think it was my mistake, I overtightened it. I'm happy with the build quality, no complaints. |
| 4. | Vladlen: I’ve heard negative reviews about Granta, saying that the system is often overstuffed. This happens, but extremely rarely, the defect is not widespread. |
| 5. | Ignat: in order for the machine to work properly and the parts to last longer, it is necessary to treat it with care, care for it, and maintain it. |
| 6. | Dmitry: Six months have passed since the purchase of the car, so far the work is perfect, no investments except for the purchase of consumables. |
| 7. | Valentin: I am satisfied with the build quality of domestic transport; breakdowns do occur, but they are insignificant and can be easily repaired. The engineers managed to combine good quality at an affordable price. |
| Negative | |
| 1. | Ivan: negative experience during operation of the car, already at 45,000 the thermostat jammed, then the bearing flew off. The model is still crude, there are many shortcomings, the manufacturer does not strive to quickly eliminate them. |
| 2. | Vladimir: the build quality is low, after two months of using the car, the rubber pipe cracked and antifreeze began to leak. |
| 3. | Vyacheslav: Lada Granta or Renault Logan - obviously the latter. The manufacturing quality of the French automobile industry is an order of magnitude higher than its domestic counterpart. |
Conclusion As practice shows, most calls to service stations are caused by a jammed thermostat on the Lada Grant. The reasons are different. The factor of manufacturing defects cannot be ruled out, but the fault also lies with the owner of the car.
Buy original spare parts, maintain your car in a timely manner - then the number of breakdowns will be reduced several times.
| Video - Removing air from the Grant engine cooling system |
| Video - RECONDITIONING THE COOLING SYSTEM SOD-2110-11-12-13-14-KALINA-GRANT |