May 11, 2017 Lada.Online 132 053 10
MD tuning stands for throttle modernization. There are quite a few ways to modify the throttle assembly, but this article will discuss the most popular scheme proposed by the American engineer Ron Hutton. According to him, correct MD tuning can increase engine power and reduce fuel consumption by up to 25%.
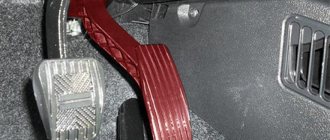
How to adapt the gas pedal?
We carry out adaptation either after repair, replacement of the computer, or long-term removal of the battery.
- We connect the battery.
- We insert the key for the first time after installing the battery and turn it to the “ignition” position. The indicators on the panel light up, wait at least 30 seconds and start the engine. Important: the temperature of the air and the engine must be at least 7 degrees warmer, otherwise adaptation is useless, the engine will operate in emergency mode.
- Next, we adapt the ignition diagnostic function: we accelerate in second gear and brake with the engine at 4 thousand rpm. Up to 1 thousand rpm - we must perform this operation six times during one trip.
Adaptation of the diagnostic function is necessary to preserve the catalyst and possible fire.
The revs began to fluctuate a little when cold, and they stayed for a long time at 1300 rpm when warming up; in general, Largus’s favorite problem with the K4M began to appear.
This is my second Largus, on the first I wound up the fum tape, then under warranty they changed the receiver, installed a new one with the inscription RENAULT, but the rings are of course a weak point. So, the known methods of treatment 1.) Rewind the fum tape, not reliably, not for long, the fum tape practically does not absorb shock, as a result, the ring presses its place in it and the suction appears again. 2.) Put a new ring with a code 8200068566
, good but expensive, the toad is against it and there is a chance that the ring will last for a year.
3.) Put on a Nisanov ring with code 16618-00QAA
, this is the same new ring only with a different code and a lower price, but still the toad is against it.
4.) Install the Gostov ring GOST 18829-73/9833-73 064-072-46
, cheap, reliable and cheerful, but mother is lazy, you need to look for such rings.
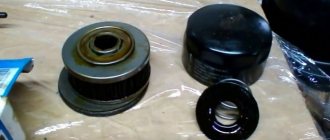
5.) There were Gost rings available, but not 4.6 but 6 mm, so I decided to make myself an eternal ring from it, because... the ring is thicker, the throttle with such a ring doesn’t fit into the receiver, so I’m redoing it a little. I just file off the excess rubber and it becomes a little flat. We assemble this device from a canister cap, a bolt with a nut and two washers, a drill and a file clamped in a vice.
Cleaning process
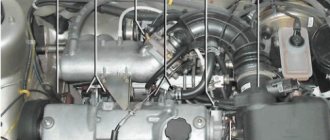
Removing and cleaning the throttle valve on Renault Logan and other models where the K4M engine is installed, for example, Largus or Duster, is done at a service station. But you can do this yourself, since this operation does not require special knowledge or tools.
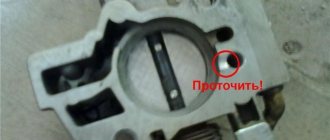
The reason that the speed of a cold engine fluctuates is the depressurization of the seal connecting the throttle and the intake manifold. To check this, you need to unscrew 4 bolts. Remove the throttle cable and connector from the idle air control, which will require a socket wrench. After this, the intake receiver is removed, for which you will need an E8 head; you can use a 6 head, which removes two bolts.
The crankcase ventilation pipe is disconnected from the idle air control valve. The receiver is pulled off the throttle towards the engine shield. The Renault Logan 1.6 16 valve throttle body is removed after unscrewing the two bolts that are located under it, which will require a 8mm socket.
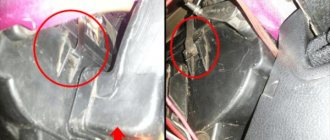
On the removed assembly you can see the Renault throttle valve O-rings, made of special rubber. The small seal goes into the intake manifold, and the large one into the receiver. The floating idle speed is affected by a small o-ring that needs to be replaced. However, after removing the manifold, it is recommended to replace or additionally seal both Renault Logan throttle valve gaskets.
After removing the old seals, the throttle is treated with a washing liquid in the form of an aerosol or other available method. Then it is thoroughly wiped with a rag. Seats for rubber seals are thoroughly degreased.
There are several solutions for sealing the intake manifold and receiver. The ideal option is new original gaskets. But they are expensive, and in addition, the market always offers a huge number of fakes, which very quickly fail. A good solution is to leave the original seals, if they are intact, but wrap several layers of FUM tape under them. This will avoid unnecessary costs and ensure sealing of the throttle for a long time.
Before installing the throttle, all rubber seals are lubricated with silicone grease, and if this is not available, regular oil will do. Assembly is carried out in the reverse order, the throttle is carefully inserted into the intake manifold, and with greater force than it was removed from it, then the bolts are tightened. After this, the receiver, gas pedal cable and other previously removed components are installed in the reverse order.
Experience shows that cleaning the throttle assembly on your own is not difficult even for an inexperienced car enthusiast. To do this, you will need a set of socket wrenches and carburetor flushing fluid or other similar composition. It is imperative to pay attention that when reinstalling the seals, they must adhere to a degreased surface, otherwise they will quickly fail. Removing and installing the throttle assembly, which is located at the top of the engine, does not cause any difficulties.
Examples of throttle valve adaptation on VAG and Lancer IX vehicles
In this video, they will tell you and show you how to adapt the damper for a VAG car.
Adaptation of remote sensing for Volkswagen Golf 4:
- We warm up the engine to t=80 0 C and turn off the car. Then we connect the USB-KKL cable to the diagnostic connector and, after turning on the ignition, launch the diagnostic program (VAG-COM 3.11).
- We enter section 01-engine.
- We poll the fault memory (02).
- We erase detected faults (05).
- After returning to the previous menu, enter the “adaptation-10” section.
- On channel 00, press the “read” button.
- Save the result and return to factory settings.
- Enter the basic settings (04) and go to the measurement mode.
- If the group value is 001, press “start”.
- We wait 2-3 minutes, then close the program and disconnect the cable. Adaptation is complete.
Adaptation of remote sensing of Nissan cars with an electronic gas pedal:
- Fully release the accelerator pedal.
- Turn on the ignition for at least 2 seconds.
- Turn off the ignition and wait at least 10 seconds.
- Turn on the ignition for at least 2 seconds.
- Turn off the ignition. The accelerator pedal adaptation procedure is completed.
- We are adapting the throttle valve. The accelerator pedal is released.
- Turn on the ignition and turn it off immediately. We wait at least 10 seconds. During this period of time, the damper moves.
- We teach air supply at idle speed (XX).
- Warm up the engine and gearbox to operating temperature.
- We turn off all electrical equipment of the car.
- We start the engine and bring it to operating temperature.
- Turn off the ignition and wait at least 10 seconds.
- Fully release the accelerator pedal.
- Turn on the ignition and wait at least 3 seconds.
- Within 5 seconds, press the accelerator pedal five times, then wait 7 seconds.
- Pressing the accelerator pedal, hold it until the CHECK stops flashing and lights up constantly (about 20 seconds are required).
- After the CHECK light comes on continuously, you must release the pedal within 3 seconds.
- We start the engine to run at XX.
- Press the pedal several times to check the stability of the XX.
Adaptation of remote sensing on VW Passat B5:
We recommend that you watch this video, it will show you how to adapt the damper for a Passat car.
- Warm up the engine to operating temperature and turn off the car.
- We turn on the ignition, but do not start the engine.
- We connect the cable to the diagnostic connector and launch the program.
- We enter section 01-engine.
- We enter the basic settings (04).
- In the damper adaptation we select 060 for cars with electronic damper control, and value 098 for cars with cable-controlled damper.
- Let's start the adaptation.
- We are waiting for the “ADP RUN” entry to appear on the screen and the subsequent “ADP OK” entry.
- We return to the basic settings.
- Turn off the ignition. Adaptation is complete.
Results after MD tuning
We decided to test the effectiveness of MD tuning. First we conducted an experiment on a machine with a cable. The verification consisted of the following stages:
- Full filling of the gas tank;
- Driving approximately 20 km;
- The gas tank is full again, fuel consumption is 2.01 liters;
- Performing MD tuning on a 46 mm throttle assembly;
- Riding again 20 km;
- The gas tank was full again, fuel consumption was 1.61 liters.
As you can see, the implementation of MD tuning made it possible to save approximately 20% of fuel. Low-end power has also increased.
Next, we decided to conduct the same experiment on a car with E-gas. In this case, the throttle upgrade saved approximately 9% of fuel. In addition, the response to the gas pedal has accelerated.
When should you not perform remote sensing adaptation?
It is worth noting that it is appropriate to carry out the above procedures using software and special diagnostic equipment in the event of a failure of the damper settings. It does not matter whether the electronic parameters are broken or the mechanical settings of the equipment are lost.
If the operation of the throttle is impaired due to wear, then it is more advisable to think about repairing or replacing the part. If suddenly, after the steps described above, adaptation does not occur, it is worth checking the motor responsible for opening/closing the damper. There may not be enough power for the node to operate properly.
For example, cleaning the damper body inside and outside before starting adaptation is necessary for any make of car.
The only difference is that in some cars the damper is adjusted using a cable, and in others using electronics. This difference will manifest itself in the choice of adaptation parameters.
Cleaning without removal
Also, many car owners are interested in the question of how to clean the throttle valve without removing it. Such methods do exist, but you must immediately understand that high-quality cleaning is only possible by dismantling the damper .
To do this, you will need a special product - an intake tract cleaner. You can use different brands. You can also use EGR valve cleaning fluid, WD-40, and solvents for cleaning.
So, the procedure without removing the node :
- As in the previous algorithm, you need to remove the air duct to get to the damper.
- With the damper closed, spray the surface with cleaning liquid and remove the cleaned dirt using a rag.
- Open the damper and remove dirt from the side surface.
- Make sure that the cleaning agent gets into all channels. The cleaning procedure is similar using a rag.
Let us repeat once again that for proper cleaning, the throttle valve must be removed from the car. And when installing it back, it is advisable to replace the damper gasket with a new one. Fortunately, its price is low.
It should also be remembered that in most cases, after cleaning the throttle valve, it is necessary to perform actions to “train” it . This procedure is carried out either using a computer (by connecting it to the car's ECU), or by manipulating the ignition and gas pedal. In this case, it is impossible to give universal recommendations, since they can differ significantly for each manufacturer and even model. Remember this!
This is interesting: Removing and installing the rear seat of Lada Granta
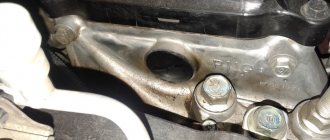
Lada Largus. Removing engine throttle assembly 1, (16V)
We remove the throttle assembly to replace the throttle position sensor or the assembly itself, as well as in case of damage to the rubber rings that seal the connection of the assembly with the receiver and the air filter housing.
Having unscrewed the two screws securing the air filter housing (see “Removing the air filter housing”), we move the housing to the front panel.
Disconnect the engine management system wiring harness connector from the throttle position sensor (see “Removing the throttle position sensor”).
Disconnect the end of the throttle drive cable from the throttle drive lever (see “Replacing the throttle drive cable”).
Using the “8” head, unscrew the two bolts securing the throttle assembly to the receiver.
We remove the throttle assembly, overcoming the resistance of its rubber sealing ring. If the O-rings have lost their elasticity or are damaged, they must be replaced with new ones.
Use a screwdriver to pry up the rubber ring... ...and remove it from the groove of the assembly pipe.
Similarly, remove the rubber o-ring from the other pipe of the assembly. Install the throttle assembly in reverse order.
Video on the topic “Lada Largus. Removing the throttle assembly of the 1.6 (16V) engine"
The revs of Lagrus, Duster, Logan, etc. are floating. Solution. Cleaning the throttle.
Repairing Largus - Blog Lada Largus Treating floating speed Issue No. 2
Floating or increased speed on Renault 1.6 16V. Throttle valve gaskets