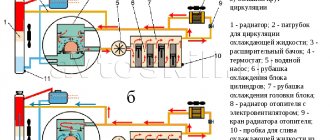
How best to insulate the VAZ 2114 engine
What about the stove - circulation? There won’t be!
you have a photo report of the cardboard installation, and preferably a separate topic, ladies, people didn’t have any more questions!
Yes Easy
My engine is covered with isolon (12mm), the battery is also wrapped in isolon, and in front of the radiator there is also isolon covering the entire area of the radiator. in the city when the car is parked on the street the heat under the hood stays longer than usual but not by much, but after 8 hours of parking on the street it starts easily at -30
and an old blanket over the engine
Yeah, it's fun to burn too
I also got some Izolon for myself, but I’m afraid to put it on. I tried it with a lighter, it melted and caught fire so easily. Of course the temperatures there are not the same, but still.
It burns if you set it on fire from the foam side, so put it on the engine with foil, the maximum that will happen when heated is that the foam will melt and that’s all, that’s why the foil is reinforced, in general the description says that it is a fire-resistant material.
Z.Y. . do not confuse the laminate underlay with insulation. they are almost the same but the principle of operation is different
here is the backing
But the foil-coated isolon (I set the maximum thickness I found to 12mm)
To be honest, I don’t really understand the special point in insulating and installing cardboard on your carburetor “baby”. My temperature always stays at around 100 degrees both in the city and on the Ring Road. And with insulation, in my opinion, the car does not cool down much longer.
Of course, if I owned a Logon or Peugeot 307 (like my colleagues at work), I would certainly put cardboard in and insulate it with something. But today it’s -20 outside, so on the Peugeot the temperature rose to 80 degrees only after 18 km (30-40 minutes of driving), and beforehand he also warmed it up for 5 minutes.
Source
How best to insulate the VAZ 2114 engine
Messages: 3838 Registered: 02 Oct 2008, 00:00 From: Tyumen Experience: 2004 Car: w212, X-TRAIL 32, FZ1 :
Awards: 1
| Rating: 6 288 |
| Reputation: +10 |
Thanked: 7 times Thanked: 29 times
Post by _lleopard_ » Aug 27, 2014, 01:01 pm
| Rating: 8 717 |
| Reputation: +21 |
Thanked: 96 times Thanked: 38 times
Post by wanted21093i » Aug 27, 2014, 01:05 pm
Messages: 3838 Registered: 02 Oct 2008, 00:00 From: Tyumen Experience: 2004 Car: w212, X-TRAIL 32, FZ1 :
Awards: 1
| Rating: 6 288 |
| Reputation: +10 |
Thanked: 7 times Thanked: 29 times
Post by _lleopard_ » 27 Aug 2014, 13:16
Messages: 1927 Registered: Sep 13, 2010, 00:00 From: Tyumen Experience: since February 2002 :
Awards: 1
| Rating: 7 717 |
| Reputation: +8 |
Thanked: 46 times Thanked: 55 times
Post by sniper81 » Aug 27, 2014, 3:09 pm
Messages: 131 Registered: Mar 06, 2013, 00:00
| Rating: 384 |
| Reputation: 0 |
Thanked: 5 times
Post by A12 » Aug 27, 2014 4:17 pm
Messages: 136 Registered: Dec 14, 2011, 00:00 Experience: 2007 Car: 3110
| Rating: 286 |
| Reputation: +1 |
Thanked: 1 time
Post by Neighbor45 » Aug 27, 2014, 6:03 pm
I drive: UAZ 31514
| Rating: 7 345 |
| Reputation: +14 |
Thanked: 328 times Thanked: 82 times
Post by Grinding » August 27, 2014, 07:42 pm
1. Check the thermostat. 2. Bend the door frames to the body. 3. Check if the heater tap is fully open (it often turns sour) 4. Check if the heater hoses are kinked anywhere. If the heater was inserted, then all the more likely this is possible or there is confusion with the hoses. 5. This is a VAZ-2104 - station wagon. From the experience of the first VAZ-2102 car (one piece of garbage), I remember that it was also not Africa, since the volume of the body is much higher than a regular Zhiguli sedan, especially if there is no shelf in the back.
How to close the radiator for the winter in a VAZ 2114: choosing the best option
Before considering the main topic of the article - how to close the radiator on a VAZ 2114 for the winter, let's consider a related question to this topic - is it necessary to do this at all?
Despite the fact that most Russian car enthusiasts perform this operation annually, it is impossible to accurately answer the question about its necessity. The reason here lies in the fact that the need to install such an improvised damper largely depends on the condition of the machine, namely, on the serviceability of its thermostat.
If it is in good working order, then cardboard (or other types of insulation) need not be installed even in fairly severe frosts.
In cases where the thermostat is not working correctly, then installation of a thermal partition may be necessary already at -20 C (at higher temperatures, for example -10...-15 C, the cardboard may not be installed at all, even with a faulty thermostat, since it has no effect it won't be the same).
If in cold weather an insulating gasket was installed in front of the radiator, it is very important not to forget to remove it when it warms up. Driving with insulation not only in the warm season, but even at zero temperatures can lead to severe overheating of the engine.
Installation of thermal insulation on UAZ cars
In the UAZ-469, in winter, another heater is installed or the standard one is replaced with a device of increased power. It all depends on the finances and taste of the car owner; we recommend the heater used on minibuses of the KITB.3221-8110010 brand.
If your UAZ is equipped with equipment for running on gas, then a gas autonomous heater is perfect, but its power must be at least 2-4 kW. The electronics of this device automatically maintains the temperature regime inside the cabin, but a specialist must connect the device.
The additional heater is located at the rear at the very end of the cabin.
Insulate the bottom of the cabin with warm linoleum or a set from the store designed specifically for the UAZ floor, consisting of foil foam rubber. Cover the interior ceiling, sides, door panels and the area under the dashboard with the same insulation. UAZ Hunter seals are suitable for all door openings.
Install a warm polymer top instead of a canvas one, and seal all holes and cracks in the interior.
Reasons for installing a cardboard damper
According to most motorists, installing a seal in front of the radiator in winter is necessary for two reasons.
The first is the creation of additional tightness, which prevents cold air from entering the engine and allows it to warm up faster.
The second is to protect an already running engine from excessive cooling while driving, which occurs as a result of a strong oncoming flow of frosty air that seeps through the cracks in the radiator.
At first glance, both of these reasons are quite justified, but it should be said again - this only applies to cars with a faulty thermostat. In the case when the unit is working properly, ordinary cardboard for the VAZ 2114 radiator may turn out to be not only unnecessary, but also harmful to the car.
How and why you need to insulate engines in winter
An article about insulating a car engine in winter - methods of insulation, features of using car blankets and other materials. At the end of the article there is a video about insulating a car engine in the winter.
With the onset of winter, car enthusiasts experience sheer stress associated with the engine, which constantly stalls and does not start. To avoid complications, experts recommend insulating the engine in winter.
Also, depending on the degree of engine wear, a single cold start can be a multiple of the car’s hundred-kilometer mileage. Insulation will allow you to avoid such loads on the main unit of the vehicle and extend its service life.
What insulation should I choose to cover the radiator of a VAZ 2114 for the winter?
In fact, the material from which the damper in front of the radiator will be made does not matter much.
The most popular and accessible means include the following:
- cardboard;
- soft plastic;
- foamed polyethylene (including foil);
- linoleum;
- felt.
When it comes to reliable engine operation at low temperatures, having a working thermostat is much more important than installing cardboard or other insulating materials.
The most important thing when choosing a material is that it is dense enough and reliably prevents cold air from penetrating into the engine (including while the car is moving). True, it is still worth saying that modern insulation materials cope with this role somewhat better than the usual cardboard in front of the VAZ 2114 radiator.
This is due to the fact that cardboard quickly wears out during use, especially if the weather is changeable - sometimes frosty, sometimes with thaws. In this case, you will have to change the gasket quite often.
Advantages and disadvantages of car blankets
The best indicator of the quality of any product is reviews from real car owners. Car blankets are no exception.
Let's consider what good and bad users identified during operation.
- “Since I started using the car blanket, the car has warmed up faster, and the ice on the hood has disappeared. I also operated the car at temperatures below -35 degrees Celsius, so the use of such a product was 100% justified. I’m thinking of additionally insulating the engine compartment at the front and bottom.” Stas, 35 years old.
- “I used a car blanket on two cars and noticed that after turning off the ignition, the engine stays warm longer (on average by 20-30%).” Igor, 46 years old.
- “I’ve been using the car blanket for a month now and I’m pleasantly surprised by the results. The engine heats up faster, the interior warms up better, and fuel consumption has noticeably decreased. All this indicates excellent thermal insulation.” Nikolai, 28 years old.
Among the advantages it is also worth highlighting:
- High quality material;
- Additional sound insulation;
- Strength;
- High quality tailoring.
In addition to positive ones, you can also find negative reviews. Here are some of them:
- “I think I threw money away. The engine still takes longer to warm up than I expected, and cools down a little slower. You could just as easily insulate the hood with paper.” Evgeniy, 45 years old.
- “I recently read that using such a product can lead to lung cancer. The reason is that air passing through this material enters the car interior. So you should think several times whether to buy a blanket or not.” Dmitry, 34 years old.
- “After two months of use, I discovered a number of shortcomings - poor quality of tailoring, lack of proper efficiency and susceptibility to the negative effects of acids (after such liquids come into contact with the surface, the material is corroded). In the future, I plan to insulate the engine compartment using more radical methods.” Evgeniy, 44 years old.
Also the disadvantages include:
- High cost;
- Small thickness at the joints;
- Low efficiency (if installed incorrectly);
- Installation problems.
How to properly close the radiator of a VAZ 2114 for the winter?
Now let's move on to considering our main question - how to insulate the radiator of a VAZ 2114 for the winter. In order to do this, you don’t need any complicated tools at all - just a knife and a screwdriver.
You can perform this simplest procedure according to the following scheme:
- cut off the required piece of insulating material;
- unscrew the fastening screws of the decorative grille (they are located on the top sides) on both sides;
- carefully press out the grille itself (using a flat screwdriver or a strong blade) - it is additionally secured with two latches;
- install an insulating gasket between the grille and the radiator;
- Reinstall the grille using the same pattern, but in reverse order.
Alternatives to cardboard
Nowadays, car enthusiasts are offered a wide range of all kinds of winter insulation for engines and sealing the engine compartment.
The most popular of them are:
- engine blanket;
- blanket for the radiator grille;
- winter grille shutter.
The first option is quite popular, although you should be careful when purchasing and using it - it must be made of non-flammable materials (since it directly touches the engine). In addition, even with slight warming, it should be removed immediately - since it interferes with heat transfer much more than a small seal in front of the radiator.
The second option is just the usual factory analogue of the usual cardboard or piece of linoleum. It can be used in the same way as any other insulation (however, before use it should also be tested for flammability).
And finally, the winter flap is a plastic quick-release cover for the radiator grille, which can be used either by itself or together with any other sealing material.
Source
Advantages and disadvantages of a car blanket
The experience of using car insulation goes back to the old days, when cars had carburetors and 76-octane gasoline was used everywhere. Naturally, such cars warmed up very slowly in cold weather and cooled down, accordingly, quickly. However, these days are long gone, cars have become fuel-injected, and gasoline has become higher octane. Accordingly, less time is spent warming them up.
Currently, there are three types of insulation - engine, radiator and battery. Let's start the review with the most common one - a “blanket” for the engine. The advantages of using it are as follows:
How and with what to insulate a car engine for the winter
- The engine warms up faster at negative temperatures. This fact is ensured by the heat shield effect, which prevents heat from the engine from rising and spreading throughout the engine compartment and heating the hood.
- After stopping the power unit, the latter remains warm for a long time. This becomes relevant in case of short stops, then it is easier and easier to start the car.
- Thanks to the use of insulation for the car hood, the warm-up time is reduced. This follows from the first point of this list.
- If the car is equipped with automatic temperature heating, the number of engine starts per night is reduced by 1.5...2 times (for example, from 5 to 3).
- No ice forms on the surface of the hood. This becomes possible due to the fact that the heat from the motor does not heat it up, and accordingly, moisture from the outside does not crystallize.
- The insulation slightly reduces the noise load both inside the car and outside.
Before describing the shortcomings, it is necessary to clarify several nuances on which they may depend. In particular, the insulation works differently with turbocharged and naturally aspirated engines, at different temperatures (for example, -30° and -5°C), under different driving conditions (in the city cycle and on the highway), when taking air from the radiator grille or from the engine compartment. The combination of these and other objective conditions gives different results from using car blankets for engines, batteries and radiators. That is why such blankets can often lead to the following troubles:
- overheating of the engine, which in itself is bad, and can threaten the failure of its individual parts;
- at a relatively high temperature (about -5°C...-3°C), the ignition coils and/or the insulation of high-voltage wires may be damaged;
- if warm air enters the system, there is a risk of delayed ignition, which may increase fuel consumption;
- as a rule, when using insulation for a car, engine power drops, naturally, fuel saving is out of the question;
- if you buy a low-quality blanket for the engine, it may catch fire!;
- Most modern insulation for a car battery, its engine or radiator have a short service life - about one to two years.
Is it worth using a car blanket?
Using a car blanket
Thus, the decision about whether it is worth buying engine insulation or not depends on many factors. In particular, if you live in latitudes where in winter the temperature drops to -25°C or lower, and the engine in your car takes a long time to warm up, then yes, it makes sense to think about purchasing. But if the winter temperature in your area rarely drops below -10°C, and you own a modern foreign car with a good heating system, then you hardly need to worry about a car blanket.
If you decide to buy a car blanket, then buy a product made of non-flammable material, and from trusted sellers, otherwise there is a risk of the insulation catching fire!
Sequencing
- Drain the coolant by opening the plastic tap next to the generator (at the bottom of the radiator). Remove any remaining liquid using a piece of hose and a funnel.
- After removing the air ducts, check the condition of the holes with the heater outlets on the panel. If they are not aligned and the misalignment is more than 50%, carefully trim the interior heater.
- After marking all the connectors with strips of colored tape (colored felt-tip pens), remove the instrument panel.
- Remove the steering wheel, steering column trim, and steering column switches. Carefully dismantle the heater by unscrewing the nuts and removing the wire from ground. Having previously marked, disconnect the heater connectors.
- With the cable release and radiator hoses removed, remove the heater by removing the 2 fan screws.
Be sure to pay attention to the condition of the rubber washers and thrust bearing.
- After unscrewing the 3 bolts, carefully remove the heater core.
Remove the radiator carefully. Residual coolant may leak out.
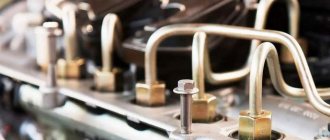
- Prepare turbulators (plastic spirals to increase heat transfer from the radiator). Spirals should be included at the factory, but are often not.
. You can cut turbulators (swirlers) yourself. Prepare aluminum (copper) plates with a cross section of 6 mm by 1.5 mm. Clamp one edge of the plate with a drill, the opposite edge in a vice and twist it with a spiral.
- Check the bottom wall of the heater for deformations, displacements, holes, integrity problems and other defects. Integrity can be determined through the hole for installing the radiator.
- Carefully disassemble the heater, moving the body halves apart from each other. Use a suitable screwdriver to open the latches and remove the screw under the central nozzle. Sequentially remove the levers that control the flaps.
- Inspect the inside surface of the heater. Glue the foam rubber if it has peeled off and stick on the bitoplast strips. Bitoplast must be glued so that the body remains as tight as possible when the dampers are moved to the extreme position. Carefully adjust the center flap.
- Treat all fastening points of the dampers with grease. Before connecting parts of the heater housing, treat the connector surfaces with sealant. Reassemble the rebuilt heater in reverse order. If there is deformation at the bottom ribbed wall and a gap has formed during assembly of the housing, fill it with sealant.
- There should be no gaps between the radiator and the stove. Strips of regular foam won't do much good. It is better to glue bitoplast strips at the points of contact between the radiator and the heater.
- Balance the fan impeller, wrapping wire around the fan blades if necessary. Route the wires back through the housing rubber plug.
- Adjust the damper stroke. All levers should be easily locked in extreme positions. Particular attention should be paid to the levers of the central and main dampers. Basically, adjustment is carried out by selecting the positions of the braid. After adjusting the dampers, work on the heater valve. Structurally, the choice of partial opening/closing of the tap is provided. Determine the position in which the tap will not close completely.
- Before installation, treat radiator hoses and tubes with sealant. Replace all clamps with new ones. After complete assembly, filling with antifreeze and warming up the engine, tighten the clamps again. Then, before installing the panel, glue foam and bitoplast to the inlet holes of the air ducts, making sufficiently wide holes in them.
- In some cases, heater maintenance may not be enough to solve all problems. The question arises, how to insulate a VAZ 2114 for the winter so that the car warms up quickly and the temperature in the cabin is as comfortable as possible? If it blows from the doors or heat escapes through technological openings, the problem can be solved by replacing the seals and thermal insulation of the car.
Car insulation
Car modernization includes thermal insulation of the interior and engine compartment.
. It is better to carry out all preventive insulation work in the warm season. In cold weather, the setting efficiency of adhesives and sealants decreases.
Insulation of the interior
If you are choosing options for how to insulate a VAZ 2114 and are looking for optimal methods of thermal insulation, then you need to keep in mind that the interior is insulated by gluing insulating materials to the internal parts of the body. Construction insulating materials (for example, isolon, foil and non-foil, or penofol) are used as insulation. Cheap, low-quality materials are not recommended because they can cause persistent unpleasant odors in the interior.
To achieve maximum effect, the roof, bottom, wheel arches, doors (including the lower parts of the rear doors), the overlap of the engine compartment from the passenger compartment, and the sides of the rear seats must be glued.
Insulation of the engine compartment
The purposes of insulation are to supply heated air into the cabin and quickly warm up the engine to operating temperature. Most of the inner surface of the hood is covered with insulating material. The stores have a selection of ready-made kits for the engine compartment. The set consists of already cut parts, ready for gluing. In order to save money, you can purchase building insulating material, make a cut, cut it and stick it according to the marked marks.
To “insulate” the radiator, a suitable piece of cardboard is inserted behind the radiator grille. There are also special screens for radiators in stores. They are put on the radiator grille in frosty weather.
. The radiator cannot be closed 100%. Complete restriction of air flow reduces heat transfer and the engine constantly operates at the limit of permissible temperature conditions. The cooling fan will spin continuously or turn on very frequently.
The cardboard sheet (screen) should cover approximately 2/3 of the radiator area.
The sequence of installing insulation in a car
First of all, choose the material with which you intend to insulate the interior of the car. To carry out the work you will need the following tools:
- sheet cardboard;
- scotch;
- marker;
- sealant;
- knife;
- rubber seals;
- screwdriver;
- scissors.
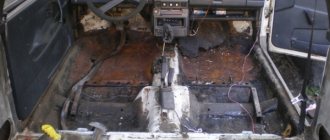
First you need to go to the car wash and do a complete cleaning of the interior. Then, preferably in the garage, remove all the seats, remove the door panels and disassemble the dashboard. All items on the rear shelf must be removed.
After inspecting the condition of the body, seal all holes with sealant. Pay special attention to the area between the engine compartment and the passenger compartment. Remove the heater core and seal all visible seams. Replace worn out old rubber seals with new ones.
It is necessary to start processing the interior for insulation from the floor of the body. Thoroughly clean the underbody of the car and treat it with solvent. Prepare patterns from cardboard sheets.
Buy the calculated volume of material in the store, plus a small supply. Using the cardboard patterns you made, cut out the penofol to the required size. If you have material without an adhesive layer, then you will also have to buy Tilit glue to connect the seams of the insulation.