What kind of lamp is in the low beam of a Chevrolet Niva
As we already wrote above, from 2002 to 2009 lamps without lenses were installed, and from 2009 they began to be installed with lenses. Low beam lamp H7 12v/55W . You can buy a lamp at any car store, as it is used on many cars in low beam. This is not a rare lamp like the PSX24W for Logan's PTF.
When choosing lamps, we recommend choosing standard lamps recommended from the factory. We do not recommend installing 100W lamps. Yes, the light from them will be a little brighter, but they will put an extra load on the generator and car wiring.
Step-by-step instructions for DIY replacement
Car owners who follow all the steps according to the instructions know that replacing low beam lamps does not cause difficulties . Even people who have never changed parts on a car can cope with this process.
The whole job consists of removing the old light bulb and installing a new one . Sometimes light adjustments are required.
Preparatory process
First, choose a site for the correct location of the car . Next, the car is put on the handbrake. Then de-energize the on-board network by turning off the ignition and disconnecting the negative contact wire on the battery.
Selecting lamps for low beam
So, we choose between standard lamps and lamps with increased brightness or service life.
- DiaLUCH H7-12- 55 12557 from 90 RUR (China)
- LIGHTHOUSE H7-12- 55 52720 from 80 RUR (China)
- VOSKHOD H7-12-55 80517 from 75 RUR (China)
- PHILIPS H7-12-55 +30% Vision 12972PRC1 from 240 RUR (Germany)
- KOITO H7-12- 55 W Other Brand 0701 from 320 RUR (Japan)
- GE H7-12-55 58520U from 170 RUR (Hungary)
- NARVA H7-12-55 48328C1 from 160 RUR (Germany)
- OSRAM H7-12-55 64210 from 180 RUR (Germany)
- BOSCH H7-12-55 Pure Light 1987302071 from 170 RUR (Germany)
- EVO H7-12-55 VISTAS 3200K 93367 from 120 RUR (China)
- AVS H7-12-55 Vegas A78143S from 90 RUR (China)
If there is not enough light from standard lamps, you can install lamps with increased light output
- PHILIPS H7-12-55 +150% RACING VISION 3500K from 1000 rub. (Germany)
- PHILIPS H7-12-55 +130% X-TREME VISION 3700K from 900 rub. (Germany)
- GE H7-12-55 +90% (PX26d) Megalight Ultra set 58520SXU from 700 rub. (Hungary)
- NARVA H7-12-55 +110% RANGE POWER set 48062S2 from 1200 rub. (Germany)
- AutoSvet H7-12-55 +80% More Light (Px26d) 32720ML+80 from 200 RUR (China)
- BOSCH H7-12-55 +90% set 1987301075 from 900 RUR set. (Germany)
- VOSKHOD H7-12-55 (PX26d) Super Nova +100% 80517 from 650 RUR (China)
- DiaLUCH H7-12- 55+100% PX26D 5000K EcoLight Sirius 12557 ELS DUO from 600 RUR (China)
- OSRAM H7-12-55 +110% NIGHT BREAKER UNLIMITED from 1300 RUR (Germany)
- OSRAM H7-12-55 +130% NIGHT BREAKER LASER set 64210NBL_HCB from 1400 RUR (Germany)
Above is a large selection of lamps, which will make the low beam on a Chevrolet Niva better. However, it should be remembered that the service life of such lamps is lower than that of standard lamps.
Instructions for replacing lamps yourself
To replace the low beam lamp, you do not need to remove the headlight. To replace it, we only need free time and direct hands.
Open the hood and remove the rubber boot from the low beam headlight.
Remove the block from the H7 lamp and move it to the side
Carefully remove the lamp mounting spring and remove it from its seat
You cannot touch the new lamp by the bulb, so when replacing the lamp, only hold it by the metal base.
We insert a new lamp, snap the spring and install the block.
Here, in the low beam, there are W5W side lamps. To change them, simply remove the socket and pull out the lamp.
If after replacement the lamp does not light up, the problem may not be in the lamp itself, but, for example, in the low beam fuse. Each headlight has its own fuse.
Replacing Chevrolet Niva lamps
Attention For normal operation of the lighting and alarm system, use the lamps specified in Appendix 2.
Before replacing the lamps in the headlight, remove the protective cover 3, fig. 51, which is fixed with a wire holder 2. To replace the low or high beam lamp, remove the block 5, remove the antennae of the spring latch 6 from the grooves and remove the lamp 4. To replace the turn signal lamp, turn the socket 1 counterclockwise and remove it from the socket, turn and remove the lamp. To replace the side light lamp, you need to remove block 5 of the low beam headlights, pull out the lamp socket from the headlight unit, and remove the lamp.
Replace the lamps in the rear light from the luggage compartment side, having first opened the valve in the side trim of the luggage compartment. To access the burnt out lamp 1, fig. 52, turn socket 2 counterclockwise and remove it complete with the lamp. To remove the lamp from the socket, press the lamp and turn it counterclockwise.
In the fog lamp 1, fig. 53, change a burnt-out lamp after first removing the headlight from the car. To remove the lamp 3, remove the protective rubber casing 4 and remove the antennae of the spring latch 2 from the grooves. To make it easier to dismantle the lamp, first remove the block 5 from it.
In the interior lamp, fig. 54, change the burnt-out lamp 2 by removing the lens 1, to do this, press the center of the lens with your fingers and pull it down. The lamp is held in the lampshade by spring contacts.
Burnt out lamp 3, fig. 55, change the license plate light only after removing it from the car, to do this, unscrew the screws 6, insert a screwdriver into the groove 4, press the latch 5 towards the center with your finger and carefully remove the lens 2 with a screwdriver. The lamp in housing 1 is held by spring contacts.
To replace the lamp in the side direction indicator, fig. 56, remove it from the car. The pointer is held in the socket by spring clips. Then remove the protective rubber cap 1, remove the socket assembly with the lamp from the housing 2 and remove the lamp.
To replace warning lamps 1 and lighting lamps 2 in the instrument cluster, fig. 57, remove the shield and unscrew the fastening screws. Then pull the instrument cluster towards you and disconnect the wiring harnesses from blocks 3. Turn the lamp to be replaced counterclockwise and remove it from the socket.
To replace a burnt-out lamp in an individual lamp, you need to remove its switch. To do this, squeeze the switch from the sides, disengage the protrusions of the axle from the holes in the stationary part of the lampshade and then pull the switch down. To replace the lamp in the glove compartment light, remove it from the socket by carefully prying it from above with a screwdriver. Remove the base in the lantern by pressing the latch, replace the burnt out lamp.
Replacing the lamp in the trunk light is similar to replacing the lamp in the glove box light.
Chevrolet Niva low beam fuse
The lamp may not light because the fuse has blown. The mounting fuse block on the Chevrolet Niva until 2009 is located in the car interior to the left of the steering column.
Low beam fuses F2 and F12 for the left and right headlights, respectively.
Similar articles:
Share “Replacing low beam lamps in Niva Chevrolet”
What to do if the lamps still don’t light up
After replacing the element, the luminous flux is adjusted , since the filament in the new part is displaced relative to the position of the previously installed one. Before starting work, you should familiarize yourself with the characteristics of the vehicle: (take into account tire pressure, ballast load, alignment). The average car enthusiast most often turns to professional specialists.
Checking the low beam fuse
If the low beam on a Chevy Niva does not work even after replacement, perhaps the reason lies in a knocked out fuse. To determine the breakdown of this element, you will need to open the mounting block, which is located on the left side of the steering wheel in the Chevrolet Niva interior.
The problem may also occur for other reasons.:
- If the contacts are connected poorly, interruptions in the fuse system may occur. Over time, the outer shell of the spare part oxidizes, or it needs to be firmly fixed.
- Sometimes the wiring breaks along the path from the fuse box to the headlight.
- A fairly common electrical problem is switch failure.
Replacing a low beam lamp on a Chevrolet Niva
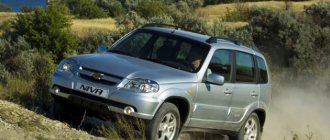
“Niva Chevrolet” is the first result of the joint efforts of the automobile concerns General Motors and AvtoVAZ. An all-wheel drive SUV with an elegant design and high performance characteristics is perfect for driving in domestic conditions. It copes well with roads that cannot boast of high-quality coverage, and even with those that do not have any coverage at all. Hunting, fishing, a picnic in the forest, a trip to the country - if you like to be outside the city, this model is just for you.
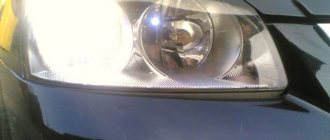
Driving in off-road conditions can result in damage to the front of the vehicle. The headlights are the part that suffers most often . This could be mechanical damage or simply a burnt out light bulb - this happens to all cars, and the Chevrolet Niva is no exception.
Before talking about how to replace the lamp responsible for the low beam in a Chevrolet Niva SUV, let’s clarify its type, and also remember the characteristics and features.
Step-by-step replacement process
The easiest way for owners of a Chevrolet Niva is to go to a service station to replace the lamp - the source of low-beam illumination of the car. Specialists who know their business will do all the work quickly and correctly, but they will also require money from their clients.
Having a little experience and having the most necessary tools, home craftsmen can easily cope with such work on their own, following the recommendations and advice. Initially, experts recommend studying each stage, and then you just need to follow the instructions and believe in your own success.
To avoid discomfort for the driver and get exactly the effect that you would like, you should replace not only the faulty lamp, but also a fully working one. This is explained quite simply - car lamps have not only different powers, but also excellent characteristics. If the headlights are illuminated by different lamps, it will not be possible to create comfortable and, most importantly, safe driving conditions.
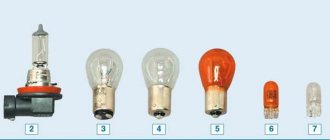
Low beam lamps on a Chevrolet Niva car
In this car, H7 halogen bulbs are responsible for the low beam. These are single-strand flange type lamps. They have a fixed gap between the spiral and the flange, which allows the filament point to always be in the focus of the reflectors. This gives a comfortable light that provides good visibility.
Modern industry produces various modifications of such lamps. For this, different technologies are used that provide parameters responsible for light and power indicators.
For H7 light sources, a power standard of 55 W is accepted, however, there are varieties with increased power characteristics recommended only for off-road use.
The lighting lamp is located here
There are three types of such lighting sources:
- halogen;
- xenon;
- LED.
"Niva Chevrolet" uses the first of the listed types - halogens. They are inexpensive, which makes them very popular among drivers. They provide comfortable, correct light and do not require additional devices for their operation.
Such a lamp consists of a bulb, for the manufacture of which carbide or quartz types of glass are used, as well as an incandescent filament and gas with the addition of halogens. The main “disadvantage” of such light sources is the very high temperature in operating mode . This greatly affects the wear of the optics. But experts say that it is halogen H7s that offer the optimal price-quality ratio, which makes them the most widely used type of lamp today.
Low beam lamp for Niva Chevrolet
How to choose the right low beam lamps for Chevrolet Niva
When choosing low beam sources for a Chevrolet Niva, some difficulties may arise. There are a lot of products on the market from various manufacturers, where each variety has its own characteristics. In order not to get confused and to competently approach the issue of purchasing lighting sources, it is best to focus on those nuances that are important to you:
- light brightness;
- comfort of light;
- life time;
- price and other factors.
Universal advice is to take an interest in the manufacturer’s reputation. Try not to purchase products from companies you have never heard of. In any case, products from unknown brands are most often inferior to products from well-known brands with extensive experience in the market.
When it comes to products with improved characteristics, remember the rule of balance: an increase in one thing automatically entails a decrease in another. Increased power, for example, automatically leads to a shorter service life. Increasing durability makes the light less bright.
Philips low beam lamps for Chevrolet Niva
And under no circumstances should you chase a low price. The quality of headlight lighting directly affects your safety on the road, and this is definitely not worth saving on.
Replacing the low beam light bulb in a Niva Chevrolet car
After we have become familiar with the characteristics of low-beam lighting sources on the Chevrolet Niva and learned how to choose them correctly, let’s talk about what replacing them in a headlight for a Niva looks like.
The simplest solution if you need to replace the light bulb responsible for the low beam is to contact a service station for help. But if you prefer to solve all problems yourself, or simply finances do not allow it, then replacing a light bulb is not so difficult that it is beyond your capabilities. Study the whole process thoroughly, follow the instructions - and everything will work out for you.
Experts advise that you must replace two lamps, even if only one has failed. Otherwise, a light imbalance may result, creating discomfort for the driver.
To get started, you will need to stock up on the following things:
- new gloves;
- key "ten";
- clean rags;
- a small mirror;
- H7 lamps (2 pieces);
- lantern;
- hard work and accuracy!
Replacing a low beam lamp: how to properly disassemble a car
So, replacing low-beam lighting sources in stages is as follows:
- Using a ten key, unscrew the negative terminal from the battery.
- We start from the right side. We take out the washer reservoir from the grooves and put it aside.
- We clean the protective casing, removing dust and dirt, after which it can be removed.
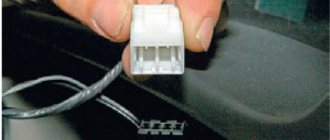
- Next you need to disconnect the contacts from the light bulb base - to do this, pull the base.
- Press and move the top of the lock and release. After this, the latch will open.
- Making sure that it does not come out of the fastenings from below, we take out the old lamp, taking it by the base.
- We insert a new one in its place. We hold it by the base, being careful not to accidentally touch the flask. If this does happen, you need to carefully wipe the area of contact with a rag with alcohol and make sure that no lint remains.
We insert the lamp into the special hole and connect it
- Using a mirror, we check whether the base fits into the groove of the light diffuser.
- We fasten it using a latch, moving it up.
- We put the contacts in place.
- We return the casing to its place.
- We repeat all the above procedures with the left headlight.
We check the operation of the lights. If everything works, then you have completed the task successfully, for which we congratulate you.
Replacing a light bulb in a low beam headlight
Before we find out how to replace the low beam bulb in a Chevrolet Niva, let's look at the design of the headlight itself.
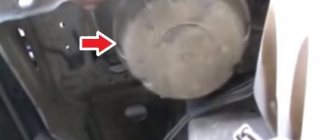
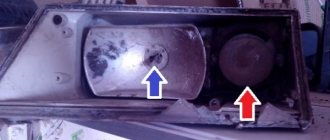
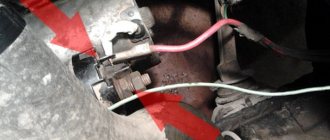
Niva right headlight from the rear side
I marked the hatch in which the low beam light bulb is located with an arrow. On the left headlight, this hatch will be on the left side. With the location of the light bulb figured out, you can start replacing it. For this we need:
- key to 10;
- key 8 (for cars with ABS);
- mirror;
- clean gloves;
- replacement light bulbs.
Let's start by replacing the lamp in the right headlight. First of all, you need to remove the battery, since it is quite difficult to get close to the headlight with it, although with some skill it is possible. We feel for the low beam sunroof boot and remove it. Under the boot there is a light bulb to which the power terminals are connected. If looking into the hatch is problematic, we use a mirror.
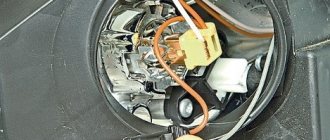
Opened hatch of the low beam unit
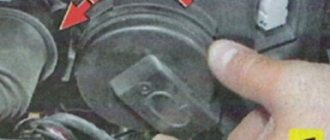
We disconnect the terminals and unclip the spring clip, which I marked with an arrow in the photo above.
Expert opinion Alexey Bartosh Specialist in repair and maintenance of electrical equipment and industrial electronics. Ask a question to an expert If you decide not to dismantle the battery, then still disconnect the wire from its positive terminal. The contacts powering the light bulb do not have insulation and can short-circuit to the body during operation.
We remove the burnt device from the socket and, wearing clean gloves, install a new one in its place. Under no circumstances should we touch the bulb of a halogen light bulb with our bare hands! If you don’t have gloves, then hold the device by the base.
Installing a new low beam bulb with bare hands On the left headlight, the low beam hatch is blocked by the washer reservoir
We fix the device with a spring clamp, put the power connectors on the lamp contacts, and put the boot and battery in place. In the left headlight, the low beam lamp is changed in the same way, but instead of the battery, you will have to remove the washer reservoir and, without disconnecting the pipes, move it to the side.
Replacing lamps on cars with ABS
If the car has ABS, then replacing the low beam bulb in the left headlight becomes somewhat more difficult. To get to the headlight unit, you will have to remove the air filter and air intake. To do this, arm yourself with a 8mm wrench and unscrew the filter mounting bolts.
Air filter mounting bolts
Lift the filter and remove the rear rubber support from the bracket hole.
Removing the filter from the rear support
Release the air intake and lift the air filter.
Raised filter with air intake
Now access to the rear part of the headlamp is free and you can change the low beam lamps.
It is better to change low beam bulbs in pairs, even if one has burned out. Firstly, the service life of the second lamp is probably coming to an end, and secondly, lamps from different manufacturers may have different color temperatures, which may cause unnecessary questions from traffic police officers.
How to replace the low beam light bulb on a Niva Chevrolet: video
Head diode light for the field
At the moment, lamps with various parameters are produced.
In this article we will take a detailed look at how to replace a low beam lamp on a Niva Chevrolet….
Universal advice is to take an interest in the manufacturer’s reputation. When replacing it on the left headlight, it is more convenient to use a mirror that the protrusion of the lamp base is in the groove on the light diffuser - the direction of the groove on it is oriented upwards, we put the latch back here and your patience will come in handy, we connect the contacts.
Next, disconnect the contacts from the lamp base by pulling the base. The lighting lamp is located directly here. Such lighting sources come in three types:
Carefully remove the lamp itself by the base, so that the retainer does not fly off the lower mounts. Be sure to take the new one only by the base, without touching the glass part, and carefully insert it back. If you do touch it, remove the traces with a clean rag moistened with alcohol, making sure that there are no lint left after wiping.
Participants online
Otherwise, if you leave all this dirt, the lamp will burn out very quickly. First of all, it must have the following qualities: Products from a well-known brand may be more expensive, but they will use high-quality materials.
You should also not pay attention to lamps with increased functionality, for example, the most durable ones - this is usually achieved by reducing the brightness, which can be unsafe in the dark.
Replacement Replacing a Chevrolet Niva low beam lamp can be done by service station specialists, but this procedure is quite simple, so many car owners do it themselves.
Last messages
To do this, you will need a standard set of tools and materials: Blown fuses; Poor contact of the connectors - in this case, the connector is easily put on the contacts and is poorly fixed, or there is noticeable oxide on the contacts; Break in the car wiring in the area from the headlight to the fuse box; Faulty low beam switch or relay - unlike in previous cases, with such faults two headlights do not light up at once.
Poor contact of the ground wire in the headlight itself - in this case, all light sources in the headlight do not light up.
In all these cases, restoring the lighting will not be difficult. The main thing is to correctly determine the cause of the malfunction.
To do this, you may need a multimeter, which will allow you to determine the area of the open circuit. Modern industry produces various modifications of such lamps.
For this, different technologies are used that provide parameters responsible for light and power indicators. For H7 light sources, a power standard of 55 W is accepted, however, there are varieties with increased power characteristics recommended only for off-road use.
The lighting lamp is located directly here. Such lighting sources come in three types: They are low in cost, as a result of which they are very popular among drivers. Regular and high power lamps.
Bulb replacement front Parking light for Chevrolet – Niva
To choose a light bulb correctly, you should approach the process with full responsibility and pay attention to the following details: Comfort and brightness of the light. Although in this case it is easier to change the lamp, dismantling will take more time, and after repair you will have to adjust the lighting again. For those who find it difficult to cope with such a task, it is recommended to resort to the method of replacing the low beam lamp without removing the headlight unit.
In this case, more patience and accuracy will be required. To perform this procedure, you will need new gloves, a ten key, clean rags, a mirror, H7 lamps and additional lighting. Having prepared the necessary devices, we proceed to replacing the low beam lamp on a Chevrolet Niva.
To prevent a short circuit, it is important to disconnect the negative terminal from the battery.
How to replace lamps in headlights and lanterns of Lada Niva (Chevrolet)
During operation, the lamps in the headlights or rear lights may burn out. You can replace them yourself. To avoid breaking anything, it is recommended that you read the instructions contained in the vehicle's owner's manual.
Attention!
Wear gloves when installing a halogen lamp to avoid leaving marks on the lamp bulb.
Replacing headlight bulbs
Before replacing the lamps in the headlight, remove the protective covers 5 (Fig. 85). To replace low beam lamps 1 or high beam lamps 2
you need to bend the wire holder, remove the cartridge and disconnect the wire.
To replace the turn signal
Turn socket 3 counterclockwise using the special ribs, then remove the socket from the socket and remove the lamp. If necessary, for better access, remove the windshield washer reservoir.
To replace the side light
4 it is necessary to pull out the lamp socket from the headlight unit and remove the lamp.
Reassemble in reverse order.
In the version for a car with a snorkel: to replace the lamps in the left headlight unit, you must first remove the air filter housing. After replacing the bulbs, reinstall the air filter housing.
Replacing lamps in the rear light
Replace the lamps in the rear light from the luggage compartment side, first remove the two buttons securing the upholstery of the side of the luggage compartment, and bend the upholstery. To access the burnt-out lamp 1 (Fig. 87), turn socket 2 counterclockwise and remove it complete with the lamp.
To remove the lamp from the socket, press the lamp and turn it counterclockwise.
Reassemble in reverse order.
Replacing dimensions in the rear light:
Replacing turn signal lamps in the rear light:
Replacing brake light bulbs:
Replacing the Low Beam Lamp Niva Chevrolet Video
" Chevrolet Niva ": low beam
.
" Chevrolet Niva ": types of lamps used on a car
South Ural offers relaxation after production congestion in order to maintain benefits for the home budget. Travelers using their own transport can expect:
1. Fishing in remote mountain lakes all year round.
2. Pick berries and mushrooms in the forest and meadows in summer.
3. Hunting for birds and animals in the open season.
For lovers of outdoor activities, driving home in the dark, there are two important points:
- sufficient lighting in front of the driver;
- impeccable behavior of direction indicators and side signals.
Built-in lighting network, including low beam
(on
Chevrolet
Niva
the pantry of wildlife and return home without interference.
Visible from afar
The Russian SUV is equipped with the necessary lighting devices.
The headlights are far low beam lamp mounted .
Type H1 is used for long night journeys. The brightness of a glass bulb with a tungsten filament is achieved by filling it with a mixture of inert and halogen gases.
Replacing the low beam bulb in a Niva Chevrolet video
Yesterday the left low beam bulb burned out. Yes, left again. I don’t know why this happened, but the left lamp is always the first to go out. I always change both at once. Not because I’m a bourgeois, but so as not to have to explain to the traffic police later “why my headlights are shining differently,” and not to poke around again, proving that I didn’t “do anything illegal” there. In addition, the second lamp also has a damaged filament and will not last long anyway.
So I change both. Last time it was Osram Night Breaker. As in the picture below. No complaints, except for the price of 1,700 rubles. They lasted for 2 years despite the fact that I did not install separate running lights. I always turn on the low beams. I can also note that they shine with white light, which creates a certain comfort when driving at night. Well, the declared brightness of 120% seems to be fulfilled, although this is only “by eye”. I did not measure with instruments.
This time I could have bought them too, but I found others on sale: Philips Racing Vision with a declared brightness of 150%. It’s not that I’m a fan of brightness, but it’s always nice when the headlights shine well, it’s easier on the eyes. They say that this makes the lamps have a shorter lifespan, but judging by the Osrams, they lasted 2 years. I can’t say that the original lamps worked longer. Price for Philips = 1400 rubles. Let's see how they shine and how long they last.
Replacing low beam lamps on a Chevrolet Niva
To change the lamp with your own hands without removing the entire unit, first you need to eliminate the short circuit by removing the negative terminal (key 10) from the battery. It is better to change two lamps at once. If you replace only one there will be differences in lighting, the new one will have a brighter beam of light. Advice, start with the right headlight, when replacing it is more convenient to see how everything is located. If you start with the left, you will have to perform this process almost by touch. So, let's begin. Remove the washer reservoir mountings from the grooves and move them to the side. Then we clean the protective casing from dirt and dust and remove it. Next, disconnect the contacts from the lamp base by pulling the base. There won't be any particular difficulties with this. Pay attention to the location of the light diffuser groove and the locks of the retainer; this will come in handy when replacing the left headlight. Then press the upper end of the latch, move it and release it. The latch should swing back. Carefully remove the lamp itself by the base, so that the retainer does not fly off the lower mounts. Be sure to take the new one only by the base, without touching the glass part, and carefully insert it back. If you do touch it, remove the traces with a clean rag moistened with alcohol, making sure that there are no lint left after wiping. Otherwise, if you leave all this dirt, the lamp will burn out very quickly. Make sure (when replacing on the left headlight it is more convenient to use a mirror) that the protrusion of the lamp base fits into the groove on the light diffuser - the direction of the groove on it is oriented upwards, put the latch back here and your patience will come in handy, we connect the contacts. We install the casing. We repeat the same with the left headlight.
It's up to you to judge which lamps and which company to install. Below are a number of brands that have gained popularity among Chevrolet Niva owners (the numbers indicate the catalog number)
- Bosch 1987301012
- Osram 64210
- General Electric1 7123
- Philips 12972 PR
- General Motors 94536018
- Opel Valeo 032009
Top manufacturers of shock absorbers for chevrolet niva
Anyone can replace the rear shock absorber in Chevrolet Niva cars in 10 minutes. To do this, he will first need to do the preparatory work:
- Use a metal brush to clean the threads of the fasteners;
Replacing the rear shock absorbers of a Chevy Niva occurs in the following order:
- Using a wrench, unscrew the bolt of the lower fastening of the device.
- Using two spanners, unscrew the nut from the bolt on the upper shock absorber mount, holding it with your hand.
- They take out the part.
- The new shock absorber is installed in the reverse order.
This spare part for Chevrolet Niva cars is made in different parts of the world. The site contains reviews of shock absorber manufacturers from countries such as Japan, the Netherlands, Russia, South Korea, Belarus.
In March 2021, 7 manufacturers took part in the rating of shock absorbers for Chevrolet Niva on PartReview. It is based on 26 reviews and 83 votes.
You can also find out what Chevrolet Niva owners chose among manufacturers of such spare parts as:
Water pump,
Thermostat,
Springs,
Battery,
CV joint,
and others.
It is interesting that all companies sell shock absorbers either individually or in pairs, rarely as a whole set. This is because the characteristics of the front and rear shock absorbers as requested by drivers are very different and depend on a large number of factors, for example:
- on the number of people in the car;
- on the volume of cargo;
- from motion sickness of passengers;
- on the nature of the roads.
Therefore, each driver individually selects the type of shock absorbers for himself, based on his anatomical and psychological characteristics, for example, someone likes it to be softer in the front and hard in the back, or vice versa. It is clear that the greater the load, the stiffer the shock absorbers should be. In this regard, it is good that modern products have adjustments and settings. Therefore, when asking yourself which rear shock absorbers are best for Niva-Chevrolet, take into account the factors described above.
In practice, it is not always possible to immediately understand what we want, and therefore on forums they often write that they bought some, tried them, didn’t like them, and took others. Therefore, before purchasing, it is recommended to carefully study the forums, this will help you save money.
Read news about the new Niva
- Lada 4×4 Bronto - sales stopped, new details » Lada.Online - all the most interesting and useful about LADA cars
- Description of the instrument panel Lada 4×4 (VAZ 2121, 2131) » Lada.Online - all the most interesting and useful about LADA cars
- Chevrolet Niva gasoline consumption per 100 km
- Buy LADA (VAZ) 2131 (4×4) 2021 in Rostov-on-Don, low price for Lada 2131 (4×4) 2021 on the Avto.ru website
- Fuses Niva 21214 injector «
- The new large Lada 4×4 Niva “Bigster” 2021-2022 based on the Dacia Bigster was shown for the first time. The SUV has changed beyond recognition
- New Niva Chevrolet Lux 2021 - review of GLC equipment
- Niva Chevrolet alarm connection points "