The standard instructions for using the Tomahawk key fob contain a complete list of information about the capabilities of the security system and its operation. You can find the data here:
- necessary blocks for normal functioning;
- sequence of installation of parts;
- standard equipment;
- connection diagram of all parts of the circuit;
- recommendations for the location of blocks;
- system software settings;
- available operating modes;
- principle of operation of nodes;
- working with key fobs and their settings;
- custom calibrations.
Thanks to the information contained in the manufacturer's passport, the car owner can independently install and configure the alarm system. The information will also help in case of unexpected breakdowns or malfunctions of the main units.
See how to disable 1 2 temp start tomahawk.
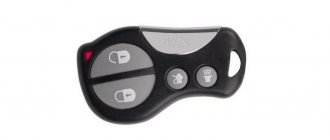
Description of the Tomahawk keychain
Regardless of configuration and modification, the Tomahawk alarm system is supplied to the market with two remote controls.
The first is the main element and is equipped with a full set of controls. There are usually five keys and a liquid crystal display. The screen displays basic information about the system status in real time. Additionally, there is a set of auxiliary options:
- timer;
- alarm;
- current time;
- driver notification in vibration mode;
- backlight (depending on model).
The second module is designed as a spare element and is used primarily in emergency situations. There is no display or key to enter service mode. The indication is made in the form of a light diode. The backlight operates in two modes: red and green. The first indicates a malfunction in the functioning of the complex or an alarm. The second indicates normal operation of the device.
How to attach a second key fob to a tomahawk alarm
In this article, auto mechanic Alexey Bakulin communicates with readers on the topic “How to attach a second key fob to a tomahawk alarm?”
Correctly linking the remote control device of the Tomahawk anti-theft system allows you to fully control its functions. Programming must be carried out if the remote control is lost or replaced with a new one. To correctly configure the key fob pager, certain actions are required.
You can program the Tomahawk 9010 key fob yourself, but you should remember the consequences, after which you should immediately contact a specialist. For additional functions enabled by buttons to work, the device must be configured correctly.
Every car enthusiast can synchronize the TZ 9010 key fob with his car. This is done when it is replaced or lost. To pair a remote control without a screen, you need to follow a number of simple steps.
The first method is suitable for fully compatible remote controls. Otherwise, a different procedure must be followed.
This procedure is also followed when replacing the alarm pager. To program functions, strictly follow the instructions.
The Tomahawk 9010 remote control may break at one inopportune moment. One of the frequent breakdowns of an old key fob is the display fading. I have to buy a new pager with auto start. How to program it correctly?
You can do this yourself by carefully studying the step-by-step guide in the instructions:
It often happens that the remote control buttons do not respond correctly to pressing. How to reset all its settings and flash it again? You can study the attached instructions in detail or watch the video that is filled with the Internet.
You need to adapt the alarm key fob like this.
When setting up the TW 90 10 remote control yourself, questions may arise. The key fob is not programmed and is not recognized by the alarm. This problem appears not only on domestically produced cars (Prior, Kalina), but also on foreign cars. The issue is not the make of the car, but a problem caused by the setup and use of the security system.
What to do in this case?
- Open the instructions for your car alarm. Find a detailed guide to programming remotes.
- If there is none, then try setting up the key fob using the methods discussed earlier.
- Did not help. Look for other reasons. Some mechanical damage is possible. Examine all components of the security system. Carefully inspect the contacts on the control and primo transmission connectors. Test the electrical circuits with a tester. If you find damaged wires, replace them. Clean oxidized contacts thoroughly.
- Remotes still not working? Carry out diagnostics on the control unit. Its reflashing is not excluded. This work can only be done by qualified electronics engineers.
PROMOTION: SALE OF NEW CAR 2021 PRODUCTION
The tomahawk car alarm belongs to the category of multifunctional security devices. This equipment can be controlled remotely using a key fob.
To ensure its highest quality performance, it is necessary to configure it correctly. In total, up to four key fobs can be stored in the Tomahawk alarm memory.
Key fob codes are recorded when the security mode is turned off. When recording new key fobs, you must also rewrite the old ones, otherwise they will be deleted from the system memory.
After purchasing the alarm, you need to program the key fob. To do this, you must turn on the vehicle's ignition. In this case, the car engine must be turned off. Next, you need to click the Override button.
It must be held until the car owner hears four CHIRPS from the siren. This will confirm the entry of the car alarm into the key fob programming system. The next step is to release the Override button.
Next, the remote control is programmed in this way: the Silent Security and Trunk Open buttons are turned on simultaneously. They must be held until the person hears the siren's CHIRPs. The device emits the first of them for the first key fob, the second for the second, etc.
When the car alarm receives signals from the key fobs for six seconds, the system will automatically exit the programming mode. In the same way, you can register the functions of the key fob. It is also used if the key fob is being replaced.
The above method is highly effective only if the compatibility of the key fobs is fully consistent.
Otherwise, programming is performed using a different system. Initially, you need to turn on the car's ignition. In this case, it is necessary to ensure that the vehicle engine is turned off.
In order to program a new key fob, you must simultaneously press three buttons:
It is necessary to hold the buttons until the car owner hears 5 CHIRPS of the siren. After the car owner has released all the buttons, he needs to press them again.
The buttons on the car alarm key fob are held down until the vehicle's turn signals blink several times.
Next, you need to turn on the ignition with the vehicle engine turned off. After this, you need to click the Override button. The user must hold it until 4 CHIRPS of the siren pass. Next you need to release the button. After this, press the Silent Security Mode button. At the same time, hold down the trunk open button.
They are held until 4 CHIRPS are received from the siren. This will indicate that the device is remembering the new key fob. After completing all these steps, you can fully use the key fob.
If the compatibility of the key fob and the device is good, then the user will be able to program it the first time.
This algorithm must also be carried out if the key fob is replaced. In order to register the functions of the key fob, you must use the instructions.
The undeniable advantage of the alarm is that it has a remote control with which it can be controlled from a considerable distance. The compatibility of these devices is at the highest possible level, which ensures their excellent performance.
One of the key fobs has a liquid crystal display, which provides convenience when using the device. Information is displayed on the display, which allows the car owner to constantly monitor the performance of the system.
The remote control is backlit, which makes it convenient to control the device in the dark. Expansion of the signaling functionality is provided due to the presence of feedback.
When the remote control receives a signal, the light indication turns on, which makes it easier to control the equipment. The equipment is protected from hacking thanks to an innovative dynamic encryption code.
Car alarms are characterized by the presence of an additional key fob. The remote control is designed to activate the autostart function. The key fob has backlit pictogram buttons, which ensures maximum convenient use at any time of the day.
The device uses LED indicators, which provides a high level of backlight brightness. The compatibility of the additional key fob with the device is quite good, which ensures ease of use. Convenience during the use of key fobs is provided due to the coincidence of the functional purpose of their buttons.
Key fobs can perform a variety of functions that the user can register independently.
The equipment is equipped with an innovative base unit and a new key fob, which is capable of fully performing its functions at an impressive distance.
The instructions contain detailed information. The car alarm system can independently turn off sensors in accordance with zones.
The car is reliably protected from hacking thanks to a modern encryption code. The vehicle's on-board network voltage is monitored by a special program.
Thanks to the use of modern technologies in the production of equipment, its noise efficiency is ensured as low as possible.
The instructions contain detailed information. The security system is characterized by the presence of a mini-USB port, which is used to update the software.
Accuracy of signal acquisition is ensured using a built-in dual-band antenna. The device is equipped with a built-in antenna, which allows it to capture signals as efficiently as possible.
The equipment has the most correct integration, which ensures an organic increase in anti-theft potential. If there is a threat of burglary or car theft, then the corresponding notifications are sent to the alarm key fob.
If this does not happen, then it is replaced. The device has a built-in memory, which allows it to contain information about previous operations.
Car alarm key fobs have special buttons, which guarantees the simplest possible process of controlling the device from a distance.
Programming of the Tomahawk 9010, 9020 and other key fobs is done using a personal password, a button to enter the service mode and standard buttons on the remote control. Depending on the system model, the combination of controls will be different, usually this is the simultaneous pressing of buttons with indicators of an open trunk and a crossed out horn. The binding of additional communicators occurs in a similar way.
Features of programming a new key fob for Tomahawk alarm systems of different models
Video: programming Tomahawk 9010 key fob
Tomahawk 9020 and 9030
Video about binding the remote control for alarm 9020
Linking an additional key fob
How to reprogram an old key fob?
Possible problems and their solutions
Download Tomahawk alarm operating instructions in PDF format
Video: diagnostics of anti-theft system options 9010
Comments and Reviews
Before programming a new pager with or without an alarm system, the key fob must use working batteries. Control elements must be installed in a special compartment. It is located behind the back cover of the device.
When programming new communicators, the system deletes information about old remote controls from the memory of the Tomahawk alarm control unit.
Detailed step-by-step instructions that allow you to bind or register the key fob code yourself before using the pager:
Taken by Danil Andreev.
The communicator on the X5 model will be programmed as follows:
If it was not possible to bind an additional device using a similar method, perform the following actions:
- The ignition system in the car turns on, but the power unit does not start. When turning the key in the lock, the user must simultaneously hold down the button to enter the service mode.
- The siren will play four sound pulses.
- The service mode button is released.
- On the communicator, you simultaneously press controls with indicators in the form of an open trunk and silent car protection. In confirmation, the siren will play several sound signals, their appearance indicates successful programming.
- To exit the binding menu, you must take no action for 6 seconds.
To find out how many remote controls are registered in the Tomahawk memory, you need to press the button in the form of an open trunk with the ignition off. The remote control will blink its LED indicator several times. The number of flashes corresponds to the number of recorded key fobs.
You need to reflash the pager as follows:
- The key is turned in the lock to turn on the ignition system. The engine will not start.
- At the same time, the user must hold down the service mode button, as well as the keys on the key fob being registered. These are controls with indicators in the form of a crossed out siren and an open trunk.
- The siren will sound five times. After they are played, the keys are released.
- Then the indicated buttons on the key fob are pressed once. The car's external lighting devices should blink.
Most often, the communicator is not recognized by the alarm control unit, which is why the user cannot control the security mode and other functions. It is recommended to ensure that the battery installed in the device is in good condition. If the battery is worn out, it must be replaced taking into account the polarity.
Then the following steps are performed:
- The key fob is re-programmed taking into account the nuances specified in the technical documentation. To do this, it is recommended to study the service manual in advance.
- If the steps indicated in the manual did not help, you can try to reflash the device using the methods described.
- Provided that the communicator is intact and the battery in it is working, you need to test all the components of the alarm. The system may not receive pulses due to mechanical problems. You need to make sure that the control unit and other components have good contact with the on-board network. If possible, all wires should be tested using a multimeter, and damaged electrical circuits should be replaced with new ones.
- The contacts on the microprocessor module, as well as the transceiver, are checked. The connector could be oxidized or clogged, so to eliminate the problem, clean it. If the contact elements are damaged, they must be resoldered.
- The transceiver location is being checked. Often the lack of signals is due to its incorrect installation. If metal products or body parts are located within 5 cm of the antenna module, this will reduce the range of the key fob. In such cases, the transceiver must be reinstalled.
- If all components are intact, then the cause of the breakdown may be a software malfunction of the microprocessor. To fix the problem, you may need to reflash the device. It is also recommended to check its board for integrity and absence of traces of moisture. If the unit has been exposed to condensation, the circuit must be removed from the microprocessor and dried.
You can download service manuals for controlling Tomahawk remotes using the following links:
| Manuals in Russian for the use and installation of alarm systems | |
| Operating instructions Tomahawk 9010 | |
| Operating instructions Tomahawk 9020 | |
| Operating instructions Tomahawk 9030 | |
| Operating instructions for Tomahawk X5 |
Instructions for Tomahawk key fob: download and read PDF manual
The user manual contains separate instructions for the Tomahawk remote control. The document contains information about available modes, calibrations and settings. The standard instruction manual with pictures also has illustrations of all indicators and modes. Here you can see the options:
- remote engine start;
- automatic heating at a specified time or temperature;
- available security modes and methods of their activation;
- module programming;
- displaying system status in real time;
- calibration of additional options.
Here you can download or read online one of the complete operating instructions for the Tomahawk key fob in PRF format.
Find out where the Valet button is located on the Tomahawk alarm system.
Setting up and connecting a new remote control
To synchronize the key fob with the X3, LR 950 LE, Z5 systems you need to:
- Insert the key into the ignition but do not turn it.
- Press the Override key 7 times.
- Turn on the ignition and wait for seven beeps.
- Press the open and closed lock buttons and hold them until the siren sounds.
- Write down the required number of keys.
- Turn off the ignition and wait for five blinks of the turn signals.
At this point, the setup is considered complete. You can store 4 pagers in memory as standard, the old ones need to be reinstalled. Find out everything about Tomahawk 9020.
How to use a Tomahawk keychain
The manual for using the Tomahawk security system contains information on how to properly use the alarm remote control.
After turning on the pager, control is carried out as follows. To arm the car, you must enter the appropriate key combination. Deprotection is performed in the same way.
INSTALLATION INSTRUCTIONS
Installation Basics
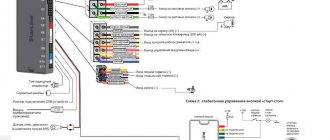
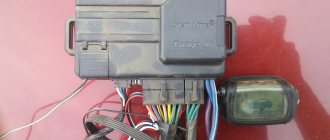
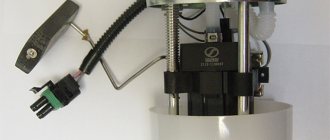
The TOMAHAWK TW-9010 security system has a classic connection diagram. First of all, before starting the installation, turn off the on-board power supply to the vehicle (disconnect the “-” battery terminal). To select installation locations for security system units, be guided by the following principles:
- Installation secrecy
- Absence of heat and moisture sources near the blocks
- Provide for minimal influence on each other of the vehicle’s standard electronics and alarm units
ATTENTION!
The radiating antenna must be installed away from the alarm and vehicle control units. When installing, try to minimize the length of the wires.
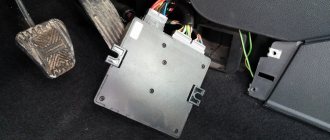
Selecting the location of the main blocks
- The electronic alarm control unit is installed inside the vehicle's interior. To obtain maximum range, the transmitting and receiving “RF” antenna of the system unit must be positioned as high as possible and not come into contact with metal objects or electrical wiring harnesses.
- The siren is installed in the engine compartment, in an inaccessible place. If you are using a stand-alone siren, provide access to the service key hole. The siren should be installed with the horn facing down, this will prevent moisture from entering. It is better to plan the wire connections inside the cabin for less oxidation.
- All high current circuits (power supply, parking lights, central locking, etc.) must be protected by fuses of the appropriate rating.
- The hood and trunk triggers cut into places protected from moisture that are inaccessible when the hood and trunk are closed. Triggers need to be lubricated periodically to prevent seizing and corrosion.
- The shock sensor is installed in the passenger compartment, the center of the car can be considered ideal, it is attached to the metal of the body with self-tapping screws or glued.
- Contacts in places where ignition, starter, etc. circuits are broken. It is recommended to solder.
……..
Connecting wires
6 PIN remote start power connector
1. Black and yellow wire - starter activation wire (+12V). +12V output signal to the starter solenoid relay.
It is connected to the wire on the ignition switch, where +12V appears in the “Starter” ignition key position. This signal is intended 4 to start the engine. Connect this wire after the locking relay.
2. Blue wire - +12V ACC output signal - auxiliary equipment.
It is connected to the wire on the ignition switch, where +12V appears in the “ACC” and “Ignition on” ignition key positions.
3. Thin red wire - system power wire (+12V).
Connects via a 10A fuse to the “+” of the battery.
4. The thick red wire is the power supply wire for the remote start power circuits (+12V).
Connects via a 40A fuse to the “+” of the battery.
5. Yellow wire - IGN 1 wire, +12V output signal.
It is connected to the wire on the ignition switch, where +12V appears in the “Ignition on” ignition key position, and does not disappear in the “Starter” ignition key position.
6. Green wire - IGN 2 wire, +12V output signal.
It is connected to the wire on the ignition switch, where +12V appears in the “Ignition On” ignition key position, and disappears in the “Starter” ignition key position, if this wire is present in the vehicle on which the system is installed.
Central locking connector 6 PIN
1. Blue wire - central contact of the central locking opening relay
2. Blue-gray wire - normally open contact of the central locking opening relay
3. Blue-black wire - normally closed contact of the central locking opening relay
4. Green wire - central contact of the central locking relay
5. Green-gray wire - normally open contact of the central locking relay
6. Green-black wire - normally closed contact of the central locking relay
Main connector 18 PIN
1. Black wire - “-” system.
(Ensure strong, confident contact)
2. Blue wire - wire for turning on interior lighting
-300mA when disarming the system (duration is programmable)
3. Black-red - IGN3 output.
-300mA during the remote start procedure, to organize additional ignition circuits. This wire may be needed if the ignition switch of a vehicle on which a system of more than two ignition circuits is installed or to activate immobilizer bypass modules.
4. Black and yellow wire - starter interlock relay wire.
-300mA after setting the system to security mode and/or remote start procedure and/or in “Anti-hijack” mode.
ATTENTION!
The blocking relay should only be used to block the starter, which will prevent the engine from stopping while driving.
5. Yellow-red wire - wire of the 2nd additional channel. (-300mA)
6. Gray-black wire - tachometer wire input.
Connect to the “-” wire of the ignition coil or tachometer signal wire.
7. Blue-red wire - “+” door sensor input.
8. Orange-white wire - “-” trunk sensor input.
9. Purple wire – wire for enabling the “Anti-hijack” function.
When “-” appears on this wire, the “Anti-hijack” function is activated.
10. Green-black wire - power wire for parking lights. Connects via a 7.5A fuse.
11. Green-yellow wire - power wire for parking lights. Connects via a 7.5A fuse.
12. Black and white wire - bypass wire for the standard immobilizer. -300mA for 1.5 sec during the remote start procedure.
13. Gray wire - siren output. (1.5A)
14. Yellow-blue wire - wire of the 3rd additional channel or two-step door opening (programmable).
- 3rd additional channel - “-” 300mA, pulse duration is programmable.
- Two-step door opening - “-” 300mA.
15. Yellow-black wire - wire for remote trunk opening. (-300mA, 1 sec)
16. Orange-violet wire - handbrake wire.
It is connected to the “-” handbrake switch (for a manual transmission) or to the brake lights (for an automatic transmission) (see diagrams 8, 9) depending on the vehicle’s configuration.
17. Blue-black wire - “-” door sensor input.
18. Orange-gray wire - “-” hood sensor input.
Shock sensor connector 4 PIN
Override button connector 2 PIN
LED Indicator Connector 2 PIN
5 PIN transmit/receive antenna connector
Selecting a manual or automatic transmission
The choice of manual or automatic transmission on the TOMAHAWK TW-9010 is carried out using jumper 1 (see connection diagram).
Jumper closed - automatic transmission. Jumper open - manual transmission.
Connecting the central lock
TOMAHAWK TW-9010 has built-in power relays for central locking control. The wiring for connecting the central locking is routed to a separate six-PIN connector. Wire colors and connection diagrams are shown in diagrams 1-4.
ATTENTION!
Remember that the pulse duration of the central locking control is a programmable function.
Setting up the shock sensor
The last stage of installation of the TOMAHAWK TW-9010 security complex is to set the sensitivity of the shock sensor to a minimum. Smoothly increase the sensitivity of the sensor, checking the response threshold with periodic impacts, and tap the body with your palm.
ATTENTION!
Excessive sensitivity can lead to a large number of false alarms, and you will be forced to coarse the sensor settings.
Tomahawk key fob functions: button combinations
The most common Tomahawk models have two standard remotes. The main element has five buttons and is a tool equipped with all the necessary controls.
Depending on the key combination, the security system can be configured to suit the needs of the motorist, which guarantees sufficient comfort during operation of the device. The instructions for use contain a detailed description of the buttons and options.
- The F key is designed to enter the key fob settings and calibrate alarm options.
- Crossed out speaker – control of the sound of the security module.
- An element with a pattern of an open trunk is responsible for the position of the cargo compartment lid and hood.
- The key is a button for calling the security function and activating the anti-theft system.
- Lock - a structural element designed to control the locking of doors and central locking.
Depending on the key combination entered, the remote control calls up a certain option or operating mode of the alarm. The full list of features is in the instructions.
Security modes
Thanks to the updated firmware, all Tomahawk devices have several modes.
- Standard protection. The mode provides for normal vehicle security with all sirens and lights turned on.
- Setting in silent mode means turning off the sirens. Information about a break-in attempt is transmitted only to the driver's key fob.
- Auto staging. This option allows the owner not to worry about forgetting to turn on the alarm. If the extension is active, the car will automatically arm itself after turning off the engine and closing all doors.
- Immobilizer - turns on automatically 30 seconds after closing the car. In this case, it is impossible to start the engine with a regular key.
Find out how to identify a Tomahawk alarm using your key fob.
Automatic heating based on temperature
Most Tomahawk models have the ability to automatically warm up the power plant based on temperature. The built-in sensor allows you to accurately adjust the thermometer to trigger the mode. In some modifications, it is possible to connect an additional thermoelement and warm up the engine according to the temperature in the engine compartment (the accuracy and efficiency of the procedure increases).
In addition to activation, you can set the following parameters:
- lower engine start threshold;
- starter cranking time;
- oil pressure or crankshaft speed at which the start relay is turned off;
- upper threshold for power plant shutdown.
Remote motor start
Some device modifications have the ability to remotely start the engine. The extension is extremely convenient for drivers who need to preheat the engine before leaving. Thus, you can start the car while sitting at home and when the owner arrives, the vehicle will be immediately ready to go.
The main parameter is the need for proper preparation - the process is universal for all alarms:
- turn off the ignition;
- put the gearbox in neutral;
- raise the handbrake lever all the way;
- get out of the car and close all doors.
After completing the operation, the appropriate combination is entered on the remote control.
Auto start by timer
Similar to other options, Tomahawk key fobs offer automatic engine start using a timer. The extension is in demand among a group of owners who need quick departures at different times.
Depending on the model, the response interval can be set with a gap of 2, 4, 12 or 24 hours. Just like with starting by temperature, the procedure requires preliminary preparation (manual gearbox).
Jack State
Many users cannot figure out the Valet mode. The function is designed to make it possible to provide the vehicle to third parties for repairs or service. When activated, the security complex is completely disabled, except for the part responsible for controlling the central locking.
To enable Valet mode on each device, you must enter a unique combination of characters. At the same time, the Zz indicator will light up on the display of the main key fob, indicating that the sleep mode is operating.
Anti-theft mode
Along with modern analogues of third-party alarm systems, the Tomahawk security complex contains the Anti-hijack function. The anti-grabber helps the driver preserve property during an attempted theft. In case of illegal entry into the car, the device turns off the engine and sabotages the operation of the main systems. Thus, it becomes impossible to leave by car.
To activate the Anti Hijack program, you usually need to follow these steps:
- start the engine;
- simultaneously press the closed lock + open trunk.
If everything is done correctly, the engine will continue to run for 30 seconds in parallel with the lights flashing. After the timer expires, the engine will be locked. Shutting off the engine compartment on older cars is done by shutting off the fuel line and applying voltage to the spark plugs. For modern foreign cars, blocking is performed at the level of electronic control systems (ECM). Thus, it will be impossible to restart the power unit.
Programming a new key fob - the second method
The above method is highly effective only if the compatibility of the key fobs is fully consistent.
Otherwise, programming is performed using a different system. Initially, you need to turn on the car's ignition. In this case, it is necessary to ensure that the vehicle engine is turned off.
In order to program a new key fob, you must simultaneously press three buttons:
- Opening the trunk;
- Override;
- Enabling silent security.
It is necessary to hold the buttons until the car owner hears 5 CHIRPS of the siren. After the car owner has released all the buttons, he needs to press them again.
The buttons on the car alarm key fob are held down until the vehicle's turn signals blink several times.
Next, you need to turn on the ignition with the vehicle engine turned off. After this, you need to click the Override button.
The user must hold it until 4 CHIRPS of the siren pass. Next you need to release the button. After this, press the Silent Security Mode button. At the same time, hold down the trunk open button.
They are held until 4 CHIRPS are received from the siren. This will indicate that the device is remembering the new key fob. After completing all these steps, you can fully use the key fob.
If the compatibility of the key fob and the device is good, then the user will be able to program it the first time.
This algorithm must also be carried out if the key fob is replaced. In order to register the functions of the key fob, you must use the instructions.
How to reset the key fob
Rebooting Tomahawk remotes is required in case of software failures or errors when the device does not respond correctly to user requests or head module impulses. To reboot, simply remove the battery from the pager and wait 15 seconds. Then return the battery to its place.
After switching on and off, the transmitter will be completely updated and any existing errors will be reset.
Adding remote controls to the system
Binding of new Tomahawk key fobs is carried out individually on each alarm model. However, the principle of operation is similar:
- turn off the engine;
- enter the Override service mode;
- select the required section;
- enter a specific combination on the remote control being linked;
- confirm the action.
All complexes have the ability to connect at least one additional pager.
Why is the key fob not registered?
Reasons why it is impossible to attach the remote control may include:
- a dead battery that needs to be replaced;
- mechanical malfunctions, unreliable contact with the on-board network;
- oxidation of contacts on the microprocessor and transceiver;
- incorrect installation of the transceiver;
- system software glitch (often occurs in Tomahawk D900, S700, 7010, 9000 alarm systems);
- active radio interference;
- dead battery.
If the key fob is written incorrectly, it will be impossible to adapt it. It is important to find the appropriate alarm and remote control models. Violation of the sequence leads to failure of action. And it is also important to choose the right setting option for a certain type of signaling, which will ensure long-term trouble-free operation.
Video instruction. Find out everything about proper programming of the Alligator key fob.
Malfunctions of Tomahawk car alarms with auto start
Among the most common breakdowns, users identify:
- key fob failure;
- malfunction of internal modules;
- no signal from the antenna.
As a rule, malfunctions are caused by mechanical damage, water ingress, or lack of the required voltage inside the on-board circuit. Depending on the type of damage, repairs are carried out:
- wet parts are dried;
- blocks with mechanical failures are replaced with known good ones;
- recharging or installing a new battery.
The third method is a combo
The principle of the third method is that points 1 and 2 must be done simultaneously : That is, you need to turn on the ignition with one hand and simultaneously press the secret “Override” button with the other, and then everything should work out according to the instructions