Replacing the light bulbs in the dashboard of a VAZ 2110 yourself
Installation of the dashboard on a VAZ 2110
The dashboard of the VAZ 2110 car is designed to reflect information about the current condition of the car. Made from ordinary plastic.
The presence of a huge number of light bulbs leads to the need to replace them from time to time. Many drivers want to replace the unsightly factory panel of the VAZ 2110 with a more modern one.
The article suggests finding out how to replace the dashboard bulbs of a VAZ 2110 and how to make it more aesthetically pleasing.
Features of the dashboard of the VAZ 2110 car
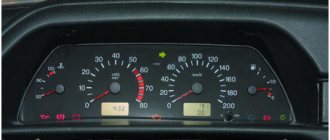
Dashboard VAZ 2110
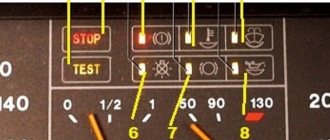
The composition on the dashboard of a VAZ 2110 car dashboard includes:
- 1 – indicates the temperature of the cooling water. If the arrow of this indicator moves into the reddish zone of the scale, this indicates overheating of the motor.
You need to pay attention to the operation of the electric fan and thermostat of the cooling system.
Tip: Do not operate the motor in overheating mode. Water temperature is more than 110 °C.
- 2 – tachometer. Shows the approximate frequency at which the engine crankshaft rotates.
To get the real value of the unit’s rotation speed, you need to multiply the device’s arrow reading by 100. The arrow reading in the reddish zone means that the engine is operating at an increased frequency, which is unsafe for the vehicle to continue moving.
- 3 – speedometer. The position of the arrow indicates the approximate speed of the car in km/h.
- 4 – indicates the fuel level.
- 5 – reset button on the daily mileage counter.
- 6 – screen for the trip odometer and odometer.
- 7 – screen for indicating the time.
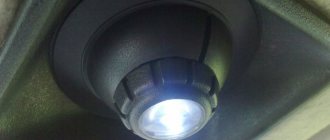
- Positions 1 – used to illuminate device hands and scales.
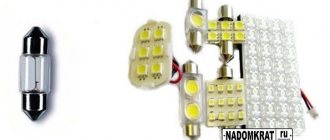
- Positions 2 – the smallest in size are used in yellowish indicators and burgundy signal indicators. Such light bulbs are installed without rubber caps. Light filters of suitable colors are already integrated into the device.
- Position 3 – has a medium size, used to indicate a low gasoline level, just when the needle is at zero. It burns out very rarely.
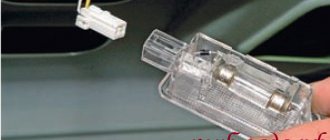
The photo shows the installation of light bulbs on the panel:
Installing light bulbs on the panel
The entire arrangement of devices is fixed with 2 screws in the corresponding slot on the dashboard. Its connections are made using printed circuit board mounting using foil getinax. The board is perfectly attached to the back of the case.
The speedometer is equipped with 2 counters showing the distance traveled: one is total, the other is “daily”. Using the corresponding button, the readings of the latter are simply reset.
Tip: Readings can only be reset when the car is stationary.
The latest VAZ 2110 models are equipped with an electric dashboard. It contains all components and control indicators, icons and lamps.
Methods and meaning of tuning the VAZ 2110 dashboard
Let's start, perhaps, with the benefits that an update or radical change in the appearance of the tidy can bring. To begin with, the panel on the top ten looks boring and even dull. 2114 is better in this regard. The readability of the instruments is, in principle, tolerable, but at night, not everyone is happy with the afterlife illumination, and during the day, the severity of the dials and the minimum of information are reminiscent of the times when electronic watches with Yellow Roses of Texas music were a miracle of cybernetics. Therefore, I would like to modernize the tidy of the dozens. Fortunately, there are more than enough funds for this.
The front panel, in principle, can carry much more functions than it currently carries, without surgical intervention. Information content, the presence of lights and color highlights will also not hurt the panel, so we will try to pay a little attention to each of the options so that tuning the VAZ 2110 dashboard, in addition to benefits, also brings aesthetic pleasure. However, you need to know and feel the limits when, in the pursuit of originality, the readability of the instruments disappears or a panel that is too colorful will automatically distract the driver from driving.
Replacing the backlight on the dashboard
Dashboard sign for VAZ 2110
To do this, you need to use the following algorithm:
- The panel should be removed.
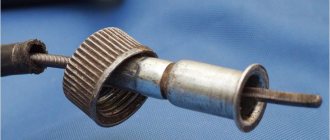
- The illumination designation is determined by special LED bulbs. To replace the backlight, these bulbs must be removed.
Note: this must be done very carefully, because they are quite small. In addition, there is a possibility of damaging the panel itself.
- But before that you need to disassemble it. This is not a difficult task, as to disassemble it you just need to press the latches, thanks to which you can remove the bulbs.
- Everyone has seen that on top of the dashboard there is a “sticker” and symbols (speed, amount of gasoline). It is held on by glue, so to remove it you will have to dig around a little.
Remaining glue must be removed.
- You can start replacing the backlight.
Note: it is advisable to choose colors that are not very bright and strain the eyes. White or blue colors are ideal.
- To remove the light filter located on the back of the “sticker”, you need to take a utility knife. The light filter is located under the protective layer. First you need to remove it. Do not press too hard with the knife, as necessary parts may be damaged.
Description of dashboard tuning
Note: it is easier to remove it if you rub it with a knife in one direction, then in the other.
- To insert LED bulbs, you must remove the board located in the plastic case. There will be special holes for them.
Panel instrument pinout
Note: but that's not all, you will need to solder the wiring of the light bulbs to the board for them to work.
- Now we need to put everything back together and install it correctly.
Priora panel
Some people prefer the Priora's dashboard. You need to know that you won’t be able to change it with your own hands “in a hurry” - there are differences: in the wiring, in the mounting of the ECU.
It should also be taken into account that the Priora has the same “propensity” for unnecessary squeaks as the “native” one, so you should also think about sound insulation in order to “fit” the Priora panel without unnecessary gaps and cracks. Another drawback of the Priora is the small glove compartment. In addition, you must definitely purchase a mount in the ECU area, specifically from Priora.
Panel from Priora in VAZ 2110
Or maybe you even liked the electronic panel, the installation of which is also possible. However, before you decide, do not forget to calculate how much such a replacement will cost you.
It is quite possible that tuning the lighting you already have, carried out with imagination and invention, will cost you much less. In this case, tuning yourself will become a source of pride for you, and will not only decorate the interior of your VAZ 2110, but also improve the lighting, make it brighter and more comfortable.
Separately illuminated arrows
LEDS IN THE INSTRUMENT PANEL FOR VAZ 2110 2111 2112
Video guide for replacement
DIY
instrument panel for
VAZ 2110 An example of replacing
...
How to remove the instrument panel on a VAZ 2110, 2111, 2112 and replacing light bulbs
Video review - Backlight styling
interior of a
VAZ 2110 car, replacing
all incandescent light bulbs with diodes on
the panel
...
LED instrument panel VAZ 2110
If you want the arrows to glow a different color, you can do the following:
Note: in this case, the arrows will light up in a different color only when ignited.
Instrument panel tuning
Some car owners dream of tuning the panel. The VAZ-2110 can be decorated simply incomparably. After all, such tuning is a type of interior modification. Many car enthusiasts simply cover the panel with leather. But there are also those who install the element from other cars. So, the VAZ panel with the Audi A4 1996 is ideal. Be sure to try it!
Instrument tuning (VAZ-2110) is standard - replacing the panel itself or installing new sports dials. The first option will allow you to see the control panel in a completely different way, since it is completely redone. Another way to tune the instrument panel is to install a light strip in the contours. This is now a fairly popular modification on foreign-made cars. This system is connected to the on-board network via a switch and fuse. The effect is amazing, especially in the dark. At the same time, battery consumption is minimal, since the light strip is made from low-power LEDs.
How to change the backlight using color film
Old dashboard of VAZ 2110
In order to change the color of the dashboard lighting, it is not necessary to change the LED bulbs.
To do this you can simply:
- Take 12 LEDs and an LED strip.
- Remove the light bulbs from the base and insert one LED at a time in their place.
- You need to take the required amount of LED strip.
Instrument panel diagram
Note: its length is measured according to the size of the panel.
- The base and LEDs must be returned to their original location.
- The tape should be glued to the plastic of the panel (the appropriate temperature must be maintained).
- Tighten the block well.
Alternative optics
If you have a VAZ-2110 car, headlight tuning is carried out by replacing standard bulbs with alternative ones. This will not only improve the appearance of the car, but will also increase the illumination of the road. Thus, headlights are installed of drop, diffuse or beam type. All alternative optics look original. It will be a great addition to the external body kit that the VAZ-2110 has. Tuning the rear headlights is also accompanied by the replacement of these elements.
The best choice would be LED lights, which are perfectly visible at any time of the year and day. Daytime running lights are an addition to the car's optics. Tuning greatly improves the VAZ-2110 car. The photos presented in the article show a clear example of the installation of alternative and additional lighting elements.
How to assemble and disassemble the panel
To reset the speedometer or fix the problem that the turn signal light on the dashboard is not blinking, it must be removed.
To this end, you should perform the following actions:
- You can remove the cover, but the board will still be locked.
- You need to take a Phillips screwdriver and use it to remove a few more bolts.
- Now you need to unlatch the latches on the panel. You should start from the bottom. If they were disconnected from the bottom side, then you can push them up. This way the fee will be removed quickly.
- The arrows will have to be removed anyway.
Note: some arrows are easy to remove, but the arrows for the gasoline quantity indicator are much more difficult to remove. To remove the arrows, you need to gently pull them.
- The panel is disassembled, now we need to try to solve the problem.
Note: There are very small LEDs on the board that can also burn out. Because of them, the turn signal light may not blink, so they need to be replaced.
This requires working with a soldering iron.
But if the panel was disassembled in order to reset the speedometer readings, then:
Now it is advisable to somehow put the panel back together.
This is made even easier:
- Place the board in a plastic case.
Note: It is advisable to have a clean cloth underneath to prevent the surface from being scratched.
- Now you need to screw in the bolts on the panel itself. They do not need to be completely screwed in yet, as the arrows must be put in place first.
- Before putting the hands back in place, they need to be wiped thoroughly, as fingerprints, dirt, etc. will be visible when exposed to light.
Note: the arrows should be set approximately 3-4 mm below zero. It is also important that there is a small gap between the needles and the speedometer, otherwise they will stick.
It is much easier to install, as well as remove, long arrows. To install short arrows, you need to act very carefully, as they are more delicate compared to long ones.
- Before installing the glass, it also needs to be wiped. Now snap onto the latches.
- Secure the board with bolts.
- Lastly, screw in the screws on the cover, and then put all the light bulbs in place.
Working with a panel in a car is probably the simplest thing it can be. Therefore, there is no point in going to a car service center, where the price even for such trivial work will be high.
It’s better to look through a bunch of photos and videos before you decide to do repairs and tuning of the car’s interior with your own hands, so as not to harm the car. Any instructions will help you get the job done quickly and efficiently.
The instrument panel of the VAZ 2110 is boring and unsightly, but everything changes when they arrive - white LEDs.
About 8 years ago I myself assembled LED lighting for my six from what I had. Now the choice of LEDs is simply huge and without any problems I simply replaced the dashboard backlight bulbs with LED ones. The transformations pleased me.
Removal and disassembly
Do-it-yourself removal of the instrument board is carried out according to the following algorithm:
- First of all, remove the casing;
- Use a Phillips screwdriver to unscrew the fastening bolts;
- We find and unlatch the latches. It is better to snap off the ones at the bottom first, and then push up. This way it can be easily removed;
- Before tuning, you need to remove the arrows. At first, just pull them lightly. If they don’t give in, start turning them from right to left, while slightly tightening them – they will definitely come off.